Description
Transcript
Read Full Transcript
(waves crashing) In this practice, your hips and glutes are gonna feel much more spacious and open. Pretty simple stuff. First we're gonna lie down on the back. And it's quite possible that many of you have done this before, people call it windshield wipers or knee drops, and I walk the feet about the width of the mat apart, but you can play around with your feet positioning. I like to open the arms and just let the legs fall to one side, and then fall to the other side.
Why I like to have my feet wide is that I feel personally that I get a little more of this massage of the glutes, which feels really good. And just a slow rhythmic movement. By the way, the other thing that's happening here is that each time you roll this way, the thigh bone is rolling in the socket towards the mid line and then it rolls in the socket externally, and repetitive movements that don't require much muscle work tend to juice up the joints, release the muscles, to allow a lot of other things to be available. So I can feel some of the objections that my glute muscles were peeping out to me when I first started this, they're quieting down. So I think I've probably done it long enough.
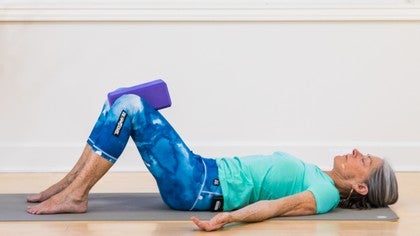
And I'm gonna roll over and get the bolster. No, I'm not gonna roll over, I'm just gonna tuck it under, bolster under sacrum and low back. Both legs bent towards the chest, just feel into that and make a couple circles perhaps. And then this is gonna be like figure four pose, people call this figure four. I'm gonna slip my forearm between my thigh bone and my shin bone, and pull the knee across that way.
And what I'm effectively doing is I'm rolling the thigh bone out, away from the mid line at the same time that I roll the shin bone out. You can see the line in my tights moving that way. So that makes space in the knee joint. And then I'm playing around with just... rocking, back and forth, head to tail a little bit a few times. So here, I'm into some good territory, I can feel a stretch happening, and so I'm gonna hold the position with this closeness of my leg and then I'm gonna rock left and right.
Not quickly, slowly enough to... ascertain whether there's an even juicier spot to hang out with. And today, it feels like rolling away from the hip actually gives me a better stretch. Some days it feels better if I go out to the side. So you're just gonna hold that for a little while, a little gentle rocking. (sighs) I really have found that raising the pelvis makes this so much more accessible, not just to me, but of course I've tried this out with a number of my students and they like it this way too.
I don't get as much knee compression, and the piriformis and glute stretches are terrific. So you can see how I'm just continuing, well, you probably can't see 'cause you're doing this yourself, but I am continuing to explore by slightly rolling a little deeper over towards the left, away from my right hip, and back again. And I'm starting to feel like that's probably enough. So I'm gonna let go, put both feet back on the floor, pelvis still on the bolster, ah. Okay, second side.
Lift one leg at a time. Feel that nice tucking in, the release of the front of the hip joint in the front, and then moving the right leg a little bit further away, taking the left forearm on the inside of the left thigh and the inside of the forearm on the shin bone allowing for that rotation away from the mid line part of the joint. Ankle comes across the knee. And a little bit of pulling the leg towards my chest, exploring... the comfort level of my knee, the comfort level of my hip.
So I'm moving a little more carefully on this side, I am feeling a little compression on the inside of this knee so I'm gonna readjust my arm and see if I can find, I do this with my hands because I have some inflammation in my finger joints and thumb, so I want to be kind to the hands, and this works really well. And now I find that I can move without that inner knee pain. if I can't, I'm not gonna continue doing this, it's not worth it, it's just not worth it. So... Ah, nice.
So I'm rolling away from the left hip, with my right hand on the knee, rolling away from the left hip and finding a really nice little stretch. And it's not terribly painful, it's just that nice deep ache of something that hasn't been addressed for a while. (sighs) And it's the kind of ache that diminishes as you hang out in it, so that's always a good sign. Although it's still there. Hmm.
Usually a minute or so of this is enough. Okay, it's pretty quiet, it's pretty nice there. So down with the feet again. I'm gonna lift my pelvis and move the bolster away and I'm gonna come back to the knee drops. And see how that feels, sometimes it's nice to take the arms overhead as you're doing this.
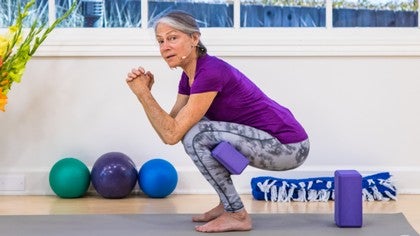
Wow that feels terrific. Okay. All right, and the last piece in this little trio is gonna be standing up. So here we go, coming up to standing. Pushing back and up.
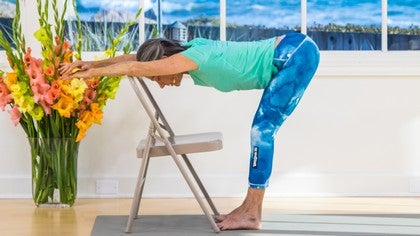
Mm, nice. Gonna get a chair, we're gonna work with a variation of chair pose here I'm gonna turn so you can see my side. Most often chair pose is given as a pose where you try to keep your spine as vertical as possible and this requires that the knees go quite a bit in front of the ankles, not a good position for somebody with knee inflammation. So there is a variation where you can come forward, and I'm just using the chair as a marker, I don't really need the chair anymore, but I'm giving you an opportunity to see how this works. I start with a couple of inches between my knees and the chair, I'm not gonna be real strict and require that my shin bone stay so vertical that I can hardly move.
So there we go, feet are hip-width apart. This requires that you really let your hips go back, and I'm standing on the back rim of my heels. I don't know if you can see my toes but they're like this, flying so that I don't fall. There's a little low back curve happening here, and I imagine widening the thigh bones in the hip sockets and I can really feel a lot of work happening in my hips. And then I'm just gonna take the arms forward, and shoulders are going down the back, and then I'm off the chair, so I don't lean on the chair.
And just hanging out here for a little while. And sometimes I might go into just a release away from that stretch, and then bring the knees back, touching the chair, coming up again, and let the hips do, the hips and the lower spine, you really feel a lot of work in the lower spine, which is appropriate, and the shoulder girdle. So it's the back body working to hold this posture. And then... let it go. So this is another hip stabilization, after doing the pigeon, and the knee drops or windshield wipers and really getting some openness here, and then this is a stabilizer.
So see how that feels. Is there some more spaciousness and more ease? And know that that last one goes along with the spacious and ease for stability. We need both. Sthira Sukham Asanam.
Thanks so much for tuning in and practicing with us. Namaste.
Yoga Rx: Patricia Sullivan
Mention
 |
Patricia Sullivan (Teacher) |
 |
Sara S |
Comments

You need to be a subscriber to post a comment.
Please Log In or Create an Account to start your free trial.
