
Description
Transcript
Read Full Transcript
Hi everybody, welcome. So today we're going to do our practice with the help of the wall. In a lot of the yoga poses that we do when you're just on the mat without some reference point, it might be a little harder to feel the direction of where you're supposed to be applying your pressure or your energy. So the wall is going to be quite amazing. And even though the wall is our friend and it's really going to help us a lot in the poses, it's also going to help us to intensify into feeling a lot of the engagement of your muscles in these poses. So I hope you have a fun experience with me. Okay, we're going to come to just lying down. You're going to have your feet into the wall. And actually before we lie down, let's just check out the feet. So we're going to press the balls of the feet into the wall. You're going to peel the outer edges of your feet away. And then you're just going to make sure that your heels are also touching into the wall. So everything is pressing into the wall, you're going to let go there. So we'll just remember that feeling. Just scooch on down. And then we're just going to have the knees even slightly bent. You're going to get your shoulder blades underneath you again, extend through the fingertips, and then we're just going to extend into the legs and really push into the wall. So now we're in Tadasana with ourselves pressing the feet into the wall. And usually when you do Tadasana, you might not be able to know if you're in alignment or not. And press the back of your head as well as your shoulders. So the tops of our shoulders, most of us, we have cyber shoulders because we do a lot of computer stuff. So now we're just going to kind of undo that.
So bring your shoulders down into the floor and just feel the sense of your spine just being supported, your heart being open. Very nice. And even here, your legs are engaged, so you're drawing up through your inner legs. Then we're just going to try tree pose lying down. So we're going to press your right heel into your left leg. You can put your leg wherever it feels comfortable for you. And in here, you notice that once you try to go into tree pose, your left hip has a tendency to lift. And with the reference of the floor under us, we can actually notice this whole hip coming off the floor. So we're just going to slowly enjoy having a friend, the floor right now, give us this reference. We're going to bring the left hip back down. And let's just bring the arms up overhead. And again, just notice how your shoulder blades feel, how your shoulders feel as you use the floor to glide your arms up. And then just allowing the arms to come to straight by keeping the shoulders relaxed, taking a breath here and notice if your left foot is starting to peel out to the side. And then just try to see how it feels to just press the ball of your left foot into the wall.
Very nice. And then slowly release coming back to tadasana lying down. And just going to the other side, we're going to take the left foot into the right thigh. And again, your right hip might lift. So if your right hip is lifting, we're just going to bring that left knee up a little bit more so that the right hip can come on back down. And then having the lower body in place with the bottom foot pressing into the wall, we're going to inhale again, just bringing the arms up. Again, notice how the shoulders are feeling and really use the awesomeness of having this ground support, this plane that we can lean back against to just look for that feeling of being able to lean back and feel how it is different when your energy from the crown of your head all the way to your tailbone is just more aligned. So a couple of breaths here and then slowly release. And then taking your time, we're just going to roll over to the side and come on up. So we're going to come on up to the wall and we're going to come into tadasana depending on what feels comfortable for you. You're just going to walk back towards the wall.
And again, for a lot of us, we have rounded shoulders that tend to go forward like this. We're going to roll up and back and then using the wall as reference, just really feel as much as you can, the entire upper shoulders just being supported by the wall. So coming into tadasana here, stepping your feet to forward and back until you find that sweet spot for yourself where you feel that your weight is just distributed nicely into the feet. And then with the palms open and because we have the support of the wall here, we're going to be engaging muscularly, but let's try not to grip today. So instead of gripping, we're just going to roll back, use the support and then see what happens. So a couple of breaths here, eyes soft, just looking ahead. Great. And then now we're going to do three posts and we're going to do three posts with the wall, which is great. So we have already had plenty of falling trees in lots of yoga classes and to do tree with your arm, just helping you to feel that sense of balance is going to make it feel a lot easier. In fact, we're going to wave over, but you're going to feel a lot more balanced. So coming into tadasana with the feet with the lower body, just open through the palms, pressing the hands into the wall. In fact, if you have tight shoulders, this is really quite nice to just spend a moment here, just turning that shoulder back, pressing the heel of the palm in. Breathe in here. Okay. And then from here, press down into your right foot, take your left leg up and wherever you like. So we can even start down here. Just try not to press into the knee. And then we're going to take the heel to wherever is comfortable for you. Heel presses into the thigh, thigh presses back into the heel, your hands on your hips. And then just remembering earlier, when we were lying on the floor, how one hip naturally will want to kind of come forward like this. So we're going to try to imagine what it was like when we had that support behind us and just slowly bring it back. Nice. Keep that right arm quite relaxed. So both hips facing forward, your heel pressing into your thigh. Inhaling, we're just going to bring the left arm up, extend through the fingertips, keep the shoulders soft. And then exhaling, we're going to really use the fact that we have something to reach for and get our fingertips overhead. And then just notice you could be rounding forward, you could be throwing yourself back. And again, try to find that sweet spot where you feel like you're in line. And then just breathing into your side body. You can try to draw your tailbone a little bit further down towards the floor. And then exhaling, press into your feet. Inhale, come on back up.
And then we're just going to turn to the other side. So once again, finding that distance to the wall, open up through your palms, press in through your fingers, and also through the heel of your hand. Feel as though you're cupping the wall with the cup of your hand. And so as you draw in with the palm, lengthen in through your arm bones all the way to the shoulder socket. And just take a breath here. And then making sure that your feet feel nice and stable, we're just going to ground down through your left foot. Bring your right foot up to wherever you like. And press the heel of the foot into the thigh, the thigh presses back into the heel. Hand can be on your hip. And again, you're going to notice that your left hip is going to want to curve forward. Remembering how it felt to be on the floor, we're just going to try to use that memory to bring everything back. Then inhaling, we're going to bring the right arm up, extending through the fingertips, relaxing through the shoulders and exhaling slowly, just drawing into the wall. So breathing here. And even as you hear, just try to notice if you're swaying through the hips and just try to use that reference point of that imaginary plane behind you to open up the front of the right shoulder and to get the right hip to draw back and the left hip forward. Very nice. And then inhaling, we're going to come on up. Exhale, just release from here. From here, we're just going to go down to the floor again, coming into Adho Mukha Svanasana, Downward Dog. So this is a really key point here, that when we have our heels into the wall for Downward Dog, you want your toes to be on the floor. So your toes are on the floor, the ball of your foot is into the wall, and your heel is into the wall.
So we're going to back in, get your feet to be about hip width apart. The rest of you comes into all fours. And I'm pressing the hands into the floor. We're going to inhale, keep your knees soft, let your head go, and then draw the sit bones all the way up to the sky. And if you can, just simply let go your head and your neck. Very nice. As much as you can, let's make the work about the legs. So we're going to draw up on the thighs. We're going to press back with the quadriceps into the thigh bones. And then with your outer hips, we're also going to just gently draw to its the wall. Breathing into this, if you want to feel a little more ease, you can soften the knees a little bit more and just really work on continuing to bring the sit bones up high. So we're going to do this so and then just playing with that. And inhale, looking forward, exhaling, we're going to step the right foot forward between your hands so you can drop your left knee down and we're going to lunge into that right leg. So here you might want two blocks. So for some of us, we might be feeling unstable. And in that case, you can take your two blocks and just put them right where your hands would be and just come into a low lunge. So lunging forward through the knee, we're going to take the right hand onto the right hip and just gently draw the right hip down. Breathing into this, we're also going to take our hand onto our sacrum and just feel the support of our sacrum and drawing the tailbone down towards the mat. Take another breath here. Then if it feels okay for you, you're going to inhale and lift through the heart and maybe through the arms. And if you like, you can keep your chin slightly tucked and then draw back a little bit more with your hands aiming towards the wall. Nice. And then exhaling, you're going to just let go, stepping back to downward dog. And from there, we're just going to take the left foot, bring the left foot forward between your two hands and then drop the right knee down. Again, you can choose to use the blocks or not. And if you don't have blocks at home, you can always just take your hands onto your front thigh. So rolling the shoulders back again, just relaxing through the hips, pressing down through the front foot. Left hand is on the left hip. You're going to slowly draw that left hip back. And then let's just take the left hand onto your sacrum and see if we can soften that tailbone down. Breathing into this. And if you could, if you like, take your fingertips up, gently looking up.
And then if you like, also just drawing back. So when you're going back into a back bend, if you like, you can always just tuck your chin if it feels better in terms of how you're breathing. A couple more breaths. And then exhaling slowly, release, stepping back. Another downward dog. So you can bend one leg and try to draw your hip, your other hip towards the wall. Bend the other leg, draw the other hip towards the wall. What's really key here is that you're really feeling like you're driving your heels into the wall. So it almost feels like your heels are going to bust the wall. See if you can gather that strength within and then push it all back.
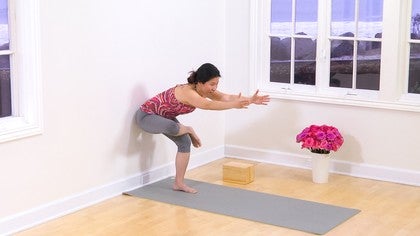
Very nice. And then from here, we're just going to walk the feet forward, draw the fingertips to it yourself. Inhale, lift and lengthen. Hands can be on your shins if you feel better. Then we're even going to just walk back. Now we're going to find our sit bones. So your sit bones are your two kind of protruding points right here. We're going to find them. My English can be very good. So we're going to go back and just ground those sit bones into the wall. You can really feel them in general. So now that we have our sit bones stabilized into the wall, if you need, keep your knees soft. And if you feel like you could have your legs straight, you can also do that. And then we're just going to flow forward. Now, if you would like to use blocks for this again, you're so welcome to. So just breathe here. Couple more breaths. Nice. Then from here, we're going to slide the sit bones down the wall. So you're actually going to use the wall to help you guide yourself to come into the Utkatasana, invisible chair pose. So you might need to scooch your feet forward a little bit more. See what feels right for you. And then take your hands onto your hips, roll the elbows back, lift through your heart. Now push your sit bones into the wall, roll your pelvis forward and then extend the arms forwards. See if you want to bring the arms higher or lower. Check out what feels like a good spot for you to play at. And we're just going to breathe into this. And then exhaling, you're going to take your right elbow to the outside of your left knee. Press the palms together and turn. And breathing into this Utkatasana twist. Nice. And then exhale, release, scooch the sit bones up the wall, flow forward. And once again, pressing into the feet, slowly drop down through the sit bones, raise the hands, lift the heart, breathing into this.
And we're going to take the left elbow outside the right knee. And again, find that momentum, slowly turning the chest with that press of the elbow into the knee and twisting. Nice. And then exhaling, we're going to slowly release once more using the wall, which is coming forward. Nice. And then bending through the knees, slowly coming on back up. Nice. And just inhale, let's bring it all in. Exhale to the heart. Great. So from here, we're just going to do one more thing with the sit bones into the wall. And we're going to come into pigeon. So sit bones into the wall, maybe walk the feet back just a little bit more, scooch on down, take your right ankle on top of your left thigh.
And then it depends on how you're feeling in the hips. So you might want to just stay here. Or if you like, you can go forward a little bit more, extending forward through the arms. So there's a lot of poses that we see where people look like this. And we'll feel like, oh, could I ever balance in that? So yeah, you can just use the wall to help you practice until you find it easier. And just breathing into this. And then take your left hand to face up across your body and then your right hand up the wall. Breathing into this. Exhaling slowly release. We're going to take the feet just a little bit more apart. And then we're going to slowly roll on down, hands holding opposite elbows. And with the wall supporting us, draw up into the thighs a little and just allow your spine to flow forward. Walk your hands forward, looking forward, drawing the shoulders back. And then taking your time, walk it all back and keep the feet about hip width apart.
And let's glide again into Utkatasana. Chest up, hips pushing back, inner thighs engaged. Very nice. And then let's take the hands onto the hips, left ankle onto the right thigh. So not on your knee, but behind the knee and slowly coming on back down. So you might notice that on different sides, your feet might want to be doing different things. Try as much as you can to keep the feet pointing forward. And again, staying here might be nice. Or you might want to lift and lengthen forward and then play with how far you want to come forward. So if your hips feel quite tight, it's really nice to use this pose to bring a lot of breath in there. And again, right palm facing up. We're going to take the right arm across the leg, inhale that left arm up, and then we're just going to walk the fingertips up the wall.
Nice. And then exhaling, we're going to release. Just take your feet apart. Inhale, lift and lengthen and exhaling. Hands can be on your legs, on your hips, on blocks, or just on your ankles. And again, just flowing forward. And then from here, exhaling, press into your feet, take your hands back onto your hips, inhaling, soften the knees, and come on back up. Nice. So when we practice with the wall, at some point we do kind of like get really in love with the wall. You might feel like it's really your friend. So it's a great thing. Use it. So now let's come back to downward dog. It becomes really meditative. It's almost like you have helping hands to help you feel kind of where you need to go, where you need to give a little bit more juice. Okay, let's come back into downward dog. So coming on to all fours, we're going to come into downward dog, press your heels into the wall. Again, really use that reference. Super power piston heels and legs into the wall. Press down through your arms, roll those outer arms down, let the head go. Let's just take a breath here. And then let's take the right foot forward between your hands, lunging forward into a high lunge. This is a good point. Again, if you want to introduce some blocks to give you more support, press into the blocks, lift up through your heart.
And then hands can also come onto the hips as you slowly press that front foot down and lift up. So this is when the wall becomes really, really useful. You really want to drive your back heel into the wall. And you find that with that back heel pressing, it gives you a lot of momentum forward. So with that back press, let's lunge into that front leg, lift through the heart. And then inhaling, let's bring both the arms up, fingertips lengthening up, shoulders relaxing. If you like, you're going to soften that back knee and not have it touch the mat. And then inhaling coming up and slowly going back down. And then come on up. And then just doing it three times for good measure.
And slowly coming up, exhaling, we're going to take ourselves back into downward dog. So stepping back, coming back into downward dog. And then inhaling, left foot forward, right heel again, driving into the wall. Hands onto the hips, inhale, lift and lengthen. And then let's bring the arms up, fingertips lengthening up, shoulders relaxing down.
Smooth, deep breaths. Soften the back knee, slowly coming on down. Inhaling coming back up. And then softening that back knee. So this one does feel like a super burner. See if you can keep yourself calm as you do it. And then exhaling, downward dog. Very nice. And then we're just going to walk the feet forward, lengthen through the heart, folding all the way down. Exhaling, we're going to press into the feet. Inhale, let's bring it up.
Palms together, palms to the heart. And just notice for a moment how you're feeling on the inside right now. Nice. Then we're going to take our mat and we're just going to give it a little bit of a switcheroo. Take the long side of your mat against the wall. Okay, so coming into tadasana, just get that upper chest to open the arms to flow down the wall and keep the face soft. Nice. From here, we're just going to step the feet apart. You're going to turn your front foot out and your back foot in. Take your hands onto your hips. And from here, you're just going to lunge forward into that front knee. So we're coming into a warrior two again. And you'll notice how usually when we come into warrior two, right now my other shoulder is also trying to come forward this way. But in warrior two, we're trying as much as we can to be open. So we're going to exaggerate a little bit. We're going to open and we're going to go up right into the wall. So feel your shoulders, feel your shoulder blades, and then kind of give yourself a bit more length. Go up the wall a little bit and then let's come and hover right over the legs again. So using the wall as our supportive invisible alignment, you're just going to lunge a little bit more into that front leg and then check into your torso again. If you feel that this side is again coming out, we're going to gently bring it back. Take a breath here, press more into the feet, lengthen away with your arms.
Inhaling, we're going to extend through that front leg and exhaling. Let's come into triangle. So imagine the wall as a chi wall because we have this little bit of distance. It's just a soft cushion behind you. Now just caress it and coming on down. So if you like, again, a block behind your right shin or your hand onto your right shin and taking your left arm up. So even though you're not falling into the wall, just come a little bit off and feel that reference of having this behind you. Lift and extend through the arms, press the way through the feet. Notice where your hip might be and see if you can also draw that hip towards the wall a little bit more. Very nice and then slowly coming on back up to warrior two. Very good and then hands on your hips, come back to center. From here we're just going to turn the other way. So you're going to take your other foot to face forward, your back heel in and again notice once you turn your back heel in there's such a tendency for this part of the hip to want to roll forward. Let's find the wall again, kind of get that hip to move so that it's more in line with the wall and it opens through your hips. Once more let's exaggerate, lean right back, ah it's still here and then extend through your arms. Gently come off the wall, imagine again that support and that plane right behind you cushioning you and inhale we're going to lift and lengthen, exhale let's lunge into that left knee. So lunging into the left knee again just checking, are things just starting to come into different places? If they are just again gently see if your suggestion for it to go back into the plane would work. So breathing into this, then inhaling we're going to lengthen through the front leg, exhaling still following the wall.
Get the hand onto the shin and open up through the chest. Breathing into this, so continually just very subtly collecting in the shoulder blade on top, drawing the top hip back, opening back. Nice and then lunging into that front knee, let's come back into warrior two. And straightening into the front leg turn both feet in, take your feet forward a little bit more, sit bones into the wall and let's come on down again holding opposite elbows. And let's walk the arms forward, inhale looking forward, exhale folding back in.
Oh hi Coco and then slowly coming back, hi cutie pie, yay my friend Coco. Okay so we're gonna take a block and we're gonna come into some twists at the wall. So you just need one block, it's just like practicing in our living room together. So we're gonna step that right foot forward, we're gonna have that left knee back and now we're in our low lunge with the wall to our side. So you want about enough distance to the wall that when you turn around towards the wall you still have plenty of support from the wall so it's not too far from you and you can't quite reach the wall. In general about a brick's width is pretty good, so a block's width, very nice and then from here we're just gonna again inhale just to get our spine to feel nice and long. Exhaling we're gonna have both hands into the wall. So we're gonna take it really easy here, we're not going to go and then kind of throw ourselves into like a really painful curve. So when I work with the wall I'd make a lot more sound effects. So instead of scrunching your upper back we're gonna take it really easy. So gently towards the wall, press your right hand gently into the wall and as you do that you already feel your right shoulder blade drawing in and down and with that breathe in lift through your heart and as you exhale just with a little bit of support with the left hand too, just pull in towards the wall. Smooth deep breaths here. Nice and then exhale just come back to center. So we're gonna try it another way. We're going to take now your arm all the way up and exhaling you're gonna lengthen forward. We're even gonna try to roll the belly a bit more out of the way and you're gonna take your hand onto the block. So your block is right here next to your foot. If you want the block higher that's also a good thing so it's up to you how you want to do it. So you're gonna inhale, let's start from here, inhale lift and lengthen, exhale turn like we did before, hand onto the block and then the other arm just walking up the wall. So walking the other hand up the wall breathing into this twist. You'll be surprised how amazing it is to open quite deeply with this support. And then if you feel a little bit more like powering into that back leg and just to play with whether you remember what it's like to have a wall behind your back heel, lift up with the back knee and power back. Now if you like you can also bring your arm overhead. Smooth deep breaths. If you want to add one more thing you can drop your right hip for the back and down. In terms of what to do with your head you can look up or just look forward whatever feels better for you.
Very nice. So I'm sure that was more exciting than you thought it would be. So we're just going to turn back to the center. One more Prasarita Padottanasana. Maybe take the block. So it can become very meditative and it is very deep work in the end to work with the wall. So we're just turning the other way now we're dropping the back knee. Take the block to the wall and be about a block's width away from the wall. So we're going to start here. Inhaling again lengthening. Exhaling. Softly turning. And it's always the back arm that will give you a little bit more of that leverage and push. But remember to take it easy and keep it soft. So inhale lift up through the heart. Exhale gently roll the chest in towards the wall. It's natural for your breath to feel shorter when you're doing twists. So just notice that. Nice. And then exhaling coming back to center. Let's take a breath here. And then let's bring ourselves up again. Inhale lengthening up through your arm. Exhale turning towards the wall. Your elbow is outside the knee and you're going to press your palm into a block.
So just turning into the wall and we're going to walk that top arm up. So breathing into this. And if you like let's raise that back knee, push that heel back like you still have a wall behind you. And then for the next few breaths we're going to keep working on getting that top arm to walk up and dropping that hip that is close to the wall. You can walk your fingertips a little further down. Press the outer edge of your palm into the wall and look into the wall. You can also just look forward whatever feels better. And then exhaling slowly release. We're just going to come into a downward dog. And now let's come up onto our tippy toes. Pretend that there is a wall behind you. Soften to your knees. Press into that wall for your downward dog. Maybe your downward dog by now feels very different than the first one you did. And then inhale look forward. Just come on down to your knees. And we're just going to face the front of our mat. So we're just going to cross the legs. Cross your shins. You're going to flex both your feet. You have the right shin in front of the left shin. Then we're just going to breathe in. Take your right elbow under your left. Interlace the arms. Press the palms together.
If this doesn't feel accessible today, this is fine. So you can just choose what you want to do. Inhale lift and lengthen. Exhale extend forward with the elbows. So this is also a good spot for a bit of block support. And it just makes your life so much easier. So choose whatever works best for you. And let's breathe into the upper back.
Even though this looks very static, actually you're continually getting your forearms to wind forward. And you're rolling your shoulder blades away and down from each other. Nice and then exhaling. We're just going to come to the other side. You're just going to take your left shin in front of your right. Use the block if you were using it before. Left elbow under the right. Wind those arms. Press the palms together.
Inhale lift and lengthen through your heart. Exhale come forward and use the support if you have it. So you're going to let go and just let yourself rest your head in your arms. Your arms are still doing that continual sense of winding against each other. And you're rolling the tops of your shoulders back and down. Nice and then exhaling slowly release. Now we're just going to come into Bharatvajasana which is a twist that works really nicely for the lower part of the body. So you're going to come again to sitting about a blocks with away from the wall. And you see in my case when I sit with this with my right thigh parallel to the wall my left hip really raises up. And that's just because of the shape of my bones and the way my hips are. So in that case if you're not feeling even on both sides of the hips take a block and get a little higher. So now I feel a lot more comfortable. So again inhale lift and lengthen exhale hello wall. So hands into the wall right hand pressing into the wall left hand just softly supporting right shoulder blade again collects down and in and breathing to lengthen exhaling to twist.
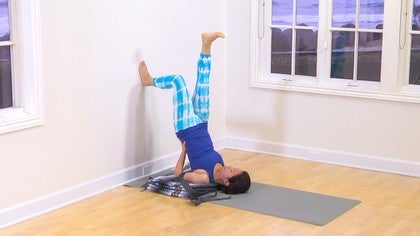
Feel as though you're pushing your big toe into the mat and you're drawing your right sit bone more on to the block. Great and then exhaling slowly release you'll be going to the other side. So again thigh parallel to the wall one blocks with your ankle is on top of the arch of the other foot and for me I like to use the block so that I feel more even and I breathe better. So inhaling breathing in exhaling gently just using the support of the wall left hand is going to press more right hand is just gently pushing towards the right collect the left shoulder blade in and down and then when you're breathing in lengthen when you're breathing out twist gently great and then slowly releasing just removing the block. So now we're going to come to a really beautiful winding down to a shavasana and we're going to do viparita karani against the wall. Viparita karani is an amazing pose that you can do anytime. So let's say you're really tired or you haven't had enough sleep or you can't fall asleep this is such an easy gentle way to have an inversion and to just reverse the blood flow in the body and it will take away a lot of the discomfort and fatigue from your legs and we just did a lot of leg work so I think our legs are going to really like viparita karani. Take your hip against the wall and as you take your hip against the wall take your hands behind you you're just going to raise the legs up swing them around and then bring the legs up the wall so I am a little bit far from the wall and actually that really doesn't matter so whatever is comfortable for you if you like you can scooch in get your bottom all the way into the wall and then we're just going to take the arms out like a cactus and just have the elbows that show the height and rest the forearms so you can just relax your legs just let the eyes fall gently closed and then just really enjoy this pose in english is called waterfall at the wall so just enjoy that sensation almost as if energy like a waterfall is just gently rolling down onto you and notice any differences between when you started your practice and right now and whenever you stay in a pose a little bit longer you're always going to notice changes or even areas of letting go where you didn't even know you were gripping before so just breathing in here allowing your attention to just follow these areas as they slowly unlock themselves and reveal themselves to you and if you like you can even stay here as shavasana you can just bring your arms closer to yourself just relax the shoulders or if you like a more traditional shavasana then you would take your feet off the wall and just lie back onto the mat so we're just going to enjoy another minute here so at home if you're doing this you can even do it for up to 10 minutes or more especially when you need it as a restorative pose notice how your breath has just transitioned into another quality to me it's almost like the breath has become more caramelly and then taking your time which is going to take the feet down the wall and just turn on our side so that we're back to lying on the mat and then just come into shavasana and for those of you who can stay longer in shavasana i encourage you to do so and for the rest of you that might have to start getting on to the rest of the day just take your time and take a few deeper breaths in feel the prana flowing through your body feel the state of perfect relaxation and know that you're perfect just as you are gently just bring the feet in turn to it's your right take a couple more breaths here and then walk your hands and yourself back up bring the palms together to your heart and just notice how you feel after allowing yourself to ask for a little bit of help and to receive that help and may we all be grateful that we have each other namaste
The Zoe and Coco Show

Mention
 |
Zoe Ho (Teacher) |
 |
Lianne M |
 |
Katherine H |
Comments


You need to be a subscriber to post a comment.
Please Log In or Create an Account to start your free trial.
