Description
About This Video
Transcript
Read Full Transcript
(waves lapping) Welcome. To get ready for bed yoga. This is going to be a wonderful segment to prepare you for a deep sleep, to relax and let go of the day. Today I have with me Ellen. Thank you for being here.
It's good to have you here, and good for you to join us in this wonderful time of letting go and relaxing. We're gonna start with Gentle Mountain Brook Pose. This is a wonderful heart-opening pose. You'll take two blankets and you'll stack them. So two yoga blankets folded this way.
And one on top of the other. Because you will be lying back over these, you want to make sure they feel smooth, there's no edges or places where there's a fold beneath. You'll place one bolster where your legs will be, and a blanket roll on top. Now if you don't have four blankets, which we're using for today's practice and a bolster, you can always just have the bolster under the knees without the blanket. Since we have an extra blanket today, we'll place this down for creating a cervical roll for the neck in the pose.
And sitting right on top of your blankets, extending your legs over the bolster, or the bolster and blanket combination, and as you're ready, using your abdominal muscles, you'll slowly recline back. As you come back you can create a small roll to go beneath the neck. And feel free to take a moment to get that roll just in the right place. If a roll feels like too much, you can use a flat blanket, or if it's not enough, you can fold your blanket in half. The arms in this pose will go out to the sides, almost like wings, to really open the heart center.
And as you bring your awareness into the positioning of your body here, the first thing that's helpful to do is to take your hands right to the center of your chest where your heart is, a little higher. Good. And then slide the hands right along the outside of the chest, and that's where the top edge of your blanket should be. So if it's not, you can always scoot back a little bit. I think yours is actually just right.
So it's below the scapula, the bottom edge of the scapula, and you can take your thumbs also back behind you and feel where that is. Palpate it for a moment if you're not sure. For women it tends to be the bra strap line. So that blanket line as it lines up with this area, now you can relax your hands, it will open the chest really beautifully and create a nice space. What happens is if it's higher, is it won't allow the chest to open and the shoulders to touch down, so if that's happening, just scoot yourself back a little bit.
Making sure the bolster's in the right position, you can always kick it with your feet. If it's not, just scoot it under you a little bit more, although the sticky mat can be quite sticky so sometimes you might need a little help with that. And it can also be very nice to use your eye pillow here. So of course, before your practice, you want to gather your props and make sure your eye pillow is nearby. So placing the eye pillow down just as you would close your eyes, across the forehead, across the eyes.
And if you don't have an eye pillow, you can use a sleeve of a shirt, a sock. You can use a scarf. These all work well, although the eye pillow creates weight, which is even more relaxing for the muscles of the eyes. The eyes are extensions of the brain, and as we put a little pressure there it tends to really quiet the mind as well. So as you arrive in this pose, take a few moments to scan your body.
Notice how you feel in this moment. Notice the quality of your breath. You may enjoy taking a few deep belly breaths, diaphragmatic breaths. And allowing yourself to explore and to feel into what's arising for you in this moment. It may be emotions.
It may be sensations in the body. There may be a place that's calling to you that's holding stress or tension. Take a few moments to explore, to feel. And if you find a place within that needs relaxation, you can focus your breath there. Imagine that you could breathe directly into your shoulders relaxation, and breathe out tension, or wherever it is for you, where your tension is held.
Using the breath is a sort of internal massage. Feel the breath massaging, soothing, relaxing as it flows in and flows out. You grow more and more at ease, more peaceful. If there's a place within you that needs healing, you may want to choose an image, a visual image, of a color of light, or an essence that feels healing, and take a few moments to visualize that light or energy bathing the area that needs healing with each breath, and breathing in the essence of whatever image feels healing to you. And as you exhale, relaxing more deeply, and taking several of those healing breaths.
When we focus the breath into a certain area and we invoke the imagination, it creates even more potential for healing. Visualizing that healing taking place and the body moving to a new level of wellness. And as you rest, feel how open you are in this position, how spacious. Feeling space in every cell of your body. Taking a few slow, deep breaths.
Feeling the rise and fall of your chest and belly with each breath. And preparing to release from this pose, and taking your time. Just a nice, slow, easy transition. So you can begin by removing your eye pillow, keeping your eyes closed as it may be bright, and then very gently rolling onto your side. It can be whatever side feels most comfortable for you.
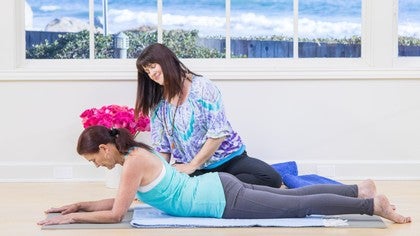
As you come onto your side, you'll slowly press up, relaxing the head as you come up. And then I'll pull the blankets out, but at home what you can do is take one blanket, and open it up crosswise here, and then take it down on the mat. Turn that over. So that you have the blanket a little longer, a little wider than usual. We'll bring our blocks now into position, and this next pose is called Sleeping Child's Pose.
It's a really sweet pose for the end of your day, for relaxing. So bringing a bolster on top of those two blocks, and what you want to keep in mind is you'll be bringing your arms underneath the bolster, so you want enough space so that your arms can easily reach, and then you'll come onto all fours with your hands under your shoulders, knees under your hips. And you want a little bit of a blanket roll under your ankles, so you can roll it under, and then walk your knees forward a little bit and out to the side. So, one of the nice things about this particular pose, Sleeping Child's, is the knees can be as wide as you'd like and for some people with knee issues it feels better to have a wider position. Let's have you take your knees just a little wider apart.
There you go. And now, sit back towards your heels as far as feels comfortable for you. She's very very flexible. Not everyone's going to be quite that flexible, but as you come down, you want to find that place where you're comfortable, and then let your chest and head release. Turn the head to one side.
Turn your head to one side when you come down. Good. So, you can scoot the bolster closer to your chest and just make sure to move your blocks as you do. Do you need it a little closer? Great.
So just scooting it to where it feels really comfortable. It should be supporting your chest and your head. And then the arms can go underneath, where you're holding the bolster, feeling as if you're embracing and being embraced back. For some people, this is gonna be too strong, so if it's too strong, you can first start by placing an extra blanket on top of the bolster underneath you. And then another choice is to come forward and onto all fours, and pull the blanket in an open position right under the backs of your knees, right into the back of the knee pretty firmly and then sit back.
And this you can do easily on yourself. Just tuck it in and then sit back. So if you have knee discomfort, try this and the extra blanket. You can come on down. And if that's still not comfortable, then you can always come onto your back and do knees to chest instead if this isn't doable for you.
So as you nestle in and settle down into the pose, bring your arms to wherever it feels most comfortable. And just let your body relax, feeling held, feeling supported. Let your shoulders soften and the back of the heart. If there's tension there for you, you can you breathe right into these areas or breathe into the low back or wherever there's any holding or tension or accumulated stress. Let the breath massage away anything you're ready to release.
This is an excellent pose when you're experiencing stress. It's also a pose that can be very helpful in times of grieving. It helps to nourish the heart and create a sense of support. Let your heart feel held as you rest, letting go into the support with each exhalation. Softening and preparing for a deep sleep.
And then as you're ready to turn your head to the other side, you'll just lift and turn the head now to the other side, relaxing down into the props. Remember you can always do a different length of time if that feels better for you. If you need to come out of the pose early to honor that and you can always breathe or come into a different pose. But these modifications are quite helpful. If you can get just the right amount of support you can often find comfort in this sort of posture.
And let your mind get very quiet here, very clear like the open sky, letting go of all of the events of the day, anything that's transpired. Feel it moving away from you as you come into this evening time, a time of rest, of quietude. And there's nothing to do, nowhere to be, just here now, enjoying each breath. In preparing to release from Sleeping Child's Pose, when you feel ready you can take a nice deep breath. Sliding your hands out, and positioning them forward a bit, when you're ready, you'll come up and onto all fours.
That's it. I'm releasing the blanket from the backs of the knees and the props from position. And from here, preparing for the next pose, which is our Waterfall Pose, so I'm gonna turn this around just a notch. Here we go. And we'll bring that up a little bit higher.
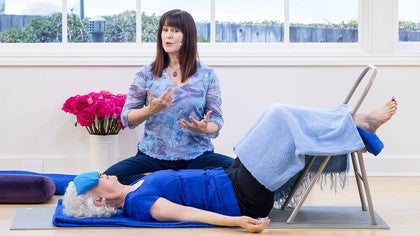
So you'll take your blanket and you'll put it once again lengthwise on your mat, so this just creates some softness for under the spine, and then you'll take an additional blanket and place it on the chair. I like to take it the thin way so it doesn't feel uncomfortable here, and then sit to the side of the chair, actually quite close, but come onto your side, and you can slide the underarm forward as you come onto your side, and then roll onto your back, extending the legs onto the chair. You may need to scoot, and scooting is good. So finding your position that feels the best to you, and sometimes it can be nice to take a blanket over the legs to create a nice feeling of groundedness through the legs. Sandbags can also be good here, or you can put a blanket over your chest and your upper body.
And sometimes it's nice to have a blanket roll under the neck, or sometimes nothing under the neck even feels good, just a nice space there for the neck to stretch out a little bit. Today we're going to work with a release for the jaw. The jaw is one of the areas where we hold a lot of tension. A lot of people grind their teeth at night and have the experience of a lot of tension in the jaw. It's quite common.
What's interesting too is the jaw muscles are directly connected to the reticular activating nerve, which is directly connected to the stress response, the fight or flight response and trauma. So when we've gone through challenging times or stress, it can get really lodged into this area of the body, so it's a wonderful way to move into a relaxation response to prepare for sleep and Artrope Heal, who's my teaching partner, has taught me how powerful this is. It's a wonderful pose and I'm so happy to share it with you. So bringing your fingertips to the space just below the cheekbones, and we're so used to massaging our jaw, but in this position you really just want to nestle the pads of your fingers right around the bones of the cheek, and then cup your face as if you're cradling your face like you would a beloved, and as you bring your hands to your face and you nestle in, it's not a lot of pressure. It can be about the weight of a nickel.
It's enough pressure that your fingers don't slide as you start to bring a little bit of pressure and your hands draw down. You should feel a connection to the connective tissue, and then just begin to let your mouth open. Haa. And let the jaw go. (exhaling) It can be great to take a few deep breaths here.
(deep breathing) And feel the jaw releasing any tension, any stress. (exhaling) Softening into the warmth of your hands, the jaw muscles letting go. And when you're done, you'll slide your hands gently off the edge of your jawbone, and release your hands out to your sides. This can be a nice time to position the eye pillow, or you can also put it on before you do the jaw release. Sometimes it makes it a little difficult to connect to that area.
So having it nearby, positioning it, and then letting the eyes also soften as the eye pillow blocks out light and quiets the eyes. This pose is often called the Great Rejuvenator. It's a rejuvenating pose. But it will give you exactly what you need, so if you're preparing for sleep, it will help you get into a deep relaxation. If you're ready to bring your energy up, to go out for the evening or to go to work, it can also be a wonderful pose to rejuvenate and lift the energy as well.
So feel the sensation of your back softening into the earth and the spine releasing. It's a beautiful release for the spine, and it's a gentle inversion, so there's blood flow moving down from the legs to the belly and towards the heart, nourishing the organs. Allowing for a deep release into the earth. And feel your bones getting heavy. Your muscles softening and letting go.
Resting and restoring. You're always welcome to stay longer, but as you're ready to release, you'll begin to deepen your breath. Remember that if you don't have a chair handy, a couch is wonderful, or you can stack props to create a similar effect. And then when you're feeling ready, you'll draw your knees in towards your chest. Rocking gently from side to side.
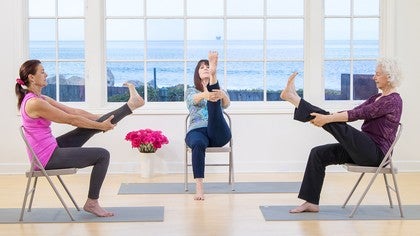
It's fine to keep the chair where it is for this next pose. But then it's helpful to also move it to prepare for the deep relaxation, which will be in just a moment. So positioning a bolster where it will go under the knees, and taking the feet to the top of the bolster. The arms can go out to the sides. Deep inhalation, and as you exhale, relax the knees to the right.
Feet a little closer together for this variation. Now this is a gentle variation of a twist with the feet on the bolster, especially if you have any low back issues or need a gentler variation. If this isn't enough for you and you want to go deeper, you'll walk your feet all the way off the edge, the right side of the bolster, and bring them to the floor. If once you take that position, that feels too strong, just let your feet come back or you're welcome to stay in the deeper pose. So find for you what feels the best.
Let the shoulders soften back and down and take a few deep breaths. Twists at the end of your practice help to stretch and release the paraspinal muscles and the back bend from the gentle movement. This is a very very relaxing sequence to do before bed. And then as you take your next breath, you'll gently bring your knees to center, and center your hips if need be, exhaling to the other side. Remember to do the same twist on both sides if you can, depending on your flexibility.
And softening the shoulders towards the earth and relaxing the legs into the pull of gravity. And always reposition the feet. Take the feet all the way off the bolster for the deeper variation. Deep breaths here. It's a cleansing pose.
Just a few more breaths, feeling the sensation of the breath flowing in, flowing out. And then as you're ready, drawing the knees back to center, knees back into the chest. And placing a blanket roll on top of your bolster if you're doing the restorative variation of savasana, or you can always just have a bolster under the knees if you don't want to get up to position that, and taking a blanket under the head. And once it's down flat, then you can roll it. Create a nice roll for yourself, just the right amount of height.
What I find is most people make too high of a roll. You want your head resting on the flat part of the blanket, so if that's not happening, it's probably too high. I want the roll really just to support the natural curve of the neck. But find for you what feels really good. And now, placing your eye pillow over your eyes.
If you have some essential oil actually you might want to do that first before you place your eye pillow, but placing a drop of essential oil can be a lovely ending to your practice, so if you want to use it you can. Lavender's great for bedtime, very relaxing. A drop in the hands, rubbing the hands together. Also, if you have trouble sleeping, it can be nice to put a little atomizer with water and lavender oil and spray your bed pillow before you go to sleep at night, or even your yoga props, just to help encourage relaxation. Lavender's very relaxing, very calming.
Anointing yourself with the oil. And lastly, a blanket over you so your body stays warm in your final relaxation pose. It can be a great time for the body to mend and heal, and so we want to keep it warm so that can happen effortlessly. You may also just go straight to bed. It may be time that you're ready to just climb right into bed, so you're welcome to do that or stay here for the guided meditation.
As you feel into your inner landscape, feel the softness of this practice in your bones, in your muscles, and your organs. And feel the body letting go even deeper now, feeling safe to completely relax. And feeling the earth holding you. You can let go into that support, that embrace. And feel the energy of the earth, the same energy that feeds the flowers and the trees, grass, feel this energy flowing up into the back of your body.
Warm and soothing. Feel the earth energy massaging the shoulders and neck. And feel the earth energy moving through the muscles of your back, flowing in and massaging and releasing any areas of tension. Warmth flowing into the low back, the hips and pelvis, relaxing even more deeply now. Feel the warm energy flowing up into the back of the arms, hands.
On your next exhalation, feel your arms and hands relaxing even more deeply. Feel the warmth now bathing the buttocks, the legs, calves, and the feet, the large muscles softening, your legs and feet sinking down as they relax deeply into the earth. Resting peacefully. The gentle embrace of the earth. You're welcome to continue to deepen into your relaxation.
Before we release from this position, I'd like to show you a technique that's helpful for when you wake up in the middle of the night and you have trouble going back to sleep. You can do this right from a reclining position with a few deep breaths, and it often will help you go right back to sleep. So take your time. When you're ready, you'll take your thumbs and you'll feel where the ridge of occiput is. So your hands can come back behind the skull and there's a ridge where the neck meets the skull.
Right under there, to either side of the spine, you'll press up and under, and see if you can find a tender or a tight point, and massaging those points, finding the tender area, keeping the jaw relaxed from your wonderful jaw release, and taking a few deep breaths. When you inhale, visualize breathing in peace, and as you exhale, relax even more deeply. Taking three to five breaths or however many you need when you have trouble sleeping or if you wake in the middle of the night. Massaging this gateway. In Chinese medicine, this is a place where as you press, it helps to release tension that can cause insomnia, so neck tension, shoulder tension, it's good for the sinuses, it's good for headaches, for colds.
It's good for a lot of things. It's a wonderful point to use for self-massage when you need it. And then when you're complete, you can release, and releasing your hands and slowly drawing your knees towards your chest as you prepare to transition out of the pose and onward to bed. You can slowly roll onto one side, removing your eye pillow. Take a moment here to embrace yourself with love and affection.
And then as you feel ready, you can make your way up to seated. I'll put a little blanket there for your ankles, but you can sit up on the bolster. (laughs) Oh! (laughs) Take a moment to feel the gifts of your practice. Feel the breath flowing in and flowing out. Setting an intention that as you climb into bed this evening that you'll have a deep and healing sleep. Hands to the heart.
Namaste. Namaste.
Therapeutic Yoga: Yoga for Healing
Mention
 |
Cheri Clampett C-IAYT (Teacher) |
 |
Andrej Z |
|
|
Cinzia P |
|
|
Claudia Jean |
|
|
Esther |
Comments

You need to be a subscriber to post a comment.
Please Log In or Create an Account to start your free trial.
