Description
About This Video
Transcript
Read Full Transcript
Hello, everyone. I'm so excited to be here to share some really interesting concepts for your shoulder or your neck as especially if you have any shoulder or neck pain. Did you know that the main focus of shoulder girdle function is where your rib cage is placed? So it's very important that you have a healthy rib cage placed over the pelvis and that you have good thoracic mobility. That's the first concept. We'll be talking about thoracic mobility in a class dedicated to spine mobility or safe spine mobility for people with bone loss. So you'll need to review that class as well if you have shoulder or neck pain.
Then what you want is to think of your scapula placed on your back, your collarbone connection to your sternum is the only place where your shoulder girdle is actually connected by a ligament to your body. The rest of the shoulder girdle depends on 18 muscles that attach the scapula to your back. So it's very important that you understand how to use those muscles appropriately Good thing. We don't really have to memorize all the names of them. We can really think of some great concepts and images to hold the scapula in a great position so that the shoulder functions better. And it can decrease impingement if you have pain with overhead reaching, It can decrease the pain in your neck, making you use the muscles appropriately in your back to try to open the front and to relax your neck.
And improve your shoulder function and strength. So let's imagine that our shoulder girdle is placed on the back just like the continent of Africa. I'm gonna turn around so you can see the shoulder girdle is shaped like the continent of Africa. So here is the tip of the shoulder girdle. I'm gonna try to move my shoulder so you can see where that tip is, and it fans out and creates a socket to the outside of the scapula. That's called your glenoid fossa.
Then the humeral head fits right in that socket. And it's so important that the rotator cuff function to keep that humeral head within one centimeter of the socket at all times, no matter what exercise you're doing, whether it's a reach overhead, a weight bearing exercise, a dundasana, plank pose, whatever it is that you're doing. So let's imagine that those two continents of Africa are on your back, And then here is the socket formed by the cupping of my hand. Let's go up and down. Usually up is really easy.
We're very good at that. And then if you go down, you wanna try to go down and try to bring it wide as much as possible. Usually, our our inclination is to pull the shoulder blades together behind but that's not actually gonna help us improve our scapula position for good shoulder function. So we wanna think of going up and down, actually keeping the scapula wide. So now let's bring the arms down and do that again.
Shoulders up, shoulders down. Shoulders up, shoulders down. Then I'm gonna turn to the sides so you can see what that looks like. So a lot of times we are standing like this a lot of the times with the forward head and a little bit roundness in the back. And then that means that the scapula is gonna sit on your back in an elevated and tilted forward position, meaning the socket's now gonna face toward the floor.
What we want is to lift the breastbone, get the rib cage centered over the pelvis, get the head centered over the body, then we try to work the shoulder. Now we're gonna go up and down, exploring the range of motion in the scapula as it slides on the back. Next, we're gonna look at forward and backward motion. Let's just bring the scapula forward and backward forward and back. So you are pinching the scapula together here. And try one more time.
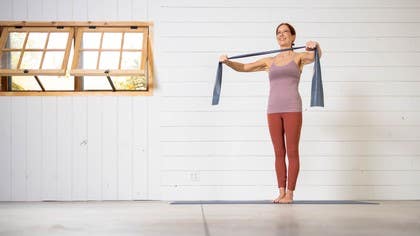
Open and close and see if you can do it with the scapula down away from your ear. So you're not doing it way up here, which is gonna grind your femoral head a little bit. So keeping the scapula drawing down arms relaxed. Alright. Another concept I wanna share with you is how to use either a Therabant, a yoga strap, or from my inspiration, Ron Fletcher's Fletcher Talwork, was so great for helping me understand how to help people have better shoulder function, just using a very simple technique. So I'd like to give credit to him for the inspiration.
I'll start with a yoga strap. If you have something at home like a dog leash, a pashmina shawl or a bathrobe belt, that will be perfect. So you want something that doesn't stretch very much that's pretty firm. And I want you to hold it like you're holding a serving tray with your palms up. Remember, the alignment and stacking of your bones from your feet to the pelvis, to the rib cage, to the top of the head.
It'd be a great idea to reference the class where I went over posture and bone stacking And then we also looked at the position of the rib cage over the pelvis. And so those classes will be great to reference for preparation for the shoulder work. Now grip the towel or the band with your fingers, not your thumb. So it's very important that you hold it properly because when you grip something, that's what actually determines what muscles proximally are going to be activated. So we're gonna grip with our fingers, leave the thumb loose. And then just do a gentle pull apart.
So it feels like not much is happening, right? But where do you feel this? Turning to the side so you can see what happens. Just by doing this little pull apart, you'll notice that the humeral head may migrate posteriorly or back This helps to seat the humeral head in the socket, especially if we spend a lot of time in this rounded posture. I'm gonna try to work on that. You can just do these pulls and get that humeral head rotating back in the socket. Then we're gonna separate the hands a little bit more I'm just gonna explore the range of motion in what we call external rotation of the shoulder.
And then again, I like to call this Sherry's shoulder setting exercise. Say that three times really fast. Right? And then pull apart. Opening the collar bones. And then some of you may have so much range of motion that you can actually get your arm even with your rib cage here, I'm not one of those people. I I I feel like my body majors in strength and minors in flexibility and mobility So I don't have that much range of motion that I can get my arm all the way back, but some people do.
If you have that much mobility, it might be to your detriment in a way and you wanna rein it in a little bit and work on that mid range motion if you need more strength in your shoulder. So let's try one more time pulling apart and feeling what happens in the shoulder girdle there. Alright. Now let's turn the palms downward and then take the arms out to what we call collarbone height. So here's your collar bones across here. We're just gonna press the arms out, and I want you to lock your elbows for a moment.
And then pull. Where do you feel that? And then you might feel it in your elbows. You could feel it in your wrists. If your wrists do that when you lock your elbows, That means that you're not really controlling the wrist joint. So want what you wanna do is reach your thumbs outward and think of these ponytails being pulled out so that your wrist is in a better position, then go to your elbow, bend the elbow slightly creating a parenthesis shape, and then pull apart and release. Now you wanna try to avoid bringing the shoulders up and see if you can seat the shoulders down But I want you to notice what happens in your neck when you lock your elbows and pull.
The shoulders tend to wanna migrate up. If you bend the elbows, it's like, the shoulders just drop down naturally, and then you create that dynamic quality in the shoulder. Alright. Now from here, we're gonna take the arms up. Before we go up, I wanna make sure that you're not holding the towel too close. You wanna separate it a little bit so that it's wider than your shoulder girdle and wider than your shoulders. So that's an easier position of the shoulder.
When you're reaching overhead. So let's take the band and pull apart, and then we'll take it overhead. And then just keep going until you feel that you've gotten to a stopping point or maybe the shoulder is stiff in that position. Maybe you can get it way up overhead. Notice if your rib cage starts to move and then take it back down.
Alright. Bring it all the way down. Now I'm gonna put this aside for a moment, and I wanna show you how you can facilitate better shoulder motion with an overhead reach. So remember we did the scapular protraction and retraction. Let's take the arms up and reach them forward. We're gonna reach around to the scapula and feel that scapula go forward and back. Let's try that on the other side.
Reach around, see if you can feel your scapula and wrapping around that tip of the scapula. Draw the shoulder down a little bit, and then feel it go forward and backward. So good to feel your own shoulder blade as you're moving at. Alright. Then we're gonna take it this direction. And reach forward and backward.
And I want you to notice what happens when you lift your arm past that ninety degree angle. The scapula kinda disappears from your hand. It's like, oh, what happened to it? Right? Bring it back down. It starts out with this vertical position, you reach around, you find that scapular tip, it doesn't move until you get to pass that ninety degree angle, then as you go up, the scapula starts to rotate And what that does is it lets the socket face the ceiling. So your humeral head has a place to sit like a golf ball on a tee. So let's do that again.
Let that scapula move forward. Create a big open armpit here and then take it back down. Let's change sides so you can see this from the other side. Wrap that hand around the scapula. Do a press forward and back.
Pull it back into place here, drop it down, and then reach up and slightly forward. And see if you can get that tip to come in line with your hip. So the tip of the scapula with healthy shoulder motion should be right in line with your hip, open through the armpit, and to get your hand overhead, that socket has to face the ceiling like a golf ball and a tee because the humeral head's really big and the socket's really small. It depends on the muscles of the rotator cuff. All around it in order to keep it centered in the socket. Alright. Let's take it down.
And roll the shoulders and relax your neck. Okay. So I'm gonna show you another tool that's really helpful. You can interchange a theraband with the yoga strap. So the theraband needs to be really thick. And if it's not really thick, if you have a a lighter one, then you can double it and use it to do the taut tail pulls and external rotation, setting exercise exactly as you did with the yoga strap.
Here's what happens a lot of times you use a too light of a Theraben, you'll get too much motion. And what you want is instead of facilitating shoulder motion, you wanna facilitate that posterior aspect of the rotator cuff that Terry's minor and infraspinatus. That's technical terms for the rotator cuff and then you pull that humeral head back in the socket. If you do that with with less tension, then you don't get that action as much. Alright. So now we're gonna step to the back of the mat, and I'm gonna bring my band to collarbone height.
Drawing the shoulders down, lengthening through the neck, stacking my bones so that my rib cage is over my pelvis, and my head is over my body. I don't wanna be here, right, because that changes everything about the neck and shoulder placement. So let's lift the breastbone up pull slightly apart on the band, we're gonna step forward. Feel free to put the band down if you need assistance and hold either a chair or a dowel if you need that to get to the floor. So we're gonna step forward in our transition to the mat, and then slowly descend downward, placing both knees on the mat with a wide position You can point your toes or flex your toes to your preference. Now we're gonna sit back just a little bit and place our hands on the mat.
So I want you to actually have your hands gripping the band because we're actually gonna do a couple of things with the band. Keeping that dynamic quality is important while you're in weight bearing. Lots of times what happens is we'll end up locking the shoulders, which is easier. The body always wants to find the path of least resistance. So if you lock your elbows, you're gonna shut off the rotator cuff, And you possibly will compress the wrists. So if I can do that rotation outward, getting that parenthesis shape, of the shoulder and arm, I will activate the rotator cuff and really get my shoulder set up for success.
So then we can shift the weight to the side, grab the band with your fingers, not your thumb, So right. We don't wanna do it this way. We wanna do it with a good grip so that the pinky is gripping the band and do a little pull apart. Trying to keep your elbows bent, softly bent, not straight, but softly bent, and certainly not locked. Now what's the other arm doing? Right? Because this one tends to go back to that locked position. So focusing on that weight bearing arm.
Now switch sides. I'm gonna focus on this arm, making sure that the weight bearing arm is still slightly bent in that parenthesis shape. I'm gonna pull the band. And, again, in that slightly bent elbow, pinky, is pulling. That's where your power is for your grip.
It comes from the pinky, not so much the thumb. Alright? Now let's shift back. And 4th. And I wanna show this from the front too, because I I think it's so important to have the right position of your shoulders when you're in weight bearing. So, again, there's the locked position, and that tends to make us kinda sag downward.
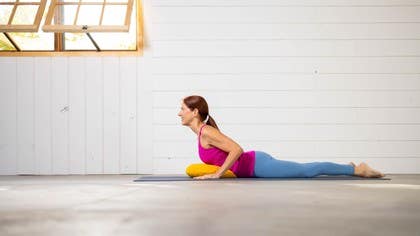
It kinda shuts off the rotator cuff. And then if we can lift up and out of there, slightly bending the elbow, pulling apart, imagining pulling apart on the strap, That's gonna be so helpful for supporting your shoulder in weight bearing. You can also shift back a little bit to get a little pressure off the wrist if you have limited wrist mobility. And it's certainly something you should work on instead of just avoiding weight bearing, go ahead and work on that wrist mobility shifting forward and backward. Alright. Now we're gonna keep that band there, and then we're gonna add some challenge to overhead press.
We're gonna take it back in your half down dog position. So go until you start to feel some resistance at shoulder, and you may not be able to go all the way down. And I suggest that you don't let your head just rest on the floor, that you shift back. And then you might even turn your thumbs up because that's gonna help you rotate the the little bump away from the socket of the shoulder. And it gets it out of that impingement position.
So sometimes this is really helpful in this half down dog position. Now, of course, you wouldn't be in a full downward dog in that position. But if you're working on your shoulder mobility, this can help. And then take it back up. And then let's take one hand and pull the band apart and then shift your weight, pull the other side, feeling that dynamic quality, and see if that increases your mobility to get back into that overhead reach position. Take it back up.
Lock yourself forward. And then this is, of course, gonna be really helpful when you start going into a full plank position so that you're taking it back and being able to put weight on your hands, slightly bend the elbows will make a big difference in how your wrist feels, and then sync and press doing some row track protraction, pushing away from the mat, retraction coming towards the mat, without sagging in your rib cage or your back. So really strengthening those muscles that hold the scapula wide on your back. So it's that thought that you keep the scapula wide on your back without actually going into a flexed thoracic spine. Coming down onto the mat now.
I want you to lie on your back. So you'll go to your side first. Take yourself down, roll to your back, and then we're gonna notice where are placement of our pelvis is first. And then the back of the rib cage, really letting the ribs settle into the mat, finding some length, And now we change our focus from pelvis and ribs as we did in the core on the mat class. We're gonna focus on where the shoulder girdle is placed on the mat.
So notice what parts of your shoulder girdle are on the mat. Do you have ease in the back of your neck? Feel free to use a pillow under your head. If you feel like your back is rounded, and you're ending up looking at the wall behind you. Right? So if your neck is jotting forward, please use a pillow, but don't put the pillow under your shoulder blades.
Because I want the shoulder blades to be in contact with the mat. Now let's press the shoulder blades into the mat. And then what we can do also is turn the palms up. And then that can help to rotate outward through the shoulder girdle, and you might be able to get more placement of the shoulder girdle on the mat. And then Can you bend your elbows and do that same action we just did with the external rotation here?
And then keeping the scapula pressed into the mat, just take one hand, thumb up, reaching up, and then see if you can take the other hand up and reach the scapula off the mat without changing your neck alignment. So see if you can keep your neck relaxed and your rib cage steady. So your rib cage doesn't go up and down. Right? Your rib cage is still and your scapula are moving on your back. And now let's try with the Therabant just like we did with the shoulder setting exercise, palms up, hold with your fingers, not your thumb, thumbs pointed outward, Shoulder blades anchored to the mat.
Now pull apart. If you feel like your scapula comes off, right, it means you didn't really troll the femoral head in the socket, and it kinda migrated forward. So it looks like that. Right? And then your neck tense is up. Wondering why we have neck tension, right, because we don't have control of the neck muscles that attach to the scapula. So let's draw the scapula down, keep them anchored, and then do the pull.
Just magic for helping to decrease neck tension and neck pain. Improving shoulder function. Alright. Now place the hands down. Palms down. And just about the width of your mat. And then just let the the arms rest on the mat for a moment.
Before you start to lift, you wanna think of your arm like a crane. And the crane actually starts at the engine that is attached to the ground that provides that counterbalance for the lifting. So you press the scapula into the mat so that the crane doesn't tip over as it lifts that long lever arm. So we're pressing down. We're gonna pull apart slightly.
Remember to slightly bend the elbows. There's a lot going on here, a lot of joints to control, right? And then we press up and then take it back down. The scapula is the most the shoulder joint is the most mobile joint in the body. So it's very complex to try to control. So you're keeping that dynamic pull apart as you take it up overhead, And hopefully, you find ease in the shoulder joint.
Now take it over your head. Keep the pull apart and then reach up. And down. And, again, if you don't have a Theraben, you can do this all of this with your yoga strap or your dog leash, whatever you have at home. And really trying to press the scapula up toward the ceiling, down toward the floor as your next day is relaxed.
Alright. Now for the grand finale, we're gonna take it overhead and then see if we can keep the rib cage connected to the mat open through the shoulder girdle and then give a little pull overhead. Now you don't wanna try to touch your arms to the floor or your knuckles to the floor, because here, I just bent my elbows. I didn't really work my shoulder. So you wanna really make sure that you're keeping the tension on the band. You're keeping the arms slightly bent. And you don't try to just lay your arms on the floor.
Right? You wanna keep them hovering off the floor and then pull slightly apart. Easier said than done. Sometimes this is a lot of work, and you might be a little shaky with this. And then take it up. And then bring it to the chest just like you're doing a push up or a bench press. Right?
So, again, keeping that thumb loose and band on tension. Alright. Now we're gonna take it to our side, rolling over to the side, push yourself up to sitting with good scapular form and alignment with, hopefully, a much better awareness of your scapula and better shoulder function, ease in your neck, and you're on the road to having great strength mobility so that you can do a yoga practice that is flowing and beautiful, and you can find that joy in your body. Thank you so much for joining me.


You need to be a subscriber to post a comment.
Please Log In or Create an Account to start your free trial.