Description
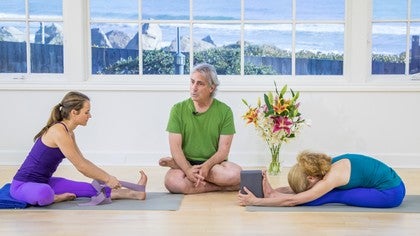
Richard interprets the traditional Mahamudra as modern day Janu Sirsasana (Head to Knee Pose). Taking a slow, mindful, methodical approach into and out of the posture, Richard pauses between sides speaking to the two names for Dandasana, Staff or Scepter Pose, and the dual image of the asceticism and authority of the yogic path.
About This Video
Transcript
Read Full Transcript
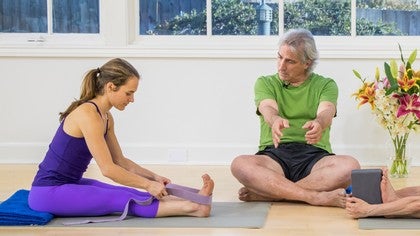
Hello, we're here with Ilana and Betsy and this pose is originally a mudra called Maha Mudra, but we're performing it as if it were a sitting forward bend which nowadays is called Janu Shishasana, which originally was called head-to-knee pose, Janu being knee, Shishya being head, and after a time that interpretation of the name became a bit of a problem because when people heard that the head was supposed to go to the knee they often forced themselves to go down farther than they were really capable of doing. So after a time we had we were also suddenly inter-calling the pose the head of the knee pose, which implied that if you pushed the bent knee away from the pelvis then it would help you come into the forward bend a bit easier. I don't know exactly where it is nowadays but you can interpret it in either one of those two ways. So I'm going to ask the yoginis here to bend the left knee. I want the more flexible yogini to bend your left knee and bring the heel into the left groin so that you can lay off to the side. So that the shin is a little bit, you know, I want I want you to have your shin more back past, yes, the more advanced or the more challenging position has that bent knee a little bit back beyond the right angle. And you always want to make sure when you do this particular exercise that the sole of the bent knee foot is off to the side of the thigh and not sliding underneath it. And I would like our example of our less flexible student to bend the left knee and bring the shin so that it's perpendicular to the right leg, just lay the leg off to the side, yes, and that's good. Now it may be necessary for some students to have a brick underneath that bent knee. She'll be able to let that knee release onto the floor eventually. Now there's two ways to do this exercise. Number one, you could do it as a straight ahead forward bend. In other words, you can bring the middle of your torso down over the inside of the of the straight leg or you could do it as a slight rotation, a slight twist, which means to bring the middle of the torso down over the middle of the straight leg. So I would like you both to reach out with your, you can use the belt please, reach out with your left hand and you can catch the outside of the foot here and put the right hand on the floor beside the right hip, lift and turn to the right. And if you would bring the belt around your right sole, hold it in your left hand and put your right hand on the floor. I would like you to lift up a little bit more please, give yourself a little bit more strap. And I'd like you to turn. Now the bent knee presses back away from the twist, but at the same time you want to take the left hip and roll it over the thigh toward the right heel. Always remember that when you do a twist, you want to have the twist rooted in the groins and not in the ribs. And what you'll see in this position very often is that the head of the the humorous bone on the on the long arm side is being pulled out of the socket, figuratively speaking of course. So what you want to do is draw this back into the shoulder socket. Uh-huh. And imagine that the arm is rooted in the mid-back between the shoulder blade so that when you turn, you're letting the whole left half of the back feed into the left arm. Ah, very good. Nicely done. And get that nice lift and twist. Uh-huh. Very good. That's very nice. This is the way to start if you're doing with a little bit more of a challenge and the twist. Now what I would like Betsy to do is to shift her left hand to the inside of her right foot and bring your right hand to the outside of the foot here. And what I would like Ilana to do is swing the right hand around to the outside half of the belt and shift the left hand to the inside half. So you hold the belt in separate hands. Yeah, like that.
Now I would like you both to lift up. Would you give yourself a little bit more belt first please? Every pose begins with its own opposite. And so a forward bend should always begin with a bit of a back bend. And you want a back bend over the over the scap of this upper torso back bend. Very nice. Now for Betsy, I would like her to keep her arms fully extended as she comes into the full fold. And knowing that she can come quite a far, come quite far forward, we'll take this block and put it on her sole so she can reach forward. And eventually what you'll have to do to keep the arms completely extended is to turn the block this way. Very nice. And for Ilana, I'm gonna ask her to start to walk her hands down along the belt, but I don't want her to bend the elbows and I don't want her to pull on the belt. I wanted to slacken her grip on the strap and very lightly walk the hands along toward the foot. Now when you reach the point where you start to bend forward from the belly, that's where you want to stop and lift off a little bit and reaffirm the length of the front of the torso. See, in a forward bend, the focus is on the front of the torso, not the back. So I wonder if you could, you can see how in this position here she's a little bit closed across the collarbones. So I wonder if you could take the scapulas down, lift from here more, and open the clavicles across the upper chest. No, no, no, no, no, no. This is just pushing the chin forward. Can you lift from here more and open the clavicles? Exactly right. Now of course she could probably take the foot if she was in a class, but I'd like her just to continue to hold on to the belt for the time being. And what you see on our more, our more challenged student is that the torso on the left side is plumped up, whereas the right ribs, you can't see this on the camera, but the right ribs are closed down a little bit. So what I would like her to do is lift the torso up, yes, and bring the left ribs in slightly, aha, and make the right ribs longer, exactly, and then lay the torso back down again, a little bit better. But what's going on now is that the straight leg, she shifted on to the outside edge of the straight leg. So can she take a slight internal rotation of the left leg and shift more weight back to the left side? And of course she can, and she does, and she did, and that's very nice, much better, very good. And this is called, in this particular sequence, Janu Shishasana, Janu the knee, Shishu the head, and that you would come up with an inhalation please, and extend both legs forward into Dandasana, nicely done. Now remember, when you shift sides in this position, you always want to come back to the neutral position. You don't want to just swing the legs one forward and one back. So come back into Dandasana, very nice, very interesting pose. Danda means, usually is interpreted to mean staff, but it also means scepter. And so what you have here is an image of both the asceticism of traditional yoga, the staff, which the wandering yogi used to stabilize himself as he wandered along his lonely path, but it also is an indication of the authority that comes from the practice of yoga, the scepter, the kingly authority, or the queenly authority. So it's a very interesting image, Danda. And of course the Danda also represents the marrow Danda, you'll also see it called the spine called the marrow Danda, which is a reference to the Mount Meru at the center of the mythic universe. And of course the spine here is the center of our universe. So let's bring the right leg back and we'll do the left side. Again I'm going to ask the more flexible student to bring the knee a little bit past the right angle and the less flexible student to bring the knee into the right angle or even a little bit closed if need be. And again if you could turn to the to the side to begin please. Right hand to the outer foot and would you get the belt. If you don't have a belt to work with then yes you can bring the hand to the outside of the leg, but it's probably best if you if you have trouble with your forward bend to have a belt handy. You don't really need to buy a yoga belt, you can just use an old tie or some kind of a strap. Would you bring the strap just into the right hand please and put your left hand on the floor. Lift and turn. Now again you have to watch very carefully where you're turning from. Most people will tend to turn from the lower ribs which puts a lot of pressure on the lower back. So the first thing that you want to do before you start to turn a lot is to press the thigh bones down and lift the belly up. And once you get the length in the belly then you can start to turn. The twist is always rooted in the groins and not in the ribs. Very nice. So the pelvis wants to turn with the rest of the torso. Again you press the inner thigh of the bent knee back and roll the hip point up and over the thigh toward the straight heel. Very nice. Now bring your hand around please and if you would take the outside of the belt here. Now when you have your hands on the foot as Bessie has you want to be sure that your thumbs are on the sole not on the top of the foot. Bring your other thumb around. Yes always have the thumbs on the sole. And remember here when you bring yourself into the fold not to pull. No bent elbows. You walk your hands lightly along the strap. That's right. Just hold on the belt.
Very good and then you can come down. Exhale. Oh much better on the second side. And then we take the block please. Very good. Very nice. Now I'd like you to keep your elbows straight please. Lift up. Uh-huh. Now once again you're tending what you want when you come into a fold like this you want to measure the distance across your upper back and then you want to measure the distance across your upper front. And what typically happens is the back broadens more than the front. So for you right now could you give yourself another yes. Now draw the shoulder blades down. Yes and open the collarbones up. Aha. Well done. So when you when you measure the distance across your upper front and your upper back you want to have that pretty much even. Very nasty done. Janu is cognate with the Latin word genu from which the English word from which we get the English word genuflect. Very nicely done. Well done. Inhale. Come up. Better on the second side. Well done. And you too. Inhale up and then straighten both legs back into danda. Beautifully done. Thank you very much. Janu Sushasana.


You need to be a subscriber to post a comment.
Please Log In or Create an Account to start your free trial.