Description
Richard methodically moves us into Locust Pose step-by-step focusing on coming up mindfully using our back muscles and with a nice, long front spine.
About This Video
Transcript
Read Full Transcript
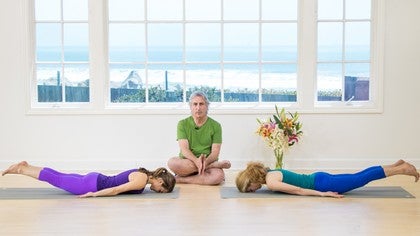
Hi, I'm here with my friends Betsy and Alana, my good friends Betsy and Alana by now. And we're going to continue on with a demonstration of some of the backbends from the Garandasamita. So as in the previous pose, I'll ask them to lie on their bellies, on their tummies. And again, making sure that the feet are not wider than the hips, and again making sure that the little toes are planted firmly down on the floor. Again, you want to make sure that's being done to impart a slight internal rotation to the thighs, which helps to protect the lower back.
Now for this one, I'm going to ask them to bring their palms on the floor, fingers pointing forward beside their waist. So the forearms, as you can see, will be more or less perpendicular to the floor. This is Shalabasana, by the way, and it's usually translated as a locust, but it can also be a grasshopper. Now in this pose, there's a tendency for the students to push up using their hands. And what I like to do is to make sure that they use the muscles of their back more than they use their hands to bring the torso up.
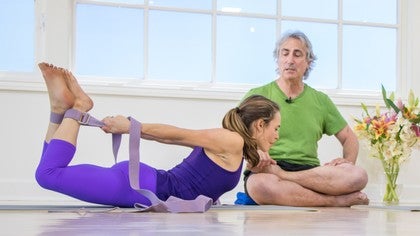
So could you let your hands rest very lightly on the floor, and with an inhalation, just pick the torso and head up just a little bit away from the upper torso and head. So you're not so much pushing yourself off the floor as it is, you're lifting yourself with your back muscles, continuing to lengthen the tailbone, very good, toward the heels as you do this. Very nicely done, and then exhale, release, and come down. Now let's bring the arms alongside the torso with the palms turned up toward the ceiling, push the hands back toward the feet, that's right. And with an inhalation, raise your right leg off the floor, but keep the hip down on the floor.
Take an inhalation to do that. And be sure the toes are slightly turned to the left as you do, so that you want to continue to roll the upper thigh in. And then from the tail, reach back along the back of the leg through the heel and out. What I'd like you both to do is to push through the heels first, yes, and then keep the heel long and just push out through the base of the big toe a little bit more, so not so much pointing the toes as reaching through the heels, very good, and then exhale, release, and come down. And then do the same thing with the other leg, lift it up, keep the hip on the floor, very good.
Again, the first thing to do is to push through the heel and then the base of the big toe. Again, when you're lying on the floor in this position with your belly pressed against the floor, it's very useful to learn how to breathe into the back of the torso. Good. And then inhale, and on the exhalation, come on down. Take a few breaths.
And let's do both legs now, but keep the head down on the floor and take an inhalation and come on up, firming the tailbone against the back of the pelvis as you come up. As the legs rise up, the tailbone should sharpen against the back of the pelvis. Bring the legs a little bit closer together, yeah. Other hips a little bit softer, turn the legs in a little bit more, there you go. Very good.
And then inhale on the exhalation, release, and come down. Nicely done. Now bring your hands back on the floor beside your waist as we did earlier, and let's do the full pose now, okay? Headed upper torso and legs, ready? Take an inhalation.
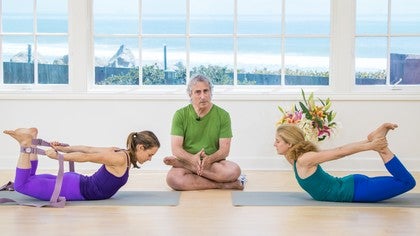
Okay, using the muscles of the upper back to help lift the torso and head, take the legs up and the torso and head all the way. Hands soft on the floor, very nice, reaching back legs too wide, bring the legs in, breathing. This is the original version of locust, I know that you may think that the arm should be stretched back alongside the torso. This is the way that the pose was done 350 years ago, and you can see that the elbows do look like the legs of a grasshopper or a locust. Nicely done, good.
And then take an exhalation and release all the way down onto the floor. Beautiful. And then bring the hands a little bit forward under the shoulders, and with another exhalation, push yourself back. Again, be careful not to arch into the lumbar spine to do this please. Push straight back, exhale.
And let the hands stretch out in front of the torso, spread the palms, and not just laying the hands on the floor, but press the palms firmly down into the floor. Very good. Now walk your hands back towards your knees, very nice, let the hands rest very lightly on the floor. I'm going to bring you up out of this position this time, but what I want you to be sure to do first is to lengthen the front of your torso along the top thighs, and then pull down from the tailbone and come up with a long front spine, not rolling up, exactly. Very good.
Thank you. Shalabhasana.

You need to be a subscriber to post a comment.
Please Log In or Create an Account to start your free trial.