Description
Transcript
Read Full Transcript
Hey everyone, welcome back and welcome to this practice. This is a back bending practice that's focusing primarily on getting movement and openness in the upper portion of the spine. If you're working with hypermobility or if you're working with any type of tension or discomfort in the lower spine in backbends, I think that the movements that we'll do in this practice are a nice way to start to work towards extension. However, it's really important to keep active awareness through your lower torso and through your legs. For me, this practice feels accessible as a beginning practice.
For you, you might also want to have a little bit of a warm up beforehand. I think that the hip strengthening series is a really nice lead-in to this practice actually because in that series we do a lot of focus on the psoas and on strength from the spine into the legs, which is really supportive for these backbends. Another thing to mention for this practice is that I'll be using quite a few props. I've got a couple of blankets, a bolster, a strap, and I'm going to be using a chair later in the series. I'm going to start off lying on my belly.
First we'll come into a sphinx pose. In sphinx pose, you can have your elbows positioned below your shoulders and your middle fingers in line with your elbows. I'm going to start here by thinking about the length of my legs reaching from either side of my navel and extending all the way past my toes. If my toes could reach back and touch the wall behind me, they would. There's a sense of length through the backbend.
The top of my head is reaching towards the ceiling. Where my tailbone is or where your tailbone is, I should say, is not tucked, but also you could have a sense of containment around the pelvic floor, and so the balance between pubic bone and tailbone is something to think about here. From here, we'll take more weight onto the right elbow, and then you can turn and look back over your right shoulder into your right heel. Now when I do this, I feel more of a gentle but definitely noticeable lengthening through the left waist. I want to continue to reach back through my left toes, and then you can inhale and come back to the center, and then take more weight over onto your left elbow and turn and look back over that shoulder and continue to reach through your right toes.
Let's do one more on each side, just holding for a couple of breaths. Starting to kind of warm up a little bit into the extension in the front of the hips and into the spine. One second side. For the next movement, you want to grab your bolster. I want the bolster here on the wooden floor, not on the sticky mat, and I'll place my elbows and the lower portion of my triceps on the bolster, but otherwise my arms are free.
I'm going to bring my hands to touch, and then from here, I'm still reaching through my legs, I'm going to start to take the bolster and slide it forwards. You can let your head come down and rest, it might even touch the floor. In this movement, we're just starting to prepare the arms and the shoulders for some of the moves that we're going to do later. Can you breathe into the back of your chest here? Can you reach through the skin of your elbows?
In the center of your body, lengthen out through your toes. Go ahead and lift your head up. You might want to repeat that movement again. You can also fold a blanket on top of the bolster if you didn't get a lot of sensation with that one. Don't make this about sensation.
You don't need to get a lot of stretch feeling, but again, just to start to lengthen through the triceps and pair that with the lengthening of your legs. We'll move on from here, and you can grab your strap and just move this bolster out of the way. With your strap, you'll just want to bring the tail of the strap through the D-ring. Just one time, we'll create a cinch. You're going to bring it around both ankles.
You'll want the metal portion or the buckle of the strap to be at the back of your ankles. Then come and lie down on your belly again. Bring your strap up behind you. This is similar to the last movement that we did. You need to keep length moving through your legs.
One part of your body that you want to stay really vibrant and aware in is your lower back through your hip joints. Starting with your head down, you can bring your hands to the strap just below your neck or behind your neck. From either side of your navel, reach long through your legs. Think about the bolster sliding forwards with your elbows. On an inhale breath, go ahead and lift your arms up.
Start to lift your hands up and reach through your legs. If it feels comfortable to start to walk your hands further back on the strap, that's an option. From the space behind your navel, think about the sides of your spine lengthening towards your toes. As you breathe, let your breath inflate around your lower ribs. Let's take one more breath here.
Then with your exhale, release down. From here, go ahead and come on up. We won't need to stop again. So the next pose that we're going to do is definitely more of an advanced pose. It can be a little complicated to get in, so I'm going to teach you getting there in stages.
First of all, there's the approach, especially for those of us who are working with potential instability in the low back. What I'm about to teach you is kind of an important step to keep from jamming weight or pushing too much weight into the lower back. I'm just going to show you this move, and I'd encourage you to practice it a couple of times. Basically what it is, is it's an approach towards full-wheel or urdvadhanirasana. We won't be going up right now, so it's just starting to get in.
What I'm going to show you, or what I'd like you to pay attention to, is how when I come to the top of my head, I'm also going to lift my heels and let my knees travel forwards. The lifting of my heels and my knees traveling forwards gives more space to my low back. I'll place my hands beside my ears like so. You can just practice here, not even coming to the top of your head, but just taking some weight into your hands and sliding your knees forwards. Try that a couple of times.
My heels lift, my knees slide forwards. If that feels okay, the next thing to do is to come all the way onto the balls of your feet, let your knees slide forwards, and lift onto the crown of your head like so, and then come down. My heels lift, knees go forwards, I'm on the top of my head. The length you need to be, or the distance you want to be from the wall, is a little bit variable. I hope I'm at the right distance.
You'll know when you get up there. When you come to the top of your head, you'll transition your arms so that they're like sheer shasna. Your forearms will be on the floor, and you can interlace your hands behind your head. I'm going to show the pose from there. Hands beside my ears.
Take an inhale, and then exhale to the top of your head. From here, I can bring one hand at a time behind my head. All right. Here, notice that my heels are staying up, but I'm going to start to walk my feet forwards until I feel the wall. One foot at a time, I'm going to find the wall, push into that foot, and then come into my pose.
Here, my lower back feels really nice and long. I'm reaching still from either side of my belly button into my legs. I can actually push so much down through my forearms that my head is not on the floor. I'll stay here and breathe for just three or four breaths. Now, when you're ready to come down, let your head release first, and then one foot at a time, take your feet down onto the floor.
As if you are going to come up into wheel pose, you can bring your hands to the floor, lift weight off of your head, and then bring your skull onto the ground and release your torso down. All right. The next pose we do is going to be with the chair. When you're ready, go ahead and roll off to one side, and you can get your yoga chair and we'll set up. All right.
When you're ready, come on up to stand. Where you'll want the chair is dependent upon your height. For me, a little bit more than halfway along the length of my mat, I think, is good. You can work it out. I'll show you the pose first.
You'll want a bolster, and also for those of you that are taller, you can stack more blankets on top of each other to build up more height on your chair, and then you'll bring your bolster like so. This next step is absolutely crucial for you to remember. Don't forget. It is so important that you keep your heels on the front legs of the chair and the balls of your feet down. If you don't do this, you run the risk of tipping over backwards in your chair.
Not fun. Heels stay on the front legs of the chair, balls of the feet down. This is your stability. I'm going to talk through it first. First I'm going to use my arms to lift myself up.
Where I want to feel the rung of the chair is just about at the shoulder wing tip line or around T7. From here, I'm going to lift myself up and then start to arc back. My head can rest on the back of the bolster, and I can reach one hand at a time for the wall. It is a nice accessible variation of a drop back. Then from navel height, I want to reach down into both of my legs.
Maybe walk my hands a little bit further down. I want to feel that my head can relax. I'm focusing on my inner thighs, strength through my inner thighs, but then a spreading and a broadening around my lower back, moving from midline out to the sides. Stay for a number of breaths, and then when you're ready to come down, one hand at a time, grab a hold of your chair and then chin to your chest and seat back on your chair. So I'd recommend doing that at least a couple of times and holding for a few breaths each time.
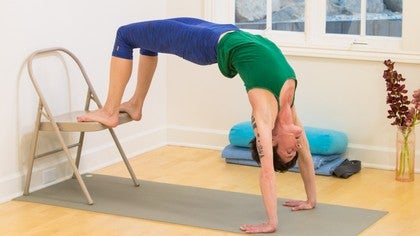
From here, though, we'll move into a variation of Urdhva Dhanurasana or upward facing wheel pose or full wheel pose. This variation of the pose, I find that it requires a little bit different kind of upper body strength, but for those of us with a tendency to kind of collapse through the lower back or the waist area, there's a lot of support in bringing the legs up higher. Another way to practice this is with blocks underneath your feet, also at the wall so that whatever you're putting your feet on doesn't move around on you. So you're going to come down onto the floor and lie down on your back with your feet on the seat of your chair. All right.
So the same movement that we did before to get into Dvipada Viparita Dhanurasana, the headstand-like pose, it's similar here. So I want to think about my shins traveling forwards when I come to the top of my head. And then from here, I feel that my feet are stable on the chair. I'm going to plant my hands and I'll inhale and come up. So I have a lot more room in my low back here.
I'm reaching from either side of my belly button into my feet, breathing into the circumference of my torso, letting my head relax. And that same kind of wrapping of the outer shoulders forwards, I think the feeling we had in the tricep stretch with the bolster. And when you're ready to come down, bring your chin to your throat, strong arms, and let the back of your head come to the floor, and then roll all the way down. And from here, you might just want to rest for a couple of breaths with your knees wide apart before we go on to the next pose. So when you're ready to move on, we'll come back up.
Lots of up and down with the chairs for this one. So the counter pose that we'll do for the backbends is a variation of shoulder stand or Sarvangasana using the chair. If when I show this, you're like, no, don't do it. And just skip right ahead to the last pose that we do, which is letting your calves rest on the chair. Another option to take would just be legs up the wall for this one.
I really like shoulder stand as a counter pose to back bending. I think energetically, it's really balancing. However, the setup can feel a little bit tricky if you've never done it before. So I'll go through it in stages. First of all, you'll want your mat on the seat of your chair to keep your blankets from slipping.
So you can fold your mat up and then place it on your chair seat. I'm going to bring my chair a little closer to the wall. Just as another added precaution. And I like to have two folded blankets to support my shoulders and neck. I'm going to point out that the fold sides of the blanket are facing away from the chair and that the blankets are folded pretty evenly.
So the blankets are here to support your shoulders and to give your neck a curve, maintain your cervical curve. Take the time to fold your blankets well. It's your neck. So here's our setup. You're going to start seated sideways on your chair.
And then turn around so that you can kind of hug the back of your chair seat with your legs. I'm going to use my hands to walk down. And then release my legs from around the chair. Now notice that the backs of my shoulders come fully onto the blankets. But my head is off and on the floor.
And then I'll bring my hands and thread them underneath the chair to grab the back rung of the chair. And my sacrum is resting on the chair seat. So I'm going to keep my sacrum resting on the chair seat. The weight of my pelvis is supported. And then when I'm ready, one leg at a time, I'll bring my legs out.
From here, let your eyes either close or your gaze turn down towards your chest. And feel that you can relax your belly and your lower jaw. So modifications for your body height. If you're taller, you have a longer spine than I do. You'll want to stack up more height underneath your sacrum or on your chair seat.
If you need more support for your neck, you can fold more blankets under your shoulders. And as you bring more height under your shoulders, you may find that you also need more height under your sacrum. Some people even like to have a bolster, maybe even a bolster and a blanket underneath their shoulders. So I'm going to stay here for about another minute or maybe somewhere between five and ten long deep breaths, depending on how long your breaths are. Under the counter pose is relaxing the sides of your neck, from your ears to your outer collar bones.
And feeling that your heart can energetically rest towards your back body. So you're not thrusting forwards into your chest, but that your heart is kind of just gently resting back. There we go. Well, I find this to be a really restful place to be. It's definitely a place where you could spend a longer amount of time, even up to five or ten minutes here. The notorious they say that it's at three minutes that you start to get the benefit of inversions. I don't know if that's true or not, but you could find out and practice for three minutes and see how you feel. But for now, we'll come down. Come down mindfully by first placing one foot at a time at the back rung of the chair, and then transitioning one hand at a time from underneath the chair. From here, you're just going to slide in the direction of your head. Slide back off of your chair. And then when your pelvis comes down, go ahead and roll off to the side. And we'll just unfold a blanket from here to take our final shape. I'm going to unfold the blanket for cushion. I'm going to come onto my back again. And just bring my calves up onto the chair. All right. So this is we'll take this shape instead of Shavasana. So I had someone tell me that spending ten minutes a day in this shape was one of the best things that you could do for your health. And it's kind of like they said that it was better than an afternoon nap. Again, I don't know if that's true. That's the they talking. But I have noticed that if I give myself some time in this shape, it brings a lot of ease into my lower back. It's a really nice way to give kind of an even or symmetrical release from the weight of your lower back. It's a really gentle inversion.
It's good for balancing the parasympathetic system and encouraging good organ health. So we'll just stay here for a couple of minutes today. You can definitely just pause your video and stay here for much longer if you'd like. But for now, you can let your eyes close and your arms really stand by your sides and feel that the chair is supporting the weight of your legs. And as much as you can here, relax your back onto the floor and let your legs release any effort that they're making. All right. All right. All right.
All right. All right. If you have the time to stay longer today, please do. And whenever it's time for you to come up and just bring your knees into your chest for a couple of breaths. And then roll to your side and spend a couple of breaths there. And when you're ready and with the support of your hands, come back into a seat. Thanks for sharing your practice today.
Anatomy for Yogis: Renee Sills
Mention
 |
Renee Sills (Teacher) |
 |
Elissa P |
Comments


I would recommend cutting up an old yoga mat into strips that are about 4" wide by 12" long as forearm props and then stacking as many as you need until the height of your arms compared to your head allows you to keep your forearms on the floor while getting into the pose. (You can glue them or bind them with rubber bands so they don't slide apart as you get into this particular pose.)
http://www.fivepointsyoga.co m/wp-content/uploads/2009/11/Wheel- Pose-blocks-under-hands-300x225.jpg
I hope that helps! Let me know. - R
You need to be a subscriber to post a comment.
Please Log In or Create an Account to start your free trial.
