Description
Transcript
Read Full Transcript
Hi, everyone. Welcome to this class focused on core control getting down to the mat. We're gonna be looking at trunk control the rib cage relationship to the pelvis that we worked on in classes that were focused on the feet working your way up the body through the posture, and looking at head and neck alignment as well and how that affects core control. So we'll be needing a dowel that's at least 48 inches long, could be a broomstick or a mop handle. You can take the mop off the handle, and then we'll also need a yoga strap and a yoga block or some pillow to sit on. Alright. So now let's place the dowel on your back placing the head, mid back, and sacrum against the dull.
Place your thumb in between the stick and the low back We're gonna step back on the yoga mat so that you're going to transition to the mat using that optimal spine alignment. Hinge at your hips, keeping that pressure against your head, your mid back, and your sacrum as best you can. Keep your knees apart. Watch those feet to make sure your feet don't collapse and that your knees stay in alignment. Over the middle of your foot.
So remember that 6040 relationship. Let's lift the toes. And then place the toes back down, keeping 60% of the weight on the outside of the foot, 40% to the inside. Now let's do that again. It's almost like you're trying to pull your knees apart as you hinge.
Alright. Now let's take a step forward. If you need to take the stick off your back and use it for balance, feel free to do that. You can place the dowel out in front of you. Take that big step forward.
Always use another surface to place your hand on if you need it. And then let's do a couple of those heal, lowers, and lifts. This will help to stretch the hip and the calf, the ankle, and prepare you for descending to the floor, step together, and let's switch sides. Lift the heel. Try to keep the weight centered.
Over the front of your foot so that you're not rolling out toward the pinky side of your foot and or rolling in over the big toe side of your foot. Think of lifting your pubic bone up and forward. And now let's bend both of those knees and see if you can descend toward the floor. If you have a hard time with that, Now place both knees on the mat. If your toes are tucked under, it means that you have a great deal of mobility in your great toe and enough mobility to be able to do this. So if you're having a hard time with that, you can point your toes and hinge at the hip joint.
So same idea. As in standing, we're gonna think of hinging and sitting back toward the heels So you can do that with pointed toes or flex toes. I like it with flex toes because I want you to be able to stretch those joints of your feet. Gonna be really helpful for a lot of your yoga postures. Alright.
Now hinge back and then place your hands on the mat. Now here's the balancing act. We're gonna see if I can actually do it as well. So placing your hands on the width of your mat So your pinkies are touching the outside edge of your mat, and then slightly bend the elbows thinking of pulling the mat apart. Now we're gonna hinge back and see if you can keep the stick balancing on your head, your mid back, and your sacrum.
Now this is easier said than done. I'm always happy that I can do it and demonstrate it without it falling off. So the good news is that you can put it inside your shirt inside a t shirt if you wanna keep it from falling off your back, but it's such a great concept for keeping that neutral or optimal alignment of your spine. Alright. So we're gonna hinge back, so I can take the weight off my hand, and place the dowel on the mat. Alright. Happy I was able to do that.
Let's hinge back. And then sit towards your heels. If this is painful or difficult for your feet, then just go as far as you're able to go. And see if you can get that stretch to both your hips and your feet, also getting a stretch to your knees as well. And feel free to use padding for your knees if you need to.
Alright. Now take the hands in that wide position. Spread your fingers apart. And what I'd like you to do is actually lock your elbows. I want you to notice how much pressure that places on the wrist.
And you're gonna shift forward. And that's gonna give you a big stretch on the wrist. Now some of you might have difficulty with weight bearing on your hands. And might need to modify this, but I don't want you to avoid weight bearing because it's so good for activating the muscles of your rotator cuff and the support of your shoulder. So I want you to see if you can stretch your wrists, and then you can go back and stretch your feet and hips.
And then come forward, stretch the wrist. Alright. Now try this. Pull the elbows out wide. So I like to call this like a little party trick where you're reaching the front of the elbow forward. You're locking your elbow, then you're unlocking it, just rotating that forearm.
And then try that on the other side. See if you can actually rotate your forearm. You have control of the position of your elbow much more than you probably thought. And now pull the elbows out wide, making a parenthesis shape out of the arms, see if you can maintain your neutral spine position, and then take yourself forward. And you're gonna notice a lot more ease in the wrists.
If you need to, you can shift your weight back. So that you're not putting as much weight on your hands. And then breathe in here. And as you breathe out, see if you can lift your knees 1 inch off the mat. And then take it back down.
That's easier said than done. Sometimes that's challenging. Alright? And lift and lower. And what I want you to watch for is that you're not tucking your buttocks under and lifting through your mid back. And you're not sagging into your arms. Right? You wanna keep your face and chest pressing as far away from the mat as possible. Keep the pressure outward. Like, you're pulling the mat apart and then lift and lower.
And try to maintain the position of your arms in that parenthesis shape. Alright. One more time. Take it back. And then take it forward, go as far forward as you can, getting a stretch to the wrist, and then release it back until you don't feel any pain or discomfort in the wrists. And that's usually a good place to work on your weight bearing.
Alright. Now let the belly kinda drop, and then see if you can pull up through the low belly. And then let it drop and see if you can pull it up. Now couple that with breathing. Usually, it's easiest on an inhale to let the belly drop, and then pull it up. And let it drop and pull it up. So what you're trying to do is keep the spine lengthened and in that optimal position and avoid doing something like this. Right? That's what people end up doing is pulling their low back toward the ceiling, kinda hanging down and then lifting up.
What I want you to do is be able to have control of the abdominal wall pelvic floor and the diaphragm without having to move your spine or your pelvis. Right? So this would be more of a glute exercise, whereas keeping that neutral position, getting control of your abdominal wall is what we're after. Alright. Now I'm gonna take it to the mat. Let's have a seat here.
Keep your spine lengthened. We're gonna sweep those legs around, and it's important that you keep your spine in that lengthened position as you lie down on the mat. So we're gonna slide the hands apart, and sort of plank down to the mat, and then place your hands by your side, and take a moment to lengthen your pelvis away from your rib cage. I like to call this like the pelvic walk. And then take another moment to reach your rib cage away from the pelvis and then the back of your neck and head away from the body.
And then place your hands by your side, open up those hands, and see if you can let your collar bones widen across the front of your chest. Now notice the position of your lumbar spine. If your low back is more of in a flat position, or is it more in an arch position? Can you put your fingers under there and see how many fingers you can get under there? And your fingers you're trying to get your fingers more vertical so that if you have your fingers stacked up, sometimes it's hard to get them in there, but you can stack them up like that where one finger is on top of the other. Kinda see how much space you have, and it should be the same amount of space that you had when you were standing.
And then you're not trying to lift the spine up or lift the rib cage up, you're just trying to be in that elongated and more honoring the curves of your spine. You're not trying to work here. You're just placing the pelvis, lengthening the spine. And then let's place the hands on the pelvis so that you feel the heels of your hands on your pelvis fingertips on your pubic bone. And then notice is your pubic bone higher? Or is it lower, or is it level? So what you want is it for it to be level.
Now move your hands up from the pelvis, pinkies on the pelvis, and then thumbs on the lowest ribs. Just let your elbows rest on the mat so you're not having to hold them up. And think of pressing the thumbs toward the pinkies as you breathe. So we're gonna take a breath in, and you're gonna feel those ribs kind of expand outward in that costal breathing, those bucket handle breathing styles that we were talking about and then exhale. Feel the ribs funnel toward the pelvis.
Inhale open. Ribs open wide, but they also open in the back as well. So you might wanna think about breathing into your back and then exhale. Alright. Now maintaining that position in neutral so that your pelvis is in that neutral or optimal position, rib cage is anchored to the mat, but not pressing down so much that you feel like it distorts your spine. I want you to see if you can lift one leg up without changing that.
So again, our spine is in a neutral position, meaning that we have a small inward curve And everything is staying stable. You're staying relaxed in your neck. And if you need a pillow for the back of your head, please feel free to get one. Alright. Then let's try this. Take the knee and open it out to the side and see if your pelvis follows, or are you able to maintain that pelvis?
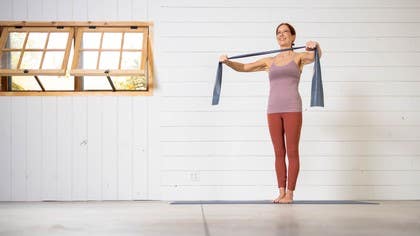
Let's couple that with a breath. We're gonna inhale to prepare, and then exhale to open. And bring it back in, and then inhale, and then exhale to bring it back in. Alright. Now I want you to take a yoga strap or a dog leach Bathrow, belt, necktie, whatever you have that's firm, and lift your hips up and place the strap around your lowest ribs.
We're gonna work on that costal breath that we worked on in our alignment of the spine class. Take the strap, place it around your rib cage. Now take a deep inhale. And exhale. Again, inhale.
Feel the strap open. Like, there's nothing you can do to keep it closed. Your trying to keep it closed, but your lungs are powerful, and they will be able to open that strap. Now this time, we're gonna exhale with that, what we call forced expiration. Inhale. And as you exhale, you'll feel the strap that will cross each other and close because the rib cage actually descended so much and narrowed to help push the air out of the lungs.
So this is the kind of breathing that we wanna do when we try to when we wanna try to maintain core control. If if our belly is expanding with each breath and we're trying to maintain trunk or supine support, then we'll lose that if we inhale and allow the belly to relax. So again, I'll show you the technique. We're gonna inhale through the ribs, Feel that expansion outward, exhale, ribs funnel toward the pelvis. Place the hand on your belly. Do it again. Exhale.
Notice that the belly wall does not move. I like to call this the abdominal wall because there's a lot of abdominals that cross each other here. Now try a abdominal breath or a belly breath, or you're expanding. Into your hands. Inhale.
So you're you're not contracting this area. You're allowing the diaphragm to press the abdominal contents down and forward and it pushes out and down. Alright. So that being focused on in your practice, knowing what kind of breath to use for the technique that you want, It's gonna be really important to focus on that costal breath where the rib cage is moving, the abdominal wall is firm, especially when you're doing a difficult pose, like a plank position or a transition to the mat in a sun salutation series. Gonna be really important that you focus on that spinal control and alignment keeping the spine lengthened and supported, and that costal breath will be great to do for that. Alright. Now gonna take this strap and move it down to the low back.
Place the strap around your waistline and find where your belly button is, and then throw the strap back down. Your belly button is right opposite l 3, which is the middle of your lumbar curve, and that's a perfect place to put the strap. Now what we're gonna do is use the strap as feedback for different movements. First, we're gonna do a pelvic arch and a pelvic curl. We call this the pelvic clock.
The pelvic arch and pelvic curl. And you also notice that your head moves with this and just allow that to happen. You're feeling like you're relaxing your back lengthening the muscles on either side of the spine. Alright. Now what I want you to do is think of rocking your pelvis from side to side. And one of the easiest ways to get started with this is to do what we call the side to side motion, and it's just swaying your knees from side to side.
And usually what happens with this is, you know, your pelvis might come up. Maybe it won't. And your rib cage might come up, but just notice what moves when that happens. And now what we're gonna do is kind of refine the movement. We're gonna notice what body parts are moving. Let's bring the feet together.
And I want you to move your knees as one unit. And it's just gonna be a small amount of movement. Place your hands on your pelvic bones and see if you can keep your pelvis still and just let your hip joints move. And this is just isolating the hip movement. So this is gonna be really good if you discovered that you had some stiffness in your hips. Now we're gonna open just one leg out to the side, keeping the pelvis still.
Very tempting to let the pelvis kinda follow and just what I call the tail wags the dog. Right? We want the dog to wag the tail. And open to the other side. And then the breathing that helps with this is usually an inhalation as you open and exhale to close. But I always say breathing is a tool, not a rule. It's you don't have to breathe like that.
You can. Exhale to open, and inhale to close, man mainly being mindful with your breath. Alright. Now we're gonna do a little more complicated movement. I want you to separate your feet. And then you're gonna do that same action of the rotation of the pelvis, but you're gonna keep one side down.
So this is kinda tricky sometimes. We're lifting just one buttock, one knees going forward, You're trying to keep your rib cage still, and just do a small movement. We like to call this the pelvic clock. So before you were moving from 12 o'clock to 6 o'clock. Now you're moving from 9 o'clock to 3 o'clock.
Side to side motion. And give yourself time and patience with this because you wanna do it with a relaxed back. I feel this is one of the best moves to do if you are stiff in your low back and you're trying to get those muscles you can feel in your low back to relax. And then you think of connecting the pelvis to the rib, rib to the pelvis, And so there's this diagonal contraction happening. Alright. Now if you feel like your back is more relaxed, see if you can find some more length Getting your body longer on the mat.
Okay. Now we're gonna challenge ourselves a little bit. And we're gonna see if we can bring the hips into play here and get a little hip mobility Let's bring one leg up to a ninety degree angle, place the hand on the knee, just gently on top of the knee, and then lift the other leg up. So you're holding on to this leg and allowing your other leg to come up. Now place both hands on the front of your knees that if your your knees are painful, you can grasp either behind your knees or in front of your shins, your choice. And then see how far you can bring your knees without flattening your back. Right? So Take your hands behind your thighs if you have a lot more mobility and bring your knees a little wider towards your shoulders. Sometimes your hips are easier to bend that way.
And then take it forward. And, again, bring it here. So it's a lot easier to bend your knees towards your chest with flattening your back. But here, we're trying to keep our pelvis and spine in neutral. Alright. Let's place one leg down.
Sometimes that's easier, and you can bring just one knee towards your chest. And really focusing on keeping that pelvis in its original alignment. Imagining that your hip bones are staying or your pelvic bones are staying parallel to the ceiling. Let's try the other side, and then bring that knee in. And then sometimes you can take your hand and place it in between your pelvis and hip to create some space in the front of the hip.
That can help a lot. Now let's let the other leg come up. Place the hands gently on top of the knees. Let the feet dangle, and just stir your hips in the sockets. I love this one for a stiff or arthritic hip.
And then let's try the other direction, inhaling, and exhaling. Alright. Now the gentle movement is over. Now we do the strenuous movement. And I don't mean to say strenuous, but we're gonna have a little fun with this. Alright.
Now press the low back down. On your strap. And then what it's gonna do is let you know that you're there in a flat back position. And what I want you to notice is do you grip in your hips, or do squeeze your buttocks, because I want you to do it with your abdominals, not those other muscles. So let's see if we can pull the pelvis toward the rib cage keep the buttocks relaxed, you can actually feel to see if your buttock muscles are relaxed and then feel that your neck is relaxed as well. And then tug on the strap.
Keep the tug on the strap, holding the strap down, and then lift one leg. And see if you can maintain that position. And here, we're focusing more on the abdominals with strengthening and pressing the low back down. Alright. Now there may be some of you that have a big curve in the back. What you can do is double up your strap and make it thicker.
So that it it fills up the space better. And now let's press and then tug on the strap. And try it again. And if you weren't successful before, maybe that was the reason. And then let's try touching one foot to the floor and back up.
Other foot to the floor and back up. So I hope you noticed that I am not advocating whether or not you should be in a flat back position or whether you should be in neutral. It depends on what you're working on. If you're working on pelvic stability, hip mobility, especially for vertical postures, you're gonna wanna be in neutral. If you're working on abdominal strength, flat back is usually better, and it can help ease the hip flexors if you tend to have tension in your hips.
Alright. So let's bring those feet down. And now we're gonna change the exercise. I'll remove the yoga strap. And then let's separate the feet. With your feet separated, you always have a lot more mobility in your pelvis and hips.
So for this exercise, we're gonna try lengthening the spine, and then let's articulate up one bone at a time as if we're peeling the spine up off the mat. And then when we get to the top, let's see. Are we in alignment, shoulders, ribs, hips, knees. There are some postures in yoga where we do a big arch in the back This is not one of them because we're working on our alignment for vertical postures and core control. Let's breathe in. And breathe out to roll down through the spine.
I know usually people have a lot of issues with you know, knowing how to take care of their body when they have osteoporosis or low bone density. And they wanna be able to do some spine mobility without being fearful of fractures. So this is a safe spine mobility exercise. That you can do, that you can get that wonderful massage up and down your spine. Breathing in, breathing out as you lift is usually an easier breath pattern, connecting ribs to pelvis, then lengthening that tailbone across the room, like an airplane taking off, breathe in, and then breathe out to roll back down.
Sometimes you have a little kind of ratcheting or sort of cogwheel kind of motion as you roll down, and that will get smoother over time as you practice. Okay. Now we're gonna change the focus of our bridge to more of a stability bridge. Let's bring the feet together. And let's pick the pelvis up. I like to think of it like a lunar liftoff.
You're just going straight up. So that looks really different than what you just did. So we're kinda contrasting mobility versus stability. So picking the pelvis up, and now put it right back down. And you should find that neutral position exactly where you started the beginning of the class and then pick it up.
And down. You'll also notice that with your feet together, you won't be able to go up as high. Your hip flexors will limit you. And then we're gonna lift up. Now for even more stability challenge, you'll stay there and then lift one leg. Like you're marching in place, and you wanna keep your pelvis level as much as possible.
One way to keep your pelvis level is to take that for a stick that you had before and place it on your pelvic bones And then check your altimeter reading and see if the pelvis drops on one side, you'll be able to easily see that. And try to keep it from dropping as you lift the hip or lift the leg. And it's the side of the leg that drops. The one that lifts is the one that drops, but it's actually the fault of the opposite hip. So you wanna strengthen that glute on the opposite side by planting that foot into place lengthening your tailbone across the room so you don't get into that arch position, keeping your spine as long as possible. And you can certainly challenge yourself more by extending one leg and doing maybe that straight leg lift That's gonna give you a bit more long lever arm and a difficult challenge there.
And then place the feet down, And then you can roll down or lower do your linear lift off or linear lowering down? Alright. Place the dowel by your side. And now we'll roll to the side And then I want you to practice coming up to sitting, keeping that length in spine, and you're gonna get in this side swept position, see if you can maintain a vertical spine. And then we'll see if you can keep your hips mobile in this position and do have enough mobility to be vertical in your trunk.
You will be asymmetrical in your pelvis. That is perfectly normal. And then we're gonna switch sides and let's compare. Let's see. This hip is an internal rotation. This one's an external rotation, and sometimes it feels like a different person is on one side versus the other.
Your hips feel very different. And then you can do a sitting in more of a cobbler's pose and sit up tall and see how the hips are as far as how how low one knee is. We'll indicate whether or not one hip is tighter than the other. And just sitting up really tall and maintaining that position. If you feel like you can't maintain the position, no matter what, if you're sitting and you're like this, and you don't have enough hip mobility to be able to get up tall in your spine. Then what you can do is take a yoga block, or a pillow, and you can come up onto that pillow or yoga block, and you got a lot of different options here.
You can sit with your feet in that cobbler position, and that way you can be there for a long of time if you wanted to do a seated meditation. You can also sit in a parallel alignment. Which is my preferred posture. I enjoy that position. And then you can see if your pelvis is in neutral, is your back relaxed, Are your hip flexors relaxed?
Could you maintain that position for anywhere from 5 to 20 minutes? Now we'll transition on to our side So let's remove the block or the pillow if you had one. You're gonna go onto your hip and then to your forearm. And the goal is to try to get there without too much side bending. You don't wanna compress the vertebra of your spine.
So we're gonna lengthen, again, creating space between the ribs and pelvis, take your hand out, and let's lower to the elbow. And this can actually be a really nice transitional movement where you lower to your elbow and then back up, and you're trying to keep that shoulder in alignment. As you do that, keep your spine lengthened. And then we're gonna take our legs out and then slowly bring ourselves to the floor. Now it may be beneficial for you to bring a pillow and put it under your head, especially if you have neck tension or neck pain.
And especially also if you have shoulder problems, the pillow will help to support your head and not put so much stress on the shoulder. Alright. Now keeping your hand under your head, if you're not using a pillow, you can lengthen your pelvis away from the rib cage. And try to get in that pelvic neutral position so that you're you're not in a fetal position and you're not over arched. And you think of your wall behind your mat, or your mat basically has a wall behind it and you're trying to get your buttocks your mid back and your head against that wall, just like you were doing against the dowel. Alright. Now from here, I'm gonna place my hand on my pelvis, And I like to put my hand on the top of my pelvis because if I hike my pelvis, I will feel that.
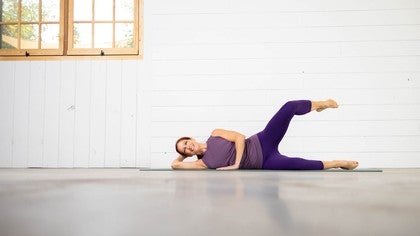
And then imagine that you have a little mouse house under your your waistline, and you're gonna keep that lifted. And then we're just gonna lift the top leg, and you just keep your feet together We're gonna do what I call the clamshell. It's just basically trying to move your hip without moving your pelvis. You're moving the hip and the socket. And do that one more time as you exhale lift, inhale to lower. Now it's a lot less movement than you think you should have because if you rotate pelvis and the spine, you're gonna have a lot more movement. If you just move the hip, you're only gonna have about 45 degrees at best.
Alright. Now let's see if we can do what I call the fire hydrant. I can imagine that you're a dog and you're lifting its leg to water the fire hydrant, but you're keeping that pelvis still. And then let's try this. Stand the leg out and really reach across the room. You can either point or flex your foot.
You wanna reach long through that heel or the toe, And then let's take the leg forward just a little bit. So maybe just a little wider than the width of your mat. And now the trick is to see if you can take the leg back behind you without falling backwards or without excessive rotation forward. So you're trying to maintain your torso position, inhale, and then exhale to lengthen back. And then inhale forward and exhale take the leg back.
Alright. We're gonna do one more little challenge. Let's see if we can extend both legs out, flex the feet, and let's lift that top leg. And we're gonna just do a small reach forward, and you do need to put your hand on the floor for that so that you can maintain your position and not roll forward. And then extend the leg back. Really trying to get that buttock to fire and your hip flexor to lengthen.
One more like that. So that's a little progression that you can do. And then let's take it down. Alright. Now we're gonna go to a prone position. We'll do the other side in just a moment.
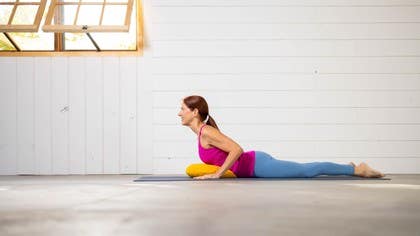
That will go right over to prone, and then place your hands under your forehead, widen your elbows, Draw your shoulders down away from your ears and towards the mat. So you wanna think of bringing your armpits toward the floor. Now feel your pelvis like a little tripod on the mat. I want you to feel like you're pressing your pubic bone into the mat, and then you're lifting up. And then pressing pubic bone into the mat and lifting up. And you might notice that your glutes will contract as you do that.
Your abdominals lift a little bit. Now let's tuck the toes under, of your left foot, And then see if you can just lift your knee off the mat and straighten your leg. Feel like you're lengthening through the back of your leg and lifting. Now let's press the foot into a point and then lower and lift. Lower and lift.
Now if this bothers your back or you feel like it's painful to your back, try putting a pillow under your pelvis and ribs. And what that does is that puts your back into a longer position and decreases some of the compression that you might be feeling if your tailbone is lifting, or you're having a hard time with that. You can also just keep your foot on the floor and practice your knee extension and hip extension working on your pelvic stability and your hip mobility. So we're lifting that other knee Let's do one more like that. Feel that thigh muscle contract in the front as you lift the leg.
Now see if you can keep that leg straight and then point your toe. Press into your opposite pelvis to maintain your position so you don't twist or rotate. And then lower the leg. And lift. That feels good to you. And if not, just go ahead and get a pillow and see if you can put that under your ribs and pelvis and see if that helps the situation.
One more like that, and then Relax there. And now we're gonna roll to our side. Come up to sitting because you'll need to be facing the camera. Right? And then swing around and then go to the other side Now, we're gonna practice that transition from the elbow or the forearm because sometimes the tricep muscle or the arm muscles are not strong enough to push us up from that position. So you can do a few of those to work your side muscle control of your trunk and then your tricep strength to push up.
Alright. Now go ahead and take yourself all the way to the mat. Get the pillow if you need it, and then place your hand under your head. You wanna try to lengthen and relax your neck and get the head back in relation to the body. Think of that wall behind your mat, and you're gonna organize yourself so that your head, your mid back, and your sacrummer against that wall. And now let's rock and roll the pelvis, not front to back, but side to side.
This is your 3 to 9 position here. Lift through the waistline, creating that space under the waistline, stack the feet up, and then lift one knee. And you can place your hand on your pelvis to try to keep the pelvis stationary if you feel it rock back. Right? You'll know because you felt it there. And then taking that knee up rotating the hip in the socket.
Alright. Now try the fire hydrant. And taking it up, lift, and lower. Exhale to lift, inhale to lower, You're welcome to reverse the breath if that's better for you. And lower. Now extend that leg out.
Feel that reach across the room, and then flex your foot or point And then lengthen that side of your waist. You're gonna shorten the side on the bottom, and then you can keep your hand on your pelvis for a moment here. And see if you can hinge at the hip and sweep the leg back behind you without tilting forward or backward. One more like that. Breathe in and breathe out to sweep it back.
Alright. Bring your knees together. And then again, let's press up. And come up to that vertical posture. Use your yoga block if you need to.
Find your best sitting posture. Placing your hands gently across your legs, and then preparing for meditation, sitting at a computer, driving your car, whatever you're doing in that vertical sitting posture, it's gonna benefit from everything that you just did on the mat. You wanna take that mat work and that yoga to life. Thank you so much for joining me.
Empowered Aging: Bone Health
Mention
 |
Sherri B (Teacher) |
|
|
Angeliki H |
Comments

You need to be a subscriber to post a comment.
Please Log In or Create an Account to start your free trial.
