Description
Transcript
Read Full Transcript
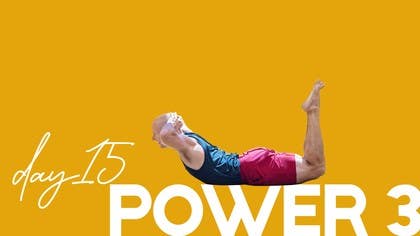
Well, this is an exciting day. This is day 15. We are at the halfway point in our 30-day challenge. We are in day three of the theme of power, and we're going to be working into our pinnacle of backbends in this routine. I have a few props for this routine.
We'll need two blocks, a strap that I've already set for my hip width, and a blanket for the end for really nice shavasana. We're starting in this pose here, vadrasana, and we'll be working into gomukhasana arms. I'm going to grab the strap. We'll be working into the gomukhasana arms that we did in tadasana in our last practice. So we'll start out with the strap in the right hand, bring the strap over the top, and catch with the left hand.
I'm going to turn off to the side here on the left so you can get a little better view of that action. The left arm holds the strap. I pull down with that arm while I raise the right elbow up and back, up and back. So we're doing a little of that pumping action again as we work open the chest. Let's do two more, and then release.
Second side, left hand holds the strap, palm up, we take the strap behind, I capture with the right hand, and we're doing a little pumping. Left elbow, I reach up to the ceiling, and back behind as my shoulder permits. Remember our goal for this particular pose is helping to open up the chest, to draw the mid-back, what's known as the thoracic spine, a little deeper in, to open up the chest. And then letting go, and put the strap off to the side for just a moment. And still in Vadrasana, or any other pose by the way that works for your knees, we'll start by interlacing the fingers behind the back.
Elbows are well bent. We're going to take the hands around the side of the body and try to bring the elbows closer and closer together. This is again another way for us to use the shoulder blades and open the top chest. And we'll bring the hands back and around to the other side. We try to draw the elbows nice and close together.
And once again, first side, but this time before we do, if you can change the interlock of the fingers, so I open the grip, shift the fingers the other way, and we're ready for the first side. Bring the elbows around, or the hands around, and draw the elbows closer together. Squeezing those elbows to roll the shoulders back. And then releasing to the other side, bringing the hands around the body and elbows squeezing toward one another. This is a great pose even just to help if you've been at the desk for a little while, to open up your chest, refresh those shoulders, bring a little energy back into the neck, and then release and let go of the hands.
Let's find a downward facing dog now that we've got the chest beginning to open. This is nice to open up the knees after that pose. Great time to pedal out the legs a little bit. And then let's hold a full downward facing dog. Soft head, soft neck.
Let the heels come high up off of your mat. This again gives us that ability to elongate the spine more freely without any restriction from the hips or minimal restriction. Using your hands, lengthen the spine up toward the tailbone, chest a little closer to the knees. And then heels come down, and come down to your knees, and we'll rest on the tummy. Lengthen the front of each thigh so your hip joint is very open and long and close to the ground.
Point the toes back, hands right alongside your chest. We're going for a baby cobra here, but first, very important is the movement of the sacrum and tailbone towards the heels. We want to roll. You can see me doing that now. Let me just make a note.
It's different from pinching the buttocks together. It's a deeper hip musculature that rolls the sacrum and tailbone towards the heels. That's important in backbends. We don't want to rely solely on the buttocks to do the work. Sacrum and tailbone towards the heels.
Anchor that, then using the hands, a little easy baby cobra. Working those back muscles, lifting the chest. And relax, just for a moment, you can rest your head down. And again, hands alongside the chest, elbows narrow to the body, sacrum and tailbone. I'm doing that now.
You can see that rolling them towards the heels, and then using the back muscles, getting that baby cobra in. Lift the collarbones. Again, elbows squeezed, and release. Building this into our full Urdvat Dhanurasana, full wheel pose. Hands alongside the chest.
Roll the sacrum, tailbone towards the heels. Anchor that in place, using the back muscles again to the baby cobra. Rolling there, elbows narrow, shoulders rolling toward the hips, and then once again, rest. Our next pose will come up to hands and knees for a brief moment. We'll be using two blocks to support and open the chest, lovely position.
We'll start with one block somewhere near the head of the mat and flat, and a second block right here on its edge. This block will be for between the shoulder blades. So I'm going to start with my hips on the ground, knees bent, and I'm going to guide myself down into that block. Let's see how we do here, right in the center. There we go.
And then the other block for the back of the head. Then we can let the legs down. And the feeling we're aiming for here is that the chest is very well supported open. You can take a moment, like in Shavasana, to do a little tuck of the shoulder blade down toward the hip and a little in toward the spine. And I'll do that with my right arm first, and now the left.
I can feel now that that chest is very well supported open. To aid the chest opening, I'm going to use a little help from my feet. I'll bend the knees just a little bit and bring the feet together. Notice toes off the ground. I do a light little dig into the ground and push and slide those heels, and maybe you can even see how my chest is further supported open.
So just taking a few minutes here and allowing the chest to receive the gift of these blocks. As a standalone pose, especially if you happen to work at a desk or doing a lot of work where you're hunched over, this is such a good counter pose to that kind of activity. Lungs get a little stretch. We'll go even a little further now by bringing the arms straight up. We're going to hook thumb to thumb and then take the arms over the head.
You draw the arms as far back as you can, and the activity with the hands is as though we're trying to break that thumb lock apart, but we don't let it separate. This energizes the arms and fully opens the chest. Bring the arms back up and we'll change the lock of the thumb so the other thumb is in front. Again, arms go overhead. I try to break the lock of the thumbs.
This straightens the arms at the elbow and draws the energy open in the chest. By energy, I just mean that the chest is given an opportunity to truly open up. And then bring the arms back down to your sides, bend your knees. We'll turn off to the right side for just a moment and draw the knees a little closer to the chest to take out some of that back bend a little, let the back relax. And then pressing up, we can put the blocks off to the side and we'll take a downward facing dog.
Here we try to keep that same consciousness in the mid-back, drawing the mid-back a little deeper in, moving the chest toward the knees. If you like to help with that, we'll raise the heels. Really gives that freedom of the spine to lengthen. And then heels down, holding your dog pose, and then lower the knees. Once again, we'll collect the blocks to help us in our next two poses.
We'll stand them on end, find your dog pose again, feet together, and we'll step the left leg generously forward and come onto the blocks. Here for this version of Parsvottanasana, take a look at my back leg. My back leg heel is way high off the ground. This allows me to really lengthen the spine. Starting here, we're working for what's known as the concave back.
So rather than a back humping up towards the ceiling, we're challenging getting a longer spine into concave back. Bring the legs back towards the tail end of the mat while I reach the spine forward. Then we take it a little further, same leg shape. I'll bring the right block in a little, and turning into rotated triangle pose. Still strong legs, bringing in a little of that balance element here.
Turn that upper back, and then releasing down. We'll step back, hands on the ground first, your dog pose. Feet together, now right leg forward. Remember to lift your left heel high as your body permits, blocks on either side of the front foot. We engage the legs, and we're working them once again toward the tail end of the mat.
Energize those leg muscles. Stretching the legs into the ground, that's that earth element. And then the power of the legs to help us reach for the concave spine in Parsvottanasana. Then taking a little further, we'll bring the left block in closer, and we're turning for rotated triangle pose. Back heel is still well lifted, we get that balance challenge, and I'm turning the spine toward the right side.
One little tip here is to roll the back body down toward the yoga mat, the back toward the yoga mat, and then hands down. We'll take our downward facing dog, and then knees to the ground. For our next pose, we'll only need one block, and we're working toward a full elbow stand. So we did the leg reaches in our first power series, we did the jumps in the second, and now we're going to give it a challenge for a full pose. We'll start with the hands around the block like we've been practicing, forearms shoulder width apart, raise the knees, and walk in.
Remember, we're working on keeping the shoulders up and back away from the block. So we can either work on doing a little bit of bouncing, or challenging the possibility of coming up fully into the pose. We'll see if we can make it up today, close, and coming down and rest. Take a little pause, it may happen today, it may happen tomorrow, just keep practicing. Inside hands down around the block, lift the knees, walk in, second leg up, and we can either do some hopping, or, oh close, see if we can make it all the way up today, close.
Tomorrow is our day, rest in child's pose. Take a few breaths, and come on up from your child's pose. Let's put the block off to the side, we will return to a tummy down position. As we continue to deepen our back bend, working towards Urdhva Dhanurasana, we'll be in locus pose to start. Stretch the front of the thighs so that your front hip is open and long, and down onto the floor.
Legs together, arms along the side of your body, palms face the ceiling. We'll start with an inhale, lift the chest, shoulders, and hands from the floor, and bringing the legs up. Remember that sacrum and tailbone movement toward the heels. Holding your locus pose, Shalavasana, rest. One note in back bends, it's common for the legs to turn outwardly so the thighs point out.
We want to work to bring the inner leg up as fast as the outer leg, to help not to pinch the lower back. Let's do that version one more time again. Arms alongside, raising up the shoulders and chest, sacrum and tailbone is moving toward the heels. Lift the legs, inner leg and outer leg working the same amount, holding there. And resting down.
We'll add a little challenge by bringing the hands underneath the forehead. Legs together, bring a little consciousness to the inner edge of your leg, and we'll lift chest and arms, and the legs, working that sacrum tailbone energy, that helps keep that low back nice and long, and rest. We'll add one more challenge, that is arms long. Ready, thighs together, lift the chest and arms, inner and outer leg lifting, holding five, four, three, two, and rest. From here, a side locus pose, and I'll do this side so you can see my back first to see how I'm turning onto the shoulder.
I'll bring my left arm alongside the body, feet together, my right arm just alongside the chest. We'll start just like before in a locust, and I turn onto the left arm. Here I'm rolling that left shoulder blade closer to the spine, and then an element of balance. Bring and looking up, hold, and release. Fun pose, great to start working into the back poses, the back bending poses.
Let's try the other side, right arm alongside the body with palm down. Left arm is here to help push. I lift up the legs and chest, turn onto the right shoulder, and the balancing. By turning, I'm rolling my right shoulder close to the spine. This opens the chest.
Turning and looking up, legs lifted, holding, and then land softly. One more pose in this locust challenge here is makrasana. In this pose, we interlock the fingers behind the head, bend the knees, and inhale and lift. Challenging for the back muscles, lots of power in this pose. Elbows wide, elbows lifting, and attempting to look forward.
And coming down, let's rest down. Push your head, relax the back muscles. If you like to wiggle a little left and right on the floor to release those back muscles, that helps. And then hands alongside the chest, let's push up for that easy cat and cow sway left and right. Take your time, slowly working into the back, allowing those muscles to release.
And then we'll come into a kneeling position. We've practiced this before, the camel pose, ustrasana. We'll do a single-sided version, and then we'll go to the full camel pose, starting with the left arm. We'll curl the toes under, sacrum and tailbone down, that's important for the lower back. Start by lifting the chest and bring in the left arm, left hand to left heel.
Square the chest to the ceiling, right arm up. You can turn the palm and reach over for a little added extra lift, sacrum and tailbone down, and inhale, come up, point the toes, relax. Second side. Kneeling position, tuck under the toes, lengthen the low back, tailbone down. And lifting the sternum, we'll bring the right hand to the right heel, lifting the chest, left arm up, squaring the chest, bring that right side chest a little higher up, and then left arm over the head if you like, and then inhale, come up, point the toes, relax down.
Come up once again into kneeling, tuck the toes under, and now we do the full camel pose version. You can use your thumbs to help guide that tailbone down. Lift the front of the pelvis, sternum up, and we're going for our full camel pose. Hands to the heels, press the heels, continue taking the tailbone down, lift your chest, holding here. As you feel comfortable letting the head drop back, chest continues to lift, and then inhale, come up, have a seat, and just relaxing here, letting the back settle before we go into our Urdva Danyarasana.
From here, we'll go on to our back, but it's a great time for you to grab your strap, and we're looking for a strap that is hip width. I'll place the strap around the knees. This helps us keep the legs from splaying open, same reason we use the strap around the elbows in the previous session, so the elbows don't flare out wide. We want to keep the hips, the knees rather, hip width. We'll start with the hands alongside the head, and if you like, you could watch me guide the first one.
We'll go to the prep pose first. Inhale to the top of the head, reorganizing the hands as needed, lift the chest. Then if you're ready to take the full pose, inhale, pressing up, and then coming down, tuck the head, and settle. And then joining me on another round, we'll take the hands alongside the head. Ready for prep pose, inhale, come up top of the head to the mat, reorganize the hands, and lift the chest toward the ceiling.
Inhale to come up, holding, breathing, and coming down. Take a pause for a moment, recover. Let's do one final Urdhva Dhanurasana together. Place the hands, fingertips pointing toward the shoulders or slightly out to the sides. Breath in to the crown of the head.
Pause there to reorganize. Lift your chest, and then we come up together on an inhale, lift, legs and arms pressing. Hold your pose, breathing, five, four, three, two, and coming down. Tuck your head a little, landing, rest. Let your body go for a minute.
It's nice to have the strap around the legs because you can let the leg energy relax, the muscles to be soft. Let your back relax into the floor. Let's do a few recovery poses, some counter poses. We'll take the strap off the legs, you can put that off to the side, and a few windshield wipers left and right. Let your legs fully release side to side.
Women is soft, this rolling action is to let the muscles release away from the spine. Bring your feet together and knees into the chest. Take a moment to let the back continue to relax before you go any deeper. Take a nice big breath in. Now slowly nose to knees, and then release.
And turning to your side, we're going to do a gravity assisted counter pose for back bends. Feet mat width, and straight legs helps with this. If you need to bend the knees though, you go ahead. We're going to take the body right in line with the left leg, and gently turn the chest into the leg. We don't stay long, second side, bringing the body in line with the right leg, and turn the chest into the leg.
This is just like the cross legs sitting that we did to release the back in the last few practices. Back and forth, it's about a breath or two per side. And I'm rolling, if I go to the left leg, I'm rolling my right side chest into the leg. One more time, going to the right leg, I roll my left side chest into the leg. So nice to have gravity help us with this.
And then coming to center, we'll come back down once again, now that the back is nice and released, and lie down. We'll take one moment in Karnapirasana to further release the back. Hands along your sides, knees into the chest, roll up, hands support the back, do a little tuck of the shoulders, and drop the knees into the chest. If you like to cross the ankles, it's a nice way to hover, let the back round. If the body will relax enough, you can let the knees perhaps all the way to the forehead.
And then unfurl the legs, support with the hands, release down, and it's time for Shavasana. So let's take a moment to extend the legs out, one by one. Little tuck of the shoulders to support, open the chest. All that great chest work we've done. Make sure the low back is long, soft, relax the legs.
Open the energy out of the feet, let them become very passive, hands nice and soft. We've done great things, 15 strong challenges. Thank you.
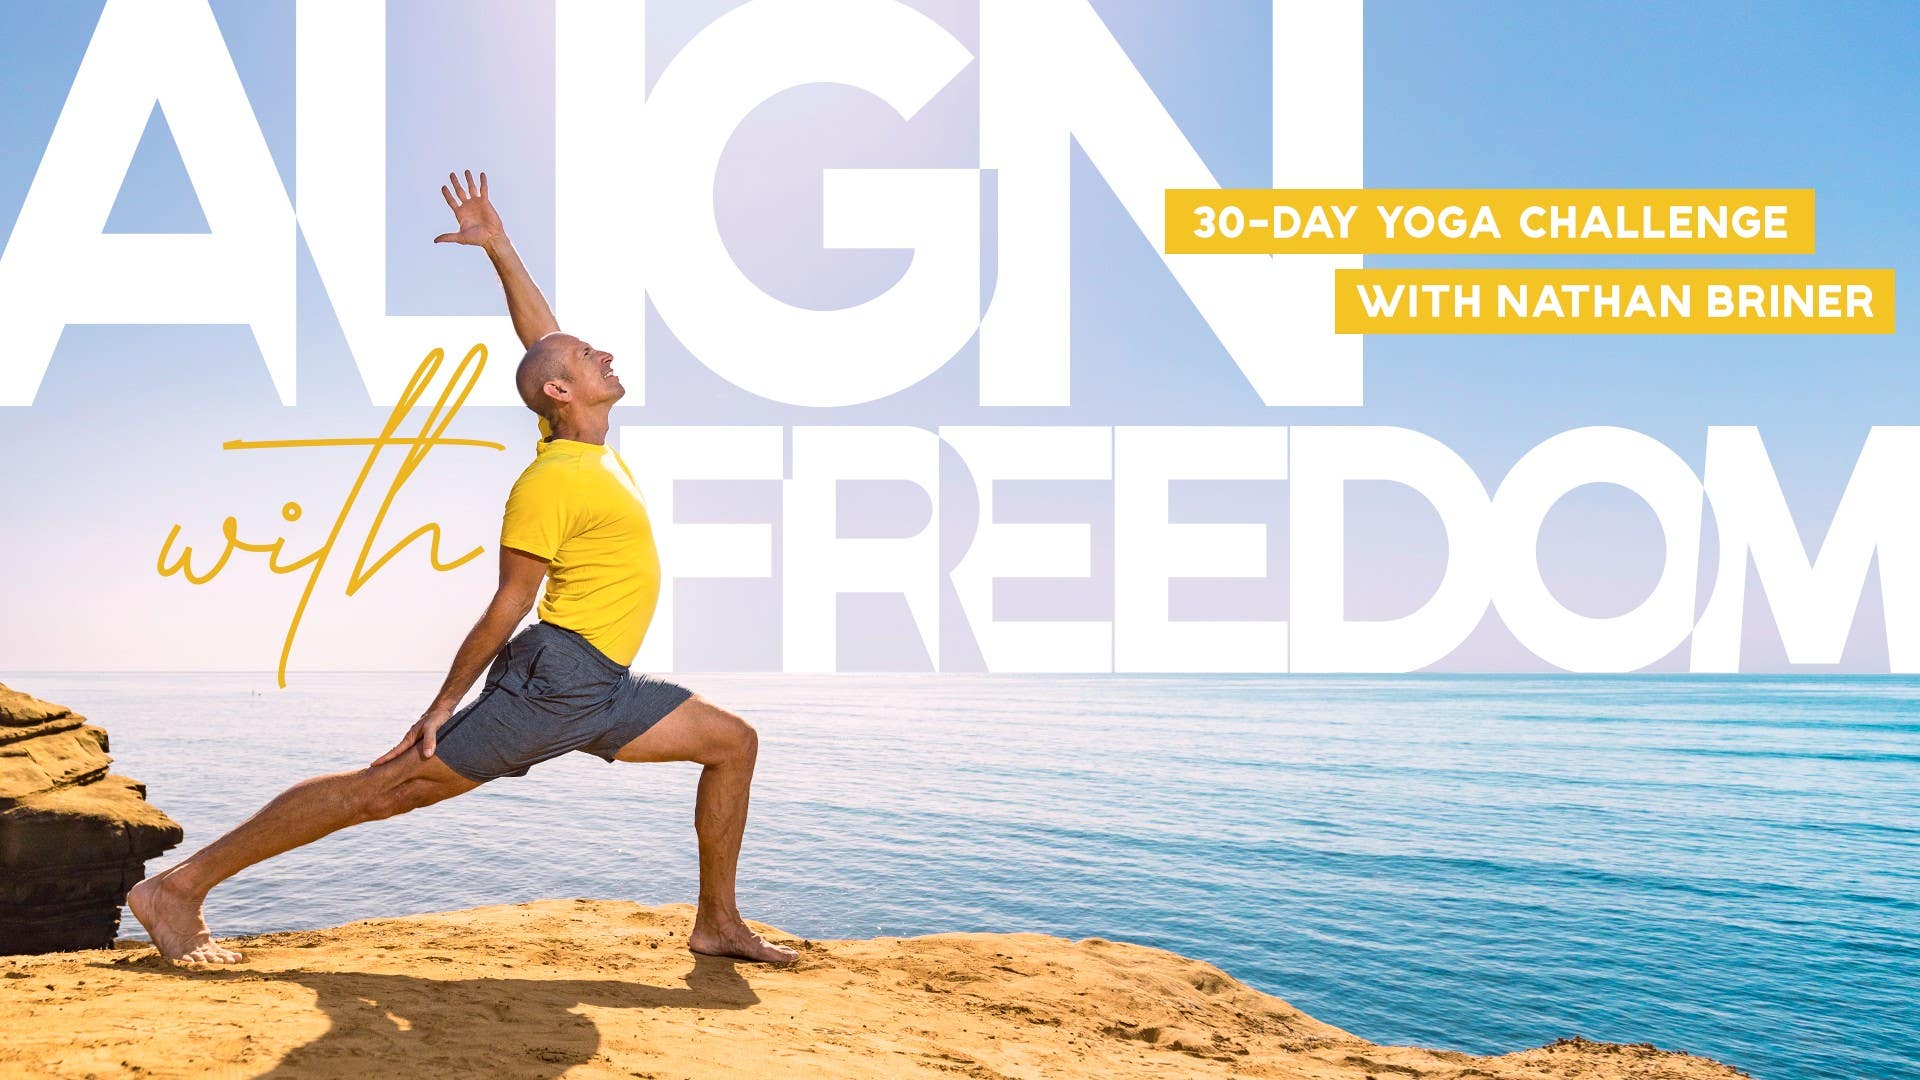
Align with Freedom: 30-Day Yoga Challenge
Mention
 |
Nathan Briner (Teacher) |
 |
Rachael D |
|
|
Elizabeth H |
 |
Sandra Židan |
|
|
Lili C |
 |
Laura M |
 |
Caterina C |
 |
Rosanna S |
|
|
Michele S |
 |
Meagan P |
 |
Christine D |
 |
Matthew |
|
|
Anne S |
 |
Szilvia K |
 |
May R |
|
|
Ibrahim G |
|
|
Jean C |
 |
Catherine R |
|
|
Charlie S |
 |
Christel B |
|
|
Tracy S |
|
|
Mandi G |
|
|
GIGI A |
 |
TS |
 |
Kate M |
 |
|
 |
Jenny S |
Comments


You need to be a subscriber to post a comment.
Please Log In or Create an Account to start your free trial.
