Description
About This Video
Transcript
Read Full Transcript
Welcome to day two of our 30 day challenge. Great to have you back. We are in our second routine of our strength theme and we're going to be building on what we did last time and adding some new ideas and concepts. We're going to start once again in a child's pose. So let's take our spot on the mat. Feet together, knees apart and just one note with child's pose. As we come into child's pose, sometimes it's common to see folks, students to lift their buttocks very high and really push down on the hip hinge. For this version, I'd like you to let the sits bones sit down toward the heels, almost rounding the lower back a little bit so we have some space in the hips. This is working a little on the theme that we finished with last time. Let your head down and if by chance your head doesn't go down easily, placing a block underneath your forehead is a nice solution to that. Oftentimes people feel it's too much in the shoulders. So this helps you get into the pose without any discomfort and I'll rest with the block version today.
Take a few minutes to check in. Anything grabbing your attention in your body you want to pay attention to through our practice. Is the mind quiet? Is the mind racing? Take a few deep breaths. And then we'll move ourselves into a cat and cow position. We can put the block out of the way, hands and knees, and let's start with some spinal movement. Cat cow. Inhaling to drop the spine, exhaling to lift up.
And just check in with your body today. You might notice as we progress that you start to feel more motion happening at these spinal joints. Inhaling down, exhaling, round the spine up. Let's do one more. And last one, exhale. And then come to a level spine. We're going to work once again with this low bird dog. We'll take the left arm forward, right leg back, touch the arm and leg to the floor and really energize the muscles of that back leg.
Lift your front ribs and navel, breath in. Exhale, lift the opposite pair. Just an inch or two away from the floor. This helps us focus on the core work. Three, two, and one. Let down. Second pair. Reach the arm and leg out, really charging up those leg muscles. Keep the knee fully straight. Ribs and navel up. Inhale, exhale. Here it comes. A little lift. Holding there. Breathing. Three, two, and one.
Bring it down. First pair again. Left arm forward, right leg back. Make a nice strong back leg. Big breath in. Exhale the ribs and navel up and lift. Just a few inches. Now maintain the ribs up, navel up, and slowly lift the arm and leg a little higher without losing that core control. That core position. Two and one. Release down. Final side. Here we go. Arm and leg reaching out. That helps us get everything set and ready.
Breath in. On the exhale, lift the navel and ribs. Lift the leg and arm just a few inches to start. Feel the steadiness of the core hold and bring up the arm and leg just a little bit more without releasing the ribs or navel. Holding. Three, two, and one. Bring it down. A little bit of cat and cow variation now. Side to side movement of the ribs. Get some freedom back into the muscles and joints. And now we go to our double knee lift. Tuck the toes under. We're going to add a little bit of heat to this.
Big breath in. Exhale. Knees come up. Hold the ribs and navel in. Holding steady here for five, four, three, two, come down. All right. That's our first one from our last session. Now let's add a little something to it. Big breath in. Exhale. Ribs and navel up. Two knees up. Here's the challenge. Pick one foot up from the ground just a little bit. Five, four, three, two, and one.
Really shake it out. Move it out. Let the blood flow. And here's our second side. Final time. Big breath in. Exhale. Ribs and navel up. Lifting the knees. Let's hold. Ready? Second foot up. Just hovering off the ground. Five count. Five, four, three, two, and one. Let it go. Relax the legs. Relax the spine. Breathe it out just a little bit. And then let's find our downward dog position. Walk the hands a bit forward shoulder-width apart.
Raise up the knees. Today, again, I'm going to be showing the bent knee version of dog pose. If you feel the straight leg version is fine for you, you go ahead and take that pose. But again, bent knees really helps everybody get a long, long spine. Helps to open up the lungs. Helps to learn the hip hinging action that we do in so many poses in yoga. Let the head and neck relax down. Take a few deep breaths. I can already feel the heat building up in the legs here as I hold this pose.
From our downward dog, let's move into a kneeling lunge. Step the left foot forward today. We'll drop the right knee down and point those toes back. We'll start with the hands on the front knee and just a couple of times, like we did in our earlier session, we're going to move the hips in and out, forward and back. Just helps us warm up all the joints, get everything ready for the deeper move. We'll hold into a little bit of depth here. This time, we add a twist.
We'll take the right hand down just to the side of the left foot. And using this left hand, we're going to start to turn. And it's not just the shoulders that turn in this twist, but all the way down from the navel area, we're going to try to revolve up. Press firmly down on that right arm into the floor, left arm straight up. Depending on the comfort of your neck, you might look straight ahead, down to the floor.
Or if it's available, go ahead and turn that neck. Use your neck muscles to look up. Let's hold. Five, four, and release the top hand down. Curl the back leg foot, right toes under, and now we're in a full lunge. We're using this lunge to begin to work the muscles of the back leg. So we want to tighten up the thigh muscles, lift the knee joint, the thigh bone, and even the right hip up so you feel fully supported into the abdomen.
Let's hold here, working on the strength of the legs. And then step it back to your dog pose. Bent leg or straight leg, whatever is working best for you, will hold here. You might feel the difference between the two hips. How have they changed since the last pose?
And then second leg, we'll step forward, right foot. Drop the left shin down, point the toes back. We'll have the hands on the front knee and a few times, forward and back. Warming up the hip joints. Take a few deep breaths.
We'll hold in and then bring the left hand down to the floor, just to the side of the right foot. Using your right hand again, use it to help begin your twist. You might take a few breaths. Remember turning not just from the shoulders or ribs, but all the way down into the navel. Press firmly down on the floor hand, left arm, and raising the right arm up.
Here again, choose a neck position that works for you. Challenge yourself, though, see how it works to look all the way up. Couple deep breaths. And then releasing the hand down to our full lunge on this side. Curl the back toes under, left toes under, and lift that back leg.
Here again, the challenge, we want to firm the kneecap muscles, firm the thigh muscles up, actually physically move it up, and the hip joint move up a little. In other words, we're not hanging down on the joint here. We're supporting the muscles up, the joint, the hip, the abdomen. Holding there. And we find our dog pose again.
Bent, knees, the one I'll show. If you want to go straight legs, please do. Here again, check in with the hips. It's so important in yoga to feel your body, what's new, what's different. And then from here, walking forward to the front of the mat into Uttanasana, or half Uttanasana in this case, hands on the shins again, and let's practice that nice long spine action.
For some, it might be easier to lift up even a little higher. That might work better for you to get that long spine action. If it's okay for you to go to shins, go to shins. Holding here, strong thighs, using the same energy we used in the lunge to firm the leg muscles against the bone. And then inhale, come all the way up.
Our next pose is chair pose, and we're going to move a little deeper into this version today. Instead of the arms out, we're going to point the arms and fingers straight down to the floor and challenge touching all the way down to the floor. This is a deep hinge. We're going to go for ten. Here's two. Let's get a little breath with this.
Exhale down, inhale up, exhale down, and up, down, and up. This hinging action of the hips and knees of the squat is one of the most functional movements that we can do in the human body. So good to practice and work on this depth. Now let's get one more, and coming up. And if you weren't able to touch the floor today, keep practicing, it will come.
We're going to go into wide legs, feet pointing straight ahead, and arms out. Here we're going to practice the rooting concept again. We press down through the legs to feel that inner lift. Take a minute with this. Stretch out the arms, push down through the legs from hip to heel until you feel that light little, I call it like helium, there's just a little inner lift in the body.
Spread all four limbs away from the center, all five fingers away from the center of the hand. Good, and then release the arms. We're going to find our goddess pose again. When the heel's in, toes out, let's bend down. We'll start with this version here, feeling how it feels.
And by that what I mean is check in that your feet are turned in such a way that you don't feel any own undue strain at the groins or at the hips. Okay, come back up. Let's challenge it with a new arm position today. Arms straight up, big breath in, here we go, down into the pose. And let's hold for strength.
Ten count. Breathing. Yeah, I can feel the heat already going in those legs. A little bit of shaking going on in those legs. Three, two, and come up, release the arms.
We'll keep the legs as they are, but let's shake them out, get the blood moving again. All right, next pose is the twist from goddess. Come on down, hands on the knees, on the insides of the legs. And once again, we're going to do our little twist of the chest. One side, twist of the chest, second side.
Here I'm using the hands to help keep the knee open and back for that additional inner leg stretch. One more each side. Gets us ready for our next pose, warrior pose. But let's stop in a tadasan, mountain pose just for a second and find that inner lift. Stretch down through the legs, squeeze the legs in toward one another and look for that inner space.
Let's even engage the arms as an expression of that inner space. Good, then wide legs, shooting for warrior two here. Left toes in, right leg out. All the things we were working on last time, thigh, knee, and foot alignment straight ahead. Stretch out your arms, big breath in, let's go for it.
Three times, we'll go in, out, exhale in, and out, we're challenging that deep hinge of the right hip. We pause on this one, energize the inner leg muscles here up against the bone so you feel very supported. If I drop that, you see I drop into the hip and it's too much on the hip joint. Keep that energy in the inner leg muscles. Turn and look over your right hand, let's hold it.
Like before, reach all four limbs, two legs, two arms away from your center and then release, arms down. Let's go to the second side, right toes in, left leg out 90 degrees. Stretch out your arms, big breath in, three times, exhale for one, two, exhaling into three. Keep that inner thigh musculature nice and strong there. Good, we're learning to fold deeply at that left hip.
Stretching out your arms, all four limbs reaching from the center of your body. One more nice big breath. You can feel those legs working. Straighten the legs, heel toe, heel toe, release the arms, shake it out. We're pausing, tadasana, reaching down through the legs.
Look for your inner lift. A little squeeze of the thighs together and then the arms are an expression of that inner lift. From here, paarsvokanasana, side angle pose. We're going to take it a little deeper and to help that, we're going to bring a block into play. We'll take the legs out wide, left toes in, right leg out and we're going to place a block just to the inside of the right ankle.
Stretch out your arms. Take a big breath just like warrior pose. We're going to bend in, pause, inhale and exhale. Today, we're going to take the hand to the block, right hand down to the block, left hand, let's just leave it at the hip for now. If you feel that's too deep, you could rearrange the block at a different level or go back to our first practice of forearm on the thigh.
I'm going to show with the block today because we get an added benefit of the block. I push my arm, my right arm against the leg. This helps me create the alignment we were working on in the previous routine. So knee aligned with the three middle toes. Right buttock forward or into the body.
Let's take a full pose here, side angle. And then we take this alignment smoothly into triangle pose. I push my right foot into the floor and slowly press the entire body back and straighten the right leg, triangle pose. Holding here, very firm legs reaching each leg into the floor to help open the chest, open the spine. We'll bend the leg to come out of the pose, inhale, bring the block with you, come up, turn the feet in.
Let's do the second side. Right toes in, left leg out, we'll put the block down, ready for the pose. Stretch the arms, nice strong rooting into the floor, big breath in. Exhale, bend the knee, we'll hold there for just a second. Breath in, exhale your way, side angle.
Let's start with the right hand down on the hip for a second so we can work on the energy of the leg and arm. Pressing that left arm into the left leg, opening the knee, helping us to push the left buttock forward this way and see the response that that has in the chest. All that space. Holding there, take the top arm up. A few deep breaths.
Feeling into your pose, feeling the things that you're liking, feeling the things that maybe you're not quite liking so much that we'll work on over time in our challenge. To triangle pose, pressing the left leg into the floor, pushing the entire body back. I challenge the straightening of that left leg. Again, you could adjust the block if that's just too much on that hamstring. We're holding.
A few deep breaths. Still here, left buttock in, chest turning up. And then to come out of the pose, bend the knee again, bring the block with you and come up. Heel toe the legs all the way together, and we'll take tadasana for just a moment. Pressing into the floor, catch your breath.
Let the brain settle into that inner lift. Great. Let's put away the block. We'll come to the front of the mat again. And a deep chair pose challenge. Using the new arm alignment, stretch the fingertips down.
Big breath in. Exhale as you come down into your chair pose. I challenge you. Can you touch the floor with those fingertips? You can do the best you can, but we'll pause here.
Front ribs a little in, tailbone rolling a little bit down. That makes space in the low back. Ten, nine, breathing. Chest lifting. Two and one.
We're going to straighten the legs. Hands on shins for half uttanasana, forward fold. Here's my new challenge for you in half uttanasana. We're going to bring the hands to the forehead. This adds a little extra power and strength into the hamstrings.
Long spine. Hip muscles working to hold our position. Three, two, and one. Hands down. Step back to your dog pose.
I'm going to go with bent knees again so we can get that nice, long, long spine. Dare to bend those knees a little more than you think you ought to today so that the hips are totally free. Spine can elongate. Take the last few deep breaths in your downward dog. Head and neck are soft, strong arms to support that spine.
And then bring your knees down. Let's do a few cat and cow just to test out that spinal movement. One more time, up and down, exhaling, spine goes up. And then leveling your spine, do a little side to side. This is kind of a tricky action for the spine to learn.
Side to side, ribs push to the left and right. And it's like wagging your tail. Great to get all the directions of the spine involved. And then from there, we're going to take a seated cross legs position and I'm going to be using a blanket and a block to help me in this twist. I use a blanket so that my spine can be free to lift without any hindrance.
So I'll start in cross legs and you can see, just being on that blanket, I've got all kinds of space to work with here. So we'll start by raising up the arms, getting even more space. Here we push down through the buttock bones to root to the floor to find that inner lift. Press the buttock bones into the floor blanket and then we'll turn to the right side. We'll bring the left hand across the opposite leg.
A block is there for us to twist. Take a nice deep breath in and turn around to that right side. Now in twists, usually the shoulders are the easiest, most obvious thing to move. More challenging is to move from the organs here, the abdomen, the navel area. So as you breathe, can you turn that lower abdomen area almost as though further than the shoulders?
You're not trying to compress or harden the abdomen and it's something that grows, our ability of this grows over time. Broad shoulders, long wide neck and then release. Let's move the block to the other side and we'll make some space. Press down through the buttock bones and lift up those arms. Make some space for your spine to turn.
Nice big breath in and we'll turn to the other side. Right hand across, left hand on the block and turning. Again, the shoulders turn fairly easily. Can you begin to turn more from the abdomen, from the navel area? Long neck, wide shoulders.
And then release to center. If you're using a blanket underneath you, we can send that out of the way. But I'm going to keep the block and grab a strap. I'm using the block today to show how, for some, it might be easier to do the next pose we're working with by placing it underneath, in this case the left heel, straight leg and the block under the heel. And by lifting the leg up a little bit, it gives a little greater freedom for the lower back and it makes it a little bit easier for those with stiffer hamstrings to work into this pose.
We'll put the strap off to the side for a second and repeat what we learned in the previous lesson of pumping the hip in. Let's do just three. Breath in, breath out. Remember, if you're feeling any pinching in the front of the right hip, you're going too far into the pull or your low back is remaining too rigid. Let that release.
And then grabbing your strap, we'll open it up and place the strap around the bottom of the right foot and work on straightening the leg. Depending on the mobility of your hamstrings, straight might be quite a bit farther down or it may even be quite a bit more up. What we're going to shoot for is a 90 degree leg for today so that we can focus on the firming of the quadricep here. Tighten the quadricep, firm that knee joint. And you may find that you can tighten it for a second and a half, then it lets go and then you have to reaffirm that tightness and reaffirm it again.
The leg down at the block or in the floor, left leg, press it firmly so you can feel very stable. It's our way to root down in this pose. Abdomen should be soft here, legs alive with energy. And then we'll bend the right leg and we'll switch out. We'll move the block over for the other leg, heel right up on the block, set the strap off to the side for just a second, and we'll do a little bit of pumping work on the left leg.
Breath in, breath out, three times. One, two, three. We'll grab the strap, strap around the bottom of the left foot, bring it up, create that firmness around both legs. Right leg pressing into the floor, left leg firm around the kneecap, abdomen soft. One more little squeeze, that left quadricep.
And then release. And we'll put the strap off to the side, block as well. Let's start with bent knees. Lengthen your lower back by reaching the buttocks down away towards the heels. One leg down, second leg down, arms out, and a little tuck of the shoulder blades.
Slowly release your legs away from one another. Let your attention inside scan through your body for any unnecessary tension. And let all movements settle into stillness. One, two, three. And as always, if you want to stay a little longer in your shalasana, please, please do.
We'll finish our session today by bending the knees. Turn softly over to your right side and support your head with your arms. And leave the eyes closed. And press your way slowly up to sitting. And we'll pause there for one final reflection.
Great job today. Nice work in round two. We will see you in the next section as we work a little further into strength. Have a fantastic day.
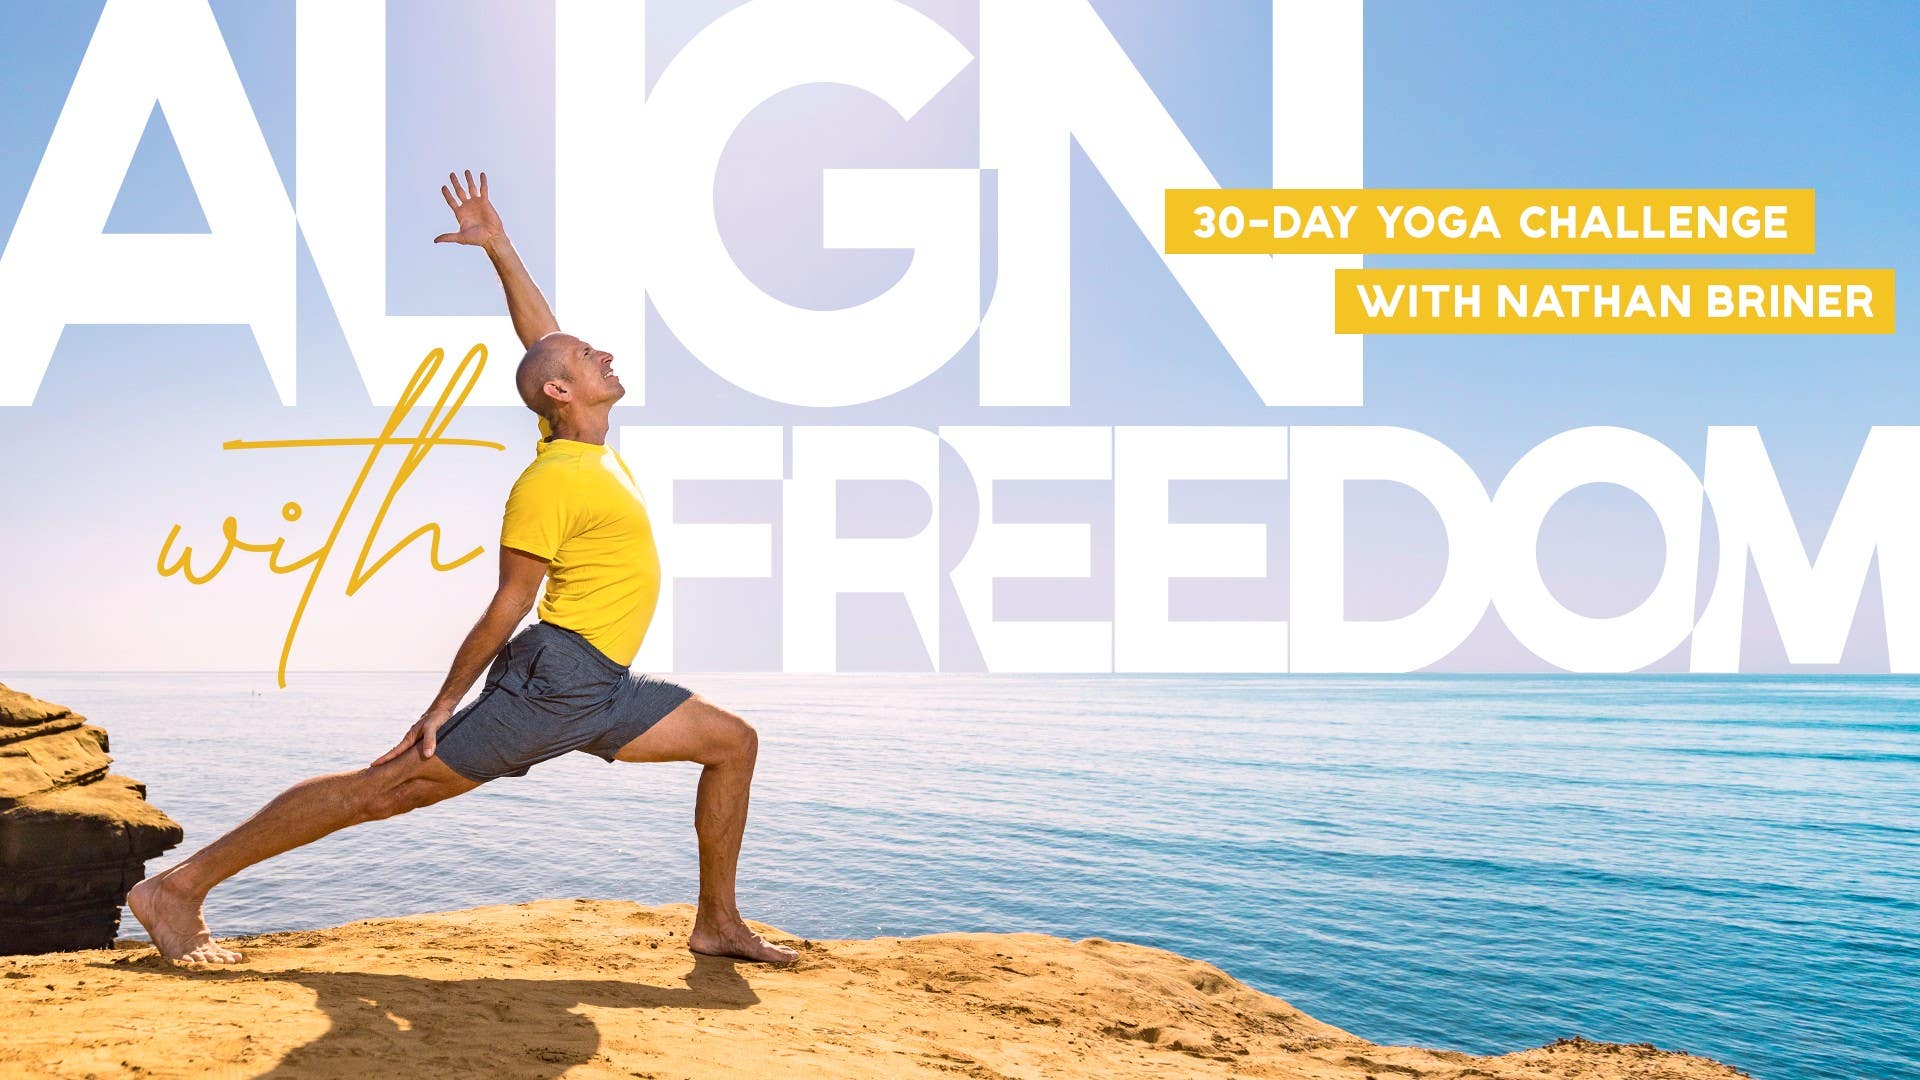
Align with Freedom: 30-Day Yoga Challenge
Mention
 |
Nathan Briner (Teacher) |
 |
Sandra Židan |
 |
David G- |
 |
Michelle |
 |
Elizabeth H |
 |
Rachel S |
|
|
Brenda S |
 |
Nancy W |
 |
Rachel B |
 |
Rosanna S |
|
|
Fabian H |
|
|
Lisa D |
|
|
Ibrahim |
 |
Louise O |
|
|
Asli Y |
|
|
Deborah G |
 |
Timmie H |
|
|
Carol Y |
 |
Megan M |
 |
Kate M |
 |
Matthew |
 |
Comments


You need to be a subscriber to post a comment.
Please Log In or Create an Account to start your free trial.
