Description
About This Video
Transcript
Read Full Transcript
Welcome back to day five of our 30-day challenge and before we get into our routine I just want to give you a huge acknowledgement for bringing out your mat yet again and coming to practice. This routine we're going to be doing a little bit more core work adding in some strong standing poses and introducing a little bit of back bending today. So let's get started. I'm going to start down on our back and just take a moment to check in. Relax a little bit. Let go of the things in your day or the things to come in your day and check in with how the body's feeling. How is your breath moving? We'll start by drawing the two knees into the chest. Wrap your hands around the front of the knees and we'll just pause there take a few more breaths. We'll take a nice big breath in. As you exhale lift up your head as you bring your nose to your knees and pause there. A little abdominal squeeze and then release back down. Breath in. Exhale. Head comes up, squeeze with the arms, work with the abdomen and release back down. Two more. Inhale. Exhale. Up and hold. Can you breathe in this coiled shape? And inhale. Exhale. Draw the knees toward the chest. Lower abdominal squeeze. Nose right into those knees. Hold. Three, two, one and release. Let the legs down for just a second. Take a recovery breath. Now we're moving into our bent knee spinal twist. We'll take the arms out of the sides, palms up. Bring both knees into the chest using just the abdomen and leg power. We'll be going to the left side first. Take a breath in. As you exhale, two legs glued together over to the left side. Use that lower abdomen and try to draw the knees into that left armpit. Hold there. Knees and legs hovering. Right shoulder down. Then return to center. Take a pause. We'll leave the knees close to the body. Big breath in. Exhale. Legs over to the right side elbow. Keep those legs glued together. If they start to come apart, that means you're going too far for today. Holding there. Three, two, one. Come back to center. Breath to recover. One more time each side. Big breath in. Exhale. Lower abdomen squeeze to hold the legs close to the body. Turning over. Left side. Legs together. Three, two, and one. And last one. Big breath in. Exhale. Legs together. Knees over toward that right elbow. Remember to keep the left shoulder glued to the ground. Three, two, and one.
You can already feel that heat in the body coming on. Let the legs down for just a second. Take a few deep breaths to open the abdomen. And now we take it one step deeper today. Once again, knees into chest. And this time, right leg straight up into the air. We are gonna glue the legs together once again. Big breath in. Exhale. Over towards that left side as though you're gonna put right foot in left hand. So that's way over there and up there. Holding for three, two, one. Release to center. And second side. Here we go. Leg up. Strong straight leg. Big breath in. Exhale. Lower abdomen holding the legs tight to the body. Legs together. And all the way over toward that right hand. Holding three, two, one. And release the legs down. Relax the abdomen. Take a few recovery breaths. That's some deep core work right there. Let's move now over into Cat-Cow for a little spinal movement. Exhale. Spine comes up. Inhale. Spine goes down. So we can utilize that core strength that we've been building over the last few practices to help mobilize the spine. And we can use the down position, the cow position, to open up the abdominal muscles that we just used for the spinal twist. Come to a pause in the middle. Walk the hands a bit forward. Tuck the toes under. Let's lift up into a dog pose. Pedal your legs for just a minute. Get the legs ready for the deeper work we're gonna do today. One leg at a time. Little knee bend. Other heel presses into the ground. And then high heels. Lifting those heels as high as you can. Strong straight arms, long spine, and a deep hinge at the hips. And then stretching the heels down. Remember, if you need the bent knee pose that we worked with in earlier practices, please do. If you can straighten the legs without arcing up the back, rounding the back, challenge that deeper dog pose. Alright, let's get into a little bit of movement. High heels. Inhale. Look forward. Exhale. Left foot between the hands. We're gonna start out with a high lunge here. And working in some mobility for the hips. Let's start by charging up the right leg, thigh muscles, kneecap, and hip area. Once again, so we're not sinking down into the hip and ligaments. We've got a nice strong support there. Take a few breaths. Long spine. And then send that left leg back. Come into a plank. If you would like to go down to knees for your chaturanga, you can. Or if you're ready to challenge and knees off, let's do it. Big breath in. Exhale. Come down to your controllable depth and pause. Our first upward dog together. Here we go. Curl over the tops of the feet. Long straight arms. Lift your back. And then curling back over the toes. Downward dog. Exhale. High heels. Look forward. Right foot this time between the hands. Charge up the left leg, kneecap, thigh muscles, hip area lifted, abdomen feeling supported. Take a few breaths here. Feel that strength in your body. Long spine. Shoulders and neck. Long. Wide. Let's challenge the vinyasa flow again. Step back with the right leg. Big breath in. Choose knees or lifted legs.
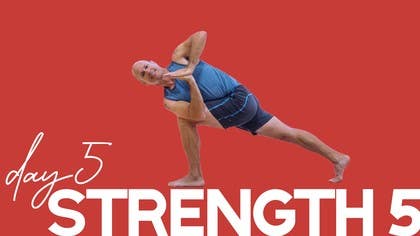
Exhale. Coming down. And then up dog. Strong thighs. Just like the lunge. That's why we practice that first. And then pulling back dog pose. Going back to left leg again to lower the right knee down. This will be a kneeling lunge and we're taking a new version of the kneeling lunge today. We're going to be crossing over. So we're going to start by doing a little bit of a turn and hooking the right elbow across. Using this hand, left hand, and that right elbow, lift up a little. Turn. Lift up a little bit more. Turn a little deeper. We're going to go prayer position right here. So it's nice to think, yes, rolling up the chest but also rolling the back of your body down towards your yoga mat. And then release. Come out. Step back. Let's go through that vinyasa. Exhale. Inhale. Exhale. Back to downward facing dog. Left right foot through. Lower the left knee down. We'll come up with a lot of space in the spine. Turning to the right side. We'll take the left elbow across. Using the right hand is a little wedge to help. We lift and turn. Lift and turn. And then hooking that left elbow around the knee. Right palm on left. Making that prayer shape. Front chest turns up. Back of the body turns down toward the yoga mat. And then release. Hands to the floor. Step back into your plank. Big breath in. Exhale. Halfway down. Up dog. Breathe in. Down dog. Breathe out. And then come into a plank. Come down to the knees. We've got our first side plank together. A lot of firsts here today. We're gonna stay on the knees, stacking one leg on top of the other. Our challenge here is to bring the hips up away from the mat and move the tailbone forward so we get this nice strong lift in the body. We'll take our free arm up. Left arm up into the air. And then bring it down. We're gonna switch right over to the other side. Kneeling pose. Feet swept back. Press down through the arm. And again, that sacrum and tailbone. Move them forward or deeper into the body so we can roll open the chest and arm up. Holding there for three, two, and one. Come down. Let's find dog pose just as a little rest and recovery. Strong arms. Active legs. Take a big breath in. High heels. Look forward and a step to the front of your mat. Feet together here. And half Uttanasana or half forward fold. Hands on the knees. And take a moment here. Same legs we use in dog pose. Nice strong thigh muscles. Kneecaps lifting. All the way up to the hip joint. We feel energy in those legs. Long straight spine.
Take one more breath in. On your exhale, release the body down. Grab your elbows and hang. Hands to hips. Use the hamstrings and buttocks to come all the way up. All right. For a chair pose variation. Nice tall arms pressed down to the floor rooting through the earth. Big breath in. Exhale. Chair pose. Oppose we've been practicing a lot. Let's take it a little deeper today. Hands to your thighs. Turning to the left side first. I'm going to turn the spine and slide that right arm to the outside of the knee. Take another breath. Lengthen the spine. Slide a little deeper. Hooking the elbow. One more time. Exhale. Turn that abdomen and navel. Hook that elbow. Here's your prayer position right here. Holding. Three. Two. One. And inhale. All the way up. Make some space in the body. Release your arms. Take a recovery breath. Move your body. Shake out the legs. Second side. Arms up. Inhale. Root down into the earth. Open that space in the body. Then big breath in. Exhale. Coming down into chair pose. Utkatasana. To the second side we'll take the two hands to the right leg. Lift and lengthen the spine. Exhale. Slide the left arm further to the outside of the right leg. Again inhale. Exhale. Abdominal turn. Go a little deeper and hook your elbow. One more time. Inhale. Long spine.
Exhale. Navel turn. Go a little deeper. Hooking that left arm even further. Right hand on left. Rotated chair pose. Challenging. I can feel the legs. I'm sure you can too. Three. Two. One. Unwind. All the way up. Big breath and release the arms. Relax. Shake out those legs. Let the breath flow. Once again in tadasana we're gonna move. Arms up. Big breath in. Exhale. Straight legs folding down. Utkatasana forward fold. Step back to a plank. Strong legs. Again choosing your chaturanga. Bent knees are straight. Inhale. Exhale. Come down. A little up dog for a moment. And down dog. We have a standing pose sequence coming up. Raise the heels. Inhale. Look forward. Left foot. Right between the hands. Crescent warrior come up. Breathing. Strong back leg. Very strong lift of that back thigh. Right thigh.
Taking the right hand to the right thigh. Turn the left palm to face behind you. Oppose we challenged in our previous practice. Exalted warrior. Coming back. Crescent. New pose. Arms out. 45 degrees. This gives us an opportunity. This shape right here to relift that right hip so we're not hanging on those ligaments. And of course a length in the spine. Big breath in here. Rotated side angle coming. Right arm comes across. Left leg. Take a breath in. Lift and lengthen. Turn from the abdomen. Hook a little further. Again inhale. Lift. Exhale. Turn from that navel a little further. Hook a little further. One palm on top of the other. Rotated side angle pose. Feeling the heat. Strong strength challenge here.
Alright ready to unwind. All the way to Crescent. Strong balance challenge too. And then hands to the floor. Step back. Dog pose. Bend the knees. Feet together. Take a breather. Let those legs rest. We've got another side to do. We're gonna need that energy. Gotta mix in the resting with the hard work. And here we go. Hands out. Ready for a dog pose. Alright here we go. High heels. Right foot between the hands. And charge up that back leg as we enter Crescent pose. Arms up. So we're looking for depth. Right thigh aiming towards parallel. Back leg strongly lifting. There should not be an over amount of sensation in the front of that left hip. Means we're overstretching. We're looking for space and exalted warrior. Left hand to the back side. Turn that right hand to face behind you. Pressing down to the feet to get that inner lift so that we can open the chest. Open the spine. Inhale back to Crescent. Breathing. To our 45-degree warrior. And we're looking for a straight line from that left heel all the way up through the spine. Feeling equal. Front and back. Holding there. Lengthening the spine.
Lifting that left hip joint. It's time for a rotated side angle. Place the hands on that right thigh. Then lift and lengthen a little. And turn to hook your left elbow over the right leg. Again inhale lift a little. Exhale naval turn. You can try again. Inhale lengthen. Exhale naval turn. And then we'll go hands on hands. Rotated side angle. Holding five, four, three, two, and Crescent. Here we go. Big unwind. Oh those legs. Arms up and hands down. Dog pose. And we get our child's pose rest. Here we go. Down to the floor. Relax the hips down. Cross the arms and pause to rest. Feel your body. Feeling your body slowly start to cool down. We'll know we're ready when those legs no longer have that heat so intense from that standing pose series. Great challenge today in those. Let's take it here into one more plank with a little bit of extra spice. You thought you're done with that leg work. We're gonna do a little bit more. Feet together. Find that energy in your legs. All the way through the hip joints into the abdomen. Find the support. And then just a slight lift. Left toes. Front ribs up. Naval up. Left toes down. Right toes up. Level pelvis. Thighs. Hips. Abdomen. Right toes down. Big breath in. Slow lower to the floor. We made it. Point your toes back. Lift and lengthen the front of each thigh and hip. Lift and lengthen the front of each thigh and hip. We're gonna keep the hands right alongside the chest and begin to introduce a little bit of back bending. I know we've done some up dogs but here with a little bit more awareness in a baby cobra. Lift your chest. Roll your tailbone towards your heels. Let's just start with this much. And resting down.
It's not uncommon doing back bends like this. People get foot cramps and that's because they try to lift their back by gripping the bottoms of the feet. So be conscious of that in the feet. They don't need to work so hard here. Here we go again. Press down with the hands. Let the chest lift. And roll the tailbone towards your heels. The tailbone towards the heels is not a buttock pinched together. It's more subtle than that. Rolling the sacrum and tailbone. Look for that feeling to lengthen your lower back. Holding and come down and rest. How'd you do with the feet? They stay soft. One more time together. Let's add just a little bit extra. We'll take the arms behind and clasp. Now if this does not come easily for you, you could take your strap and hold here hip width or wider for a much easier way to get into the arms. I'll show with the fingers interlaced. Roll the chest up. Sacrum and tailbone toward the heels. Holding there you could lift the hands an inch or so. Three, two, one, and rest. Let's press up for just a moment to cat and cow and variations. You could go up with the spine, down with the spine, sideways. This is just to get any undue tension that may have developed in your back bend. Up with the spine, down with the spine, side to side. And next turning on to the back. Rest here for just a second. Our next pose is going to be a bridge pose. And today I'm going to show bridge pose assisted with the block. We've done so much strong work today that I don't want to overdo the legs. We've got a nice strong practice coming up next, so I want to save a little energy. But I'm going to show how to use a block for support in bridge. Three different ways you can place the block. Flat, rolled up what I call the middle setting, or the tallest setting where the block is thin ways, thin between the sacrum, between the two buttocks there. Resting on the back of the sacrum. Choose what works best for you depending on your mobility, your height. We want to get a good back bend in here, but nothing too aggressive yet. We're still introducing back bends in our challenge. Let your arms rest out to the side, and give yourself a moment to feel how the body's responding to this pose. Next, bring the hands to grab the sides of your yoga mat. And I do mean grab, not like just a little, you know, thumb and forefinger here. We want to grab hold of it so that we can lean away from the right shoulder a little, and tuck roll that shoulder under. Lean away from the left shoulder, and tuck roll that shoulder under. So you feel like the chest has been lifted. We'll keep hold of this mat so the shoulders stay put. From your shoulders to your hands, press the arms into the floor a little so that you feel your chest rise and open. From shoulders to your hands, press the arms into the floor, into the yoga mat, until you feel your chest rise and open. Walk the feet a little closer, knees narrow, and we add just a little bit extra. Press the right foot strongly into the floor, and flex the left hip toward the chest. Keep pressing the right foot into the floor, and holding that left leg as close as you can, as you stretch straight up. Okay, kind of told a little fib there. Said we weren't going to use the leg muscles too much anymore. Little bit of leg work here, to be honest. The challenge of this particular version of bridge pose is to lift and energize that leg without sinking down in the chest. Chest and spine should stay well lifted because of the lift of the leg. Okay, release. Take a breath, and second side.
Press down through the left foot, flex the right hip, drawing that knee into the chest, and hold there. Remember to keep the left knee narrow toward midline as opposed to falling out to the side, knee narrow. Shoulders to hands, we're pressing the arms into the floor, and ready, extend up. Spread those toes, strongly engaging your right leg. If your flexibility of the right leg doesn't permit that, then you can bend the knee a bit, no problem. But again, our goal is to do what we're doing with the leg without dropping the lift of the chest and spine. And then bend the knee, and release. Let go of the mat, and lift your hips to release the block. Lengthen your low back onto the ground, and just let your body settle into the floor. We won't need the block again, you can set that out to the side. In future practices, if you want to use that support, if we're doing a freestanding bridge, that's always available to you. Really nice way to enter that bridge pose, and find the finer points without straining. Separate your feet about the width of your yoga mat. Let's do a few windshield wipers, right and left, both knees to one side, both knees to the other side. Take your time with this, and do pay attention to the lower leg. So if both legs are going left, that left leg is what I'm calling the lower leg, and let it release completely. Allow the pelvis to follow the legs over to that left side. Soft abdomen, long spine. Second side, two knees right, that means the right knee. We've got to let go of that groin area. Pelvis is following, this helps us lengthen the sides of the spine. One more time left, one more time right, and do make sure your feet are wide apart for this. This really helps to lengthen the spine, whereas narrow feet is a bit of a different action in the spine. Walk the feet together, we'll finish a bit like we started. Two knees together, wrap your hands around the shins. Big breath in, exhale, nose to knees. Easy does it, and release. Two more, exhale, and again, lifting. Two feet down. Check that you've lengthened the buttocks away from the lower back, just so the lower back is soft. Not smushed into the ground, but soft. One leg out at a time, energize the legs for just a moment. Place the arms out, and like in bridge pose, a little tuck of the shoulders, toward the spine, and down away from the neck and head. Now releasing those legs, slowly take the tension out. Let them fall away from one another. Watching the breathing calm down. Fantastic job today. A lot of strength we've worked on there. This will help us tremendously as we move into our upcoming theme of balance. So we'll let go now into that stillness and space. If you would like to stay longer in your shavasana, you certainly deserve it.
Hard work today. If you'd like to come out with me, you can bend your knees one at a time. Turn softly over onto your right side, and rest your head on your hand. Take one or two extra breaths here on your side, staying a little internally focused on that stillness and space. And then using your hands, press yourself up to sitting to a comfortable position. Once again, tremendous job today with the strength that we needed in this routine. I'm looking forward to seeing you tomorrow where we've got our warrior challenge. I'll see you then. Take care.
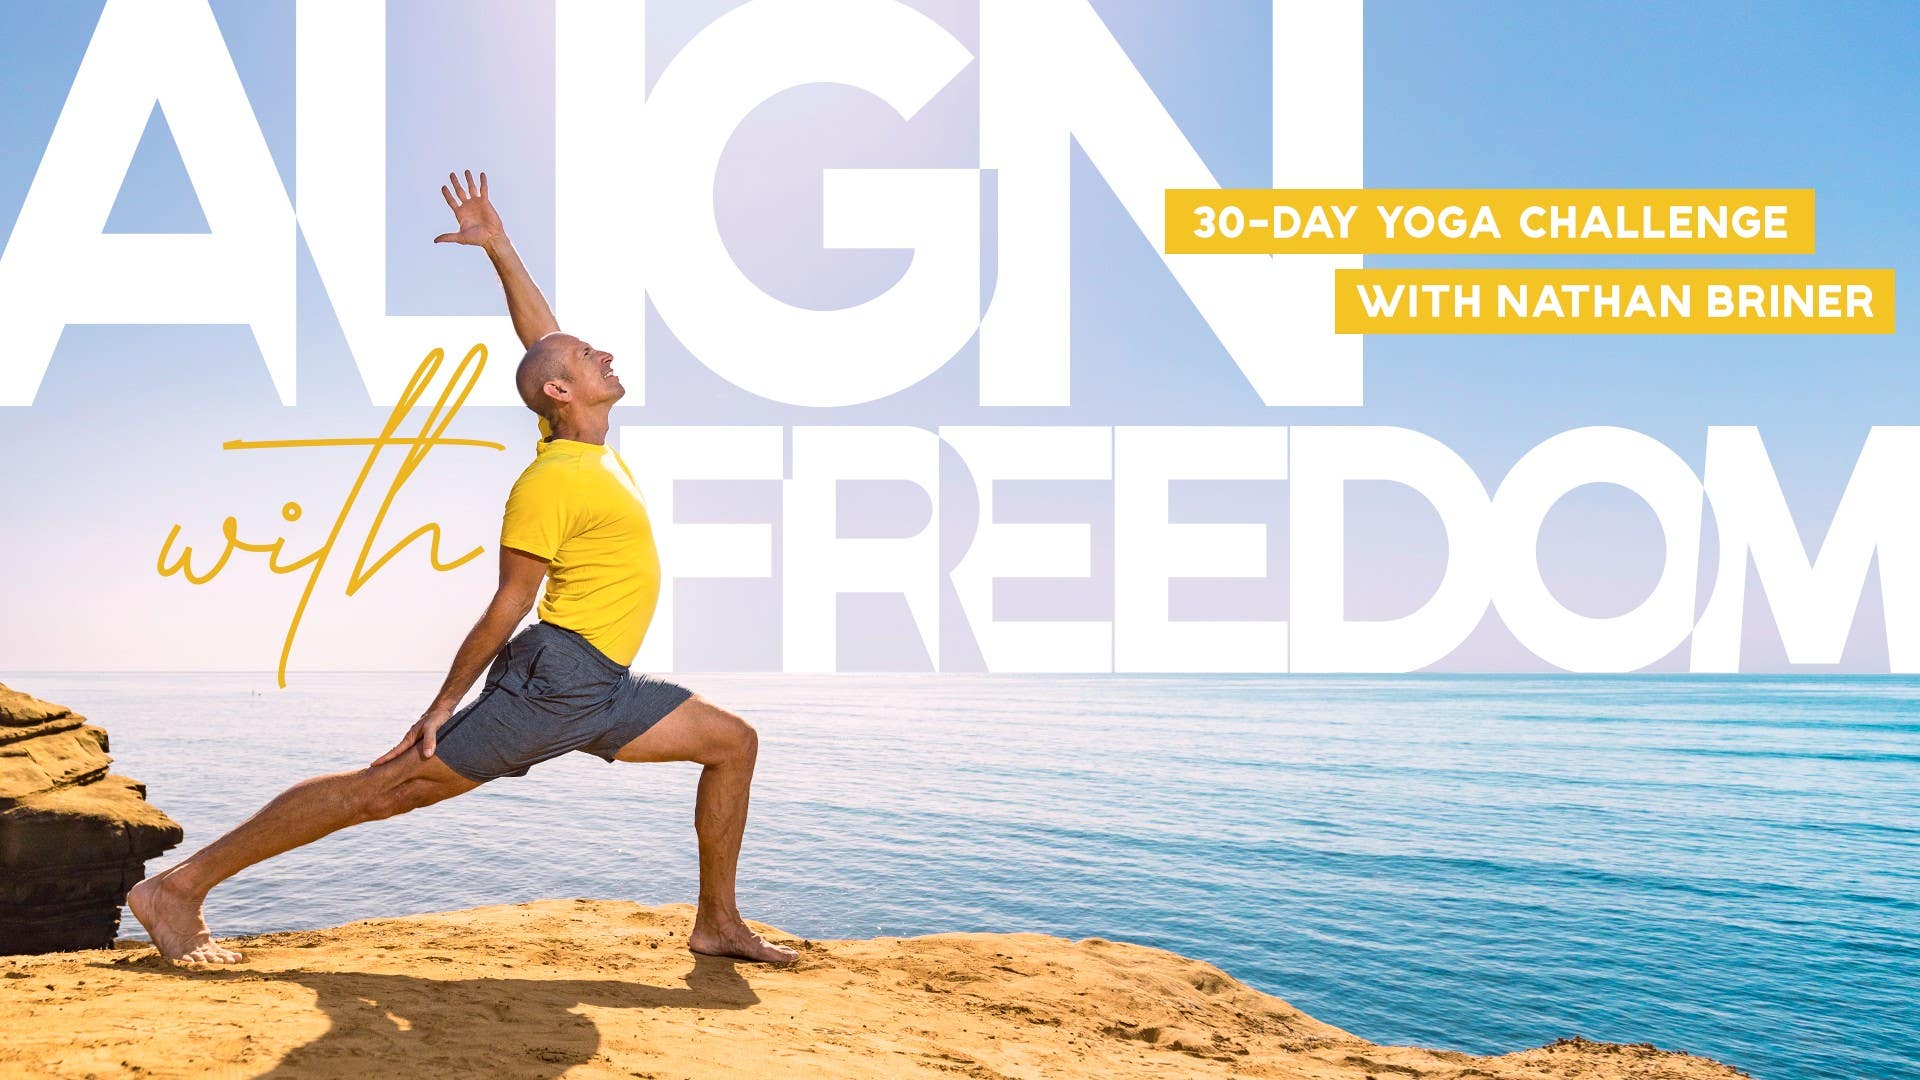
Align with Freedom: 30-Day Yoga Challenge

Mention
 |
Nathan Briner (Teacher) |
 |
Donna B |
 |
Sandra Židan |
|
|
Jo S |
|
|
Lindsey W |
|
|
Tracy C |
 |
Bridget |
 |
Kerry N-W |
 |
Rosanna S |
 |
Matthew |
|
|
Lisa D |
|
|
Anne S |
 |
Christel B |
|
|
Rain T |
|
|
Charlie S |
 |
Nancy M |
 |
Megan M |
|
|
Carol Y |
 |
Luna J |
|
|
Barbara N |
 |
|
|
|
Lyse B |
 |
Joan J |
|
|
M Angela C |
Comments


You need to be a subscriber to post a comment.
Please Log In or Create an Account to start your free trial.
