Description
About This Video
Transcript
Read Full Transcript
Hi, welcome to a practice for sciatica. We'll start lying on our abdomens. Coming down, ankles hip distance apart, toe in, place your forearms under your forehead. Roll the front thighs in, back thighs broad, and allow your back to relax, softening the muscles to the right and left of your spine. So that the spinal vertebrae descend, the bones of your spine, release them down through the lower back, mid back, and even through the neck.
Now through the nose, soften the jaw, exhale out the nose. Now gently lift your head and adjust your arms forward. So we're coming up on our elbows, but the elbows are way out in front of our shoulders. Check in again with the muscles of the back. Continue to relax through your lower back, mid back, also the buttocks.
Let the front thighs roll in and the back thighs roll out. If you're not feeling symptomatic, you can start to walk your elbows in and come up a little higher, deepening the back bend. But still passive, your arms are supporting you and the spine is receiving that support, spine melting down through the lower back, mid back. Next, place your forehead on the floor and walk your hands near your shoulders, palms flat, fingers spreading. Now you can reach back through the toes and straighten the legs, however, continue to keep the buttocks relaxed, lower back relaxed, press through your hands, inhale, low cobra, very low, lower back buttocks relaxed, exhale, forehead down on the floor.
We'll do this many times, inhale to rise, starting just a little bit, and then exhale, gently lower the head. You can stay low or begin to increase the range of motion, coming up a little bit higher. And your arm muscles are your main movers here, still released through the buttocks, lower back. If you come up and you find the buttocks clenching, you've come too high. This is very important to help relieve the symptoms of sciatica, passive back bending.
So you might feel your arms getting a little fatigued. But the back should feel completely relaxed. What to do with the legs, roll your inner thighs up to the ceiling, roll your outer thighs down towards the floor. Exhale bone can be heavy, but not firming the buttocks to make it so just let it descend. You could straighten the arms all the way.
So long as there's no pinching in the lower back, and the pubis stays on the mat. But following your symptoms as your main guide. So as low as you need to be, that this feels good through your back and legs, and maybe just firm in the arms. One more inhale up and exhale down. Inhale the forehead is on the floor.
Exhale now firm your belly, support your back and press to hands and knees. Take your feet as wide as your mat, tuck the toes under hands underneath your shoulders, plank, look forward. We're not going to be here long, inhale, exhale, keep looking forward, bend your knees to down dog. So a bent knee down dog heels can be up, you're looking forward maintaining some backbend in your spine. One more inhale here, long spine hips back, exhale, lower your knees.
Go ahead and take your blanket. This is mainly for cushion, place it underneath your knees, and take your blocks underneath your hands, medium height, or high height, hands turned out. On an exhale, firming the belly, step the right foot forward, ankle under knee. Again wrap the left inner thigh back, and then walk your hands up to your right thigh. Pause, inhale, exhale, tailbone down, reach your arms forward and up.
Lifting the side ribs up to the fingertips, breathe in, exhale, bend your elbows, cactus arms, pause, coil the thoracic spine into the chest, lift the chest a little bit more, maybe glance up, inhale, reaching the arms back up tall. Exhale, lower your hands to the blocks, walk the blocks back near the blanket. Flexing the right foot, lift your head, right leg straight or in that direction, and then lower the toes and the head, pointing the foot, inhale, flex the foot, lift the head, exhale, lower, point the foot, lower the head. This is nerve gliding for your sciatic nerve. The head is optional, so if this motion irritates your neck, you can just do the flexing and pointing of the foot.
This is a good idea if you have sciatica for many reasons, and this is preferable to just a static hamstring stretch. So you might feel your hamstring stretching when you flex the foot, but then you may not when you point. This is a safer stretch for sciatica. One more time, inhale, exhale, and then walk your blocks forward, bend the right knee, back toes tucked under, lift up through your hips, firm the belly, that bent knee down dog, draw the hips back, maybe look forward still, you could lower the head. And lower your knees, second side, step your left foot forward.
Let the pelvis release forward, but roll your right inner thigh back. Walk your hands up to the left thigh, steady, lengthening the tailbone down, reach your arms forward and up, inhale, side ribs tall, exhale, bend the elbows, draw the shoulder blades down the back. Press the shoulder blades anteriorly into the chest and restraighten the arms, palms face in, breathe in, exhale, hands down to the blocks, walk the blocks back, straightening the left leg, hips back, toes up, head up, toes down, head down, flex the foot, look forward, point the foot, look back, cycling through. Again, option to keep the head steady and only move from the leg, the ankle. You can inhale when you lift the toes, exhale when you point them down, one more, and then placing the foot flat, bend the left knee, walk the blocks forward, step it back, downward facing dog, knees bent, draw the hips back, long spine, and release, knees down, knees under the hips, place your wrists underneath your shoulders, firming the belly but with a long spine, reach the chest forward, draw the outer hips back, take your right leg back like plank so the right toes are tucked under, straightening the right leg, roll the inner thigh up to the ceiling, keep the toes there on the floor and stretch your left arm forward.
If that movement irritated your back, just stay, both hands down, right leg back, otherwise moving on, possibly raising the right leg now off the floor, bird dog, and release, second side, extend the left leg back, toes tucked under, support the back, firming the abdomen, the idea is still the back muscles are soft but you have support from the front of the body, reaching the right arm forward perhaps, and steady through the spine, lift the left leg off the floor, and release, a little more quickly now, inhale, right leg back, left arm forward, exhale lower, inhale, left leg back, right arm forward, exhale lower, one more round, inhale, right leg, left arm, exhale lower, and inhale, left arm and right leg, exhale and lower, downward facing dog, knees bent, hips back, look forward, and lower down, we're gonna take the blanket now, and you might keep it this height or you could fold it to even make a bigger cube for pigeon, setting the blocks a little bit forward, the right hip on the blanket, left toes tucked under, roll the left inner thigh to the ceiling, and the outer thigh to the floor, now coming down, you can use your blocks for your forearms, resting the forearms on the blocks, medium height, or down a little bit lower, or forearms on the mat, you can let your head go down, or hold it up, if that feels better for your symptoms. Relaxing into this shape, for many people with sciatica, the piriformis stretch, which you might feel here in the right glute, brings relief from the symptoms, and for a certain percentage, this can be curative, but generally not for most, but it should at least feel good. Now you can stay here, we're revisiting our back bends, walk your hands up to the blocks, maybe take them to their medium height, and walk your hands perhaps closer to your legs, pressing down through the hands, straighten your elbows, as you lift your chest, soften your spinal bones forward, allow them to melt towards the front body, and if you feel any pinch or increase in symptoms, maybe just walk your blocks a little forward, and try again, lifting the breastbone, release the shoulder blades down the back. One more inhale, and exhale, downward facing dog, tucking the back toes under, and step the right leg back bent, knee down dog, and lower your knees, pigeon on the left, take the blanket over to the other side, step your left leg forward, rest your hip on the blanket, with the right toes tucked under, straighten the leg for a moment, roll the inner thigh up, the outer thigh down, and then when you release the knee down, the front thigh faces the floor, coming down on your blocks, and just be here for a few breaths. Exhale coming up, perhaps walking your hands in, your blocks in, and finding a back bend similar to upward facing dog, coil your thoracic spine, the entire spine forward to the front body, but passively, so again, your arms support you, and the back muscles release. On your next exhale, finding downward facing dog, adho mukha svanasana, knees bent, maybe look forward, and then lower down. Okay, we're going to move on to another passive back bend. I'll show two versions of the blocks. Pariyankasana is classically done with the legs in Virasana. We're going to take one block high, and one block on its medium height wide. Virasana, roll the calf flesh out, sit down between the ankles, and guide the block to support your thoracic spine, and the other block to support your skull. You can catch your elbows and frame the head, releasing the arms down. Now another option with the legs is to sit with the legs in Baddha Konasana, soles of the feet together, knees wide. You can go back the same way over the blocks, but if that's feeling not comfortable, then switch the blocks. Make the forward one medium height, and the back one, the one under your head at the highest height, bringing the lower block to the lower thoracic, and the high block to the head. We can hold our elbows here, or extend the arms up, palms face in, and take the arms alongside the ears. These back bends can be intense, softening the back muscles, releasing the breath, like a massage. Inhale, abdominal cavity expands, and exhale, softening the belly. Bringing your arms up, take your fingertips under your head, lift your head, and then place your hands on the floor, and press down to lift off of the blocks. You can set your blocks aside. Supta Padangasthasana two, have a strap and your blanket. The blanket will be propped up at your outer right hip. Make your way to your back, knees bent, feet flat on the floor. And then we'll bring the right foot in. You could hold also the big toe, otherwise strap the ball of the foot, extend the leg up, take the strap and immediately open the leg out to the side so that your right thigh rests on the blanket. From there, optional, straighten your left leg, extending the heel long on the mat, extending the leg long. Left leg, the same internal rotation we've been doing, roll your left inner thigh down. Both legs extend from the sit bones through your heels and spread your toes. Arms wide. Inhale, let the lower belly respond and expand. Exhale, soften the lower belly, soften through to the lower back. Inhale, bringing the right leg up, bend the left leg, bend the right leg, and we'll change sides, taking your blanket now against your outer left hip. Taking the left big toe or lassoing the ball of the left foot, leg up, then hold the strap and open your left leg to the side, resting your left thigh on the blanket. And then perhaps slide the right heel along the mat, straightening the right leg as well.
Change from the sit bones out through the heels, long legs, and spread your toes, spread your metatarsals. Legs are active, roll the right inner thigh down, firm the quadriceps so the knees are straight. Abdomen soft, lower back soft. Let the breath movements shift the shape of the abdomen like a wave. Inhale, belly rises. Exhale, belly releases and falls. Coming up, bend the right leg, foot flat, raise the left leg and then bend that knee and remove the strap, setting it aside. And you can set your blanket aside as well. Apanasana gently reach for your calves or hamstrings and draw the knees towards the chest. This helps us prepare for Shavasana. And for Shavasana with sciatica, you could take the prone Shavasana that we began the practice with on your abdomen. Alternatively, with the legs extended, feet a little wider than hip distance, you could try the blanket on the top thighs like a weight. This can help bring the lumbar curvature back into the spine. But if it feels excessive, go ahead and swipe the buttocks flush with your hands towards the heels. Tuck your shoulder blades towards one another. So the collarbones are wide, chest is open, palms face to ceiling. Relax now through the face, neck, entire body letting go. Allow your next breath in to be a little bit deeper. And exhale softly, feel free to stay here longer in your Shavasana. Otherwise, bend your knees and roll over to your right side. Pressing down through your arms and hands, make your way up to a comfortable seated position. Thank you for your practice today. Namaste
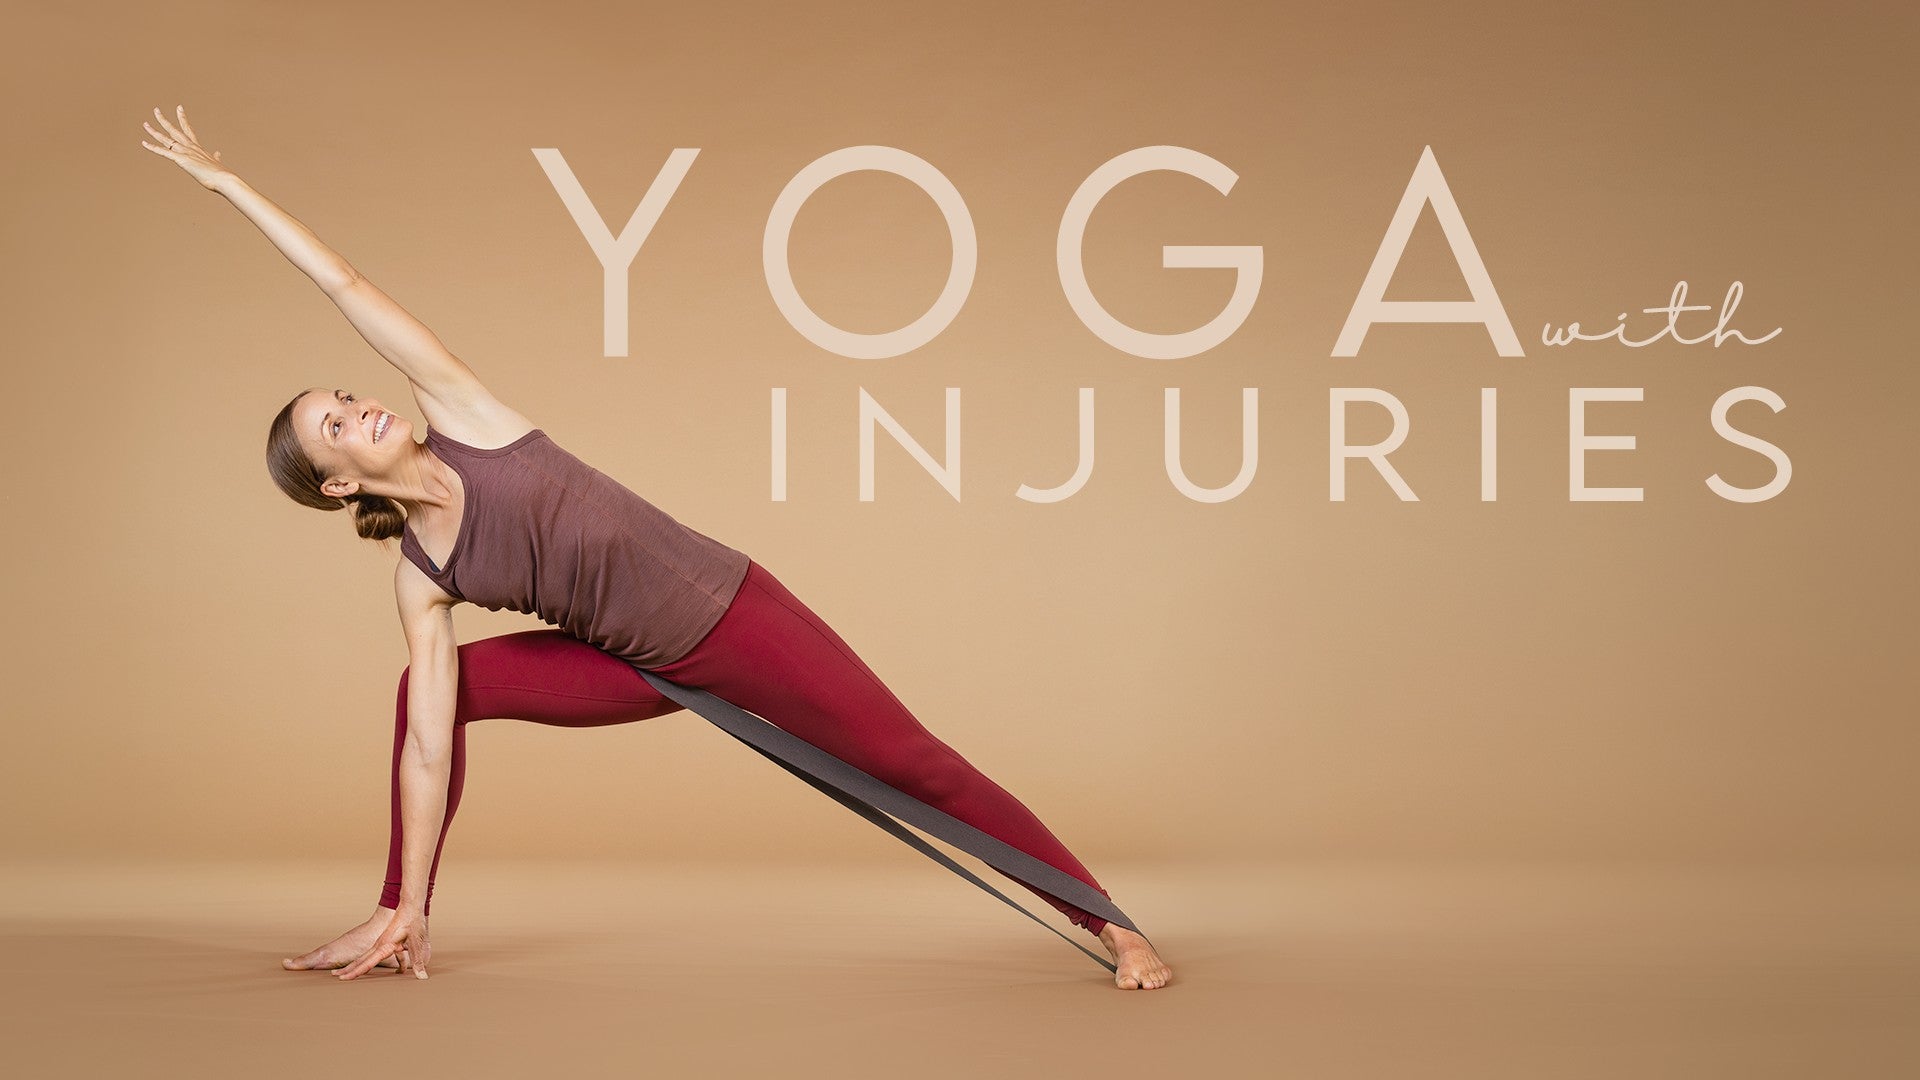
Yoga with Injuries: Olivia Barry


Comments


You need to be a subscriber to post a comment.
Please Log In or Create an Account to start your free trial.
