Description
We've reached the final pose in this Gheranda Samhita sequence. Used for sitting, breathing, and meditation, this posture is often called Perfect Pose in modernity. Richard brings our attention to the details of our hand position and alignment in this seemingly straightforward posture.
About This Video
Transcript
Read Full Transcript
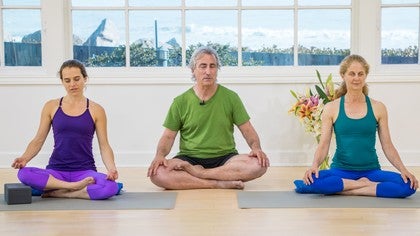
Hi, we're here with Betsy and Alana for the last pose in the sequence. It's a sitting pose that we would use for sitting, breathing, or meditation. And it's called Siddhasana. Siddha is a very frequently used word in the Hatha text. It means success or it also means adept.
So this is in many texts translated as adepts pose, meaning that the person who sits in it is adept at yoga. So we'll have, this is an even numbered day that we're filming this on. So we'll be sure that the right leg is going to be the top leg because we want to, when we sit, we want to make sure that we cross the legs oppositely every day to make sure that we keep a balance between the cross. So my system is to cross the right leg on top on even numbered days and the left leg on top on odd numbered days. And of course, if you're a left footer, you can change that around if you want anyway.
And what I'll have my helpers do is bring the left heel into the perineum first. And like a lot of these sitting poses, you want the heel to plug into the bottom of the pelvis very firmly. And then we'll take the top foot, exhale, the right leg. And you'll often see the pose done with the ankle pretty much sickled. So what I want them both to do is to take the outer edge of the right foot and sort of wiggle it into the crease between the calf, yes, and the thigh, very nicely done.
So that outer edge of the foot is pressed into the crease between the thigh and the calf. And the ankle is more or less in a neutral position. Now we're going to ask Alana to bring this brick underneath her right knee. She doesn't really need it, but it serves as an example of what a lot of people do need. And that is that groin is not going to be open enough to let the knee rest comfortably on the floor, as you see here, and a block is very helpful to support the leg.
You don't really want that knee to float in space. Now the hands, as you see, as experienced practitioners, they've already got their hands shaped into different kinds of mudras. Again, there's many, many different hand mudras that you can perform in this exercise. The palms turned up usually helps to create a feeling of lightness in the pose, if that's what you're looking for. The palms turned down often helps to create a feeling of more connection to the floor or to the earth.
And as far as the pose itself is concerned, you want to be sure that the sacrum and the shoulder blades are very firm to the back. And what Mr. Iyengar has said is that the back of the torso supports the lift to the front of the torso. So the sacrum is firm, as are the shoulder blades, and the coccyx is releasing down into the floor. Again, it's not so much of a tuck, but it's an uncurling of the bone down into the floor, and then you penetrate, imaginatively speaking, the tailbone deep into the earth to root yourself, as if you had a taproot on a great tree. Base of the skull lifting lightly away from the back of the neck, that helps to draw the crook of the throat a little bit deeper into the head, and in turn that will release the tongue onto the floor of the mouth.
The eyes release to the backs of the sockets, as before in Shavasana, and then it would be good if you could keep the eyes turned down a bit. And it's difficult to do, at first anyway, it can be done with some practice, and of course, quieting the eyes helps to quiet the brain. Evenly broad across the upper back and across the upper front. So you open the scapula side to side, but at the same time you want to open the clavicles or the collarbones away from the stern as much as you open the upper back. Heads of the femur bones in front, dropping down, so that in effect you're not sitting so much on the sitting bones anymore, rather you're sitting on the heads of the thighbones and the tail, using that as a tripod.
And if you can spread the sacrum and narrow the hips as you do that, what you may feel is a slight lift in the perineum, which is a precursor of Mulabanda. But it's not a muscular contraction, it's a response to the space you're creating in the groins and the hips. And this is opposed, as I mentioned, we use for breathing and for meditation. If it's difficult for you to sit freely without a support for your back, then you can sit against the wall, although it's best to have a bolster inserted between your spine and the wall. And when you do that, you want to slide the bolster down from above, so that you push the bolster along your back torso toward the tail, and helps to release the back from the skull to the tailbone.
Very nicely done. This is Siddhasana, this is the pose of the adept, or the adept's pose. And you can bring your hands now, both into Anjali Mudra, with the thumbs resting lightly on the sternum, and we'll say thank you, Siddhasana.


You need to be a subscriber to post a comment.
Please Log In or Create an Account to start your free trial.