Description
About This Video
Transcript
Read Full Transcript
(waves gently lapping) Welcome to Therapeutic Yoga for Breast Cancer. This is a beautiful, healing practice. If you've been recently diagnosed, or if you're in treatment. And I'm happy today to have and introduce to you, my model, Francine. We'll be journeying through some gentle poses that are nourishing, supportive, and healing.
Each time you come into this practice, it's a time to turn towards what needs healing. To breath into those areas that are healing. To soften, and to really receive the gifts of therapeutic yoga. The breathe-work, the imagery and the nourishing postures, such as the restorative poses and gentle yoga. So, for today's practice, it's helpful to have three blankets.
We're gonna use a couple of throw pillows. And you may not need those. That's to prop the arms in case you've recently had surgery or radiation or treatment. And then also a block to prop up the back end of the bolster, and a bolster will also be used. So let's have you sit here.
And you can face this way. So taking a seat and behind you, you'll place a block and the block will support the back end of your bolster. So you'll place your bolster with the far end held. Then you'll take one blanket and place it on the top end of the bolster. This'll become your head and neck support, once you've reclined back.
Then you'll take two additional yoga blankets, and you stack them together like this. And create a nice, thick roll to be positioned or placed directly under the knees. The legs can extend straight over the roll and you can move the roll so that it's just under the crease of the knees. The hands can come to the floor or the bolster. I sometimes like to press the edge of the bolster down a little bit, and then, using your stomach muscles, chin tucking into the chest, you can slowly recline back.
And perfect to recline back into supported reclining pose. The eye pillow can go over your eyes, now. And/or you can use a sleeve of a shirt, a washcloth, and if the blanket's too high, what you'll see is a flattening of the cervical spine. This looks a little high. So we're gonna take it down a notch.
And let's bring that, your head up just a little bit. And you can also make your support just the right height for you. That feels better. So, checking in with your body and just feeling the position of the bolster, the blanket. Making sure the blanket is not under your shoulders, so you can receive the most beautiful opening here, through the chest, which is one of the gifts of this pose.
Now take a few moments to check in with your body. If you've had a recent surgery, or there's an area of tenderness, and it feels like too much to rest your arms on the floor, you can bring your hands to your chest, to your belly, you can rest your hands on top of you, or you can use something like this, this wonderful pillow, throw pillow, to make an armrest and then the arm can relax onto the pillow. And there's different sized pillows. You can bring it down a little bit so it catches the elbow, but what you should feel is that there's a softening, not as deep of an opening in the chest. If it's still uncomfortable, you're welcome to add more propping, another blanket underneath that side.
Or, as I mentioned, keep your hand on your body and just rest the arm a little higher. So, taking a few moments here to listen and to feel inside. To observe what's happening in this moment, in your body. Our bodies are these wonderful, living organisms that are always changing, but especially when you're going through a healing alchemy, a healing process, a transformation. Which I really see happens with the journey of breast cancer.
Each day, your body's going to be different. You're going to meet it with compassion, with love, and with this kind of nourishment to support your deepest healing. So, as you feel inside, you can begin to scan from the top of your head all the way down. And take time to visit into those areas that are healing, that are transforming. Noticing how they feel.
Allowing your awareness to flow down through the inner landscapes. You may visit your organs, checking in and seeing how they're feeling. Sometimes, I even talk to my body when I do this. And I say: How are you, today? What do you need? Just quietly, in my mind, and sometimes my organs will be very clear and have definitive things to say.
My kidneys may say: I need more water. Or, more rest or whatever. So this is a good time to feel for yourself, what your body needs and how you can support it. And as you journey through the body, you may notice that there's places of tension or holding. Also remember that the body doesn't forget anything that it's experienced, so there may be places of holding or memory.
There may be emotions associated with that. There may be pain. So when there is something like, let's say, physical pain, it's often helpful to breathe a visual image of healing energy, or something that's soothing, into that area and breathe the pain out. And see if you can soften. Often when we're in pain, there's a tendency to tighten and contract, and that creates more pain.
So, if you're noticing there's any discomfort, any pain, just breathing and softening those areas. The pain could be physical, but it may also be emotional. Or, today, your body may feel light and beautiful and open. Just meeting yourself wherever you are today, without judgement. And as you take your awareness through your whole body, you may even choose a place today that you can feel really needs attention.
And taking a few deep breaths now. As you breathe, feel the belly rise, the chest expands, and then softens with the exhalation. Taking a few deep, cleansing breaths. Breathing in fresh oxygen, breathing out tension, toxins, anything you're ready to clear. Breathing in positive energy.
Breathing out mental stress. And notice how it feels to breath this way. To think of the breathe as a cleansing breeze, drawing in positive, and releasing anything you're ready to let go of as you exhale. And you may find that you drift off into a deep meditation. Which is welcomed.
These, often, are the moments when the deepest healing can take place. Resting the mind. Resting the body. Taking some slow, deep breaths. A beautiful pose, gentle yoga movement, that you can incorporate either when you first come into this pose or at the very end is arm circles. So you begin by bringing your hands over your pelvis, the palms facing down, and as you inhale, you'll reach your arms up over your head, all the way towards the sky.
And as you exhale, like making angel wings in the snow, you'll sweep your arms down just a few inches off the floor or wherever feels most comfortable for you. Now, if it feels too strong to do this with a full arm, you can, extension, you can do it with the tips of the elbows, with the hands resting at the shoulders. Yeah, that's another choice. And it makes it gentler. And then choosing whichever feels the best to you.
Taking a few more breaths, inhaling as the arms come up, exhale as the circle around. And then slowly release the arms by your sides. And remember, too, at different times, you may not need any armrests, so that will be a deeper stretch if you don't have the pillow under the arms. You'll see the chest gets a little deeper opening. But the pillow can be nice to use for your head as you prepare to come out of the pose.
So, when you're ready, you'll take a deep breath and slowly bend your knees, keeping the eyes closed, removing the eye pillow, And then slowly transitioning all the way off the bolster and onto your side. If you don't have a pillow handy, you can pull the blanket to go under your head. That's been resting on top of the bolster. But you have a pillow, so you don't need that. (laughs) There you go. Good. So, drawing both knees towards the chest a little bit, especially because you've been in a back-bend, it can open the low back.
And taking a few breaths here, just feeling and noticing the changes within the body, how it feels, from the first restorative pose. From here, you'll slowly press your top hand down in front of you, and keeping your head heavy, you'll roll up, one vertebra at a time. And as you come up, you'll come onto all fours. Your knees on top of this blanket. And what happens with the knees on top of the blanket, and the knees in alignment with this edge, is that ankles get a little additional support.
So I want you to find that place where you're feeling a little bit of extra lift under your ankles. Good. The knees can be hip-width apart, and your hands are gonna come to the sticky mat. So you're gonna come to all fours, your hands are under your shoulders, your knees under the hips. So, a little bit further forward with the hands, yeah.
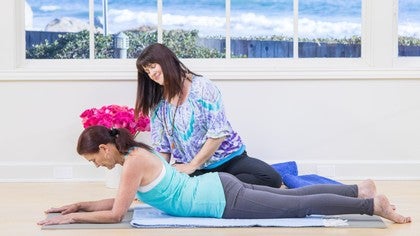
So it's a nice, long spine. As you inhale, you'll draw your heart forward, but lengthen the neck, so rather than compressing the neck, think of a turtle pushing its head out of the shell, and then as you exhale, you can draw, ah, draw up towards cat stretch, so you go straight up. Good. And then exhale all the way back to child's pose. Keeping your hands active.
This is gonna stretch through the arm and through the breast area. So, go back as far as feel comfortable for you. Make sure you've relaxed your head and neck. And then, as you inhale, your arms are gonna stay straight. You're hinging in your shoulders, in your hips.
The heart pulls forward, the head reaches forward. You can lift it a little bit, but keeping a little space at the back of the neck. Good. And exhale, pressing up, up through here, up into cat stretch, and then sitting back towards child's, as far as feels comfortable for you. Remember, if your knees feel tender, your hips feel tender, you can go part of the way back.
You don't have to sit all the way down. And then as you inhale, arms straight, hinging in the shoulders, the hip joints. So we keep a little bit of activation in the hands, here, all the way through the movement. And finding your own movement. That's it.
Keeping the hands active as you come back to get a little more stretch. Unless, for any reason, you need to soften. That's fine too. And then inhaling up, draw the heart forward. So this warms up the spine a little bit.
These spinal movements are actually also considered anti-aging poses. One of the things that you'll see that happens as we age, spine gets more and more stiff and stuck. Almost like it gets shrink-wrapped, if you don't stretch in this way. And you'll see elderly people, that haven't had yoga in their life, hunched forward and very stuck in those forward positions. So, this movement is a wonderful movement to keep throughout your life to keep the spine healthy and all that wonderful energy that flows through the noddies and the chakras.
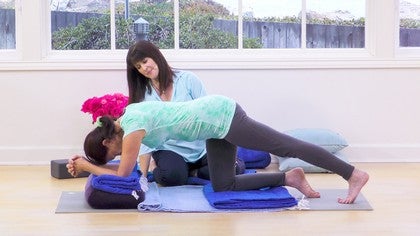
Really active. Now, maybe as you come back, here, you just wanna rest and take child's pose. You can let your head come down, your forearms come down, and stay here if you'd like, for the remainder of our hold in child's pose. Or, if you know that you'd like supported child's pose, with the bolster underneath you, you can come into this variation. You can come up onto all fours, and we'll take a bolster, gonna bring it here for now, and add one blanket on top, folded in half, just to give her a little more height.
And one of the things that I've found to be really helpful for when I'm teaching at the cancer center, anybody who's having breast reconstruction, or radiation, or recent surgery, is to create a nice roll that goes right down the center of the chest and it holds the breastbone and it floats the breast area. So, we're gonna create one of these for Francine. But first, I'll draw this back. You'll open your knees a little wider. Good.
And, I'm gonna get that just between her knees. Not too close, I don't want it pressing into her belly, and then I'll take the fringe side of the blanket, not the hard edge. The fringe side creates a little bit of a ramp, which is nice, and I open the blanket lengthwise, which is important. If I try to roll it from this roll, it's gonna be much too thick and heavy. So, we lay it down, and if you're doing this for yourself you're just gonna create kind of a tight sushi-roll.
You don't want it loose, you want it nice and firm. And the firmer it is, the more support it's gonna give, depending on the size of your breast area, you'll need to kind of find, sit back, you'll need to find the right size roll for you. So feel free to make it bigger or smaller. Now stay sitting back, and come forward. And place this right on your sternum.
Good, and turn your head. Now another thing I've found the roll to be lovely for, is helping with if you have neck pain and you have a hard time turning your head all the way, you can turn your head to face down a little bit with your cheek, your nose resting just to the side, and your cheek resting on that roll. So the nose can go down as much as you need to, and just have the support of the blanket here, right along the cheek. Now, if you don't need that, you could even flatten it a little bit around the face, so it feels comfortable. So this is supporting the ankles, supporting the shins.
This is important too, to look and make sure that your shins are comfortable, your ankles are getting a little bit of support, your feet are coming off the back edge of the bolster. And then this is your time to just rest. This is a really healing pose. It's a nourishing pose. It's also, as I mentioned earlier, in another segment, it's good for grieving.
So, often, when we're going through the challenges of treatment and we may be grieving for parts of our body that have been lost or changes that are taking place and so, it's really helpful to come into this pose and to connect with your heart, and to feel any sadness, any grief that may be there. And to feel the support that's here for you in your yoga practice. That no matter what arises in life, no matter the challenge, that your yoga can hold you and support you through it all. You wanna make sure that you have your head turned to both sides, so halfway through the pose, we're gonna turn the head now to the other side, resting the cheek on the blanket roll, relaxing the neck and just letting go, here, into this beautiful supported posture. If you find that you're propped up on your forearms, just make sure that you're able to soften and sink down.
Sometimes I'll, just to check, I'll walk my elbows out a little bit to make sure, that the upper back also can open and relax. It can be nice here, too, to place your eye pillow, if it's handy, on the back of your neck and to feel that. The neck is a vulnerable area, so it's awfully nice to feel it protecting the neck. And if it's too heavy, it may not feel good. You can remove it.
I also sometimes will place some weight or my eye pillow on the sacrum, just to support that opening that's happening in the low back. Noticing what you feel as the breath flows in and flows out. Like the ocean. Just easy, fluidly washing through you. And, when you're ready to come out of the pose, you'll slowly return back onto all fours.
So, you'll keep your arms forward just a little bit. And your bolster, you can push out of the way for the moment, and you'll keep your hands on the sticky mat, and you'll turn your, ah, well, let's start with a gentle variation I'd like to show, first. This is a beautiful variation to do if you have any wrist or shoulder issues. Pause for just a moment. If you have any wrist or shoulder issues, you'll put your elbows up on your bolster.
So, you'll bring your bolster right under, yes. Good. And then you'll straighten your left leg back behind you, hooking your foot onto the mat and pushing back through the heel. This I call: half dog. You can keep this knee right under the hips.
So don't come back with your shoulders. The shoulders come forward. So come forward for me. There. Shoulders are gonna be right over the elbows.
Shoulder joints are actually strengthened in this pose, so you can press down a little bit, creating some strength. And always feel free to walk the foot up a little bit higher to get a deeper stretch through the hamstrings, rather than coming back in the shoulders. And take a few breaths, lengthening the achilles, the calf. And then you can change legs. Left knee can come down, right leg extends straight.
So this is great if you've had surgeries in this area, too. Building strength. Also, if you have wrist issues, it's a nice alternative. We're also going to, in a few breaths, offer a down dog. And that's a great pose.
So those of you that know down dog, you could always do down dog instead of half dog, or you can do both. Explore starting here, building some strength, a little bit of heat and then going in to your down dog. And then, so those of you that would prefer not to do down dog, you'll do this pose again on both sides. Let's have you come into down dog. So, I'll remove this bolster, and you can bring your hands onto the sticky mat, fingers spread wide.
Lots of energy in the hands. And then, turning the toes under, also on the sticky mat, and taking your down dog. Good. So, feeling into your body, releasing the neck, and taking the tailbone towards the sky, tilting the tailbone up, and then the thighs go back. Thighs go back, the hands stay active.
If you're really flexible in your shoulders, watch that you don't sink into your shoulders. I even like to rotate the arms a little bit, which builds some strength in the triceps. And make sure the neck and this area, the trapezius is soft, the crown of the head facing the floor. And then, feel free to bicycle your legs. Some people call it walking the dog.
If it's really easy for you to touch your heels down, walk them back an inch or so, so you can actually get, walk your feet back an inch or so, so we can get a little more of a stretch through the achilles. Good. This is gonna be a little different pose, there. Just a couple more breaths, your breathing sounds great. Deep breathing here, a little more energizing movement.
And then when you're done, you can come down. So you can feel, for you, when your body's ready to release from the pose. Actually, I'll remove this before you come down. And you will, now, come back onto your back. So you can turn around.
And here, when you're ready, scoot forward a little bit. Don't come back yet. I wanna show what we'll be doing here with the strap, so those of you at home, practicing, you'll wanna get your strap down first. That's key for this pose. And it doesn't need to be too big of a space, because the strap's going to be going around the bolster, the blanket, and your lower legs.
So we'll take this and we'll put it down. And then first goes the folded blanket. And you can do one, two, however many you have. I like to do it higher, but if we're just working with three blankets, we may have one down, one under the head, one here, or, and definitely, it's nice to have one to go over you, as well, to keep you warm. So let's have you scoot back a little bit for me.
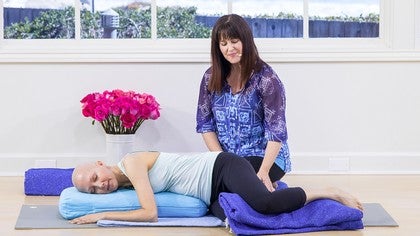
'Cause we like the knees, maybe a slight bit forward, the knees to go right at the crease of the bolster or slightly up. Then, when we strap the legs together here, (clicking) and I love the quick-release straps 'cause they're so easy, you wanna make sure the buckle is not pressing into your legs. And it should be firm enough. Go ahead and tighten that, just to the right level of tightness for you, so you don't feel like your legs are gonna fall off. Now, for some people that are uncomfortable with straps, I recommend using a blanket.
You can wrap the blanket around the legs and tuck it in. And that's a nice alternative. But one thing important to remember here is once you come back, you can easily slide your legs out if you need to. So you're tucking your chin towards your chest and slowly reclining back. And you can create just as much roll under your neck as you'd like.
Good. And so, as you're moving into this pose, you wanna make sure that the strap is tight enough that your legs aren't feeling like they're gonna fall off the bolster. You can place your blanket over you. It's often nice to find your essential oil and administer it to yourself before you put your eye pillow on, so you can see it. And a few drops into your hand.
And then rubbing your hands together, cupping your hands over your nose, breathing in the beautiful scent of the oil. Feeling the benefits that it holds for you. So, I've found sandalwood is a lovely oil when you're going through difficult periods. It can also be placed on the third eye. Also, orange, if you're experiencing depression.
It's uplifting. So, you can learn more about essential oils. There's wonderful, different blends you can buy, or single oils that you can use in your practice. And then, when you're done, you can place your eye pillow over your eyes, tuck yourself in so you feel really comfortable. And making sure everything feels just so.
The position of your hands, remembering that you can place your hands anywhere on your body as you rest in the final relaxation pose to create a nice flow of chi. And sometimes what I'll do is I'll rub my hands together to gather the chi, gather the energy, and then take the hands to the area that's healing and breath that in. So feel free to do that now. To rub your hands, rubbing them pretty vigorously, to really get that chi activated in the hands, the energy, you're gathering it, gathering it, and then taking it to your body and breathing it right into the area that needs healing. Drinking in this warm, healing energy, and visualize the deeper healing taking place in this moment.
You're welcome to keep your hands there, or when you're done, just let your hands release. And let yourself move now, into this deep relaxation. And bringing your focus to the heart chakra, anahata. Visualize a beautiful, green light. A soothing, calming, relaxing energy.
Pouring down, into the center of your heart. Feel it bathing the heart, helping to clear away, to wash away, any sadness, any grief, any challenges you may be feeling in your heart. Feel the light illuminating these areas, now. And breathe it in, and allow your heart to soften. The light expands with each breath from the heart.
Filling the chest, filling the breast tissue, and immediately healing everything it touches. You may see or feel or sense this deeper healing taking place on a cellular level. We feel the green light growing even brighter, expanding now. And it flows up to fill the thymus, enhancing your immune system and strengthening your immune system. Enjoy the feeling of this inner strength.
Garnering power from the green light as it freely flows through you now. And the light touches into all the different places within you that need healing. It's as if it knows just what you need. Calming the tissues, soothing, mending and healing. And relaxing your whole body.
And let yourself float in this light, feeling it continuing to work with your body. To bring it to a new level of health, and wellness. Allowing your breath now to gently deepen. And with each breath, feel this bright, healing energy, encircling your whole body now. And inviting this energy to stay with you.
Create a wonderful light that you can tune into whenever you need to by just taking a few deep breaths. And so, slowly and gently, you'll return from your deep relaxation. And just very easily, one at a time, you can start to slide the legs out and just rest the feet for a moment on the edge of the bolster. The strap'll stay put, so you can just slide one leg and then the other, good, out. Then resting your feet here for a moment, and just gently rocking the knees from side to side as you reawaken.
With the feet on the bolster, yeah. So you're just gonna put your feet right there, yeah. Just nice and easy. Not going too far, just awakening and feeling the massage right across your low back. Breathing deeply.
And then, as you feel ready, you can come back to center. Draw the knees in towards the chest. And, keeping your eyes closed, I'll remove your eye pillow, and then, very slowly, rolling onto your side. As you come onto your side, whichever side feels most comfortable for you, you can fold the blanket under your head another notch. So it's supporting your neck and your head and it's not too flat.
And then just take a moment here to bring your hands to your body, your heart, your breasts, your shoulders; whatever feels the best to you. And give yourself the kind of hug that you would give your dearest friends. The kind of love, loving hug that really communicates so much, energetically. And feel the love and the compassion that you hold for yourself. And at your own pace, your own time, there's no rush, you can start to transition slowly up to seated.
You can keep the blanket around you if you need it. And feel free to come back to seated for a moment. So you'll sit up on the bolster or blanket. There you go. And you can cross your legs, but you can also straighten your legs here, if that feels better.
Just taking a moment to sit in the way that feels best to you. And feeling into your body, your breath, the light within you. Hands coming to anjali mudra at the heart. Namaste. Thank you.
Thank you for being with us today. We wish you deep healing. Namaste.

You need to be a subscriber to post a comment.
Please Log In or Create an Account to start your free trial.