Description
About This Video
Transcript
Read Full Transcript
Hi guys, in today's practice we're going to be doing a handstand preparation series. These are the kind of drills and warm-ups that I like to do before I go into my handstands. So let's come onto our hands and knees, we come to one of my favourites, the cat pose. Let's bring the shoulders over the wrists, knees under the hips, we just work on some spinal articulation. So find the neutral pelvis, pulling the shoulders towards the hips and then as you exhale I just want to isolate the pelvis so I curl the tailbone under and then moving the pubic bone back to the neutral position and then lifting the sitting bones up and then coming back to neutral and then again tucking under and just feeling just the pelvis moving, try not to move any other part of the spine and then once you get to that tucked under position then start to round the back, the middle back and up between the shoulder blades and then start to come back to the neutral position.
So just holding the neutral position, then we'll just work between the shoulder blades, scapular shrugs or scapular push-ups. So we protract the shoulder blades by pushing up and then pull the shoulders to the hips and then from there just keeping the arms straight, sink down between the shoulder blades so the shoulder blades come together, try not to let your back arch and then press back up and again sinking down, try to isolate the movement between the shoulder blades so that the lumbar spine is not moving and that's it and then just tucking the toes under and coming back to a child's pose, the arms stretch out in front and then slowly coming up keeping the spine curled under so now you're going to bring the shoulders over the wrists and tailbone tucked under slightly, ribs drawn in and lift up to a high plank position rolling the thighs in, tailbone under, draw the ribs in, press up between the shoulder blades and pull the shoulders to the hips. So this is one of the main positions that you need to understand for your handstand. You can build up your strength here but I just want to fire the muscles today, not going to hold it too long and then exhale come down and go back to that child's pose and then coming forward you can lie down on your stomach. Another key position to understand is the body line position so we bring the feet together and lift the knees up and rotate the thighs inwards and then curl the tailbone under, feel the lower belly come off the floor and you're also going to imagine that you're drawing the lower ribs away from the floor and then you stretch the arms out in front.
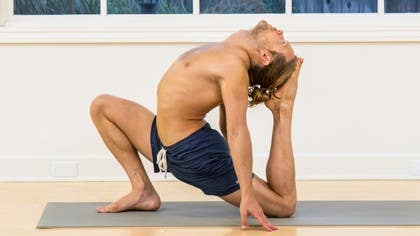
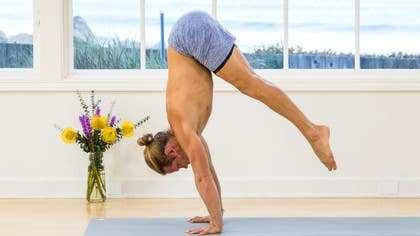
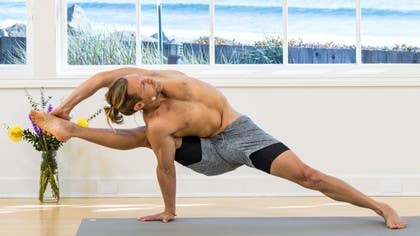
If you have a stick, a broomstick, some kind of a pole or a bar, it makes it easier to do this but basically you would grab the stick or if you don't have a stick just extend the hands and lift your arms up. Keep the thighs internally rotating, knees lifted, tailbone tucked under, ribs in and try to extend the thoracic spine. And exhale and come down and then again just going back to child's pose and then coming up onto the knees again and we just also warm up the wrists a little bit so bringing the shoulders over the wrists, keep the spine in neutral and just start to lean forward, feeling, pressing into the base of the hands, also into the base of the knuckles. Leaning a little further forward, start to grip the floor with the fingertips and shouldn't be any pain in the wrists so don't force it, just starting to explore your range a little and then coming back, shoulders over the wrists, turn your hands out, shoulders towards the hips, find that neutral position and we go to the left side, same idea here is feeling, pressing to the heel of the hand and into the base of the knuckles, start moving towards the fingertips, gripping the floor a little with the fingertips and then come back to the middle and going over to the right side, same idea, pressing to the heel of the hand, base of the knuckles, fingertips and then coming back to the middle and then turning the hands around, fingers towards the knees, shoulders towards the hips, neutral spine and you can tuck the toes under and just start to lean back, you can allow the heel of the hand to lift off the floor, start feeling a stretch through the forearms, just a gentle stretch if you can sitting back towards the feet and then releasing and shake it out so you do want to spend a bit of time conditioning the wrists if you're going to get into doing handstands so another good one is to make a fist, bring the knuckles together and you can bring the backs of the hands to the floor, keeping the knuckles touching, start to straighten your arms, you feel a little bit like Arnold Schwarzenegger, good and so you feel a big stretch through the forearms here, you can do the same thing sitting up so make that fist, bring the knuckles together and then start to straighten the arms, keeping the knuckles touching and shake it out and for a moment just cross your legs and you lie down on your back so another important position for the handstand is the hollow body position so where all that spinal articulation really comes in handy so generally when we go upside down the lower back arches so we need to learn how to control that so these drills help to give you that understanding so bring the chin toward the chest so your shoulder blades come off the floor so the middle back going flat, ribs in and then start to curl the tailbone up so the lower back goes flat and then you can bring your hands here and then just extending one leg and then the other and so what you don't want to do is let your lower back lift off the floor so curl and get that internal rotation of the leg pointing the feet either hold this position or to make it more challenging fingers to the ears again lower back stays to the floor more challenging position arms over the head and bringing it in again if you want to you can build that up to a minute but for today I'm just trying to get that activation so that when I go upside down everything switched on so cross the legs roll forward again and let's come into a downward facing dog and in the downward dog also try to find that articulation of the spine particularly of the hips so instead of lifting your sitting bones up toward the ceiling I want you to think about bringing the hips into a neutral position to slightly tucked under ribs coming away from the floor so you're trying to find a straight line through the arms through the shoulders through the hands through the hips and the head in a neutral position so not down not up so basically the shoulders in line with the ears and then you can lift your right leg up and try to find that straight line from the hands shoulders through the hips and out through the leg so we're going to create a little internal rotation again and then bring the foot down and try the other side so slight curling under of the tailbone ribs in press through the arms to the shoulders try and find that connection through the hand out through the leg slight internal rotation and then bring it down and just come down onto the knees and come to your child's pose for a moment you can find that same movement in the downward puppy if we come onto the fingertips bring the hands forward shoulders hips over the knees and so we have the three positions spine extended spine flex and then neutral so you know hands down we want to try and find that neutral pelvis so just slightly tucked under not completely tucked under this little tuck ribs in and then really is the head in the neutral position for now and this is something like what the handstand should feel like positioning of the ribs and the hips and one of the things that's going to limit your handstand is your shoulder mobility so it's important also to work on that and an easy way to do that is simply by coming onto the elbow bring the thumb into the shoulder like this take your armpit toward the floor and then draw the ribs in away from the floor at the same time feel like you're really pressing your elbow down into the floor creating some resistance as you stretch the tricep and so you're really trying to just open up this area here and then repeating on the other side bring the thumb in sink down first and then draw the ribs in slight tuck the pelvis press the elbow down into the floor good and then releasing and then just coming back to your downward dog again and then stepping your right foot forward and so another area that you need to open up for your handstand to get a good line is the hip flexors so if the hip flexors are tight you won't be able to get straight in the handstand so just work on the hip flexors a little so just sinking the hips down so inhale head up and exhale tuck the chin in inhale and exhale and again inhale exhale something you can notice here is as you tuck under that makes the knee bend okay so we want to resist that particularly when you're in the handstand so we really have to work on keeping the legs straight you know that you've tucked too much when the knee bends so keep the legs straight same when you come to a lunge like this if you over tuck the knees you're in a bend so you need to keep the legs straight so let's take the hands up in line with the ears keeping the ribs in so this is a feeling when you're upside down and really reach for the ceiling with the hands keep the knees straight you would take one more breath in and then exhale hands to the floor let's just lift up knee to the chest so you get that good high plank position and step it back and then to the downward dog finding that neutral spine in the dog and then stepping the left foot forward sinking the hips down lift the right knee up to inhale head up curling under as you exhale but keep the knees strong inhale exhale inhale exhale and then coming to your high lunge again so ribs in tailbone slightly curled under we keep the knees straight as you take the arms up in line with ears and really reach for the ceiling with the arms and hold one more breath in and then exhale hands to the floor foot lifts high plank and then go back to the downward dog and just bring your feet towards the back of your mat and coming forward to your high plank just walk the plank a little so from here you're going to walk your hands forward maintaining that hollow body position so don't let your lower back collapse you want to just keep the knees strong that slide here it's quite a strong tuck under as you walk the hands forward and then walk it back and then go back to the downward dog and then we can just step your feet to the front inhale lift the head up and exhale fold forward so this also your hamstring flexibility you need to work on that if you want to start working towards doing your press the hands down and then inhale and slowly come up to standing and we'll just work on the upside down handstand so I'm bringing the feet together so we want to start by just feeling the weight evenly in the feet and then just shifting the weight a little bit into the heels where predominantly the weight is going to be in the heels of your feet just like when you're in the handstand most of the weight should be in the heel of the hand and then shifting a little forward into the balls of the feet same like in the handstand the base of the knuckles and then the toe tips are there like if I'm falling I use my toe tips to catch me and then I shift the weight back same the handstand if you're falling use your fingertips to catch to save the handstand okay then we lift the kneecaps up and what I mentioned earlier if you when you curl the tailbone under there's a certain point when you start tucking that the knees start to bend so then you know it's too much so you're going to keep the knees straight and curl under and stop before the knees start bending the ribs stay in you need the thoracic extension so you lift up through the collarbones lengthening through the crown of the head I'm going to take the arms up and try to bring your shoulders in line with the ears okay so this is where that shoulder mobility is important without letting your back arch or without having to sway your hips forward so do all those openers for the shoulders stretches against the wall for example so we take the arms up try to bring the arms in line ribs in tailbone down and then extend your wrists so it's as if you're pushing up against the ceiling and then you can stretch your throat to look to your hands okay and so this is basically the position of a handstand there's also sometimes you see handstand down like this if you need to do that to find your balance it's fine in the beginning but eventually trying to move towards this position and then exhale bring the hands down so once more inhaling reaching up look up and then exhale this time bending forward and then inhale head up and so in the sun salutations you can start to work on your handstands by bringing your hands forward and then leaning forward so you're going to start feeling the weight shift bringing the shoulders over the fingers keep pulling your shoulders towards your hips until you feel like your feet are becoming very light eventually you may even be able to lift up in the beginning you may also need to just bend your knees a little lean forward and jump up okay so lean forward jump and go back to your high plank as you get stronger you bring the hands closer as you get more flexibility in the hamstrings you can keep the legs straight lean forward and lift and jump back to your high plank position okay then eventually the goal being just be able to keep your hands next to your feet and press and lift and float back okay but in the beginning it's going to be easier for you to have the hands the further forward your hands the easier it is so you can be here and you can bend the knees also jump find the balance point and then float back another way to work on that principle is you come towards the back of your mat and start with the feet wide apart in a straddle position and so you bring the hand shoulder width apart lean forward come up onto your toe tips start leaning forward and feel like you're going to just lift the feet up and float forward lean forward and just walk towards the front of your mat same on the way back so lift and take it back okay so for some of you that may be not attainable at the moment so what you would do is work with your knees bent or with the legs straight depending on the flexibility so save I did it with the knees bent but still lean forward and then just bend a little and use a little hop and come forward lean forward toe tips feel the weight in the arms and the hands bend the knees hop forward and the same on the way back hands here lean forward hop and take it back and forward hop and back okay you can try a similar thing in our frog jumps so we come into a squatting position bring the hands forward and hop forward okay and same on the way back hands forward jump knees to armpits and in the beginning just feeling the rhythm or the flow of the movement and then we practice working towards finding the point of balance so here and then down so that's a handstand already we go forward jump point of balance there's your handstand and come down okay and then the way back up point of balance and then back find the balance and then back and back okay and let's bring the feet together so try the same thing with the feet together essentially you bring the hands forward jump there try to find the balance point there and down and same on the way back hands forward balance and back balance and back and so when you're doing your sun salutations basically use that principle so from the downward dog you're going to jump and try to find the point of balance before you put your feet on the floor so for i'll just show you like say for people who don't have the hamstring flexibility yet you'll use that last version so you're here in the downward dog bend the knees look forward jump point of balance and then land on the balls of the feet knees bent and then straighten the legs head up and fold forward then as you get more flexible the next stage would be to jump in knees bent and try to land with the feet flat a little bit closer and then fold forward and then as you progress then you start to work with the legs straight and then eventually you find the handstand as you float forward so you find the point of balance there and then here i can either go up to a handstand or i go forward and lift the head up and then down okay so now the same thing on the way back so in the beginning depending on the hamstring flexibility you may need to lift the heels up bring the hands further forward and you jump up find the balance it's still a handstand there so you're in a handstand and then you float back to a high plank or as you get more flexible you start being able just to lift it up and again i'm here it's either a handstand there or i go back to the high plank and this is a way to start integrating your handstand practice into your sun salutations okay so one of the things i find if i'm doing a lot of handstands is that my shoulders get tight so i take time to release the shoulders i'll just show you a few of my favorite ones and start lying on the stomach you bring your left knee up and then thread your left shoulder across the body and just drop your weight down the right arm can come out in front head can just rest down and i create some resistance here so i'm pressing my elbow down into the floor as i drop the weight down i try to straighten the arm the left arm i'm going to spend at least 30 seconds in this stretch if not more just exploring the shoulder finding those tight spots good and then you come up and change the other side so bring that right knee up thread the right arm across straighten the left arm create that resistance pressing the right elbow into the floor play around with pulling the right shoulder towards the hip relax the face and relax the neck slow even breathing let's take one more breath in and then exhale and slowly come up and then we'll come into the Gomukhasana position again so with the left leg on top let's take the right arm up and either just hold on to your elbow or if you can take the left arm back you want to make sure you keep this shoulder mobility if you're going on the handstand journey so ribs in can deepen that stretch by bringing the elbow behind the head and lift the head up which again is quite similar to the feeling in a handstand ribs in collarbones lifting and the arm going back and then releasing and then I just also like to stretch out through the side body through the lats and you can experiment with the different shoulder position here so turning the elbow toward the floor or the elbow away from the floor also feels good in this position opening up through the armpit there and then look down exhale and inhale come up and just opening the chest so bring the shoulder blades together externally rotating the arms and inhale stretch the throat and exhale release and let's change sides so bring the left foot under right foot across with the right foot on top let's bring the left arm up either hold the elbow or if you can take that right arm back pulling the hands against each other drop the tailbone down ribs in lifting the collarbones up and to make it a little deeper stretch bring the elbow behind the head as you lift the head up and back at the same time press the elbow forward almost like you're trying to get out of the position so you're creating that resistance a little tension in the muscle as you stretch it and then release and go into that side bend take the left arm past the face ribs in and again experimenting with that shoulder rotation here so armpit elbow toward the face on the floor and then armpit elbow away from the floor it also feels good it's really stretching right out through the fingertips and then look down exhale inhale come up externally rotate lift the chest spreading open the front of the body inhale and exhale and then just coming into a comfortable cross leg position and we'll just take a few rounds of ujjayi breathing breathing with sound at the back of the throat feeling all the way up to the collarbones as you inhale amping slowly completely as you exhale again breathing in and out breathing in and out emptying the breath completely and then returning back to slow calm abdominal breathing and then we'll just take a few moments to lie down just to make sure the nervous system is calm and relaxed before you go on with your day so you can just carefully lie down just lengthening the back of the neck making sure to consciously relax through the neck and the shoulders particularly the trapezius sensing that the muscles of the neck the traps are melting feeling the front of the body opening opening across the shoulders the chest releasing tension through the abdomen the diaphragm the sensing sensations in the fingers the toes relaxing the face and feel free to stay here or if you wish can come up to sitting so let's first stretch the arms over the head take a deep breath in and then exhale and bend the knees to the chest and then roll over to the right side and slowly come up to sitting and thank you very much hope you enjoyed.
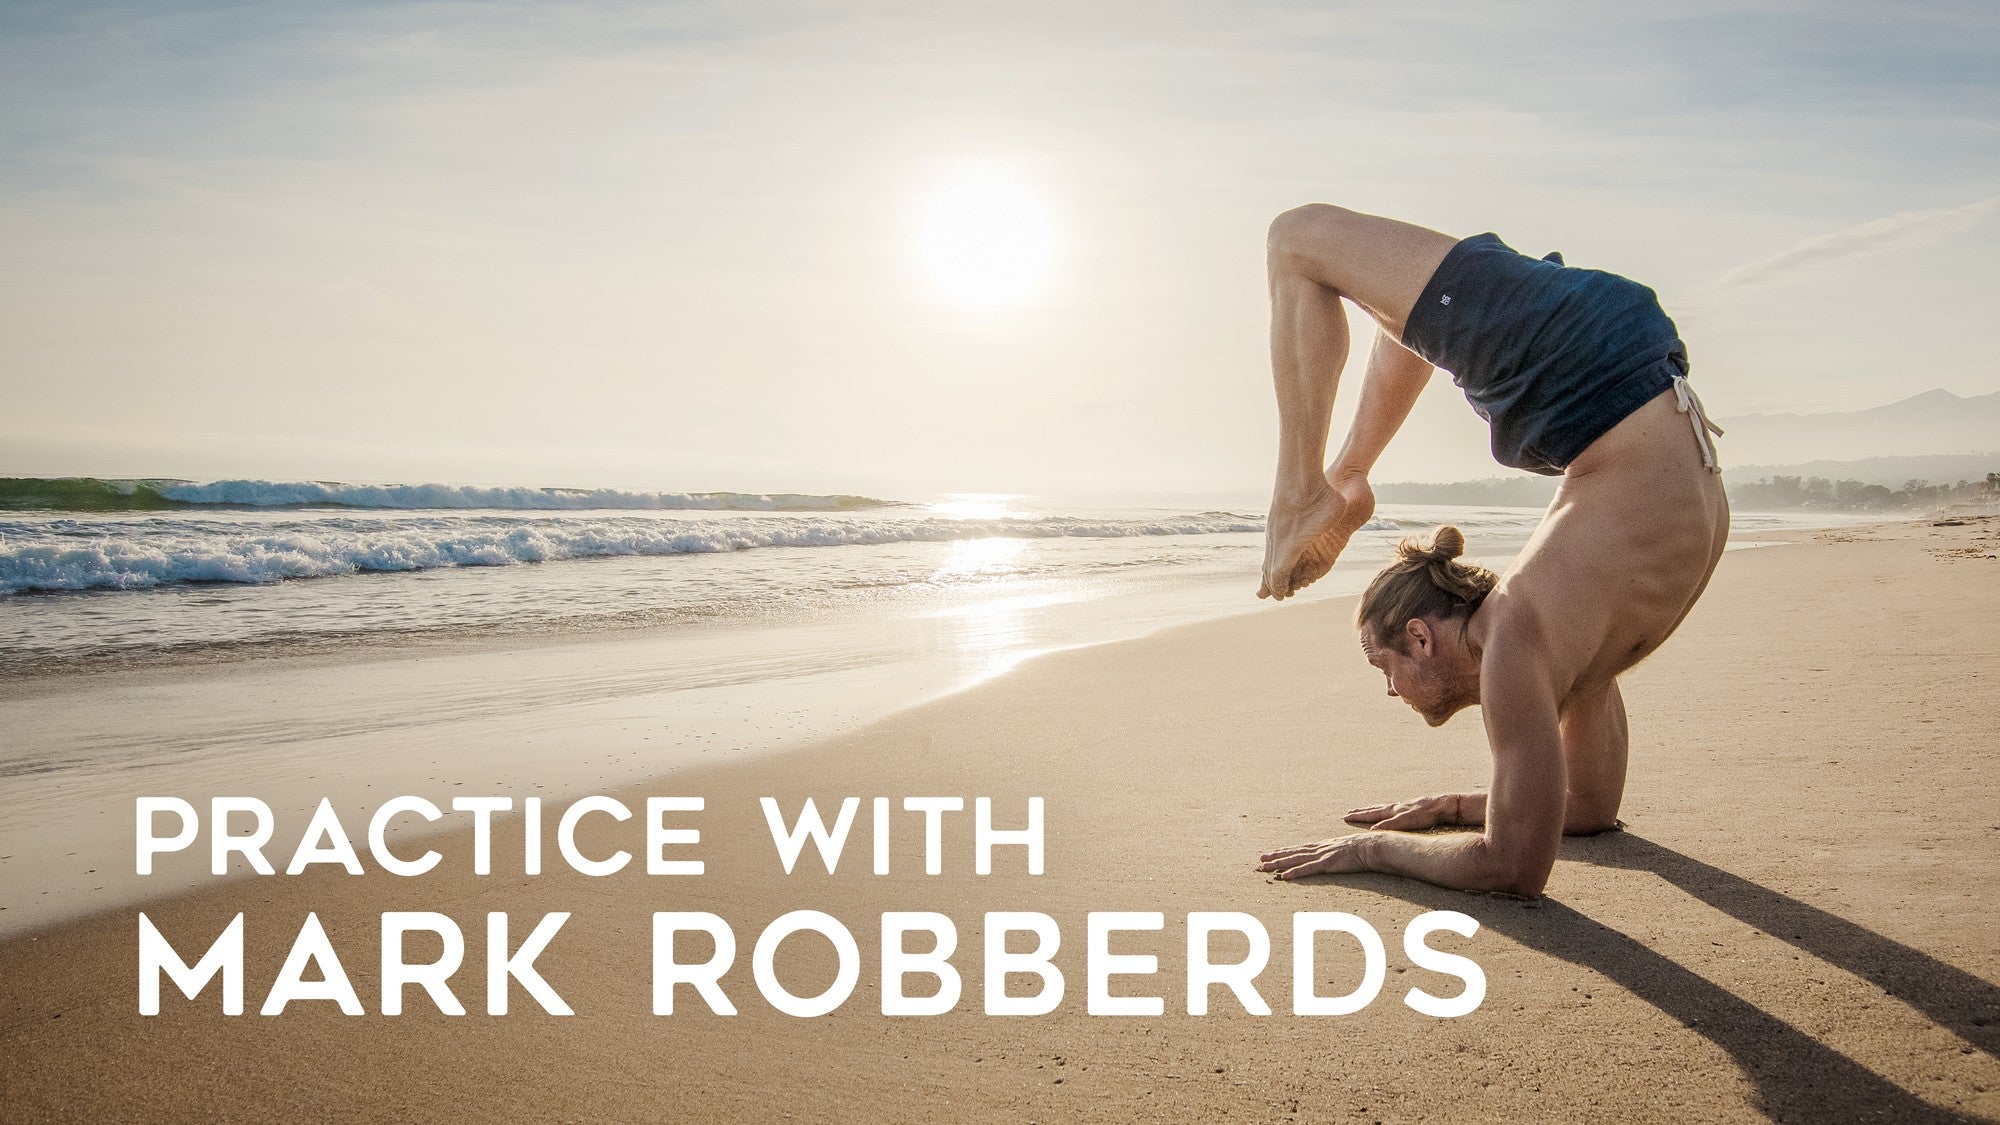
Practice with Mark Robberds
Mention
 |
Mark Robberds (Teacher) |
 |
Ch Marie d’I |
 |
Monica |
 |
Laetitia |
 |
Heidi H |
|
|
Marlene K |
|
|
Aaron K |
|
|
iOS Cust522252 |
 |
Lauri K |
 |
Kate M |
Comments


You need to be a subscriber to post a comment.
Please Log In or Create an Account to start your free trial.
