Description
About This Video
Transcript
Read Full Transcript
Hi. In this episode we're going to be working towards unsupported shoulder stand. You're going to need a couple of locks, two to three blankets, and maybe a chair. And set yourself up close to a wall so you'll have that for support. We're going to start on our backs and you'll need a strap.
So we're going to do the Supta Padagusthasana series down here. So you unroll your strap all the way. You don't need to loop it up. And you'll put it around your foot. So a lot of times we tend to put it up here towards the ball of our foot, and that creates a nice flex in the ankle.
But I want you to move it farther down so that it's more towards the bottom part of the arch. And then I call this the boxer wrap. So you take your pinky edge to the strap, wrap it around your knuckles, and then turn and hold and your arm is straight. So here we are. And the tendency is to think about getting yourself into the pose as deep as you possibly can.
And here instead of that, I want you to get to where you're in a place of just your first sensations. So just the first sensations of stretching. Your arm is totally extended. The shoulders are relaxed. And then take notice of the pelvis and the inner thigh.
And see if from that place you can start to move out towards the knee and then the foot. And so this isn't a big motion. It's just a little bit of decompression there. And take a few more breaths here. And then from within the pelvis, you're moving back through the glutes.
So they're going in two different directions. Your inner thigh is moving towards the foot. And the space deep within the back side of the pelvis is moving towards the glutes. And this will serve us later when we have to really engage those muscles to be able to get ourselves up and stay up without the support of our hands. And the next breath you'll release the strap.
Stick your other foot in there and switch it out. Do the wrap again. So it's pinky edge around the knuckles. Take a hold. And so it's important, too, to learn how to have straight legs.
It took me a year to figure it out. So we have our microbend. We have our hyperextended. And then try and find straight, which can be humbling if you're a constant microbender like I was. And again, taking your felt sense into the inside of the pelvis, deep inner thigh.
And moving it along the line to the big toe. And breathing here. And then in the opposite direction from inside the back of the pelvis towards the glute. And so that there's two things happening. And again, this isn't necessarily something that you're going to see too much visually.
But felt sense-wise, there'll be a difference between not engaging and engaging. Let me take a few more breaths here. Trying to just sense into that space in your body. Becoming familiar with it. And then we'll undo the strap.
We'll release. And you'll come on up. And we'll take downward facing dog. So I like to do my downward facing dog on blocks because it helps me get up and over my pelvis and into my legs. And it helps me have straight legs, which I learned I never knew how to do.
So you might experiment with this if you've never done it before. So from downward facing dog, you're going to want to find your serratus, which is around your side body towards your ribs. And you're going to want to move that towards your hands to lengthen through the spine. And then try and find some intention through that first knuckle of your fingers. The lower back's going to find a little bit of a curve.
And you'll root through the inner thighs all the way down through the big toe ball mount. Taking a few breaths here. Not forgetting about the side body, maintaining that inner leg line. So there's definitely stretch sensation, but there's also a lot of work happening here. You're building some heat, and it's not just a hanging out downward dog.
The next breath, you'll take the gaze forward, and you'll step your left foot forward between your blocks. And I like to set up with the block on its highest setting outside my foot. You'll take the gaze down towards the floor. So a lot of times we think about side angle as kind of an open shape. And here I want it to really be more about the side body.
So we have the gaze down. You have your torso facing down. Your back hip is rotated in. Really root through that inner leg line. Push down through the hand into the block.
If you're open enough and you have it a little bit lower, that's fine too. But it's always nice to start with more support, and then you can always take it away versus the opposite. And then find your top arm and put it by your ear and go over the head. So it's going to feel weird, especially if you're always used to doing it this way, but go over the head. So even for me, it blocks my eye a little bit, and that that's okay, that this isn't a back bend, but I'm getting into my side body.
So I root strongly through inner thighs with both front leg and back leg. I find the pinky edge, and you can see this spot below my shoulder starts to get a little bit more round, and then I reach through the fingertips. The last portion is to rotate from the navel, but not trick yourself and lose the upper arm. So rotating from the torso versus your shoulder. Shoulder blades are broad.
Keep breathing here. Again, this can be a lot of work. Breathing through that front hip crease, which tends to hold on a little bit. And then the gaze comes down. Take both blocks with you as you walk around towards the right, parallel your toes.
For arda prasarita, extend through the spine here. Take the gaze forward. Find the inner thighs, soften hip creases. Extend through the lower back, find an inhale. And then with the exhale, you might fold here up and over the femurs as you release the head.
Another inhale. You come back up. Extend through the spine. The gaze goes along the floor, inner thighs, strong, hip creases soft. And then we walk back around towards the front.
I carry my blocks with me because, again, I like to do downward dog with my hands on blocks. And we step back, downward facing dog. And we breathe here. Again, finding that side body length all the way through first knuckle. Lower back, arches slightly, inner thighs engage.
We'll try that whole thing on the other side. So your right leg steps forward. Take your block to the outside of the foot. Have the gaze be down. Find the inner legs here first.
Get the support grounded. Soften through your front hip crease. And then take your hand by your ear and reach it over. So my shoulder blades are broad. I'm not crunching them together.
I'm keeping that space there. Find the whole length of your side body from pinky edge all the way through the tips of your fingers. All right. And then as you press down through the floor, you rotate here from the spine. Inner thighs are strong, softening that front hip crease.
Keep reaching. Find a few more breaths. Gaze comes down. Grab ahold of your blocks. One walking over, prasarita.
Extend through the spine here. Gaze along the floor. And then exhale, fold. You might be able to get a little bit more out of this one, right? Strong inner thighs, soft hip creases.
Extend through the spine. Walk back around here towards the front of your mat. Again, bring your blocks with you if you've been enjoying hands on blocks in your downward dog. And come on back. Breathing here.
Again finding your serratus, first fingers, lower back arch, inner thighs, soft hip creases. Another breath. And so from here, we're going to come on down. You can move your blocks out of the way, and we're going to grab a chair. So if you don't have, like, a yoga chair, that's fine.
You can literally use a dining room chair. I use a dining room chair at home. A yoga chair just tends to have the back out so you can do other things with it, but we're not going to need that. So a dining room chair is fine. We're going to use it at the wall.
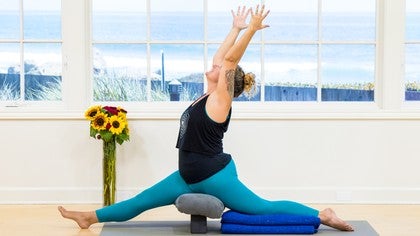
You want to place it on your sticky mat so the feet are actually on the mat so they don't slip. And you want maybe, you know, I don't know, that's like two inches away from the wall. You'll need a strap, and you'll need a blanket. So you use the blanket so that it's more comfortable on your ankle. And again, you want a little bit of space away from the wall so that you're going to have room.
Some people like to put a block here. If you have more hamstring availability, you can put one or two blocks on the back. I don't. So I just use a blanket. So again, you take your strap, you don't need to loop it up or anything.
And you put your foot on the back of the chair. You want to make sure that you have a little bit of space between, you know, it doesn't have to be a lot, but just a little bit so there's room to grow. We're going to do that same movement through our inner thigh to try and teach ourselves to extend out from that place. And then I'm going to place my strap around my foot, again, towards the lower part of the arch here. I take my hand around, right?
And work here. You can let the other arm come up. So the standing leg, the one that's on the floor, that's also moving out from the inner thigh. The way that I can find this in sensation is by pressing down strongly through my bigger big toe ball mount, but being mindful that I don't create an imbalance in where I'm distributing my weight in that foot. And then the extended leg, the same thing.
I start to move out through that inner leg line. And then back through the glutes. And for me, what happens here is then I get, like, a ton more sensation and a lot more opening in my hamstring. And this is not necessarily at my total edge. I'm not bringing my leg all the way up as absolutely high as I can, right?
So I have that space to explore this really subtle difference. Take another breath and then release and switch it out other side. So put the other leg up here, put the strap around, hold onto it with your arm. Find the bottom leg, which is good. All right, so starting there, rooting through the big toe ball mount, creating that space in your hip joint, your right arm comes on up, those legs the whole way up that side body.
And then the leg that's on the chair, right? You're moving that inner leg line towards the wall and from the back of the pelvis towards the glute. My joke with the community is it's the gluteal fart. Because that's what it is, right? It's very subtle.
Don't want anyone to know, but you're doing something. And then we release this. And then you can put your strap away for now and you take your hands onto the chair and you step back for a downward facing dog, the support of the chair. So I'm actually going to move this a little bit closer to the wall so I can push into it. So here we're going to find the hands from the serratus.
So all the way from our side body we go really long. And then I extend through my spine so there's a little bit of a curve in my lower back. Find the inner leg line of my inner thighs and softening through the hip creases. And can I do all of those things at the same time? There's a lot of work happening here.
And it's really easy to just kind of pass by these sensations. If you're somebody who's a little bit more mobile, right, your work here is to really stay before you get into your stretch sensation and work the muscles to hold you here. Another breath. And then from here we'll bring our feet closer in towards the chair. And then we'll move our chair out of the way and come to the front of our mat.
So from here we're going to practice upward salute and move into Virabhajasana 3. And we're going to use all those things that we've already been focusing on. So really strong side body, really strong inner thigh work, but just in a different orientation to the mat. So we'll take our arms up overhead here. I find my inner thighs, I root them down all the way through the big toe ball mound.
I allow the pelvis to slightly tilt back. I move here from my serratus all the way up. And then I might even take the gaze up. Keep working through inner thighs. I take the gaze back forward here and I let the weight start to shift into my left foot until my right foot gets a little bit lighter.
I keep working really strongly through inner thigh and through the serratus and into my fingertips as I start to take the leg back. And so forever I used to think that you had to point the big toe down and I don't think you do anymore. And so there can be a little bit of opening through. And then when you get to like your edge, which is my edge, you start to shift the weight back so that you can get a little bit lower. And then you bring your fingertips down to the ground and you let your foot come down.
I'm going to find my blocks, extend long through the spine here, strong inner thighs. And then exhale, fold. I may bring my hands back a little bit closer towards my feet. Then through the knees, take the gaze forward, support the inner thighs and then come back up. Take the arms on up overhead and we'll find, I'm going to move my blocks forward and we'll find our upward salute again.
So inner thighs nice and strong. Serratus working. Bone moves away from the navel and gaze might come up. Gaze comes back towards the center of the room. Your weight starts to shift over into your right leg.
So for me, I get tired and I want to relax this. And so that's the work here, is to keep all of that engagement through the inner thigh, through your side body as you start to get lighter. Again taking the foot back for every adjustment three, keeping it strong through the standing leg and reaching through the back leg through the fingertips. And then you get to your edge and you shift back through the leg. Hands come down, foot comes down.
Inhale extend through your spine. Start at uttanasana and then exhale fold, releasing. Bend into the knees again here, ground, rise on up, upward salute. Exhale hands to the heart. So we'll take a nice deep uttanasana from here, root through your inner thighs and start to come on down.
I like to find my blocks. I'll start to take them closer towards my feet, inner thighs, grounding. I'm taking the hips, creases, back through and out through the glutes. So obviously they're not really going back out through the glutes, but sensation wise or my felt sense, I'm moving that through. And so that brings your weight back into your heels.
And for me, I'm deciding that that's okay, that I'm not needing to keep it perfect here, as long as I've got nice strong inner thighs. And this allows me to get some length in my lower back, which is actually what is the tight part for me in forward folding. And then I'll root through my right leg and I'll step my left foot back using my blocks on either side of the feet, coming into parsvottanasana, ground through inner thighs, soften this front hip crease out to the side. And as soon as I do that, I'm able to kind of get up and over my femur, inner thighs of the back leg rooting. I like to extend through the spine here, push down through the hands and literally like lifting up and off my legs, and then come into the fold for parsvottanasana, right?
Again, mindful of hyperextension versus straight versus microbend. And can you find straight? Can you start to play with that relationship? Release this, bring the blocks a little bit forward to get grounding into the hands, step the back foot forward, inhale, extend, exhale, fold. Stepping your right foot back, and again using the blocks here, find the inner thighs first.
So we're finding our foundation first, right? Front hip crease softens out to the side. And then I need to come up onto higher blocks from my left leg, right? Push down here, extend up and over, and then fold. So for me, this is like some serious hard work, right?
It may not visually be as represented as something super deep, but maintaining all of those actions at the same time, maintaining the strength through your inner thighs, maintaining the lift up and off the pelvis requires a lot of deep work. Take a breath here, take the gaze forward, walk the hands forward, inhale, arda, uttanasana, exhale, fold. I'm going to take my blocks onto their medium setting and come into my downward facing dog. Breathe here, extending strong through the side body, making sure my blocks are even, strong through my side body, first knuckle rooting, lower back arching, inner thighs grounding, hip creases moving in towards the body and out towards the side. Taking a breath here.
From here we're coming on down onto the ground. You can move your blocks out of the way, and you can come all the way down onto the belly. So again, this is really similar to what we've already been doing. We're using all those same muscles, inner thighs, side body reaching, the arms come up overhead and the gaze is down towards the floor here. So I'm going to start with that length.
So inner thighs reaching length from my side body, and I'm going to let the length be what lifts me up for salabhasana. So it's not necessarily the deepest back bend I could get here, but I'm really going long and working that. Another breath here, and then exhale, bring the hands down. You can turn the gaze to one side, take a few breaths. We'll do this again, so this time the arms are going to be back.
So I like to imagine that the hands are in cargo pockets, and I'm reaching down, I'm getting that length through my chest, and then I find the length of the legs and I start to lift up. Keep reaching in both directions, long through the crown of the head, arms are reaching down, legs are reaching, and then exhale, gaze turns to the other side. We'll turn around onto our backs for a little bit of core. So this core work sucks, just so you know, right? You're going to put your feet up overhead here, and you're going to reach your arms then up overhead.
You're going to find that side body, and then you're going to lift the seat slightly off the ground. So here you're lifting deep from inside the core and using that inner thigh. And then you're keeping this as you start to extend one leg towards the ground. It doesn't need to touch, right, and then we come back up, and that's a lot, right? And then all the way, right?
Which is different here if I let this go and I'm just using my leg muscles, right? I want to use that deep inner core. We'll do one more. So slowly lowering down and coming back up. Don't forget about your upper body.
Slowly lowering down and coming back up. And then you're going to be like, oh, that was enough. If you are somebody who really likes core work, you should do more of those, right? But I'm done, right? So hip pause and keep doing your core and then come back when you're ready, right?
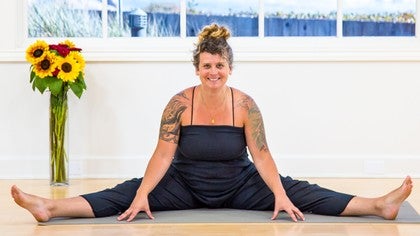
So I'm just re-plugging back in my femurs, circling my knees in both directions. And then we'll take alter pose. So I'm going to sit back up here, put my arms behind me, lift up my hips, lower the seat on down. And then if I want a little bit more, you extend your legs on out, fingertips towards the seat and upward facing plank, really sit on down. Okay.
And then we'll set up for some seated work. So Dandasana, right hands are along the sides, extend nice and tall through the spine. Take the arms out and then right on top of left, extend up through the spine. And then it's not like Pashimo. We're just getting a little bit of rounding to the upper back.
So I'm not even really necessarily getting into my hamstrings, right? I'm getting into more of the backside of my heart and I might get my chin involved here. So lowering the head down too. And then lifting back up, extending through the spine. And then we're switching the arms.
And again, as we nest down, we're not necessarily folding from the waist, but we're letting it's like the thing that everyone told you weren't allowed to do in yoga, right? Letting that space come in through the backside of the heart and then allowing the head, right? And see how this can mimic some of that shoulder stand alignment here, in particular when we go unsupported, right? There's a rounding in the lower back that happens. We'll take our right foot in here, adjust the seat, right?
So you're aiming for heart more or less through the center, right? Leg is straight, lift up and off the pelvis, and this might be enough, right? You might start to come farther forward. When you're about two-thirds of the way down, that's when you want to round. So for me today, this is like, this is good, and I'm going to work through that inner leg line, through the extended leg.
The hip crease on the outside is moving out, right? And it's then moving also in. So my hip crease here is moving out to the side and in through the glutes. I'm doing that opposite direction. And I get a lot out of that.
Dandasana, standing through the legs, strong core, and then switching sides. Adjusting your seat here, reaching through the inner thigh, long up through the spine, up and over, and then coming. Hip crease is softening, trying not to use your glutes, right? And then again, this is good for me. You can go further.
You want to get to about two-thirds of the way down before you really let the rounding come in. Hmm, there it happened. Soft hip crease through the glutes, inner thigh reaching, right, retraining our muscles to work in a different way. And we'll slowly come back up. Dandasana.
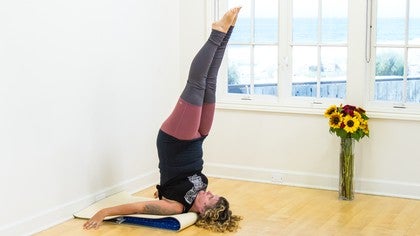
And now we're ready to move into our shoulder stand. So this requires a little bit of propping. I like to use two to three blankets. Today we're going to use two. The reason why is that, you know, shoulder stand can sometimes get a bad rap for having a lot of pressure on our neck when it's properly supported for your bone structure and your flexibility.
It should feel nourishing, and the sensation that I get in my upper back and my neck is more of like a hot stone massage than pain, right? So it should go without saying, but you definitely don't want to have any pain in this setup. If you are having pain in your neck, right, or at any place, please stop. And you might start thinking about putting up more propping. If you're not familiar with shoulder stand, you want to make sure that you're doing the supported version before you're doing the unsupported.
So I'm more or less about a torso distance away from the wall. If I'm too close to the wall, my hands won't have enough space to extend. If I'm too far away, then I don't get the support of the wall coming up. I use the wall to get up because I'm using this propping. It will be much harder to engage through my abs to get up and over.
And then I end up swinging, and that's not necessarily good for your cervical spine. So we're going to fold the mat over like this. There's two blankets. You want to make sure that it's the nice, soft edge is towards your neck and that the fringe is towards the feet. And then the mat comes up and over here.
My head is going to be off the mat. My shoulders are going to be on the mat. Your head is free, right? Shoulders on the mat. And then you come over to the side, and you roll over and get your feet up the wall.
So I'm going to make sure that my head is off the mat and my shoulders are on the mat here. And then I'll bend into my knees, get my feet nice and grounded into the wall. And then I'm using my legs, strong inner thighs, robot my arms, press the elbows into the ground here and lift my hips up. So this is even an option to stay here. This is fine, right?
And you might work that shape. If you're going to go a little bit further, right, start to lift your seat up, walk your feet farther up the wall and get your hands underneath the kidneys. This is like bus stop number two, right? Working through inner thighs, breathing here. Three is to take one foot up off the wall at a time.
Let's bus stop three. Four would be to take supported. If I'm taking supported, I get that nice reach through the leg, and then the other one easily comes with it. So this is bus stop four. And the supportive variation, I'm not using too much core.
This is a more, I'm using my arms, I'm reaching through my legs, but my core is relatively neutral. In unsupported though, I do all the things that we've been doing. I find those inner thighs, and I start to lift. And as I lift, I'm getting lighter and lighter on my hands until I can take my hands behind me. This is bus stop maybe five, right?
From here, just testing out the waters, right? Maybe taking one hand into cactus arms, and then the other. Really strong inner thighs. So I'm letting the lower or the upper back round a little bit, and I'm using that core and inner thigh work to start to get lighter on my fingertips. There's not a whole lot of talking I can do during this part.
We start to take maybe one hand, and then maybe the other, and breathing, releasing back through the cactus arms, taking the feet overhead, and then letting one hand and the other and the knees bend, getting the support before we start to go back towards the wall slowly, and then grounding the seat down. And you'll probably be like, whoa, deuters, right? Take a rest here. You'll roll over to the side when you're ready. You can take as much time as you need to to reset yourself up, right?
And come back to the ground, but then when you're ready, you'll unfold your mat and come all the way back down onto your back. So we'll take a little crocodile twist to release the neck and the spine. You'll bend your right knee, lift your whole hip up, turn over to the side. Let your right foot kind of rest here. Left hand's at a diagonal, or right hand's at a diagonal.
Left hand's on the knee, and then the gaze can go over to your right. You're releasing here from lower kidney around the glute through the knee, and from upper kidney up along the channel, that right side body out through the fingertips of the right hand, decompressing the spine and releasing, and take a full inhale, full exhale here. And then bring your foot back down to the ground, untwist, find neutral here, and preview shavasana, and then we'll bend into our left foot. Lift your hip all the way up so you can come up and over onto the side. Right hand to the knee, left hand's at a diagonal.
And then again, we're decompressing from the line of the kidney down and around through the knee, and then upper kidney up and around up through the fingertips. So the goal is not to get your knee on the floor, right? So then the gaze can go to the side. This knee can stay lifted. Your focused sensation is through the middle of the back, and releasing and decompressing there.
And it should feel really lovely. Full shoulders are grounded, right, so we're not letting the shoulder come up, we're keeping that grounded, and then working on the lower line down and around the glutes, and the upper line up and around on the fingertips. We come back through center, and then here you are in your shavasana. So it might feel really nice to prop up your legs in your shavasana, right? So that you can reintegrate females, otherwise you can prop it any way that's supportive to you.
Feel free to stay in your shavasana as long as you'd like. I'll be here for about a minute, and you can come out with me, or you can hit pause here and enjoy it as long as you need. We let everything center, root back into the ground. We soften through the back side of the body, and through the front. Notice where there's held tension, residual left over from the work we've done, and asking the body to allow the earth to support it.
Notice the sensations of the neck and the shoulders, and let the hips ground, and the jaw to soften, and the forehead, letting go of any clasping of the hands, and resting here. Again, you can always stay longer if you'd like, otherwise when you're ready you'll bend into the knees. Here, let yourself come on over to your side body as a transition space, and then pressing yourself on up to a seat. Take a second here and just ground into your body, and take note of the results of your experience. So letting the eyes close for a moment, taking a breath or two, and bringing the hands to the heart, and bowing the head on in.
Thank you.
Peak Poses: Jessica Garay
Mention
 |
Jessica Garay (Teacher) |
 |
Cay C |
|
|
Judy S |
Comments

You need to be a subscriber to post a comment.
Please Log In or Create an Account to start your free trial.
