Description
About This Video
Transcript
Read Full Transcript
So the part of the path we're on today is the path to Dandasana. Dandasana used to be called stick pose. And I used to wonder, stick, what is that about? And the koan has recently been answered when a friend of mine who's been studying Sanskrit tells me that Danda also refers to staff, like something a spiritual mendicant might lean on a little bit while wandering through the woods. And it also has an even sort of a deeper meaning of a scepter, something that a person of authority might have a scepter as an indication of attainment.
And then deeper still is the spine as our own scepter. So how do we earn this scepter? We get on the path. One step at a time, we're going to start with some things that will help, I think, to lead us to an easier way of doing Dandasana. What is Dandasana, you might ask?
So I will show you. Simple in shape, but not necessarily in execution. The legs are parallel to each other, and the feet are upright as though resting on a wall. So there's a sense of stretching out through your heels and pulling the balls of the feet back. No namaste with the feet, although it's kind of fun to do that.
You could even interlace your toes together if you're needing amusement. But here we are pulling the toes back, and when you really pull the front half of the foot back like this, it awakens the thighs and the knees, and it helps the legs to straighten. And then there's the shape of the pelvis. For some people, it can be quite difficult to tilt the pelvis forward and have the spine have its natural s-curve in a relaxed way above it. So these are some of the things we're going to be working towards in our class today, in this work we're doing today.
So I'd like to start with just a simple twisting movement to start to get some energy and freedom in the lower spine and the pelvis. I think of drawing my right leg back as my right hand goes behind and the left hand comes across and rests on the left leg. And then inhale, come back to center, exhale over to the other side, and just keep going. Exhaling as you go deep into the pose, start inhaling, come back to center, and then around again. And just enjoy the movement, even if sometimes it's helpful to bend the front knee a little bit, the leg that's coming into the pelvis.
From the pelvis out, you're lengthening the side you're turning away from. So it really comes from somewhere deep in the pelvis that reach. And then the leg comes into the pelvis on the side you're turning to. And you can do this very slowly and maybe hold a little bit on one side and let the body feel it, and you can also do it quickly. I like the slow, repetitive movements, not trying to force into the deepest possible shape possible, just kind of moving towards something so that you're pumping.
And each time you pump, it gets a little easier. Pulsing, pumping, releasing, and moving into it again. And then, so that's a rotation of the pelvis and the spine. And now we're going to go into movements of the spine that encourage that pelvic tilt that you saw me working with in Dandasana, good old cat cows. So there's a lot of ways to do cat cows, and the way I'm working with it these days, you're on all fours, and your hands are right underneath, wrists right underneath the shoulders, and knees right underneath the hips.
Now, you don't want to have the knees wider than the hips either, so take a look at that and get the legs right down under. And sinking in, this is the position that we call cow, and rounding up, this is the position that we call cat. And there are some great things on the internet with cats actually doing this, where the cat exhales, and then the cat inhales. If the cat can do it, we can do it. And as you exhale, you want to really feel your abdominal wall pressing back and massaging the organs in the back. And you can see I'm kind of just stretching with it and letting that move me.
And then to come into the cow, sometimes give yourself a moment to really let the back sink in, the upper back between the shoulder blades. It can be kind of reluctant to let go, and one way to do cow is to just stay up like this and not really try to get the upper back down. But I just want to encourage you to see if you can, maybe even by bending the elbows, try to get that upper back to come between the shoulder blades, and then the shoulder blades can find each other. And then exhale back into cat, inhale into cow, and I usually keep my head down coming into it, really get a feel for being there, and then lift. And as you lift your head, don't think that you have to take your head all the way back. You see how it takes me out of the upper back movement anyway.
Okay, so after these, we're going to go into grazing cow. So here's cow. What would the cow be doing if it were grazing? Well, it might take a step forward to get a little closer to the ground, and then it lets its head go. So you can see now that I don't have my hips right over my knees anymore, and I'm letting my head down. Now, I'd be starving if I were a cow, but somehow the cows can get their head all the way down.
You're just going to do this by relaxing your neck and allowing the weight in the hips and arms to settle into the joints. Anywhere from five seconds to a minute here, again, based on your tolerance, something that you might only be able to tolerate for a few seconds, for the first few times you do it, eventually it grows, and something starts to change and open in your body. You don't have to make great strides in any one session. We're on a path. We're not on a race. Okay, so that reminds me of another animal movement, which is, you see what I'm sneaking in here? This is a little wrist stretch, kind of stretches and releases the fascia of the tops of the hands and the wrists, dog chasing its tail.
So after you've gone from cow, you walk forward again, and your feet become your tail, and you swing your feet around and then turn to look, and then swing your feet around the other way and turn the other way to look. You can see that I'm getting a side bend stretch of the ribs, and also that's happening in my spine, and this just makes the back a little more comfortable. Sometimes when you're going for a movement that is extension flexion, by doing side bending and rotation, you make it easier for the body to find that. So you can go directly towards your goal and just do lots and lots of pelvic tilting in various poses, and you can also go to some side bending and some rotation. It's magic. Many of the little formulas in yoga are quite magic, all the way from the gross, tangible, physical form to the most esoteric.
So here we go. After doing the dog chasing its tail, we're going to revisit Dandasana, and we're actually going to go to the wall in just a moment, and here I want to encourage you to go back to a little bit of flexion and extension in search of the path towards dog pose once again towards Dandasana. So we're directly affecting the ability of the pelvis and the spine to move towards being able to do Dandasana. Now there's a technique for coming to the wall. Oh my goodness, the support of the wall. So the first time I showed it to you, I was out there in the middle of the space and no support, and here we're going to start playing with support.
So the first support that you can use is the wall, and usually when I put my students to the wall like this, they're just, oh, they're so relieved, and I can feel how nice it is. The nice thing about the wall as well is if I have a tendency to rotate my pelvis forward, I might not notice it, but when I come back to the wall, lean forward a little bit and get your bottom into the wall, I can feel, oh, yeah, right side not as much to the wall. Let's get it there. Same thing with the shoulder girdle. If I have a tendency towards a rotation, I can get myself really nicely on the wall here. Okay, now I might need another little support, which would be some height under the hips. So if that's the case for you, if you feel like you're still like, oh, your back is working too hard and struggling to get off the wall, you know, and you're still rounded in the pelvis, then you can take a little bit of height.
I think we'll use this one, and when you put that to the wall, remember that you're going to still try to get your hips and buttock all the way to the back. So you climb up and scoot back. You lean over a little bit and scoot back, and then you bring your back to the wall. And I'm only touching at my shoulder blades and my hips sacrum area. A little bit of the buttock and hips, not the lower back. See, my hand comes under here.
And we have that nice support. And then usually if you're sitting on a blanket, the knees are going to be hanging in the air, and that can create a lot of tension, both in the knees and the thighs, and also in this groin area, the thigh crease where the thigh muscles come up and attach, and that's usually a cause for tightening the jaw and wishing you were somewhere else. So let's try to give a little support, not only to the hips, but also to the backs of the knees. Usually if this height is a little lower than the hip height, that's useful, but not necessarily. Sometimes it might need to be higher in order for this here to soften.
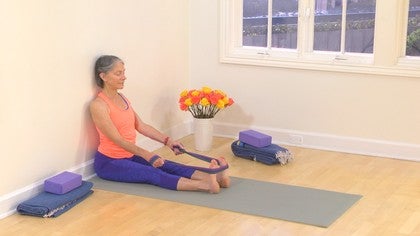
So I'm going to do it with this much for now, and then scoot back, and then I'm drawing my shoulder blades together and turning the palms up, and I'm going back to the original positioning where balls of the feet and toes are coming back, and equally right now my feet are just a little bit angled. I'm pulling the inner edges of my feet back more vigorously than the outer edges, so I'm going to let the outer edges come back, coax them to come back. Sometimes this can be done with a belt, which we'll come to in a moment. So this is one where it might be nice to start counting your breath or set a timer, and the timer is to be assiduously ignored if your body is saying to you, I've had enough, okay? So even with support of the wall, you might be having some difficulty really feeling like you can move and get this part of your back away from the wall, this lower part of the back, and get the shoulder blades on.
So we'll add an additional support, which is to take a folded blanket, and you're the princess here, you're not going to have it all twisted up. And then as you climb up on the blanket, especially with your knees bent like this, you can feel how your back will touch the wall. And so what we want here is we want just the hips and the sacrum, the part below the curve of your spine, we want those parts on the wall, and we want the shoulder blades on the wall. So we want the legs straight. But if you're on a height, your knees are likely to be hanging in space.
So let's put a little more height under the knees, and your knees, ah, your knees will be so happy when you give them support. And you can see I'm adding a little extra now, because this didn't feel with the height like it gave my knees quite enough support. So here we go. Ah, so play with that. It's always exploration and curiosity.
Investigate what works. So I'm not making it easier so that I can just hang out, which would be okay. But on this path to Dandasana, what are the next steps? The next steps are being able to draw the shoulder blades together and actually exaggerate some movements. So it's an exaggeration in sitting to be pulling the feet back and squeezing the shoulder blades together.
But what it does is it's a little tutorial for the place in the back that might be weak for holding you up. And it's a little tutorial for maybe you're a little weak on the outsides of the legs. And so it's difficult for you not to just let your feet flop in and you have to pull them back. So you're just waking something up. And you're allowing, encouraging, imagining the thigh bones descending towards the earth, and the thigh creases to be nice and wide and also deepening kind of down and back.
As the thigh crease deepens down and back, this space opens up here. And then you might just sit here for several minutes, just breathing. And when it gets hard, just stop for a moment and give the body a little bit of rest, acknowledge the work, and then bring it back, see what happens. And this is the sort of thing that over time gets easier and it affects your stride. It helps you track more evenly as you walk.
It makes it easier to stand upright, just in a normal upright position. I'm not suggesting that you'll be wanting to stand around like this talking to your friends. It makes it easier to come back to a neutral upright position. And it helps in the seated posture, the seated meditation posture, and it helps in sitting at the office. Okay, so yeah, let's let this one go for now.
So we'll move our supports aside for now. We might come back to those, so we won't toss them too far away. And we're going to use the wall again, not so much for support this time, but for feedback. So this is a reclining twist, which helps your upper back to be more mobile. Now, why is that important?
Well, if in this position that we're working towards, my upper back is really rigid, really firm, really tight, it makes it harder for the pelvis to move. If my chest and my upper back can lift and open more, that actually facilitates. So everything connects to everything. Everything supports and helps everything. And I'm going to suggest that you put a blanket under your head when I show this the first time, and then I'll show it without the blanket.
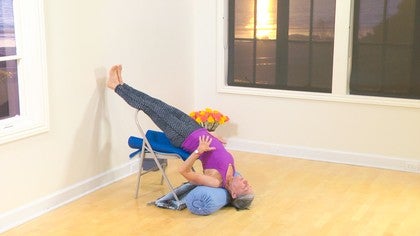
And I'm also going to suggest that you have a block behind you for your arm. Okay, so there's the setup, and I'm going to lie down making 90 degree angles with my body. Feet are on the wall, knees are on the wall. Elbow is likely to be pretty much right there, the elbow is bent. And you're lying on your side like so.
And then this twist could be done where the pelvis releases, and the knee could even come up and you could rotate backward and do a nice peaceful passive stretch. But as you'll see, I haven't really turned my spine very much, I can feel some. We're going to work towards being able to do this without moving, without turning from the lower back or pelvic area. So this is where the wall is going to help us. You're starting like this, you'll inhale, and as you raise your arm up and stretch it up towards the sky, you also will want to be turning your head, because we're wired to be able to move more easily in the direction that we're looking.
So if I'm looking to the wall, it's going to be harder to let go here. So your other hand can stay here, or you can touch the knees and just keep that leg touching the wall. Now you can see that my upper back has stopped moving, I don't get my arm to the floor easily as I did in the other method. And over time, holding steady here, what will let go is the tight musculature of my upper back. Sometimes the arm gets a bit overstretched across here, and we can get very eager to get down, and so we try to do it all from here, and it's really the back that you want to release.
So I suggest people to imagine that they're holding a great big beach ball, great big energy ball, so it's round, and that rounding takes it out of stretching right across this joint. So that's one way to work with it, and then the other way is to have something to catch your upper arm, so that this can relax and then once again over time. So deep breaths, and just letting go into it. Now for as long as we've been in it, this would probably be about enough, especially for the first time. So I'm going to come out and then we'll see it to the other side as well.
To come out, the arm comes back up and across, and then rest here for a few breaths. Sometimes in this pose, people say, oh, it hurts my back. I'm stretching like this, but it kind of hurts here, and there's two things that I find are helpful to people. One is to move the lower back in a little bit while holding this, and the other one is to move the lower back out a little bit. So there's a straightening of the back, and it just depends on your body, so you can experiment with that a little bit.
Okay, so now we're going to flip around. We have our headrest, our block, knees to the wall, and here you are on your mat. Your knees are close to the edge. Place your hip in the same place, and then tuck your arm under so that your forearm is right along the edge of the wall here. If you weren't at a wall, this arm would be straight out. Okay, and then it can be very difficult for people to lay the head down sideways here. Also, you don't want to be on the shoulder this way where it's sort of scrunched up towards your ear.
Pull the shoulder away from the ear and support your head. Okay, now we want that for the arm. As an alternative to supporting the head, because most people find that when they come back here, they could do without that. So you could just slip it away like I just did, or you can start without it and not lay your head down. So let's try that just so you can see what I'm talking about.
So up and over I come. I'm keeping this top knee touching the wall, and here I can let my head now rest on the floor. I'm going to move my back towards this lower back arch and see how that feels. As I release back, holding the imaginary energy ball, this block can be closer, holding the imaginary energy ball so that it's my back body that goes towards the floor and not just the arm. As my back body releases, my arm finds the block. So breath after breath, we have this dual job of restraint that is pushing from deep inside the pelvis and the back towards the wall and upper body gradually releasing.
And I can feel this is getting a little easier on my neck as I lie here, and my back releases one or two iota at a time. So there is no goal of getting the upper back completely down. There is just the goal of remaining straight here and the knee touching the wall while releasing to whatever degree you get the upper back down. To come back up, even if you've decided to straighten your arm and maybe you've decided you don't need the block anymore, to come up, I think it is helpful to bend that elbow because it releases the shoulder and then just roll back over. And most people find that they're more comfortable after doing this, that that initial position of having the head down to the side, which was so tense before, actually that has changed too, so we're not only affecting the upper spine, but we're releasing something in the upper back and shoulders that helps the neck to feel better.
Okay, so I'd like to, after that one, be close to the wall here with the legs, and I do one or both of the shimmy versions where you're pushing with your feet, a little push forward, just enough to have the head bob and the lower back to bob. Just enjoy that, it's pretty gentle, you don't have to get terribly vigorous with it, although, you know, your choice. And then this can also be done, you don't really need to have the feet on the wall, but as though you're reaching towards the wall with the toes and bouncing that way. Some of my students prefer this way, and some this way. But you want to maintain this for 20 or 30 seconds, and then as you pause, once you're done, just notice how sweet that is.
I always feel some release in the sinuses and just poof in the head, whatever was feeling tense is gone. Okay, so let's revisit downward facing dog, which I don't think we've done yet, but we'll revisit that before we revisit Dandasana again. I like to come into dog pose sometimes from cow. If I'm doing that, I'll actually walk my knees back a bit and come into this cow shape and turn the toes under and try keeping the shoulders over your hands for a bit so that you can get the pelvic movement going. You could even do a little cow in the dog, if the dog doesn't mind. And then keep tilting the tail up like you're a terrier dog, and then start reaching back, pull yourself back with the hips, and you're kind of resisting through the shoulders.
So there's a momentum towards coming this way in the pose, coming forward from the sternum, and there's a momentum of the shoulders and the hips pulling you back, so that those two opposing things, so you don't end up too much like this, if you can do that, prevents you. And then shooting the fingers forward, as though you had little light bulbs at the end of your fingers, so just turn all those lights on, send it out, and you can do a little twisting in dog pose again. Once again, just to mobilize and explore that movement, that connection between the legs and the pelvis and the pelvis and the spine. Sometimes people find it extremely useful to walk their heels up on a baseboard or the wall, so maybe that's the first time you've ever felt the ability to push your heels into something because they don't reach the floor. And that can be quite helpful and delicious.
And then come down, let's go into child's pose briefly, rounding down into child's pose, take your hands back if that's comfortable for you. I like to put a blanket under here, separate the knees a little. We're almost done, we're going to do one more Dandasana just to see what's changed. So here we have this feeling of primordial safety and ease, breath massaging the internal organs. Just a sweet release here.
And then to come out of this child's pose, bring your hands near your knees, let your head come up last, and here you are. So, ready for the Dandasana again? I'll take it without the support, but please remember that if you need it, the support under the hips and the support under your knees is perfectly appropriate if it's appropriate for you. So I'm getting close to the wall, I'm using the wall for support again, I'm getting that sense of it, and even though this pose is entirely possible and reachable for me, it just feels so much more comfortable now, something I could be in. Once in a while I suggest people to try taking a belt around the feet and supporting the activity of the legs and the pelvis and the chest by holding onto a belt here with the wall.
So it kind of closes the chain of connection and helps to aid in the support of the pose. Breathing in the belly and just feeling what is in the body and accepting that, that's what is, this is where I am now. We start on this path of Dandasana where we are now, this entire path that we're on is like that. And we started in a sitting posture, so I think we'll end in a sitting posture. We'll just see, just as we did with the Dandasana, how that is now.
Notice if there's any sense of greater ease in your posture, and is it a little easier to just be here? And if there is, remember that if we can hold a seed of allowing the positive energy of our practice to radiate out in great waves of benefit to all beings, just plant that seed in your consciousness, in your deep consciousness. Stay.
Practice with Patricia
Mention
 |
Patricia Sullivan (Teacher) |
 |
Kate M |
 |
Elizabeth H |
|
|
Judy S |
|
|
Christy M |
Comments


You need to be a subscriber to post a comment.
Please Log In or Create an Account to start your free trial.
