Description
Transcript
Read Full Transcript
Welcome. For this practice it would be great to have a blanket or a small pillow or a towel and two blocks. We're going to start on our backs. So as you come into constructive rest, that position with the knees met feet on the floor, go ahead right now and make sure that you have space to out stretch your arms as well as some space overhead, just so you don't have to worry too much about moving things around later. So if there's anything you need to shift or adjust, go ahead and do that. And then feet on the floor, knees bent, the knees can angle in together if that feels good. And we'll start with the arms out into a big T, palms up. Rock your head side to side a couple of times. Let your weight settle into the back of the body, into the ground. The eyes could be closed if that feels good. Let the eyeballs sink back. Let the ears draw in and start to get quiet and soften through the mouth, the jaw, and around the lips. Feel for a moment the width of your arms. So the openness of the chest here and the out stretch of your arms to your hands. Now we'll take the arms. With the right arm on top of the left, cross the arms over the chest. And you don't need to reach for anything in particular. It would be great if you can find a place where your arms are completely relaxed, where you don't have to hold them here. You can just let them go and they'll stay. And now take a couple of breaths, feeling the width of the back, the back of the heart, the space between the shoulder blades. And now take the arms out again. Stretch them up, stretch them out, back into that big T palms up. Feel the breath open across the chest and feel the the wingspan of the arms. Cross the arms again. This time you'll take the left on top and take a moment to find that place where you can completely let the weight of your arms go. Let all the muscular effort and holding go. And this time we'll even rock a little bit side to side on the upper back and see if you can feel the spread of the back of the heart a little bit more, a little more softness there. A couple of breaths. Now before you stretch your arms out again, stay connected with this feeling of width and openness in the back of the heart. Connected to that as you open the arms back out. So without losing the spaciousness of the back, feel the spaciousness of the front. Alright, let's gather the legs in. Give them a hug. You can hold over the shins or in the folds of the knees rocking side to side across the width of the back. Feeling the back of the pelvis, the ribs, the width of the upper back. And then pause. You'll need a blanket or a little pillow. So if you have something nearby that you can grab, go ahead and get it. I'm gonna use this blanket and you'll roll all the weight over onto your right side. And then this blanket or pillow is going to go under your head, the right side of your head. Now you're on the side of the body but the right arm is still outstretched. Palm up. Take your left palm and you may have to reach a little bit more to get the palms to stack. And now let the body move and adjust as it naturally will want to. Take your your left fingers and see if you can stay in contact with the ground as you circle that arm over and maybe even behind you. See if the fingers will stay in contact. Keep the head heavy on the support. Keep circling, draping across the legs, and then back to that right palm. And then we'll do it again. So the left arm is really loose and relaxed. Let the elbow bend. Let the fingers curl. Not making this a hard movement. Actually keep this really easy and just let your body roll. Pass the palm one more time. We're aiming for some mobility. Just some easy loose mobility in the upper back and shoulders. Okay the next time the palms come together, open your left leg to the ceiling and that'll start you rolling onto your back. And then you can just roll on over to the other side. Move your pillow or blanket if you need to. So again you're mostly stacked on your left side. Now reach your left shoulder a little forward and keep that arm outstretched in the half tee. Take your right palm onto the left palm and then start your connection with the ground. Trailing, overhead, maybe a little bit behind you. Maybe you lose contact with the floor at some point. It's totally fine. Over the legs and back to the palm. Twice more. Find an easy pace. Loose and languid is the name of the the movement here.
And the next time the palms are together, open that top leg. That will let you roll onto the back of your body. You may want to move your pillow or blanket. Coming back into constructive rest, do a little check in there. Feel your back on the ground. Feel your weight supported. Yield to that support. And then invite the legs in one more time. An easy rock side to side. Okay we're coming all the way up. So roll over to a side. Use your arms to support you. And we're going to make a seat. So I'm gonna sit on a couple of blankets. Make yourself comfortable. The type of seat, the construction of the legs isn't so important. Just make sure that you can be at ease. Have a neutrality in the spine, natural curves, and free and easy in the breath. Okay so we've already started to get a little bit of mobility and explore the shoulders in the upper back. Let's just do a check-in. Rolling the shoulders a few times. Doesn't even have to be symmetrical movement or circles. We're just checking in. You might involve your neck to see how are the neck and the shoulders relating to each other. How is this area today? Okay now come out into goal post arms. So your elbows are more or less straight out from the shoulders. Palms can be forward. We're gonna bring some movement into this. As the arms come forward, feel the natural tendency of the body to want to round. The shoulders, the upper back want to round a little bit. You might find that your arms stop about shoulder distance. You might find that they easily come together either way and then start to open. As you open and widen the arms, feel how there's a natural tendency for the chest to lift a little bit. No need to overdo that. Just feel how that wants to happen. And then again closing the arms. Letting the heart tuck in a little bit and opening. We'll do this a few times. Find a pace. Find a rhythm that works for you. Be in your breath. So it's really common in times of grief to assume more of this rounded shoulder, more protected posture. And then maybe we go out into the world and we feel like we have to really be out there and show that we're okay. And then we really pop. We force the heart out. We really send ourselves forward. So feel now as you start to, as you continue the movement. To keep the arms moving but to minimize that action in the spine. So it is possible to not do the cow-like movement with the spine and still move the arms in this way. So see how that feels. See if you can stay a little more balanced in the chest space, front and back, as you move the arms. Meaning that it is possible to stay a little more balanced in that emotional state because our bodies respond to our emotions and then our emotions respond to our bodies. This can be a really great tool. The next time you have your arms out, let's give them a break. Let them come down. Feeling that little bit of work in the shoulders. Shake the arms out. Let the hands rest somewhere. And let's pause. Let's check in. You might close your eyes or let your gaze get soft. And just let some of that feel through you. Where is your heart space today? Physically, metaphorically. Okay. Our next exploration will be with arms out in a T. Turn your palms up and then see if you can even start to turn your palms back. And then you're turning your elbows and then you're turning your shoulders. And you're doing all this without moving your spine. It's just the arms. And now turn your palms down and back and see if you can turn your elbows and see if you can turn your shoulders without moving your spine. And then go up and back. Kind of like you're ringing out your arms. And then the other way. Down and back. From fingertips to shoulders. One more time. This is a little more effort, a little more muscle, a little more warmth than it seems like it would be. And then let that go. Shake that out. Do a couple shoulder rolls. Okay. We are going to come around to hands and knees. I like to have a little bit of knee padding. So I'm gonna take one of my blankets and give myself some cushion. And then you come. Knees under hips. Hands can be slightly forward of the shoulders here. Finding a neutrality, a steadiness. And keeping straight elbows. This is an important piece. Keeping straight elbows. Let your chest sink down between your arms. Or you might think of your shoulders lifting up and your shoulder blades coming together. And then press your hands, your knuckles and your fingers into the floor. And imagine your arms getting longer as your chest lifts into your upper back. It's kind of like a cat pose, but it's it's really more of a heart movement. I call these heart push-ups. So let the heart come down again. Shoulder blades lift and squeeze. And then let your arms get long as you push the floor away. Lift the chest into the upper back. Two more.
This is a simple movement, but a really great strengthener for the muscles of the upper back and shoulders. Come back to neutral. Again, we just tend in this you know, really emotional, fluctuating landscape to get a little bit rounded at the upper back and shoulders. So we're doing some strengthening here. Take your right hand from where it is and take it just slightly in. Not all the way to the center, but just slightly in from where it was. Really anchor down. Long strong arm. Take the back of your left hand to your forehead. Wide elbow. Your hips stay steady. Your right shoulder stays in line with your right wrist. Turn your face, your chest and your arm toward your right arm. And then open your chest and your left elbow out and a little bit up. And then turn down and open out and up. We'll do two more. Turning down. This is such a great back body strengthener. I know there's a lot of warmth here. One more. Widen that elbow. Lift through the elbow. Press into the floor with the right hand and then come back down. Release your left hand to the floor. Give your right hand a little shake. Good. Okay. Now from steady center, take your left hand just slightly, maybe an inch inch and a half in toward the center. Take the back of your right hand to your forehead. Everything else stays stable. Turn your face, your chest, your elbow towards your left arm and then open the chest. Lift the elbow. You can look a little bit to the right. Turn back down. The hips don't move. Open up and you're attempting to keep your left shoulder in line with your left wrist. Closing and then widening and lifting. One more time. Feel the work of this and know that it's really going to support your posture. It's really going to create a good container for your heart. Coming back down to both hands. Shake out that left hand and let's enjoy a child's pose. Big toes can come toward one another. Hips toward the heels and then you can make a pillow for your head or rest your forehead on the floor. Okay. At the end of your next exhale, come back up. Grab your two blocks and put your two blocks like so. Long flat, long flat. Right together. Come down to elbows on the blocks. Bent elbows, pumps, touch on the blocks. Now as you look at your arms, make sure that they are not wider than your shoulders. Elbows not wider than shoulders. Shoulder distance or even more narrow. Okay. Now walk your knees back a little bit and start to stretch your elbows forward as you pull your tail and thighs back. So this is a two-directional movement. Forward through the arms and back through the sides of the body and the thighs. This isn't a push your chest to the floor movement. It's a lengthen in two directions movement. If you have shoulder pain, anything sharp or electric, of course you stay up, up, up, up, up. As high as you need to be to get out of that pain, there will be, this will be a sensational place. So you'll definitely feel something. Press your palms together.
They won't really go anywhere. It won't feel like much but press them and then release. Let's do that again. Press your palms together and then release. One more breath here. Now to come out of this is just plain awkward. You've got to lift your torso, start to bring your shoulders forward and then shimmy your knees up and then you can release your arms. Whoo! And a lot of people feel this mostly on release so it can feel really good to roll your shoulders around, even do a couple of swimmer strokes forward or back. Mmm, okay. Such a great mobilizer. Such a great movement for the shoulders and the upper back. We're going to take our blocks here and just turn them on their sides. So hands on the blocks. I still have the blanket under my knees which I like. If you don't have that, you might get it because we'll be in a low lunge. Either with your hands on your blocks or you can come up to a kneeling to step your left foot forward for a low lunge. Back knee is on the ground. Now move around a little bit here and I can give you some suggestions but if your body is asking for a certain kind of movement, just really follow. Follow your urges. So you might pull back with the hips and almost straighten or straighten the left leg and then come a little forward and let the hips empty down toward that front heel. You could also wave your tail side to side, either pulled back or in the forward part of the lunge. Seeing how that feels. And then draw back just a little bit. Not all the way to a straight front leg but a little bit. And imagine that there's a pulley or a tether on your left sitting bone back to your right heel. Keep that little bit of tether as you bring the hips forward into the lunge again. So you're not going to be smashing into the lunge. There's going to be a sense of lift in it. Hands up on the thigh so that you can come more upright. We're gonna try that goalpost move again. Arms out and then goalposts coming in and feel that you can still keep your heart really wide and balanced as you close the arms and then you don't have to thrust forward as you open the arms. You can stay quiet. You can stay really spacious here. The next time your arms are out with that sense of balance in front and back, let's stretch the arms up and see how that feels. Strong container, strong root of the legs so that we can be light and spacious and free in the upper body. Go ahead and bring your hands back to the blocks. Take your left leg back and give it a little shake off and come to that knee and then we'll change sides. Let's bring the right leg forward and we'll fish around a little bit here. So you don't even have to do the same things that you did on the other side. You might find that your body is curious in other kind of wiggly ways. Even though we're focused more on the upper body, you might feel like I want to roll on to the heel and see what's happening in the calf or lift all of my toes and see what they feel like. So no wrong way, no right way. Go ahead and come to kind of a midway back in the lunge. Imagine the tether of your right sitting bone to your left heel, giving you a kind of containment, some support. With that, then let the hips come down. Not losing that, keep that. Walk the hands up the front thigh and really get a sense of this front and back space of the heart. So the arms come out, goal posts, and as the arms come forward, feel that back space of the heart. Feel how it widens just naturally. See if you can keep that width as you open the front. Again, as the arms come forward, feel almost like a cloak-like feeling coming around you. And then see if you can stay inside that as you open back out. One more time. Wide, wide supportive back body. And then from the sides, the arms reach up, turn the palms in, stable legs, light and free upper body, balanced heart space. And then arms come down. Take that right leg back, give it a shake. Okay, now for this next movement, I'm going to show you two options because it's kind of a particular movement. I need a certain kind of propping and you might need a certain kind of propping that's different. So one option is to stack your blocks like so, make them really tall, and then sit on them. And this is going to be the kindest for your knees, hips, and ankles. Okay, so this is going to be the coolest place to do this temperature-wise. The other option, or one other option, is to come into a malasana squat without the support. They're both the malasana squat. Now I need some support under my heels because my heels don't like to come down easily and I don't want to have to be straining in this movement. So I'm just going to use a little blanket roll underneath my heels so that I can be more comfortable. Okay, so if that works for you, great. If you don't need it, great. Okay, so now that we're here, you can either stack your hands or interlace your fingers. And again, we're going to take the backs of the hands to the forehead, wide elbows. And because the lower body is stabilized, we can focus on just the upper body, the thoracic spine, rounding forward and down, and then lifting the chest, lifting through the crown of the head, and spreading the arms, curling back down, and then lifting and widening. We're just going to do two more, feeling the wide-ness of the back body, that cloak-like feeling, and then how it can stay really wide even as we open the heart. One more. Such a good strengthener. Pause here, really feel the knitting of the back, the support of the back, the width of the arms, the lift through the crown, and then let your arms go. I'm gonna slide my blanket out from behind my heels. So from here, we're going to come back into that umpire pose. Press onto your feet, keep your knees bent, and put your forearms on your thighs. So let yourself really be supported here. Let your belly go, let your back muscles rest, fully lean into your arms. Have a moment to acclimate in this transition. We are going to stand up, so just let yourself be here for a moment, and then dip the hips down a little bit more. Find that little bit of sling support of the low belly. Exchange your forearms for your hands, and then everything grounds down to help you lift up. Hmm, so let's check in with the plumb line, palms to the fronts of the thighs. Take the thighs back a little bit, soften the knees, looking forward, and just feeling into this moment. Let yourself step up to the front part of your mat. So we've been exploring this idea of the back of the heart and the front of the heart, and hinting at the idea of a cloak, or the back of the body, kind of coming around in a sense of support. And I think part of what happens in this emotional space of grieving, as the waves come and go, is part of this collapsing of the chest and rounding of the shoulders, is to protect. We have a sense of wanting to protect. We've been hurt, and the body responds to the emotional state, and then the emotional state responds to the posture, so they're in relationship all the time. So this next piece is offered with the intention or idea that we could make that sense of protection external, so that we don't have to do it with the posture, so that we can actually stay really balanced front and back in the heart. So let's give it a try. This takes a little bit of imagination, okay? We're here at the front part of the mat, standing on our feet. Imagine that there's a cloak behind you, and you could hold on with your hands. You could reach and hold the cloak, and as you step back with your right foot and then your left foot, you could step back deep into the warmth and the safety and the protection of that cloak that's now sort of enveloped you. Let's do that one more time, and then we'll step back with the left foot first. So in your imagination, taking that cloak, taking the back body, and stepping back into it as you bring it around you in the most loving way. And just notice what it's like to sense or imagine this kind of support around you so that you don't have to do it in your body. Your chest can actually be wide and balanced front and back. You don't need to pop it forward, and you don't need to hide it. It can be balanced. So from this balanced place, let's try a balanced pose.
Tree pose. So I like the arms out, kind of loose like tightrope walker arms. Shift your weight onto your right leg, turn your left, your whole left leg out, and then bend that left knee so it's pointing out to the left side. You could keep the left foot right here. You could bring it into the right ankle or you could take it up the right inner leg to the calf or higher if you like. What we're really using this as an exploration for is that can I stay in that centered place, that non-reactive observational place, and feel this kind of containment, this kind of fluid supportive safety. If you want to express the arms in a different way, you can. Just letting the breath be easy, letting the body be easy, and then we'll turn the left knee forward as the foot releases, the arms come down. Pause here. If you want to reaffirm your cloak, step back into it, really let it encircle you, do that, and then we'll try the other side. Shifting onto a steady left leg, turning the right leg out, bending the knee, arms can be relaxed out to the sides, and then playing with, it's really not the key piece of the pose, we're not trying to be technical, but you can play with where you have that right foot. Tree pose, and just notice if there's a physical pattern, a habit of collapsing the chest or wanting to pop the chest, what is it like to be more in a balanced centered place. Arms, if you'd like to express them differently, you can come in and out of the pose if you like, this isn't a static thing, and then turning left knee forward, arms and leg come down, and pause. We're gonna make way all the way back down to the ground, so however it's easiest for you to get there, which might be through an umpire, or you might just keep it simple and come on down to a seat. So if you have a blanket or two, we're gonna come back to a little bit of a lifted seat, prop yourself up, and let's take the right leg straight forward and the left knee bent out to the side, finding that a little bit of a lift in the posture, so it's a neutral pelvis, and we're going to stay upright for this first part, so you might be tempted to fold forward, but we're going to stay upward and take a little bit of rotation to the right. So if your left hand will easily reach across your right leg, you could touch there, have that touchstone, and your right fingers could come around to the right side just as support, not to push you into anything, but just there as supportive gesture. Okay, now from this little bit of rotation, invite your left hand to slide down your right leg as far as it comfortably will. When you find a vista point where you want to pause, pause, and you might feel that after a breath or two, after softening expectations, oh, actually can slide another degree. So we're in a little bit of a twist and we're in a little bit of a fold. Notice if you're rounding the back a lot, so this is that neutral heart space. We want to be more balanced front and back, and keep your head on. It's easy to let the head fall. Keep your head in line as best as you can with your torso, and then slowly come back up. You're still in that little bit of a turn, and then you unwind. Okay, let's try that on the other side. Lift from under your left knee, send that leg forward, scoop under your right leg, and open it out to the side. Okay, we have this uprightness, and then we start a little bit of rotation to the left. If, as you stay upright, your right hand will come to the outside of the left leg, let it, and then a little bit of support of the left fingers behind you. Stay easy in the neck, just enjoying some rotation, a little bit of turning, and on an exhale, let in the twist, let your right hand slide down. See if it'll slide down that outer leg. Keeping the front of the chest soft, and spacious, and wide. Keeping the head on as part of the torso, that column. Maybe after a couple of breaths, things have softened. You might want to dip in, and you might want to actually pull back a little bit. Feel into where you are.
And then easy, come back up, and then unwind. Okay, lift from underneath your right knee, take that leg forward, just flop the legs around a few times, wiggle the ankles, the toes, and then feet to the floor. We're actually going to come off of this support if you're sitting on something. Scoot it off to the side. You're just about in the middle of your mat. Knees are bent with your feet fairly far in front of you, not right underneath the knees, and then we'll take the hands just slightly wider than and behind the hips, fingers forward. Bend your elbows and lean back. Now hug the elbows toward one another as though they could touch back there, and as you press the floor down with your palms, start to straighten your elbows. They might not go all the way straight, that's not important. And lift the heart, like there's a little string on your heart up toward the ceiling. Feel the billowing of the heart space, even out to the sides around the armpits. So it's just full and wide, round. You can stay here. You could, if your elbows are straight and feel stable, you could also press into your feet, scoop your hips towards your heels, and then lift the hips a little or even up to the line of the knees. Now I like to keep the gaze looking forward for neck sensitivity. If you know you have a happy neck that can take your head back, that's fine. Pressing everything down to lift up. One more breath, and then slowly lower the seat if it's lifted. Release your hands, wiggle your fingers, roll the wrists a few times. Okay, we're gonna come down onto our backs. Constructive rest. We're moving toward Shavasana. So if you know there's something you want for comfort, for warmth there, get the props or get your socks. We'll take a couple of breaths here in Shavasana. Just feeling, ah, feeling the support of the floor behind the heart, letting the back of the heart rest. And then we'll bring the knees into the chest. Easy hug. It might feel good to put your hands in the folds of the knees, and then let your elbows come down. That can be a good wrist release from the last pose that we did, and rock side to side. And then from center, releasing the legs. You can either enjoy your relaxation pose with your feet on the floor, heels out, knees together, or you could stretch your legs long. Any last adjustments, even if it's just making a little tweak of your clothing so that you can be restful and undistracted as much as possible. Feeling the breath settle. Feeling the body getting quieter and quieter, heavier and heavier. Let your skin be soft and let your jaw release. Feeling the body getting quieter and heavier. Feeling the body getting quieter. Feeling the body getting quieter. Feeling the body getting quieter. Feeling the body getting quieter. Feel free to stay here as long as you like. If this feels like a good time to come out of Shavasana and back up to a seat, take your time doing so. Let there be little wiggles, little movements to bring your attention back to the surface. And then when it's right for you, the limbs can come in. In a little ball, roll yourself onto your side. From your side, keep rolling, turning your chest and face toward the floor as you press up. And we'll come into a seat.
So if you want to grab something to sit on just for a couple of moments, feel free to do that. And even as you sit, just notice this this heart space, how it feels, how you're relating to it, what it's saying to you. How are the shoulders? How's the back of the body? What's your sense of of the cloak here? Know that your efforts to strengthen and make space in your body helps create a container for emotional states to come and go. Thank you so much for your practice. I'll see you next time.
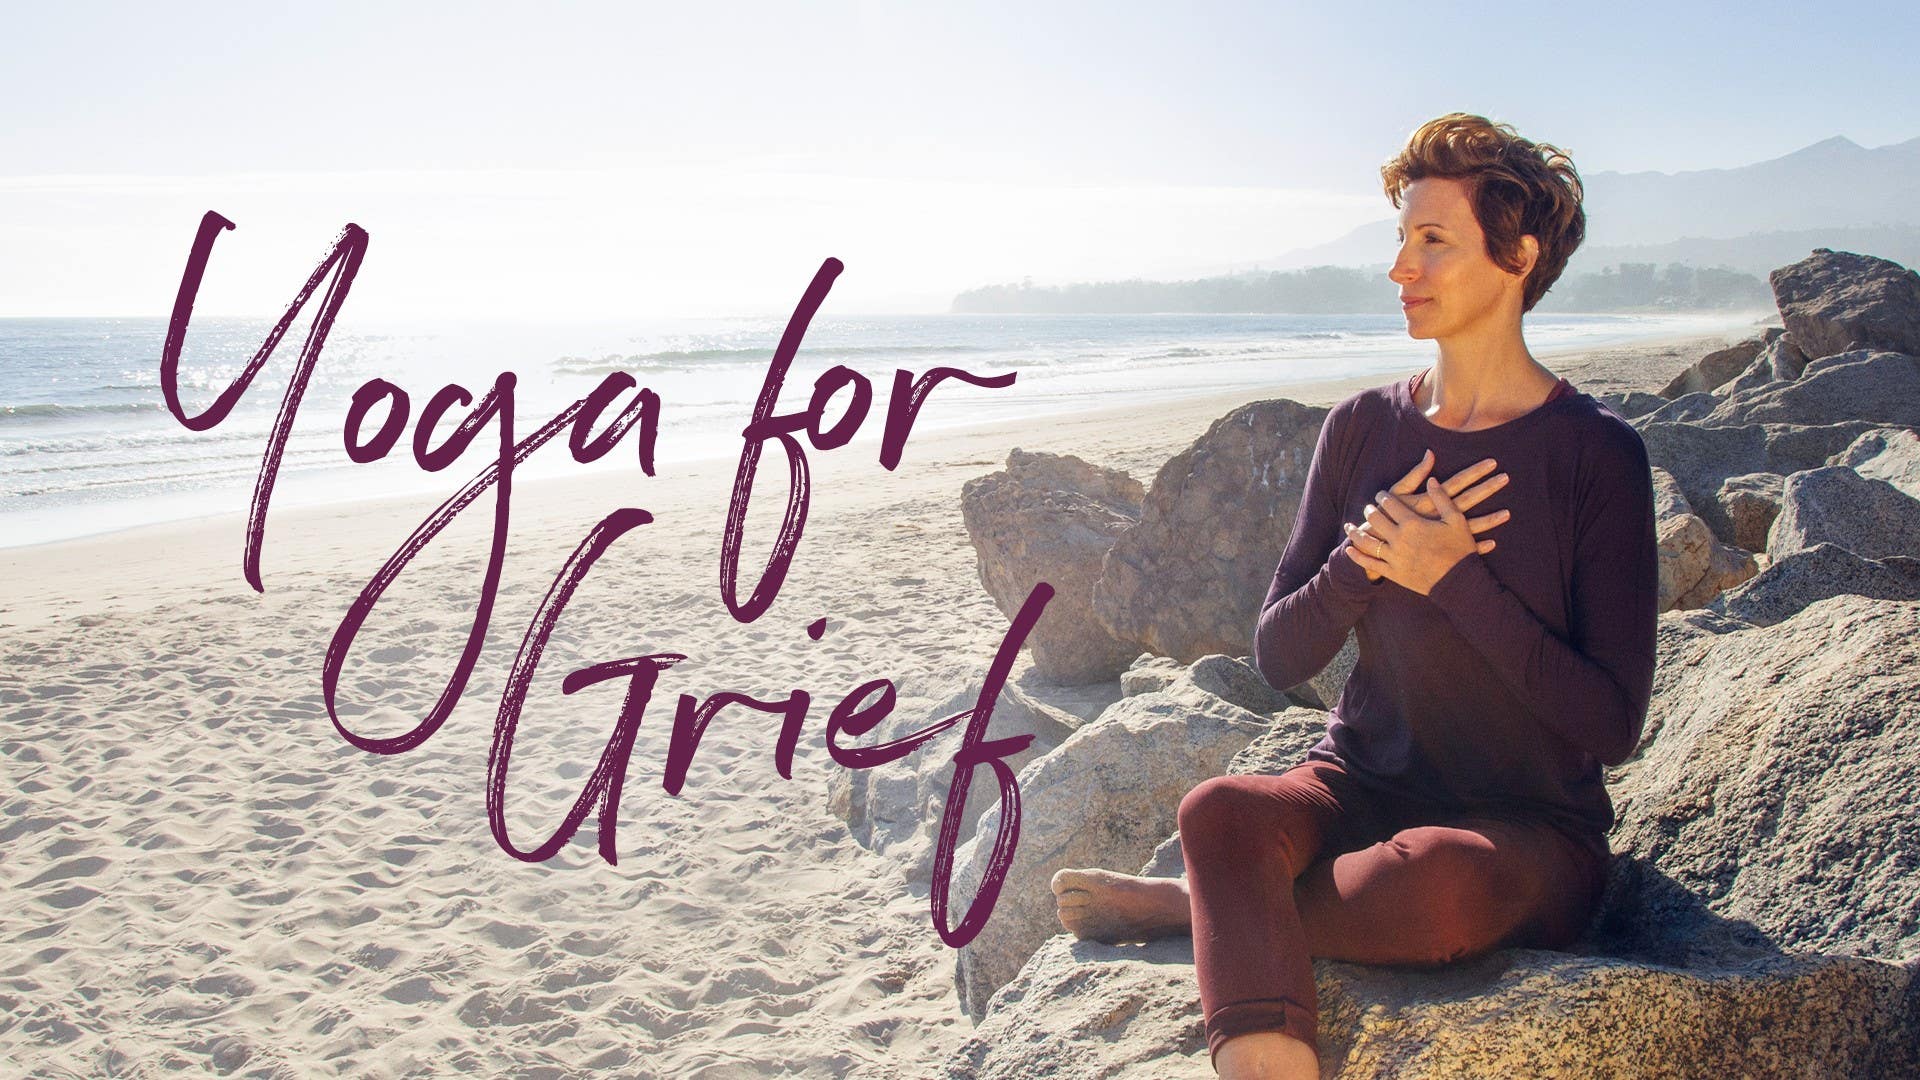
Yoga for Grief: Michelle Marlahan


Comments


You need to be a subscriber to post a comment.
Please Log In or Create an Account to start your free trial.
