What's a Course?
You can now make seasons of select shows into courses!
1. Schedule regular emails to deliver the content direct to you.
2. Watch your assigned videos to focus on the course goals.
To take a course for this show, first select a season and then click the "Take as Course" button for that season.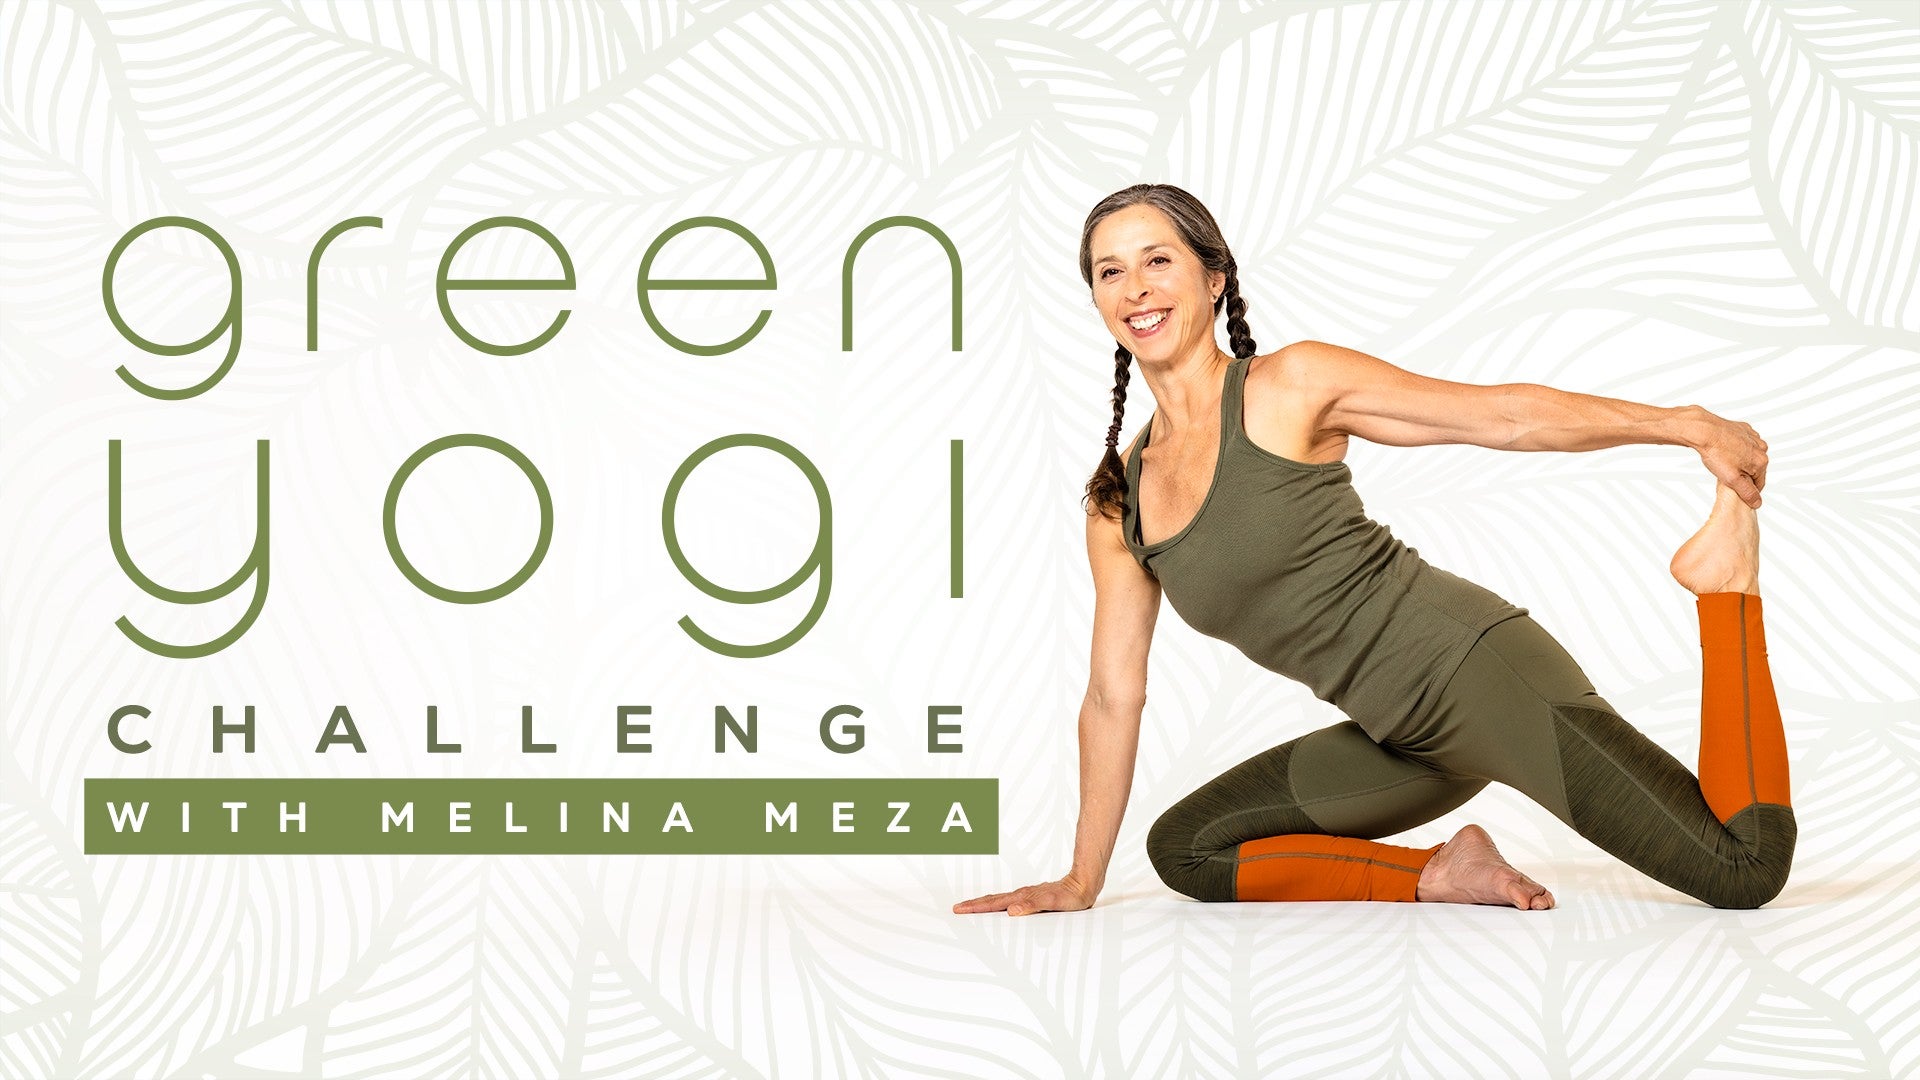
Description
Allow the Earth to support you, as you support the Earth. Being an Earth steward and activist is a marathon not a sprint, and as such it requires pacing, rest, and self-care. For Week 4, slow down and enjoy a grounding class designed to help you self-regulate and soothe the nervous system. We stay close to the ground moving through gentle stretches and seated and supine poses to relieve fatigue or tension in the legs, lower back, and shoulders. You will feel balanced, restored, and rejuvenated.
Your Homework Challenge for Week 4:
- Calming breath work practices: Pranayama (breath work) practices in reclined positions calms the nervous system and helps avoid burnout.
- Kind and compassionate communication: Practice nonviolent communication, attend rallies and protests, and vote!
- Transportation awareness: Try ride sharing, riding a bike, or other environmentally friendly alternatives to driving a car.
See attached pdf for more ideas.
About This Video
Transcript
Read Full Transcript
Hello, everyone. Welcome to week four of the Green Yogi Challenge. I hope you enjoyed last week's homework assignment of getting a little bit more connected to the community around you and maybe even trying some new recipes, including foods that are grown within 100 miles from where you live. And maybe even connected with other people around some house project or yard projects. Or certainly maybe shared a meal with somebody you love. So we've got some new things for you this week.
And for our practice today, it will be very helpful to have a bolster, a blanket, and a strap. And we're going to enjoy a class that's pretty close to the ground and meant to be really calming for your nervous system in case you're getting fired up to use your voice and activate the environmentalist in you. You might also want to have a practice that's also really calming and grounding to go to. So that's today's class. If you take your blanket and maybe roll it halfway.
If you have a really thin blanket, you might roll it all the way. And if you had a really thick one, you might roll it just about halfway. So we're going to turn and face the ceiling as you slide the blanket back behind you. And we're going to tuck that blanket underneath your neck. And you might have to fuss with that to feel what's the right thickness to have the blanket under your neck.
So that the back of your head kind of falls towards the ground. The occipital ridge gets to rest on some of that rolled blanket. It should feel lovely when you get to the right spot. It should make sense while we're doing that. And when that feels like that's in the right spots, let's open your arms out to the side.
With your palms facing the ceiling and maybe either keep your feet as wide as your mat. If you like the way that feels, you can rest your legs that way. Or for some of you, you might like to have your knees fall in toward each other. Notice which leg position you appreciate, which one feels right for today. And then maybe we use this as our meditation seat to drop back and welcome and receive the support of the earth, of the ground.
And as you feel again the areas of your body from your head, your shoulders, your arms. Back of the ribs, the weight of the torso dropping back in towards the earth. The front body can stay soft. We can feel maybe a little bit more the wave of the breath moving in and down. And as the wave of the breath moves in and down, perhaps calming the mind as we move into these deeper rhythmic breaths.
Starting to again consciously shift from whatever you've been doing to just being here. Appreciate the gift, the presence of this moment. Celebrating our aliveness, our belonging right here. And saying just a few more moments maybe in love with the way this feels. Make micro adjustments if you haven't fallen in love with the way this feels. So maybe we want to stay just a little longer, letting the earth support us.
Now if your eyes were closed, maybe we start to open the eyes and reach your arms up into the air above your shoulders and let's grab the opposite elbow for a moment. Let your arms tilt over to the right side so the outer left shoulder starts to lift away from the ground. And as best as you can really try to let go of any neck tension. Shift your shoulders back to neutral and then let your arms shift to the left and that outer right shoulder peels away from the ground. Relax the neck as best you can. Back to center.
Now tilt your forearms more towards your foreheads and you might bump up against your blankets. Back to neutral and then arms down towards your chest. So we're going to connect all those points and go to the right towards your forehead, to the left and down towards your chest. And then put that into motion in a way that feels like it's hydrating or I keep using this idea of fertilizing the muscles and tissues. We're amending the soil here.
Just gentle circles. Hopefully improving the circulation in this area of your body. Let's go the opposite direction a few times and just notice again is there anything different? Does anything change when you go to that new direction? Notice that you're still letting the weight of the head really drop back into the blanket.
Then maybe the arms for a moment release up into the air and as we did in the last practice just a little shaking of the arms, the hands. Bring a little more energy, vitality to the arms. After a little shaking, your arms come to your side and we're going to roll to a side and we'll change the shape of your blanket. So it's rolled and when we come up just a little bit, let's go ahead and flatten it out so it's a little bit more like a pillow. And let's be on your left side with your knees bent and your arms straight out in front of you.
As we look out towards our fingertips, we start to float your right palm above your left palm and stretch your right arm just above your ear or cheek. So take a moment to reach nice and long from your right hand down towards your right hip. And as much as you can, again, stretch out through the right fingertips so we're sending energy even out to your fingertips. Then we'll turn your right palm towards the sky and look a little bit towards the sky as you sweep your right arm out to your side or maybe even all the way down towards the side of your torso. Sweep back out to the right and we'll eventually travel all the way back to where we started with your palms on top of each other.
Take a moment to float your hands, right arm above your ear, take a moment to pause and lengthen through your right side. Flip your palm open, sweep it out to the side or down to the side of your torso. Right arm sweeps out so you can sense we're kind of almost drawing a full circle around you. Try that a few more times and if you have some injuries in that area just being really mindful of those injuries and celebrate the movement you have. Being careful that our movement isn't creating any future harm.
It's a reasonable ask of your body as we start our practice. One more time using that warm-up stretch, increase circulation in that right chest area and then let's pause with your right arm at some angle. Palms open to the sky to feel gravity's presence here to take that right shoulder and arm a little bit more towards the floor. There's enough openness in that chest for looking towards the sky or the ceiling. And then let's sweep your right arm back over to touch your left hand.
So now please lace your fingers in a soft lace, your palms are open, wrists are apart. We're going to try to keep your arms straight and long. Let the lower arm lift as we turn from the waist now and reach the arms up as high into the air as you can, look up towards your palms. So we're turning from mid thoracic spine and then tip your arms back to where we started. Let's again try to turn from your waist, your rib cage, the arms are straight as you reach your arms up into the air back to where we started.
Moving from your ribs, moving through the shoulders and the thoracic upper mid spine. Now let's go ahead and unlace the fingers and let the right arm one more time be parallel to your ear, lift your head and hold on to that left side of the head gently. We're going to lift the right ear towards your right hip and then drop the head down. Tilt your head towards your right hip and lower down. So you might start to feel a nice stretch to that left side of the neck as we do that gentle lift and engage a little more of the right outer waist.
Maybe two more times that little tilt towards your right hip and lower and last one little tilt towards your right hip and then lower. Sweep your right arm down to your side. I'm going to roll over onto your back and make use of this transition. Let's tilt your knees towards your chest and enjoy that lower back buttock stretch. Let your legs come up into the air and then re-bend your knees and towards your chest. Legs up in the air, just feeling how we're doing in the leg department today, going up and down and up and down.
Let's tilt your forehead towards your knees, little upper body. Release into the blanket. Lift your head away from the blanket. Release and then one more time curl up. Please set your feet back down. Let's turn now to your other side. So as you turn to your right side, let's go ahead and have your arms straight out in front of you. Legs bent and we'll float the hands so they're parallel.
Take your left arm right above your ear and take a little moment or two here to stretch longer through the left side. So you want to feel the whole outer ridge of the left side of your body. Then turn that left palm open and start to sweep it out to the left or maybe even all the way down to the side of your body. Sweep back out, kind of feeling like you're almost drawing a full circle around you. Your palms meet, hands separate, left arm above left ear.
Turn that palm open and sweep out to the left and down to your side. Kind of feel through that repetition, what's changing. Hopefully we're celebrating more range of motion and maybe even a little bit more pleasure as we go through that chest inner arm area that feels really delightful. Now maybe there's some area where we'll take that little pause and let your left arm reach out to your side at some angle as we look maybe more towards the ceiling. And just have a few moments where we let gravity take that left arm back towards the floor.
No particular rush, no particular agenda, just seeing what happens with gravity takes that arm back and down. And let's take your left hand back over to your right hand. Now we do the lacing of the fingers, palms are apart, wrists are apart. And we turn from the waist and lower rib cage as you lift your arms up into the air, perhaps above your chest. Feel how you're turning through that thoracic spine.
Bring your arms back down and lifting that right arm up, turn from the rib cage and look up. And then we come back down. So it's a place with a lot of bones. Keep going. So it might feel quite stiff.
It's not a place we have a lot of movements. Nice to kind of move these different joints on a regular basis. One more time, going up and then go ahead and come down. Right now as we unleash the fingers, let your left arm live for a moment right above that left ear area. Lift your head and lightly touch the right side of the head with your left hand.
Please now lift your head towards your left hip and then lower down. Lift the head towards the left hip and lower. So find that rhythm of going up and down that maybe allows you to feel into a little bit of right neck stretch as you hold the head up. Maybe we feel some activation through our left waist. A little squeeze and release.
Maybe one more time, a little squeeze and release. Let that left arm now come down to your side and we'll roll again onto your back. So now as we find ourselves on our back looking towards the ceiling, let's once again tip the knees in towards your chest. And we're going to add as we make use of this transition now to raise your feet up in the air and this time let your arms fall back towards your ears. Again, you might bump up against your blanket.
Let's hug the knees back in like you're doing a downward dog on your back as you stretch your legs up, arms by the ears, legs in towards the chest. One of my favorite poses, upside down, downward dog. Knees back into the chest. One more time, legs in the air, arms by the ears. And as we hug the knees to the chest, hold onto just your left, right leg for a moment and let your left leg drop down to the floor.
Stretch long, take your left arm back by your ear and just treat yourself to that really lovely stretch on your left side. And then hug the left knee in and take your right leg down and right arm by your ear. And stretch long through the right sides. One more, grab right knee, take your left leg and arm down, stretch long. Hold the left leg and the right leg and arm, stretch long to the floor.
Now take both legs down to the ground and both arms back by your ears. So we're going to start with an upside down sun salutation. Imagine you're a mountain pose here with legs full of energy, arms overhead. And our forward bend will be tipping the knees into the chest and giving them a hug in. And then from here as we open the knees out to the side, lift your left foot and catch your left ankle or left pinky side of the foot as you take your right leg down to the floor and right arm by your ear.
Kind of like we're doing a little bit of a lunge on your back. Then we take the right foot into the right hand like you're doing happy baby and switch. Left leg drops down, left arm by your ear so it's a little bit like a lunge on your right side. And then we go back into our happy baby pose which is maybe a little bit like a squat. Bring your knees together, feet in the air, arms back by your ears, downward dog on your back.
And then let your legs drop down in front of you. Get a full body stretch like you're doing mountain pose with arms overhead. Tilt your knees back and towards your chest. Separate your knees out to the side. Lift your left foot up, grab a hold of your foot with your left hand.
Right leg down to the floor, right arm by your ear. Happy baby pose. Drop your left leg down and bring your left arm by your ear. Happy baby pose. Bring your knees together, legs in the air, arms back by your ears, upside down, down dog.
And then drop your legs down to the floor in front of you. Tilt your knees back and towards your chest. Separate the knees. Lift your left foot into the air, catch that foot. Right leg down, right arm by your ear.
Catch the right foot with your right hand. Bring your left leg down, left arm by the ear. Come back towards that happy baby, it's kind of like a squat on your back. Knees together, feet in the air, arms back by your ears, upside down, down dog. Drop your legs down.
Stretch long in your mountain pose on your back, reach through fingertips and the heels. Let's find that rhythm again, knees to chest. Separate the knees. Lift your left foot up like happy baby as your right leg and arms stretch long. Happy baby.
Switching sides, left leg and left arm. Come back to that squat on your back. Knees together, legs in the air, arms back by your ears. And then legs down to the floor. Stretch long.
Do one more cycle of sun salutation on our back, hug your knees in. Separate the knees. Lift your left foot up, catch that foot as you drop down your right leg and arm to the floor. Switch, grab your right foot and drop your left leg and arm down to the floor. Come back to what would look like a squat kind of on your back, happy baby.
Knees together, legs in the air and then arms back by your ears. And then last time, let those legs drop down to the floor that way. And then we're going to do a warrior two as we tilt the knees into our hands. Separate your knees out to the side and then let just your left leg kick out to the left, like you're setting up for warrior two leg, and lift your right foot up like you were doing happy baby. So if you slide your right hand up to your shin or to grab your foot, your legs kind of look like warrior two position on your back.
Let's see if we can allow the gravity. Take that left leg out to the left while keeping your right heel above your right knee. Let your back body sink into the floor. Now let both legs open wide. So now you're doing wide legged forward bend on your back.
With a little resistance from the hands, slowly squeeze the legs together. As if you were doing a forward fold. Alright, now we'll go to the other side. And as you let your right leg drift out to the right, bend your left leg and slide your hand to ankle or to grab your foot. And stretch your right leg out to the right.
Left leg should look like it's a happy baby. So imagine your legs are doing warrior two, shoulders dropping back to the ground, back body softening in towards the floor. Then we go wide legged forward bend on your back. Slowly squeeze the legs back in. And then hug the knees back to your chest.
We'll go again, legs go up in the air. Let's open the left leg out to the left this time and start with the right leg bent. Maybe you slide your hands up to catch your right foot or your two legs. Hands on inner knees, both legs straight, wide legged forward fold. Squeeze the legs together.
Now let your right leg bend and let your left leg open out to the sides. Lift your right heel above that knee. Grab your foot. So you're doing warrior two with your right leg bent. Then go wide legged forward bend here on your back.
Slowly squeeze the legs together. Now let's complete our little warrior sequence here. We did warrior two. Now let's try warrior three. If you let your fingertips point to the ceiling, drop your left leg down to the floor as your arms reach back by your ears.
I'm going to channel the energy of warrior three. Your left heel might be down or might be floating above the floor. Swing your leg up and your arms back up. Take your right leg down as you take your arms back by your ears. And some of us might have our right heel floating, some of us might have right heel down.
Channel that energy of warrior three. Swing your right leg up. Fingertips point to the ceiling. Let's go again. Left leg down. Arms by your ears. Channel that energy of warrior three. Swing the leg up. Point hands to the ceiling.
Right leg comes down. Stretch the fingertips back. Swing your leg up. Arms up one more time. Left leg down. Arms by your ears. Enjoy that full reach.
We're in no rush. Swing the leg up. Right leg down. Reach your arms back by your ears. Big stretch. Leg up and then hug the knees in and maybe rock a little side to side.
Hope you enjoy that little sequence. Let's have your feet on the ground. Arms at your side for a second. So let's see where your strap might be. And let's go ahead and open up your strap now. So I'll suggest as we open up your strap that you kind of find where the center is.
And then lift your feet up and put the strap around the front of your ankles. Let your feet be wide and maybe a little bit wider than your hips for the start of this bridge. Where we walk the hands towards your ankles. So you have straight arms, strong arms. And you can pull the strap a little bit against the ankles.
So I'm going to press my arms down, shoulders down. And before I forget, slide the blanket out from under your head. So now as we're going towards bridge, hold on to your strap tightly. Pull the strap against the ankles. And do a little test run to see if you can lift your hips up and how great it feels to hold that strap.
Pull against your ankles and lift your hips. If it doesn't feel wonderful, you might need to move your heels further away or closer to your hips. And we might do one more little test run going up and down. So maybe we can then stay as we lift up a little bit. Adjust your shoulders so you feel comfortable and maybe able to lift a little more the side chest.
Base of the sternum slightly towards the ceiling. And feel again that right amount of tension of pulling the strap against the ankles. Ground your arms. Big breath into the base of that diaphragm, base of your ribs, base of your lungs. Let's come down and as you bring your feet just a little bit closer together, release your left foot out of the strap and take it maybe one footprint forward of the right foot.
Hold on to this strap nice and tight. And if you can now flex your left ankle so you're just on left heel. Press into right foot and now let's lift again this time and pull on the strap with your hands. Press firmly into your right foot and left heel and then lower down. Again, press into that left heel.
Fire up the glutes, hamstrings as we lift up and we have soft front body, really strong back. Lower down. Again, do that little pulsing up and then lowering down. And we're going to ask a little more again of that right foot to press down, left heel to press down as we hold. Lifting side body and trying to get that really full breath as we hold into the base of your lungs, diaphragm, upper belly.
And then come on down. Put your left foot into the strap and release your right foot forward, one footprint of where the left kind of foot is. Flex your right ankle. Hold on to the strap tight and please press your left foot down, right heel down and lift up. Holding that strap hopefully helps you get your shoulders down on the floor lower.
Press in the left foot, right heel, lift up, lower back down. Maybe a couple more times. Left foot, right heel, press down as we lift up. And then lower. Maybe one more for good measure, pulling that strap, lift your hips and then let's hold and try to take that fuller breath in toward the base of your lungs.
Use diaphragm, upper abdomen. And then we'll come all the way down. Let's go ahead and release the strap from your ankles. And we're going to make a big non-sliding loop with your strap. So if you will, take the time to make a non-sliding loop with your strap.
And that just takes a moment. I know it's worth fussing to get that right. And then once you have that, let's go ahead and slide that over your body. It's worth the fussing, I promise. And then you take that strap towards the bottom of the shoulder blade area. And then lift it up so you're aware of where the buckle is and that you're going to have the ability to adjust that buckle.
So let's take your left foot first up into that strap. And depending how long your strap is, for some of you the leg might need to stay bent. If you happen to have a long strap or you're shorter like I am, you might be able to have that leg straight. So you get to be in charge of tightening up that strap to increase the stretch or loosening up if we need to to send that leg a little more forward. So the idea is that we have arms-free, hands-free hamstring stretch.
And also that little pull of that bottom shoulder blade area as the shoulders roll back. And for me anyway, it feels quite calming, relaxing as I press up that I'm also pressing shoulders into the floor. Now, depending on your back, you might like to keep your right leg bent. Some of you might like to add your right leg straight and notice how your back responds. We're trying to choose the shape that calms the nervous system.
Which shape is more soothing to your nervous system? And maybe you notice that, whichever one that is, that your eyes are more soft, the forehead less gripped. There's a smoothness through the facial muscles, a softness in your throat. A willingness for those back ribs to drop towards the floor. And now continue doing whatever leg version you're working with.
And what's it like if we just tip that left leg a little bit open to the left and you're pressing the back of your arms, shoulders still into the floor as you figure out how far that leg might slide open to the left. Maybe your right leg tips a little bit to the right. Pressing right shoulder into the floor. As you slide that left leg back to neutral, now see if you can just pick your right foot up, tuck it into that strap and slide your left foot out. And just take a moment if you need to readjust so that the right leg can go towards straight.
Maybe you need more slack, maybe it needs to be tighter, and you're pressing up into the strap and trying to press your shoulders back down like you had sandbags over your shoulders. Press them back. And then enjoy again what's happening in that right hamstring area. Can we get the back of the ribs to settle towards the floor? See if it's a good idea on this side to stretch your left leg long or keep your left leg bent. And then maybe over the next moment or two we're going to tip your right leg a little bit more out to the right.
Kind of feel how far we could go that way while we keep pushing into the strap and pressing down through that left shoulder like you had a sandbag over that left arm to keep that side down. And over the next moment or two let's go ahead and come back up to center. Right now we're going to put both feet into this strap and we're going to give ourselves a little bit more space if you can to loosen up the straps. You can slide it up towards shoulders, up towards your neck, almost like you're going to take it off from underneath you. And now we're going to tuck it to the base of your skull, at which point you might need to tighten up the strap depending on the length of your legs, length of the strap.
And it's worth fussing with to make it right where it catches the occipital ridge. At that point you need to push your feet into the strap to keep the strap in place. And when it's in the right spot you'll thank me and thank yourself for being here to do yoga today to get this wonderful stretch. Head up and then can we let the arms be to the side or down by your side if you don't like them out to your side. Where can you get the most release in your shoulders?
So we just need to keep track of how much we're pushing the feet into the strap so the back of the head is really willing to drop into the strap. The chin slightly drops towards throat and ultimately this is a kind of a quieting practice. Something that would be calming for the nervous system. We have a little bit of that partial inversion of the legs up in the air. And feeling again the effect of maybe calming as we feel a little bit of change in blood pressure as more blood might be moving towards the heart.
And we get that message then to calm down, readjust the blood pressure. And we can discover maybe those full, deep, complete breaths. We don't really even need to change the breath just being aware of the breath without needing to change the breath. Trusting the body knows what to do to come back to that calm place. Maybe three more breaths just enjoying the partial inversion shape. And then let's reach up and grab this strap and just be mindful as we bend the knees to let the head slowly come back and land on the floor and then we can set this strap to the sides.
And as you set the strap to the side, we'll work our way up towards sitting and notice if you like to rock and roll or roll to a side as you come on up. Alright, so as you get yourself to the face forward, I want to encourage you to grab your blankets and have a little lift underneath you. It doesn't need to be that high, but a little lift underneath you so your pelvis is more forward oriented. And then let's have the legs straight out in front of you. Wiggle into your Dandasana with your arms somewhat at your side and legs straight.
So now we're going to bring in our hand mudra as we do a couple of sitting poses. Let's go ahead and start with your left foot now in that inner upper right thigh area, Janu Sirsasana legs. If we can take our hands in that Bhu Mudra we did last week where the ring finger, pinky finger curl into your palm and your thumb is holding those fingers down. So you've got index middle finger and we're going to reach down and feel into the pulse of the earth here. I'm going to try to create that mountain like torso, crown of the head, the peak of the mountain as you sit up tall.
And we're going to try to stay connected to the earth, that grounding gesture, the length in the spine, that energy moving through the spine. Keep track of it as you move forward and as you're moving forward if you have to start to round your back, lean back and try to stay with your mountain spine even if it means you're sitting right over your hips. And others might be doing a little tilting forward. The base of your mountain might get wider as you tip forwards or perhaps you feel like your fingertips if they slide a few inches back give you more width into the chest and a little more inspiration to breathe into the collarbones. So maybe we'll be looking down towards the earth for grounding, calming or maybe you do this with your eyes closed.
The right leg is actively pressing down as part of your foundation as your torso tilt slightly forward. Press into the earth with your fingers. Go ahead and lift on up and slide your left leg forward and maybe even without using your hands can you bring that right foot into that Janu Sirsasana shape. That's a lot of S's. So as we plug in, press down through your fingertips, Janu Sirsasana shape.
Lengthen your spine, tune into your mountain, life energy of the earth coming into your body to keep you stable in your body and mind. Now try to keep this in mind as your left leg presses down we tilt forward keeping the length of the spine. The center of that mountain is long and tall and full of life energy. If you feel the need to round your back, just simply lean back so that you can lift and lengthen through the curves of your spine. We're moving more at earth speed now here, slowing down, settling in and working towards again a position, a seat here that's actually calming as we look towards the earth.
Decreasing some stimulation. Slide on back up. Now give your hands a moment as you lean back and now let's bring the bottoms of the feet to touch. Now if you had the bottoms of the feet touch, let's press down into Bhu Mudra again, your index middle finger are the ones that are pressing into the floor. And let's try to create that mountain torso again. Long side body, lift up through the crown of the head. Let's have the intention to reach into the stable ground as we tilt forward without rush or without a goal.
We're all about the journey, not so much about the destination. And that willingness to let the way that the legs drop. It might not happen immediately. And patiently and kindly tipping a little forward with that intention to press into the earth to help keep the side body long, spine long. No particular rush.
Let your torso come on up and let's go for straight legs. Maybe we can, without using our arms, go to the legs wide position. And wiggle around and adjust so you're settled here with your fingertips again pressing into the earth. Tap into that energy, lengthen up through your spine, through the crown of your head and keep that mountain shape as you tilt a little bit forward with your fingertips pressed into the floor. So chest stays wide, chest stays lifted and open as you lean forward. Kind of with that open soft heart, letting the activist in you lean forwards into new horizon, new challenges with that soft open heart, that loving heart.
Moving forward with kindness and compassion as some of our companions. Tune into the wisdom of when to stop leaning forward, when to lean back. So our practice is in no way creating any future harm. Sit up, let your hands help you scoop those legs off the ground and bring the legs in. Right now, if we slide our hips off the blanket, and we'll use that blanket in a moment and we'll repurpose it in just a second, but first cross your ankles, hold on to your knees.
Let's do a little bit of what some people might call Sufi circles where you make some circles in your hips. Just to loosen up a little bit in the hips where you try to make some little circles rocking to the right, forward, left and back. Now you might notice other parts of your body you're moving as you're doing the circles in the hips. And welcome that. Okay, now if we let the hips settle a little bit and try to focus on that moving more of your rib cage.
Like we do sometimes in cat cow, how do we move the rib cage? And there's no particular right or wrong way to do that. Now go the other direction with the rib circles. Maybe your shoulders get a little bit involved as you move around. Alright, and then one shoulder at a time to sort of loosening up upper body from that concentration and forward folding work we just did.
Now we're going to use all the props. So if you move your blanket for a moment and we're going to take your bolster onto your mat and have that available behind you. And then we'll have your blanket for your heads as a little bit of a pillow. And then we're going to take this strap and we've got that non-sliding loop. We'll take it around the body one more time and down towards the kind of top of the sacrum area around the pelvic bones.
Kind of like where you might put a belt. And then put your feet into this loop in front of the ankles. You can see the strap is hanging out there. And then you're going to either tighten or loosen the strap so that it's tight and pulls the heels as close as you want towards your pelvis. So we're going to move toward a more reclined position to do a little bit of pranayama breath work.
And enjoy more of a restorative pose. It's always worth fussing with this strap until it's just right. And you know it's right because you kind of get that calm face, the eyes settle into the face. And when things feel right now there's the bolster behind you. You want to lean back and slide your heels towards the pelvis.
And then slide that blanket so it's again under the base of the occipital ridge, the base of the skull. Now we get an open front body towards the sky. Arms out to the side and your arms and shoulders kind of wrap around the shape of your bolster. So we might notice that there's a little bit of a hip stretch going on and maybe that sensation draws your attention away from your head and down into your body. And take a few moments and try to let the weight of the body sink back towards the props, the floor, the earth.
If at any time you need to change the leg position before I might suggest that please change the position when you need to. Or add blocks if you're noticing it's a little bit too intense of a stretch. If you have blocks put one under each leg. So we might start just first with breath awareness. And as a practice that can be really helpful for calming the nervous system is just becoming aware of your breath.
In yoga we talk about the beginning which starts at the nostrils where the air comes into your body. And then it brings that nourishment, oxygen into your lungs. And there's a moment when we're done filling the lungs maybe they're three quarters full and then we empty the lungs. Third part of the breath. And then the lungs are empty, the last phase.
So for a minute let's do breath awareness of noticing breath coming in through a nose when you're three quarters full. There's a pause and we transition. And there's a moment where the breath is out. Try that together. Let's try that together.
And bring attention to each cycle of the breath. Now in general there's an idea that if you pause more at the end of your exhale that there's a little bit more calming, quieting that happens in the body or the mind or the nervous system. So if you're looking for more calming you might experiment with that longer pause after exhale. If you find you're needing a little bit more inspiration or wakefulness, more energy. Linger a little longer at the end of your inhale.
So more calming or more energizing. Or if you felt balance just keep doing what you were doing. At some point if you need to slide your legs out you would slide your legs out and so it looks a little bit more like you're just doing Shavasana legs. Let's try to stay with that breath awareness practice for another minute, your full dedicated attention to where you are in your breath cycle. What you need a little more of in this moment for balance. Stay focused and alert.
Maybe these last moments in the Pranayama practice just infusing a little gratitude for our health, for our life, this breath. Maybe a little appreciation for nature and her beauty. Remembering again our gratitude and appreciation for nature so we remember why we want to protect her. And how the self-care starting with yourself is that great first step to be a better service. Really treasuring this time that you're making for yourself.
Important key step to being of service so that we can serve Mother Nature. Serve and protect. So if you have your legs in that wide position you might take a break and stretch your legs bring them in their parallel or legs all the way straight. The legs are straight let's all maybe bring your legs in together and stretch your legs long like you're visiting Mountain Pose in your recline position and maybe that big full stretch to your side body like you're waking up refreshed. Sweep your arms down to your sides and slide your feet in so your feet are on the ground. And be aware of where your props and things might be as you maybe hold your legs and lift yourself up.
And that strap is no longer needed around you so we might set that strap to the side. And then as you come to sit you might slide that bolster underneath you for a little bit extra lift. One of the things I like to do with the blanket here for the knees is to roll the blankets and then turn that that long way in front of me so that when I cross my legs my ankles are lifted. Sometimes it alleviates some tension in the knees. So we're sitting in a way that really feels gentle and kind for the knees and the lower back.
Take a moment maybe with your hands down on your lap as a grounding gesture. Sit tall like that mountain for a moment, crown of the head lifting towards the heavens, sky. Sense and feel that stable ground underneath you. And maybe visualizing again your intention for this new day or this new week. Maybe seeing that clearly in your minds.
What practices do you wish to grow and attend to? And may we use this focused mind and attention we've created in our practice to be of service in some way to the earth. And closing this part perhaps with your hands in front of your heart today. May others in the earth benefit from our practice. Namaste.
Alright everyone so in addition to your asana practice being part of your Green Yogi Challenge we have a few suggested homework practices for this week. So if we consider adding on a few things this week maybe turn our attention towards our breath and some pranayama practices in easy reclined positions like we did today. And I'm emphasizing pranayama as part of our checklist for green practices to help you avoid burnout. So taking the time to treat yourself to these practices that calm your nervous system can be really helpful in the long run. And as we know our Green Yogi Challenge and being an activist is something that we sign up more as a marathon versus as a sprint.
And these little things that we're doing on a regular basis when we take the wide view really add up to make a difference in the long run. Sometimes I know myself I feel like I doubt these little things are making a difference in the short run. But when we take the big step back and look at change that happens from individuals doing these little things on a regular basis it really does make a difference. And being calm in your body is to me in my experience anyway a really great way to start showing up to be more of an activist where I'm in good health and I'm aware of my emotions. So this sort of leads me then to the second piece of the homework assignment which is to be aware of your communication when we are engaged in conversations around environmental issues.
How can we communicate in kind compassionate ways that maybe make people less defensive and at the same time we can do good listening to others when we're calm. I love using the nonviolent communication model where I'm aware and responsible for my emotions. I'm aware of my feelings. I'm aware of what needs I have and try to articulate requests of others to meet these needs. And sometimes the reply is no and I'm responsible for dealing with no and I'm also really excited when I get to work with yes replies to request. So if you don't know the nonviolent communication you might look into that as a simple communication tool so that we are in relationship together longer in ways where we might make more effective change.
And along with that so that your voice is heard we might start to be more inspired to show up at town hall meetings or at rallies or maybe even protest if you're inspired and make those calls so you're asking more of your leaders to act responsibly. And of course, vote. The most important things that we can do. The third piece of the homework assignment is really to take a look at how we're getting around and traveling for our job maybe for errands or for shopping for socializing and is there any ways that this week that you might be able to switch. A little experience in a car to a bike ride or to a walk or to maybe do one zoom meeting instead of driving over to meet someone and just kind of be aware again of the cost of transportation.
It's impact in the environment, and often when we make some of these shifts where we're making changes to ride bikes or walks it's also really good for you. Right. So we get a little more exercise in our week, which might not be a bad thing at this turn of the year, just to get more exercise. Right. So we're around nature and we're again, getting to see nature change and open up and see how much we love the beauty of nature, and we protect what we love. So, I hope that helps to inspire you in this new week to make a few different changes and shifts, and I wish you well in your adventure of widening your circle to take better care of your communities and thinking a little bit more of the world at large. Thank you so much for being part of this challenge.
Green Yogi Challenge: with Melina Meza


Comments


You need to be a subscriber to post a comment.
Please Log In or Create an Account to start your free trial.
© 2026 Timeshift Media, Inc. dba Yoga Anytime - All rights reserved
