Description
About This Video
Transcript
Read Full Transcript
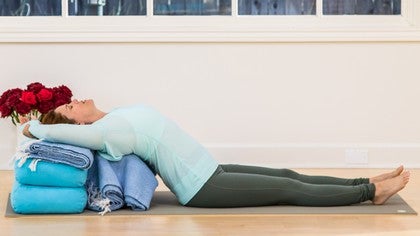
(ocean waves crashing) Hi everyone, welcome to Yoga Anytime. This is the second practice of yummy series. The yummy series is a restorative sequence that leads directly to a long yummy Savasana. There are several props that you need, you need one chair, one blanket, one block, one belt, and one eye bag. We're starting with the straight legged back bend with use of the chair, and as you can see, I have the chair set up so that my back comes to the front lip of the chair, I have a block placed on top of the seat of the chair, and here's the blanket.
Depending on your height you may determine that you need more support or less support underneath you, whether that's your hips or whether that's your head, here's where I'm setting mine up. I'm gonna be on the top end or the long skinny end, and I'm gonna place the blanket right in front of the chair. Sitting on the front edge of the clean side of the blanket, stretching the legs out, I place my hands on the front legs of the chair and scoot my back all the way up against that front lip, press down with the hands to lift the chest, and slowly begin to release the head on top of the block. Then I'm gonna stretch back and reach the backside of the chair. And you can decide if you want less sensation in your chest and shoulders by having your hands at the top in the middle, little bit more if you go to the corners, and a lot more if you slide your hands down.
So you can determine where you want kind of sensation that you can be with. I like to bring my hands just underneath the corners just at the base of the corners. (sighs) Okay, once you get set up, your legs are straight, shoulders relaxed, let's be here for two full minutes. (inhales) Always in these poses, as your flexibility opens up a little more, becomes a little more accessible to you, you can change your support. Go a little lower at the head, or if you need to go higher you feel as though you're not getting the support that you prefer.
And also feel free to just move your arms throughout the pose. Exploring the different positions for your hands, will also change what's happening at the back bend of the spine. So keep feeling your way through it. And if you feel the urge to move and adjust, it should be because you're feeling inclined to stay longer. Not because you want necessarily the biggest stretch.
Follow this breath that you're on right now and just take one more breath. To come out of the pose, bring your hands to the back of your head, lift your head by tucking your chin a little, bring your hands down to the floor, stretch your arms down to lift your chest and be in an upright position. Feel free to fold the legs if you prefer, just keep them stretched out, let's just rest the hands down on the legs, close the eyes, and release after that feeling of the opening that that back bend gives to the chest and shoulders and throat. Okay, so we're gonna prepare for setu bandha sarvangasana on a block, which is bridge pose, and we only really need two things for this, just the block and the blanket, so I'm gonna remove the chair and put it to the side. (chair creaks) And I'm taking the blanket and just giving it a little cushion for my shoulders.
And I have it so that the long clean edge is gonna be pointing toward the bottom end of my mat. Now you can use a foam block if you prefer. If you want something a little more cushiony, I like the cork ones because they're very steady, but it's just your preference. We're gonna start on this end which is the wide flat side, and after a little while we'll go to this long thin side. And then you'll have the option to go to the short side if you prefer.
I lower down. Set my backside right around my shoulderblades and my shoulder and my head are right on top of the blanket. My feet are about hip distance apart. We'll press the feet, lift the pelvis, and take the block right at the tailbone and sacrum. And once you get that sacrum down, you wanna feel that the weight drops into the middle of it, right?
Not that it's on the top end and not that it's on the bottom end, so somewhere in the middle, so just adjust until you feel the right position of the block and then conk, like let it just sink. Then I'm gonna stretch those shoulder blades out to give myself some width in the back body. And I like to bring my arms out in this goal post position but feel free to adjust your arm position however you like. And then we can close the eyes and start to sink into this first level on the block. Let's be here one minute.
The bridge pose is a great pose to feel this letting go around the upper back and neck and shoulders. Seems kind of odd because a lot of the sensations starts to perculate around the lower back, because of the way that the block is, and where it is. But that lifting of the pelvis is releasing all the weight of gravity also into the shoulders and neck and this is why it provides this wonderful release. Enjoy it. And so just kind of, you know, check it out, how do you feel here?
And if you wanna try to explore the next level, then you'll press the feet, lift the pelvis, and take that block on it's long thin edge. Now you have two options. One would be to have the most amount of surface of the lower back and sacrum right up against either end of the block, or, you could turn it the other way so it's parallel to the spine, and just have a little bit more, it's sort of a sharper experience, a little more stimulating. So you decide which one you think you'll like, try them both. And then stick with one, and we'll be here a minute.
Remember as time goes by, how thing change let your body adjust to the changes, moving in a mindful way to account for them. And then, notice the breath you're on right now and take one more, and either stay at this level, or drop down to the first level. Or maybe you wanna explore that third and final level. So I press the balls of the feet into the floor. Lift the pelvis, take that short end, right at the tailbone and sacrum, and there should be a lift of the back ribs but a release of the shoulders, and again, position your arms in the place that you like.
You should feel as though the chin is not pushing so much into the chest, you wanna feel a little bit of space where the front of the throat and chest and chin are. So a little distance there like you're holding a robin's egg and you don't want to squish it, just soft and relaxed. And let's stay this minute, wherever you are is good. Notice the breath you're on right now, complete one more. If you're on the first level, please stay there.
If you're on the third level, come down to the second level and if you're on the second level, come down to the first level, push the feet, lift the pelvis, slide down to the next level or remain on the first. Pause. This descent is important, we're regulating the blood pressure, slowly taking ourselves step by step. Again if you're on the first level, stay. And if you're on the second, push those feet, lift the pelvis and now you're on the first level.
And then notice the breath that you're taking right now and follow it with one more breath. Then lift both of the heel bones, reach your hands to the outer edges of the mat, thumbs on the top side and the fingers underneath, and push the mat towards your feet until you feel some traction occur on the lower back. Then lower the heel bones, lift the pelvis off the block just an inch or two, continue to push the mat towards your feet, get a little bit of length, and then release the mat and push the block off of the mat. Lift the heel bones and slowly lower from the top of the spine down to the lower back and feet, hit the floor, you can do whatever you want with that blanket, remain where you are or slide it out from underneath you. Or maybe just place it underneath your head.
Let the arms go and just pause. (exhales) In some yoga schools, this pose is known as the pose to not avoid. Alright, so let's bring the left arm in towards the chest and roll over onto the right side and just pause. And then go ahead and use your palm to push and come up. And just sit up for a moment.
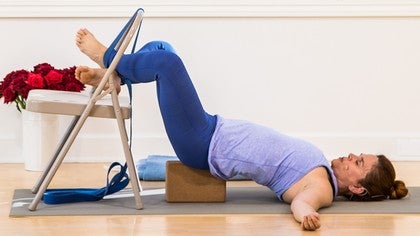
Close the eyes, be still. Okay let's move on to a wonderful variation of bound angle pose. And we're gonna need the chair and a yoga belt and a block, and you can or cannot use the blanket, just depending on if you want some additional support for your head. I'm going to remove the blanket for my practice, push it to the side, then I'm gonna bring the chair over and I'm turning the chair around, so that the backside of the chair is now facing me. And I'm gonna take the belt and unwind it, and I'm gonna fasten it to the back end of this chair.
So I just get the tail end, bring it around, place that tail end between the two metal pieces, separate them and put the tail through the metal pieces again, cinch it up. You want enough room so that you can put your feet through it. And it will loosen up a little bit, and there will be a little bit of, you know, adjusting and managing, but it's possible, you can do it, everybody does. So I'm just gonna get the end of the belt kind of out of the way, and then the block comes over again, and we bring ourselves pretty close and then we lower, and the first thing is we go to any level that you want, so, you did this level, you did the middle level, you did the top level, so you do the level you said oh I feel really comfortable in that place. My most comfortable place is the middle level, that's where I'm gonna go.
So I'm gonna lift my hips up, place that again, at my tailbone and sacrum, then I'm gonna take my right foot and put it between the, in the loop actually, and it goes right at the ankle and I let that leg just hang, take the other leg, cross it until my left ankle is on top. I let those legs fall to the side, bring the arms out, let the shoulders go, the head go, and I let the weight of these legs just drop into gravity. One full minute. Make any little adjustments, you get so sensitive to all the little nuances, not just of the shape of the pose but where you're feeling most connected. If at any time you notice that there's a lack of connection somewhere, you make that little modification in your body, that little change that you can have a deeper relationship with what you're doing.
Notice the breath that you're taking right now, and follow it with one more. And then we're gonna switch the cross of the legs so my left leg is on top, I'm just gonna take my legs and switch them. So now my right leg is on top, and I just move that belt over the middle again, and not the weight and the belt will open up a little, if it does it's okay. And let the shoulders go, let the weight of those legs release, and now we're back again, let's take another minute here. And take another easy inhale, exhale out all that air.
And then you're gonna release the legs, bring them on the seat of the chair, pause a moment, then lift the hips, if you're on the middle level or the upper level, you'll lower to the next level, pause. And if you're on the middle level, come down to the first level, and pause. And then we'll come down to remove, come down, completely remove the block by pushing the feet, lifting the pelvis, sliding the block out, lowering all the way, releasing the backs of the knees to the back of the chair, right at the back lip, coming closer if you need to so that you feel that perfect support at the back of the knees. I'm going to take my blanket, I'm going to fold it in half so it's long like the shape of a bolster, place it right up against my belly, take the sandbag, or that's not a sandbag, that would not feel good. This is an eye bag and it's gonna feel great.
Take the eye bag, level out the contents, and slide the forehead skin toward the bridge of your nose. And now we're headed toward our yummy savasana for the next six minutes. (inhales and exhales) This last minute, see if you can feel the weight of that blanket resting on the lower belly. Just receive the weight. Let the pelvis get a little heavier.
Start to bring your interest back to the breath. Eventually move around through your fingers and your wrists and let your hands just rest, let them weight down through the blanket and the pelvis. And then wiggle around through your fingers, your toes, your wrists, your ankles, everything, move around a little bit. Eventually draw the knees in toward the chest. You can keep that blanket with you.
Let's bring your left arm, just kind of hug the blanket up against you. You're gonna slide your body over to the left side and let that eye bag just drop right off of you. And just kind of draw those legs in and snuggle up with the blanket. There's something really comforting about having the weight of that blanket there when a few of those poses we exposed that part of the body so much. When you feel ready to move, just lean your chest toward the floor, push with your palm, come on up, come into any comfortable seated position, and just keep the blanket on you if you'd like.
Close the eyes a moment. Consider what might become available to you if you just keep that comfort when you feel like you're at home, that yumminess. What would become available to you if you let it spill out into the rest of your day. Bring your hands to your chest, gently open your eyes. Thanks for joining me today.
Namaste.
Relaxation Takes Practice
Comments
 I have a question. My hubby is tall, when he sits in front of the chair, his shoulderblades are above the edge of the chair. How do you adjust the straight-legged backbend pose for a tall person? My suggestion for him was, just slide a little bit away from the chair, he needs to lean back a little bit more, until he can rest the bottom edge of his shoulder blades on the front edge of the chair. Do you confirm with this? Thank you. Silke
You need to be a subscriber to post a comment.
Please Log In or Create an Account to start your free trial.


