Description
Transcript
Read Full Transcript
(water rushing) So in this sequence, we're gonna explore standing and walking a little bit, and then we're gonna explore some little muscle tutorials that help to bring the body back into balance. We can be standing either a little bit, or quite a bit off-center, and not even noticing it. The nervous system will object to this, maybe, for a little while, but if you always stand off to one side, or maybe with a little rotation in your hips, and a counter-rotation in your shoulders, or who knows what, you won't notice it after a while. I'm gonna have you walk a little bit, I'll walk with you, we'll feel into what that's like, and then we'll come down onto the floor and do these little tutorials, and get up and compare. Okay, so this is about really coming into center.
So... Taking a 1/2 a dozen steps on each foot, just feel what it's like, turn around, pace back again. Try to get out of the visual field, which can be distracting, and find yourself in the sensation of moving. Feet, knees, hips, where's your head in this alignment, very good, come back to center, what is center? Lifetime study.
And... And then let's come down to the ground. So, the first little tutorial that I'm gonna show you is a very simple movement, I'm gonna keep my right leg bent, foot on the floor, stretch the left leg out straight ahead, straight down from the hip socket down towards the end of the mat, and flex the foot back in such a way that the knee feels firm without hyperextending it, and then I'm gonna roll from the upper thigh muscles and hip muscles, I'm gonna roll the foot out, and then I'm gonna roll it towards the midline. So, what you might see if you look up at your foot is the foot turning to the outside, and the foot turning a little bit to the inside. For most of us, there's not a lot of internal rotation available.
You can do this approximately 10 or 15 times on one leg, you could do up to 20. And then, stop. Bend your knee. Bring it up so the two knees are equal, and then stretch your other leg out. Again, straight out from the hip socket, flexing the foot up so the toes are pointing towards the ceiling and even reaching back towards your hip, and then, rolling the foot out and in again, where you're working is upper thigh muscles and hip.
And, again... A moderate pace, so out and in. Out and in. Out and in. Doing 15 or 20 of these.
If you find this exhausting, just do up until you feel a sense of fatigue, and then make note of how many that is, perhaps, and switch sides. You'll get stronger over time. So then you repeat that. The repetition, and sometimes I count, like I might be oming (chuckles), om one. Om two.
Om three. Om four. Om, pretty soon I'm just doing om. I can count by using my fingers floating around in the air, so you don't have to always stick with a numerical way of counting, and you can also just feel into a sense of enough. (chuckles) And then switch sides.
So we're learning to do something repetitively as a way of teaching the body how to move differently, and we're also learning how to feel into what's enough, what's too much. It's extremely important not to do anything, any of these little tutorial actions, if they hurt. Fatigue is one thing. A joint hurting is another, you don't want your joints to be hurting. You don't wanna have nerve pain.
Okay, so I've just done two sets on each leg, and I'm gonna do a third set. Rolling in and out, and we're not gonna be rolling the pelvis, just the leg, so there's a stillness, a release, a softness, a nice, deep, easy breathing into the belly, even up into the chest, a softening in the tongue, I'm switching sides again. Om. Two. Om.
Five. Om. Seven. Om. Nine.
So I like to do the om more than I like to count, can you tell? (chuckles) Ah, yes. Okay. So there's your three sets of that one. You can call that supine leg rotations.
And that's about the relationship of your thigh bone to your pelvis. And some of us have one thigh bone that turns out, and the other one that turns in, or one turns in or out more than the other. This exercise helps to even them up. Now we're gonna work with the ankle movements again of one leg at a time. The leg that isn't moving the ankle is gonna be, center of the kneecap is gonna be facing up.
This one really helps to wake up the musculature of the calf muscles, and they attach across the knee, so it affects the knee as well, and it really has far-reaching effects on how we walk and stand. So it's a simple circling in one direction, round and around. You know, you could do up to 30 of these, just count to see how it feels. I like to sometimes use that om counting, om, I think I've done about eight or 10, so let's call that 10. Om, 11.
Om, 12. Om, 13. Om, 14. Om, 15. It helps me slow down.
Om, 16. Om. Om. Om. So that's about 20.
And I can feel that's just about the right level of getting kind of tired and needing to rest. And then, lifting the leg back up again, turning the ankle in the other direction. Do you remember which ankle at which direction you turned first? You'll be able to tell. So circling back, om, one.
Om, two. Om, three. Four. Five. Six.
Seven. Really thorough circles. Don't overwork it, but just try to find the fullness of the circle, and all the movements that requires. You can hold on to the calf and feel all the muscles that are working in sequence. I think that's pretty close to 20.
Bringing the foot down. Mm. Stretch your leg out. And just feel into both legs for a few seconds. They feel so vastly different, it's just amazing.
Which encourages one to go on, then you bend the other leg, bring the knee up, a little bit past the hip joint, you want your elbows and shoulders to be comfortable. I have really long arms, I could let my leg go out quite a ways and not strain to my shoulders. You don't want your shoulders rolling up towards the ceiling, so pull the leg back as much as you need to. Shinbone about parallel to the floor, the other leg, kneecap is pointing straight up. So here we go, we're gonna circle in one direction first for about 20 times, less if you feel fatigued before then, four.
Five. Six, this is a good pace, you don't wanna go too quickly. Eight. Nine. 10.
Om. Om. Om. Om, sometimes I count with my fingers, sometimes I just trust myself to know when it's enough. It's all about trust.
Om. Okay, putting the foot down to rest for a few moments, could even stretch the leg out if you want. It's kind of amazing how much space I feel in my hips from doing this. All the work down, apparently, in the ankle, so the leg is up again, and spinning in the opposite direction. A circle of the ankle.
Try not to move the entire leg bone around in circles, just from the ankle, while you're counting, soften the belly, lower back, breathing into your belly and heart. Om. There it is, that's enough! I can feel it! So there's one more movement per leg, I'm stretching that left leg out again and bringing my right leg up. This is just the simple point and flex. So again, shoulders are relaxed, shinbone, apparently, approximately parallel to the floor, pointing and flexing.
Pointing and flexing. Om, one. Om, two. That's actually four and five. Om, six.
Om, seven, like the way I count? Om, eight. Om, nine. Om, 10. 11.
Om. Om. Om. So, the point of the numbers, again, relax your low back, your belly, your neck and throat. The point of the counting is maybe for comparative purposes over time, over a number of days or weeks or months, and also so that you get enough work, but also, I'm letting the leg go down again.
Tune into what's enough. (chuckles) No fudging. Stretching the right leg back out again, feeling both sides, exhale, bring the left leg back up. Kneecap is centered towards the ceiling, I peek around to see where my shinbone is, it's pretty good. Not circling this time, pointing and flexing again, pointing and flexing.
Tuning into the leg that isn't doing the work, keeping it centered. Tuning it into your breathing, as you count. You could do soft internal oming, or some other mantra. (softly singing mantra) Good thing that one's over, I'm ready to put the foot down. Mm.
Both legs stretched out, relaxed. Tune in, I even feel my lower back is more relaxed. Lower back, pelvis, so there's a lot going on between the relationships of ankles to knees, knees to hips, hips to pelvis, hips is thighs to pelvis, pelvis to spine, everything loves this. Okay, so that's... Now we're ready for working with a block between the knees.
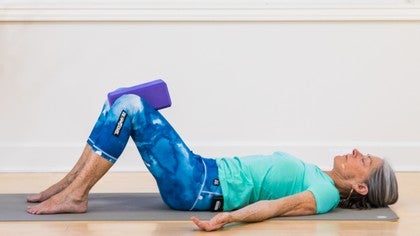
That was a tutorial for the legs, the spinning of the ankles and so on, this one is directed almost solely, almost completely at the inner thigh muscles, but you might notice that there's also just a little bit of activity right here, so, not asking too much of too many parts of the body, helps the body to come into balance, so we're gonna do this a number of times, up to 60, 60's a good number, but with three or four breaks. And you're working with about 1/2 of your capacity, so, the first couple of squeezes here, squeeze as hard as you can, well, maybe not as hard as you can, but squeeze pretty strongly. And that way you can kinda test out to see if the block is in the proper place. You don't wanna be on the thigh muscle, you wanna be on the bony parts of the knees, and that's why we use a soft block. Okay, so, not so hard.
About 50%. Relax your lower back, it's not gonna touch the floor. You'd have to push to get it to touch the floor, but you don't wanna find yourself overarching, so, squeezing. Press and release, press and release. It's about a second hold, and then, it takes about a second to release and reboot.
(chuckles) So, to do 20 of these takes approximately 40 seconds. It's not very long, actually. (chuckles) Now, I don't know if you can feel your inner thighs working, but you can just put your hands along your inner thighs near your pelvis, and if you can't already feel them working, you can certainly feel them with your hands. Alright, so it's time to rest. Take just a breath or two, it's all it takes.
The body recovers quickly. (breathes deeply) Okay. Now, if you wanna put your hands towards the bottom end of the bony part of your hips, but just on the outsides of the hips, and then press and release, press and release, you might feel a small muscle, maybe about the size of the palm of your hand, contracting as you do this pressure. And, be curious about whether or not it's working the same on both sides. And just plant the seed into your nervous system that that's what we're looking for, is an evenness of working on both sides.
So let's do about five more, one. Two. Three. Four. Five.
Okay. Another breath or two. (breathes deeply) You can adjust the position of your head, I haven't mentioned this, but, for some people it's more comfortable to do these things with height under the head, especially if when you lie down, if your chin is pointing up. Okay? So one more set of approximately 20.
Press, release, press, release. Three. Four. Five. Om.
Om. Om. Om. Om. Shreem.
Shroum, there's all kinds of sounds you can make. (breathes deeply) Just breathing. And sometimes 20 is too many. Maybe 10 is enough, you really have to feel into your fatigue level. If you only do three sets of 10 the first few times you do this, because that's enough, then that's appropriate.
Okay. So, I'm gonna take the block out. Putting that aside. And now we're gonna work with the glutes, so the buttocks muscles. And, I tell people, when they first start this, that it can be helpful to put the hands on the bum and feel the work, and it can also be helpful to put your hands, so let's actually start with the hands on the hips and the belly, because you don't wanna be tilting the pelvis while you do this.
You don't wanna feel the bones of your pelvis tipping at all, so right now, I've begun the glute contractions, and the pace is about the same as squeezing on the block. And the effort is about the same, about 50% effort. Okay, so once you've tuned into, gosh, I'm not trying to tilt my pelvis, but it is! Or, no, it's nice and steady. If your pelvis is tilting while you do this, just plant the seed internally, that you wanna be able to do this without tilting the pelvis. And in due time, your body will figure it out, it's amazing.
Okay, so that's why we're doing these very simple tutorials. We're waking up parts of the nervous system that connect to the musculature that aren't awake, so I can feel my glutes are contracting pretty nicely here. I don't know if it's visible on the camera. Sometimes when I work with somebody with doing these, (chuckles) I can't see anything happening. But I know that if they keep up with it, that they're gonna get the benefit from it.
So, I'm gonna rest. Why don't you rest too? Breathing into the belly, relaxing your low back, maybe even press the lower back into the floor a time or two, and then back to glute contractions, at one more time. One. And two.
And three. And four. And five, I think of ballet class when I count like that. (chuckles) Six. And seven.
And eight. Nine. 10. And 11. Maybe 11 is enough.
Maybe 14. 15. Let's stop at 15 this second time. Feel into how that's going for you. Deep breath.
(breathes deeply) Check your neck. Don't be tightening the neck. Just release your neck. And back to this very simple, but not necessarily easy task, of contracting the buttocks. Sometimes, simple is the hardest thing to do.
Give me something complicated, I'll let all my compensations take over, (chuckles) and it won't be that hard. So. Nah, we're not allowing any compensations, you get to really tune in to your glutes. And why are they so darn big anyway? They're big because they're necessary for stabilizing your walk, and your standing.
Okay! Approximately two seconds is one count, and so, with the breaks of breathing in between, if you do a full 60, it's a little over two minutes of work, it's not that much. Sometimes it can seem like forever, but if you bring it into perspective, it's not so bad. Okay, so we're done with squeezing the glutes. Now, we've done working the inner thigh muscles, we've done work with turning the leg, we've done those glute contractions, now we're gonna work on the muscles that push the legs apart, and again, these are stabilizers for keeping us truly vertical when we're walking, and it prevents us from compensating in ways that, when we do a lot of compensating in our walking, it can cause the hip joints, the knee joints, or the ankle joints, but especially the knees and the hips joints to wear unevenly. So normally, when a joint stacks on top, when joints stack with gravity, they wear evenly, and you get less bone-on-bone pain, so, or none! Okay, so.
The distance that I've got between my knees right now is narrower than if I had the block in between. It's maybe this most narrow distance, width of the block, which is approximately the width of a fist, or maybe slightly wider. That's the space between my knees right now. And the belt is up close to the knee joint, but it's not over the top of the kneecaps, it's on the thigh bone. Alright?
And then... A lot of people like to walk their feet up really close to the hips, but inch them out and proceed. (chuckles) You're just gonna press out, again, with about 1/2 of your strength, and release. And this is again, approximately three sets of 20. You might start with three sets of 10.
And I think we're up to five or six now. It's the same pace of all these other brief tutorials. You might not be able to feel what's doing the work. It might be kind of vague. But as you do this over days and weeks, several times a week, you start to notice what's working, and it's so interesting, you can put your hands on different parts of your legs, your hips, and so on, but also just tuning in.
Tune in and feel what's working. I'm pausing now. If you get fatigued really quickly, what this tells you is that some of the muscles that help you to remain stable in both standing and walking, are very weak, and I'm gonna start again. (breathes deeply) So pressing out, and release. Out, and release.
Press out on the belt, and release. Or maybe just holding it about a second. Releasing your belly. Keeping the back of the neck released. Calm, smooth.
(breathes deeply) It doesn't take that long, when you're doing such a simple movement, for fatigue to come, if you're weak, and it doesn't take very long to build some strength over a few days, or a few weeks. Okay, I'm resting again. Take a deep breath. (breathes deeply) Mm. And begin again.
Now, once you figured out how long it takes you to do these, maybe you can be listening to music while you're doing it, or chanting something. I really love doing the chants, because it brings my awareness into a calmer space, if I'm feeling some fatigue, I don't overplay the fatigue in my mind, you can get kinda dramatic about so tiring! (laughing) But if you're chanting, you hardly notice! It's just like, spreading the chi around your body, spreading the prana by chanting. Okay, so I think that's about enough on the abductor presses. Interesting, after doing these, I can feel that my left outer hip area's a little more fatigued than my right. So that tells me something, maybe I'm not quite on center, and that's not surprising.
So I'm slipping the belt off now by pulling the knees up to the chest, slipping the belt off, and rolling it up. And rolling onto my side. Sometimes, it feels easier to do this on the side. But you can do it on your back as well. So just one more.
After all of these little tasks, we've worked... With pretty much all the way around the pelvis, not so much the front thigh. So when we take the legs, when you walk your feet up to a comfortable distance from your hips, and sometimes it's been hard for me to get my feet up close to my hips, today, a little closer. Don't worry about how close or far they are, and bring the soles of your feet together, and let your legs fall out, and you'll stay here for one to two minutes. Having just worked all these places allows for a more equal release on left and right sides, as you relax here.
And this is a nice place for just some deep, gentle breathing. As I bring my breath in, I imagine pouring it down into a very large balloon that goes all the way down to my buttock at the back, all the way down to the floor of my pelvis where my legs join my pelvis, that's the beginning of the in breath, going down. (breathes deeply) Breathing in again, and then feeling how breathing deeply down can allow for some greater filling upward into the ribs and heart space as well. (exhales slowly) And sometimes, breathing out with the sound of a sigh, a slow sigh, like an ocean breeze, can be very relaxing as well. So breathing down, in and down.
(exhales slowly) Exhaling with that slow sigh. (exhales slowly) Now it's funny, sometimes when I lie down like this and I try bringing my legs into this open position, you could call it frog, we in the yoga community have a Sanskrit name for it, but, frog is close enough. (chuckles) If I do this at the beginning of the practice, before I've done all the little tutorial contractions, it is not comfortable. It's remarkable how doing those contractions allows for this to feel good. It might only feel good for 30 seconds or a minute to you, it might feel good longer, but I'm feeling like it's about time to let it go.
And so I'm gonna use my hands, I'm gonna walk my feet a little bit apart, and use my hands to help the legs come back up, I'm walking the feet wider, almost the width of the mat, and letting the knees fall together, and that feels really nice. Hands on the belly, gentle pressing of the lower back into the floor, and releasing, couple of times, three or four times. (sighs) And then in just a few moments, we're gonna come up to standing, and we'll stand and walk again, and compare. Perhaps you'll be able to feel some difference in what it feels like to walk after doing these tutorials. (sighs) Okay.
So I'm rolling over, pushing up. Coming up by pushing back. Pausing. (chuckles) Pushing up. Yeah.
So, not walking right away, just getting used to standing for a few moments. Wait til you feel you really have your grounding. And then step forward, take a few steps, I just felt a nice little pop in my knee. Yeah, so. I don't know what you can feel, but I can definitely feel that...
I feel more spacious in my hips and knees, and the gait feels steadier. So what are you feeling? And you can walk around the room for a while, at home, and find out. And you might even be able to feel this later on in the day, as you're walking around. So.
Thank you so much for joining us.
Yoga Rx: Patricia Sullivan
Comments
You need to be a subscriber to post a comment.
Please Log In or Create an Account to start your free trial.
