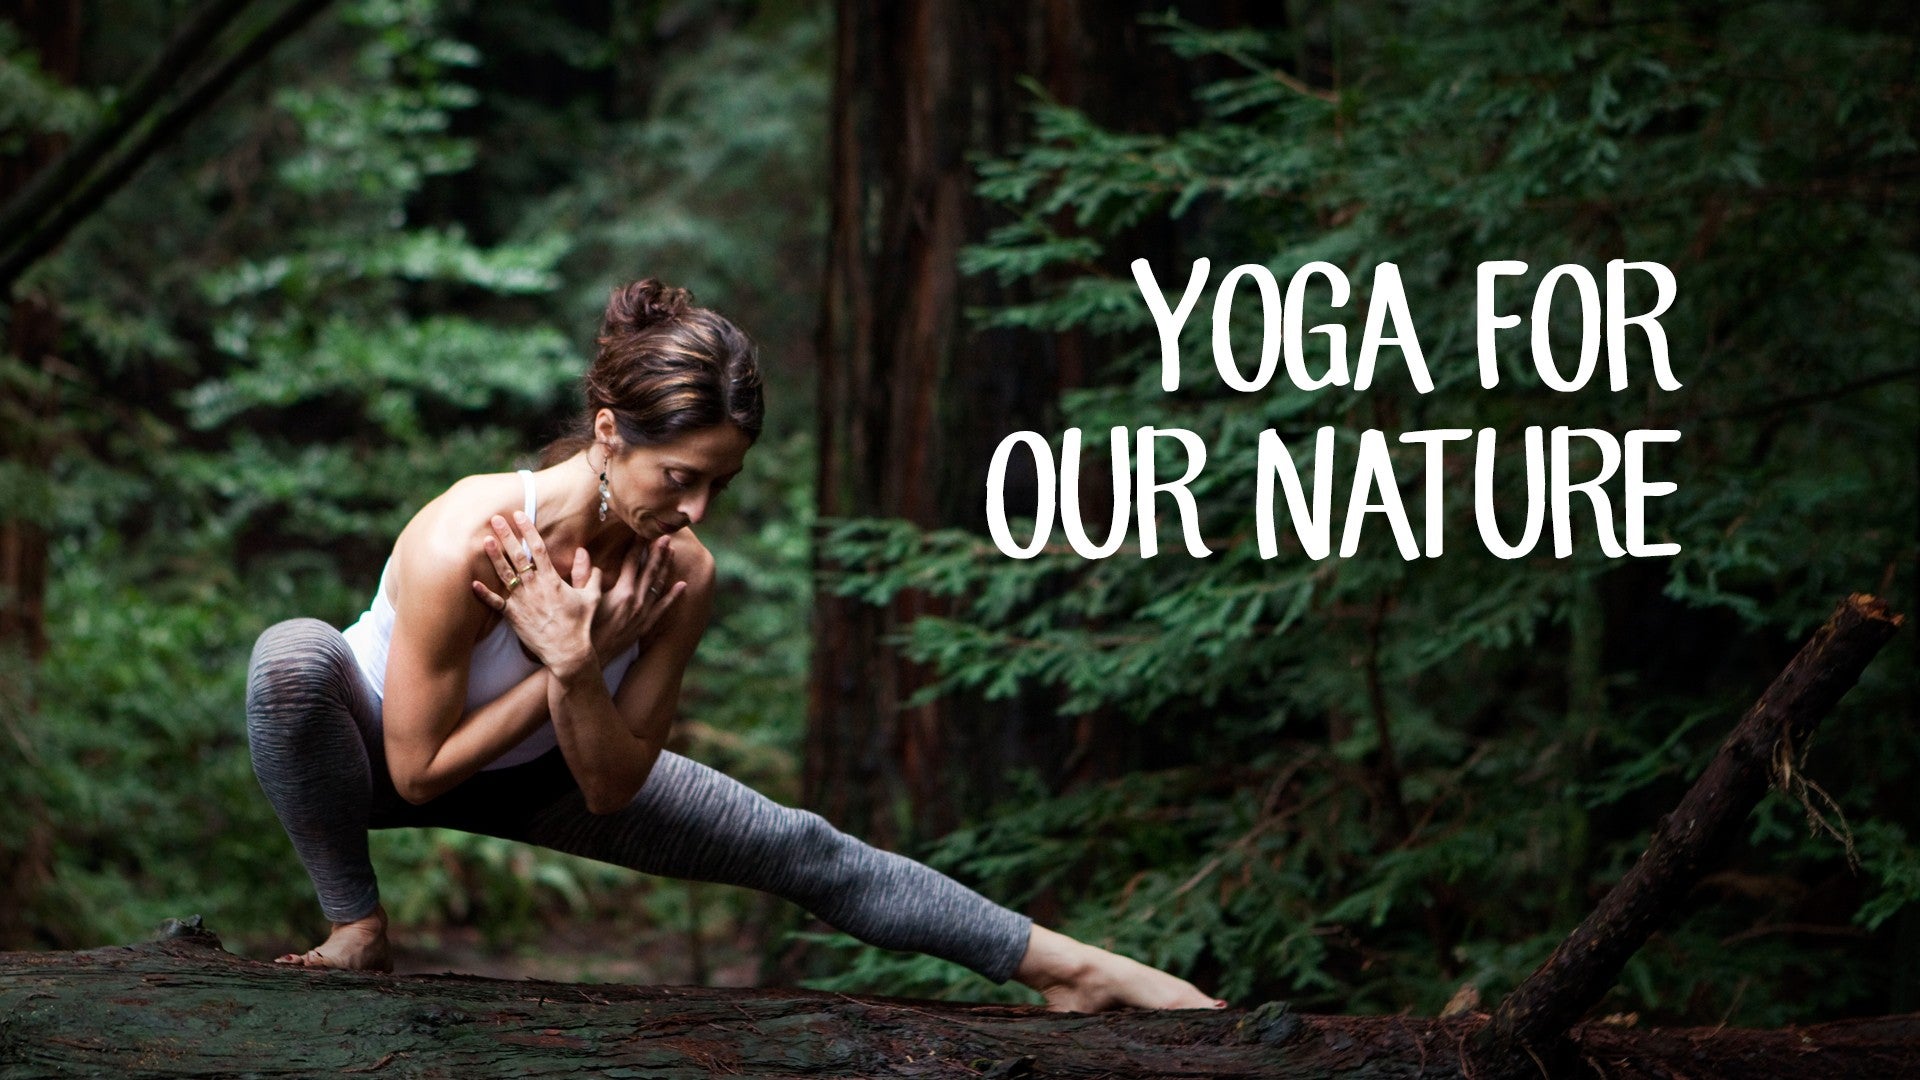
Description
About This Video
Transcript
Read Full Transcript
(ocean waves crashing) Welcome to the Elemental Soup practice. This is a practice where we'll spend a little bit of time working with all the elements, so it's a nice, full practice to help maintain your sense of health and wellness. The only prop that we're gonna need today is a blanket, and if you can take a blanket, oftentimes we might find it on the shelf in that shape, and we're just gonna try to make a roll. If you have a thick, wool one you might make it a little bit smaller, not a full roll, if that's too big, but something of that shape. So if we lie that down, stretch your legs out in front of you, and then slide this so that it lands near the base of your shoulder blade so that when you come down to the floor with your head, your shoulder blades can melt back into the floor, and arms out to the sides.
So rather than having this in your lower back or under the top of the shoulder it's right at the base of the shoulder blade. Just feel that your shoulder blades have touched the ground, and then we'll let the arms rest. Okay, so the first pose is to help us relate a little bit more to the element earth, where we become stable, calm, relaxed, and to take a moment and separate from whatever you've been doing prior to this practice just to let yourself really be here now. Try to feel heavy through the head, heavy in the shoulders, the arms, heavy all the way down into your hips and down into your legs, your feet. And then within that feeling of heaviness, just exploring the breath as it comes into the chest and this open space we're making at the bottom of the chest.
Creating space around our stomach, and then exhale all the air out, and just easing into the earth. Two more rounds, breathing in that way to open up around the chest and the stomach, deep inhalation, staying heavy in the limbs as you exhale. And last round. And then when you're ready we'll bend the legs. Put your feet on the ground, and then take that blanket as you lift your hips up and just slide that blanket down so it's right at the top of your hips.
It just keeps you balanced in a good way, a little bit of a lift. You could also use a bolster instead of a blanket, and from here I'm gonna have you bring your right need towards your chest. Try to feel when you're here your shoulders are relaxed, the back of the ribs are lifted. Take the left leg up in the air, point your toes toward your face, and try to remain stable in your hips, stable in your lower back, as you lower your left leg toward the ground, perhaps toward the height of the blanket and then pause, so we're focused on stabilizing the hips and low back. As you inhale take the left leg back up, and then reach down as you exhale without letting the pelvis tilt forward, so the pelvis is neutral.
So we're letting the breath come in, air come in to create a little bit more space down in the left side of your hip. Come back up one more time, and then exhale, lengthening from your back all the way to the left heel. And then we'll switch. Grab ahold of the left knee. If you need to, readjust on the blanket.
Take the right leg up, point the toes toward your face. Then keep the length in the leg. As you come down the priority is stabilizing through the hips and the lower back. Inhale, come up, and sometimes it's good to know what is too much, so too much might be lowering the heel to the floor, and taking the pelvis and the back with you, so we're trying to avoid that range of movement, and come to where we're a little bit more stable. Two more times going down on exhale, and lift up on the in breath.
Coming down on exhale. And right, then both feet to the floor. Can slide that blanket out of the way, and with that blanket rolled out of the way, let your knees come toward your chest, and we'll start to work a little bit more into that watery phase with simple movement and breath, so when you're ready to exhale let your legs drop over to the left side, maybe halfway over, come back up on in breath, and exhale halfway over to the opposite side. When you come back up next time maybe go three-quarters of the way toward the floor, that's good for your back. Come back up and opposite side, three-quarters of the way over.
And come back up, and then perhaps all the way to the floor if that's okay in your back, exhale. Come back up, and the last time all the way over into your twist. And come all the way back up. Okay, we'll catch the back of the knees. Just let yourself rock and roll on your spine a couple of times, just easing upwards into our practice.
Next time you come up, cross your ankles and we'll turn to face the top of your mat. When you come to all fours, set your knees down almost to touch, the hands open under your shoulders, and then continuing just to flow as we stretch back with your left leg. As you exhale, bring your knee toward your face and round through the back, inhaling with the leg flowing back behind you, reach out through the chest. Exhale as you round the back. One last time, inhale, reaching long as you look forward, and then set your left knee beside the right.
And we'll switch, right leg goes back, lift the head and chest. Exhale, bring your knee into your nose. Exhale, reach back on inhale, and exhale as you come out. Okay, curl the back, one more time, inhale, reach and exhale round. You'll set both knees on the floor.
Walk your hands back as you curl your toes under to say hello to the feet, and those vertical arches. You can either stay here or the next level of that is to bring your knees up away from the ground and just pause as we bring the hands to the floor and take a moment to squeeze your ankles together, the thighs together, the knees toward each other. We can also stay here, or the next place we might lift up to is the hands in front of the chest, and just try to lean back so you're sitting right over your heels. Squeeze the ankles, squeeze the legs, squeeze the knees together. And then to come up from that position, stretch your arms out in front of you, and try to launch up as you squeeze your legs together, all the way up to stand, and then relax your arms and your feet down.
So we'll turn to the wide edge of your mat, and with your feet apart, but your heels turned in, come down into what would be like a squat seat, a tall squat seat with the weight coming down evenly into your feet. The hands'll come to the chest and we'll work into a cycle of Kapalabhati, and we'll try to exhale from this upper abdominal region, it would look like this. (breathing sharply) That's the new practice for you, and we'll try to work from 18 up to whatever your age is. We'll just do one round today. So if you let your hands settle in front of your chest, sit down in a good way and just feel like you're easing down into the shape, but leaning back into an invisible wall, so the spine is tall. And close your eyes, or lower your gaze.
Take a breath in, and then quick, sharp exhales through the nose. (breathing sharply) Inhale, come up and out, straight legs, arms up, and then as you exhale, find that squat shape in the legs, press your hands against your thighs, and then lower your head towards you heart. Lift the pelvic floor up toward the navel and feel your navel settle further back towards your spine. Just pause. Spring up with the legs straight, arms up by your ears, and then as you exhale, arms down at your side, spin the heels a little bit wider with your hands right above your hip bones.
Take a deep breath, lift your chest, squeeze your elbows back toward each other. As you exhale, come forward and down with your hands, walking out, so it's like you're doing downward dog in the upper body, and doing wide-legged forward bend in the legs. At some point let the head settle down between the arms, and try to put weight all the way back into your heels, the thighs firm, legs straightening as we ease more and more weight back into the legs, so it's lighter and lighter in your hands. Take a big breath in, using this a little bit as an inversion today, and exhale out. And we'll walk the hands back in so their under the shoulders, heel toe as you need to, feet closer together.
Catch your hip bones and then inhale all the way back up to stand. We'll turn your right foot out to the sides. Let your arms rise out as high as your shoulders and then as you exhale, bend your right knee into your warrior II shape. When you find the right depth that works for you to stay plugged into both feet, take one more breath in. When you're ready reach your right hand over to the front of your left hip and then lean over to your right side with your left arm reaching across the room.
Come back up on the inhale to warrior II, and as you exhale again, reach over into your side body with that right hand travelling over to the left, and now come up. One more time, exhale, lean over to your side, perhaps this time the shoulder falling closer to your right knee. Inhale, come all the way up and out, with the right foot in, and both arms relaxed. Okay, the second side, let your left foot spin out, find your warrior II shape in the legs, allows you to feel connected to both feet, and then take your left hand over to the right as you lean over to your side, exhale. Inhale, come up to your warrior II, exhaling over to your sides.
Reach further and further down with your shoulder if you're comfortable. Inhale, come up. Last one, exhale all the way over to your side, and then come up and out, so we're heading into the fiery territory of the class. Let your arms come down. Heel toe your legs and feet toward each other, and then we'll step up to the front edge of your mat.
With your hands in front of the chest, just exhale, ground down through your feet as you stand tall, and take a deep inhale as we sweep the arms up by your ears with the hands gathered in front of your chest. Exhale, bend your legs into chair with your right elbow off your left knee for a little twist. Okay, and then sit down a little deeper in your hips as you exhale. Look down toward your feet, or out toward your fingertips. Untwist into a basic forward fold.
Exhale out through the mouth, all the heat. Bend your legs, come up through chair pose on the inhale, gather your hands at your chest, and then sit a little deeper as your left elbow crosses the midline. Reach your elbow, drop your hips toward your heels. Either look down at your feet or turn your gaze again to your fingertips. Untwist in that basic forward fold, exhale, and then as you inhale lengthen your spine.
Step back into straight legs, and then put your knees down as you lift your feet. Cross your ankles. Three times in a row, Chaturanga. Exhale, lower halfway down, and then push up. Exhale, come halfway down, so the fiery part and the air combine together to maintain good, even heat in our practice.
Press back with your hips on exhale. Okay, so the air stokes the fire. Left foot forward, right foot down, warrior I, as we rise up with the feet nice and stable, and as you exhale, a little Pranayama practice. Keep exhaling all the way down to the floor. Exhale, exhale, exhale, and then inhale, lift your legs and your chest in our Salabhasana, and then exhale, legs together, head down.
Inhaling, legs up, chest up on in breath. Exhale your way down, and one more time, working at that fiery phase, engaging all those back muscles, leg muscles. Exhale down, and then curling up into one cobra or cobra into upward dog as you exhale back into downward dog. We'll step forward with your right foot, when you're ready, warrior I. Ground your feet, inhale, lift all the way up and exhale all the way forward and down.
Step your back leg forward into a forward fold. Exhale. Bend your knees, ankles, inhale, circle all the way up, and then all the way up into straight legs with your hands down in front of your chest. If you feel like you want a few more rounds of that to cultivate more heat, push pause and perhaps create time to do a few more rounds of that. And otherwise, as we stand for a moment and try to find your sense of balance from right to left, we'll stay on the left foot and bring your right knee up towards the ceiling, and take a moment to embrace and hug all these muscles on the left side of the greater trochanter to stabilize that leg.
So we open up the right leg to the right and the left arm out to the left. And try to feel if you can get one inch taller on your left side here. And as we come back to the center, we'll let the hands lace underneath the hamstrings. Lift your knee and your chest on the inhalation. Find that alignment, and then gradually reach out through that right heel.
Lift your toes up toward the sky without leaning back. Try to stand a little more clearly in your inner left leg. Take one more breath there, and then release. And check out the legs. Okay, with both feet on the ground, hands up by your chest, take the left knee up toward the ceiling, and just pause and try to recruit all these muscles through the hip, the top of the femur is a little bit more centered, a little more stable.
So we stand a little more clearly in that inner right thigh. Grab your left knee, open your right arm, and then take a moment to open up the knee to the side while getting one inch taller on your right sides. Stand a little more firm in your inner right leg. Come back around to the center, lace your fingers underneath your leg, then lift your knee on your chest. We'll gradually reach out through that left heel.
Lift the toes up while giving more length on your right sides. And then when you're ready, bring your knee in and then release. And go ahead and shake out the legs. And as we step with our feet together, take a moment to root down as you exhale, and then inhale, last time, sweep the arms up by your ears. Exhale as we fold forward and down over the legs.
And as you lengthen your spine, step back with your legs into your plank position. Lower the knees to the floor, and then lower your elbows to the ground right under your shoulders. Gather your hands together, make a fist, press your wrists together, and as we press down through the bones of the forearms, steady downward pressure with the wrists, step one leg at a time back into what would be like a forearm plank, where you're on your elbows, forearms and wrists. So if you can imagine, this would be a lot like a headstand. We're tryin' to keep the belly lifted, the side chest engaged, the top of the head reaching away from the heart, and use this to build a little bit more of a base of headstand if you don't do a headstand.
The next level we could step the feet in toward the elbows, keep your head above the floor as you walk your feet first apart, come in toward the elbows, head is off the floor and you would pause to get more of our inversion. You could bring the feet together to make it maybe a bit more challenging. We could also stretch a leg up to make sure we could still keep the head off the floor here. Okay, if you like to do a headstand you might come up into a headstand for a moment, and others will just simply switch through the opposite leg up. And giving that a moment.
Both feet down to the floor. The third part of that practice, when you're ready to come down would be knees to the floor, unlace your fingers and then sit back to a child's pose with your hands back by your ankles and forehead to the floor. After a couple of breaths in child's pose, let the head come up, spine come up, and then we'll shift over to your right side or left sides and then if we sit on the outer left hip, let's take your right foot out in front by your left knee to set up for our seated twist, Ardha Matsyendrasana. So left hip is pulled back by the right hip. Hold the right knee with both hands and sit up tall.
Use your right hand to guide the femur in towards your belly, and then take the left elbow to the outside of the right knee. Stay on the tip of your right fingers, so just for a moment get a little more space in your spine. Let your eyes close, and just for a moment start to notice again where more breath is needed, the outer hip, your lower back, your belly, and see if you can stay in contact with the breath and perhaps even counting the length of your breath in and out so that it's more even. And so we're starting to embrace a little bit more with the imbalanced air and ether elements might need. It's a little bit more focused, a little more grounding.
And if we unwind from the belly all the way up to the shoulders, and just lean back so there's no tension on the knees when you switch, and have the left leg on top and the right foot folded back. If the knees are sensitive or tight, just sit on some height or keep the lower leg straight. We sit up tall, use your left hand to press in towards, press the leg toward the belly and slide your right elbow off the left knee. Stay on the left fingertips, and just feel that gentle turning of the belly toward your inner left leg. And then perhaps close your eyes, and using the seat more as a meditation to observe your breath and perhaps even the subtlety of noticing the space between your breaths.
Another cycle of the breath, maintaining your inner lift, and then slowly, slowly unwinding from the belly all the way up through the shoulders. And again, just reclining back so there's no weight on the knees. All right, so if we come to the beginning of Navasana boat pose, and then just recline back to the top of your sacrum with your feet out as high as your knees. Slide your hands out parallel to the calves, and just hold that one or two more breaths. You're welcome to work towards straightening the legs, and just have that feeling that you're leaning in towards your thighs, to engage your back muscles.
We'll slowly, slowly start to drop down toward the floor, slowly, slowly coming down to the floor, and right toward the end we'll bring the knees towards your chest, cross your ankles, and then reach forward, grab a foot and just do a little bit rocking side-to-side, just coming back into that place where you just start to notice if there's any last, lingering cravings that you have before we finish the practice. And typically I give students the last minute just to do whatever they need to to balance from the practice we did. So notice if you have any last little cravings, and to do whatever movement that is, even if it doesn't have a proper Asana name, you were to grab any extra props or cover yourself, which is a nice thing to do if we are feeling a little bit more ungrounded, or perhaps you're somebody who tends to get cold easily. So when you're done, let your feet come down to the floor and I'll throw out the suggestion for Savasana or perhaps a seat of meditation, if that's something that you sense intuitively will be a better match for you at this time of the day. So let your arms come out to the side and stay rooted in Savasana with whatever props you need.
And if you're sitting, come up to sit in a good way, where there's minimal discomfort in the physical body. And just taking notice after the practice the effects of the short practice touching into all the elements, allowing yourself to find more and more space between the breaths, the thoughts, so that we appreciate the space all around us, imagining the space beyond the room, beyond our city, beyond our outer edges of the state, to eventually feel at one with all the elements. And if you're on your back, start to make some little movements with your hands and feet. Slide your legs together, take a big stretch with your arms all the way back by your ears, and then as you exhale, getting ready to roll onto your side, okay, into your fetal shape, gather a breath or two here, and before working your way all the way back up to a comfortable, upright seat. Something that can be nice as we close, with the hands up toward the chest, is just to slide the hands together, generate a little bit of warmth in your palms so we can cover the eyes and breathe through the nose and just soften any tension lines in the forehead, and feel a little more relaxed in the eyes.
And maybe try to keep the eyes feeling that relaxed as we lower the hands in front of the heart. And may others also benefit from our practice. Namaste. Thank you.
Yoga for Our Nature: Elemental Yoga


Comments

With heart,
Melina


namaste,
melina


You need to be a subscriber to post a comment.
Please Log In or Create an Account to start your free trial.
