Finding Your Handstand
Description
About This Video
Transcript
Read Full Transcript
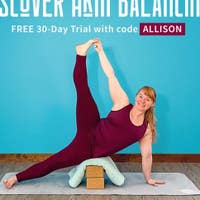
Hi, welcome to day one of this handstand challenge. I'm super excited you're here with me. In this practice, we're going to learn how to personalize your handstand, grab two blocks and meet me in standing. So you're going to take one block, place that block between your inner thighs, and then take the other block and place that one between your feet so that your inner feet can grab onto the block. So now you're going to press down into the balls of your feet and lift your heels away from the floor.
So your ankles might hold onto the blocks and maybe not. It might just let go and that's okay. But we want to have this idea of when we are pressing down into the balls of the feet, the whole body lifts up. And then as you exhale, you slowly, with control, release your heels back down. You'll do that a few more times.
And then the next time your heels come down to the floor, you're going to pause there, take your right hand, bring your right hand forward, lift your arm up, turn the palm to face away from you. And then as you're bringing the arm behind you, your spine may turn to the right. So you're going to take those right side ribs and pull them forward and you can even use your hand to do that as you bring the arm back in space. Then from there, I'm just going to move to the side so that you can have a better angle and to bend your right elbow and bring the hand behind the back without touching the back. Try to keep the arm away and this is active internal rotation.
Then from there, you'll bring the hand back down by your side and start over again, bring the palm to face forward, lift the arm up, turn the palm to face away. And as you bring the arm behind you, roll the inner upper arm inward and downward, then take the forearm behind the back, pause there for a moment and then release your right hand and come over to the other side. Take the left palm to face forward, lift your left arm overhead, reach up, turn the palm to face away from you and just like you did before, roll the right side ribs forward as the arm goes behind the body, bend the elbow, take the hand behind the back and drop the hand back down, reach the arm forward, internally rotate the arm, take the arm behind the back, internally rotate the upper arm even more as you bend the elbow and then release the hand down by your side. So from there, that internal rotation might help to bring the arm overhead without these front ribs flying forward, pull the front ribs down, pause there and then as you bring your upper arm up, notice if the body starts to move a little bit, okay? And from there, front ribs draw down, upper arm goes back, front ribs move down, upper arm moves back so that there's this feeling of your shoulder blade pressing up against your upper back, okay?
And then you can try that with the other arm. So to lift the left arm up, notice where there's that tingling of the ribs pressing forward and when you find that, pause wherever you're at, draw the front ribs down and in, lift the arm up a little bit more, pause, maybe even reach up through your shoulder blade as you take the arm back so you feel the left shoulder blade pressing against the upper back and then as you exhale, lower that arm down. From here, we're going to combine all of those actions so you can choose to have your heels on the floor or the balls of the feet on the floor, okay? So find where you want to be, then from there, lift both arms up slowly and you might pause, right? I might feel here that my ribs are going forward so I'm going to draw my ribs down and I lift my arms up and I pause, front ribs down and then I bring my arms overhead, front ribs down and the arms come up, I feel the shoulder blades pressing, integrating against the upper back.
Then from here, keep squeezing your blocks as you face your palms up towards the ceiling and then press your palms up as if you were pressing your palms against the ceiling. Front ribs down, take another breath here in your upright handstand and then as you exhale, lower the heels, lower the arms and there you have your upright handstand. We're going to add another layer to that and I really like this layer because it gives us an idea of what it's like to push the hands against the floor but in the upright handstand. So you'll take your blocks, place them on the palms of your hands, so this is the balancing component. Your feet can be however wide or narrow you'd like them to be and then press your blocks up and overhead and you may notice that the ribs are already pressing forward.
So draw the front ribs in, let the shoulders come forward, hopefully without the blocks falling, draw them in and then again take the upper arm bones back and repeat that process as many times as you need. Then from here, push into the palms of the hands as you push down into your feet so you feel like your body is moving in two separate directions. Then from there you can add on that element of lifting your heels away from the floor and so what I love about this is that as I'm pushing my hands, I'm pushing into the blocks and I can feel a little bit of a wiggle wobble and that's going to help my fingertips orient so if I take my handstand upside down, meaning hand standing on my hands, then I can feel this same action of what my fingertips are doing and then how I need to push into my heels in order to balance the blocks on my hands. Okay, so you're going to push into the floor, push up into your blocks, take another breath here and then as you exhale, lower your heels down, lower your hands down and there's another version of upright handstand, okay. Now we're going to take it down to the floor so you can have your blocks nearby but we won't use them just yet and make your way onto the floor into a constructive rest position.
So your knees will be bent and your spine is on the floor, let it be natural and then we were talking about this a little bit before, right, so the arms come overhead and I might start to arch my back, there's this space and that space is normal except I want to be sure that I'm moving from my shoulders and not from my back every time that I lift my arms overhead, that tends to be a sticky point in hand standing. So I'm going to try and draw those front ribs down, at the same time I'm drawing my front ribs down, I'm moving my tailbone towards my heel so there's a little posterior tilt of the pelvis or backward tilt of the pelvis. As you lift your arms overhead, try to keep that positioning and you can let the backs of the hands rest on the floor, push down through your feet, lift your hips up continuing to direct your tailbone towards your shins or towards your knee as you lift the pelvis. Then from here, which gets really interesting, you'll segmentally release your spine so your upper back is going to come down to the floor, keep pressing the backs of your hands into the floor, then the back of your rib cage into the lower back comes down to the floor and you may notice that there feels like there's more of an active stretch along the lats of the side body as you release down. We're going to try that again, lower the arms down by your sides, lift your arms up naturally, it's okay if the ribs come up, you're going to reintegrate the ribs, drawing them down, lift the hips up, then from there segmentally draw the upper back down, middle back down, lower back down, try to keep lifting your tailbone towards your knees even as the pelvis comes down and notice what that feels like in the shoulders, it might be really hard it might be very challenging, take another breath there and then as you exhale release, lower your arms.
Now we're going to go and grab our blocks, so you'll take your blocks and have them against the wall and it's okay if you don't have the wall right now, you don't necessarily need to put the blocks against the wall and you'll grab your bolster, so your shoulder blades will come down onto the bolster and the back of your head might rest against the curvature of your bolster, your heels will come onto the blocks, so now it'll be a little bit harder if it's just the heels, a little easier if you straighten the legs and a little portion of the calves are on your blocks, so that's up to you, you could also bring your feet all the way to the wall, so lots of different variations that you can play with here, so you're going to bring the bolster right to the shoulder blades and let the head come down, take your arms overhead, so right now you are in a back bending position that's okay, from here you're going to drive your heels down into the blocks, move your tailbone towards your heels to lift your buttocks up and away from the floor, shoulder blades press against the back as you draw your fingertips down, then from here push like you were pushing into the blocks, push your heels forward or maybe the balls of the feet against the wall, take another breath here in your prone handstand and then as you exhale release your hips, release your arms, take a pause and we'll try that again, okay, so drive the heels down may feel a lot of action in the backs of the legs, bring the arms overhead, you're in that back bending position and you're slowly coming out of that position, drive the heels down tail towards heels, lift the buttocks up, shoulder blades against the back and then as you exhale lower the hips, lower the arms, bend your knees, place your feet on the floor, roll on over to one side and you're going to switch now the position of the blocks and the bolster, so the blocks will come out in front of you and the bolster behind you, place your blocks about shoulder width or even a little bit wider apart, your shoulders do not, your hands do not have to be shoulder width apart for a handstand, I know a lot of times we say it needs to be but it doesn't actually need to be and then you'll place your thighs on top of the bolster and your elbows on top of the blocks, so you can think of this as like an elevated sphinx or shalabhasana position, so you're going to walk my thighs forward just a little bit more so my pelvis comes down and then we're going to get this idea of pushing down to come back into that more of a natural alignment for our handstand, so you press the elbows down, press the feet down, lift, draw the ribs towards the pelvis, take another breath there, it's not easy stuff, okay, move the tailbone towards the heels and then as you exhale come back down, if you want to make this a little bit more like your handstand, you're going to take the bolster a little bit further down and then place your elbows onto the blocks, okay, so you've got a little bit of your forearms supported, a little bit of your upper arm supported, you drive your thighs down, drive the arms down, pull the tail towards the heels and then see if you can lift the ribs away from the floor, pull your fingertips back towards your shoulders and then as you exhale make your way back down, okay, so it's a much harder variation of handstand in this prone position, okay, from here take your hands underneath your shoulders, move yourself into a downward facing dog, take a breath here and start to walk your feet up towards your hands, place your hands on your hips and come all the way up to stand, from here we're going to reorient ourselves to the wall and use our props in a way to help us step up into handstand, so we're starting to get that process of coming onto our hands, so you can move your bolster aside, grab your blocks and place your blocks against the wall and have them about as wide as your hips, bring your hands down to the floor, when we start the little elevation of downward facing dog, right, we were there before, so instead of pressing your chest towards your thighs and kind of coming into that back bend again, we're going to come out of that, so bring the chest a little bit forward and then what was that feeling of bringing the shoulder blades or integrating the shoulder blades onto the upper back, push into the hands, get longer in the arms as you press the shoulder blades into the back, take another breath here, okay, and then step off of your blocks, bring your hands to your hips, come on up to stand, so we're slowly shifting more weight from our feet into our hands by elevating the height of the feet, we can take that a step further, so you're going to move these blocks aside and grab a chair, so with the chair you'll open it up, place the chair against the wall and now if there's a space between your chair and the wall you can take a blanket and support it that way, that way the chair doesn't wiggle wobble, your hands will come down onto the floor, your feet will then come onto the chair, so just a little bit higher than those blocks, so bring your hands down to what feels steady and stable for you, what is that for you, right, is it a little wider, is it a little narrower, so wherever that is for you, then take one foot onto the chair, circle the other foot down onto the chair and here you go, then if you find that you're far forward, right, first integrate the shoulder blades into the back and then if you need to walk forward or walk back, that might be another option for you, you're going to push into the floor, grip with your finger pads, lift the sitting bones up, take a breath and then step one foot down, step the other foot down, hands to hips, come on up, so again you might be staying with feet on blocks, feet on chair, if that went well, we're going to take that up a little bit higher, so you'll move your chair aside and I like to start this in tabletop, so my feet are tucked under and my hands again are in that placement for me where I feel steady in my shoulders and you'll come into downward facing dog, it doesn't have to come, you don't have to come all the way up, right, so you can lean forward a little bit and then take the ball of your right foot onto the wall, push just like you were pushing the balls of the feet into the floor before, you're doing the same thing here and stepping that other foot up to create an L handstand, so you might walk the seat up a little bit higher but you don't have to walk the seat up very high, really try to embody that L shape and from here again it's not the arching of the back and pressing the shoulders towards the wall but feeling the shoulder blades press onto the upper back, take another breath here pushing down into the hands pressing through the feet and then when you're ready one foot comes down followed by the other and you take a pause there, so it's really interesting to be able to explore being on your hands but then also having the support behind you to be on your hands, so now that was going well and maybe you've practiced handstand against the wall, we're going to see what these actions have helped contribute it to and see if it makes a difference, if you're not kicking up to the wall or you haven't kicked up to the wall before you're welcome to try but you can also practice all of these variations, so I want you really to remember and empower yourself that this is personalizing your handstand, right not my handstand it's not anybody else's your handstand, okay so come on up to your feet and you want your hands to be a little bit away from the wall about six inches or so, if you feel like your head is going to hit the wall and I'm going to encourage you to take a bolster and place your bolster there that's also going to give you a little idea of how far away your hands need to be away from the wall, right you don't want to have them to the size of the bolster but rather in front of the bolster, okay otherwise you'll start with one foot in front, okay you bend that knee place your hands down a little hop, okay then you make contact and then maybe that other foot comes to the wall and you pause here in your handstand come down at any time then maybe you try taking one foot away from the wall taking the other foot away from the wall pausing there making your way down, okay so again it's your handstand and this is just day one so we're going to finesse all of these skills but it gives you an idea of where where you are in your handstand practice okay so let's try kicking up one more time one foot in front okay hands are going to be your distance apart which you've been practicing this whole time bend your front leg hop up okay you can even practice here bringing one foot in front and then what is it like shoulder blades against the back drawing those front ribs in moving the tailbone towards your foot that's away from the wall okay and then maybe pressing into your finger pads and taking the other foot away from the wall see if there's a little pause there squeeze those imaginary blocks then make your way on down okay all right so now we're going to wind down a little bit because we've done a lot of handstands and all their iterations grab your bolster and grab your blocks and you'll take your bolster towards the back of the mat and your blocks to the sides and bring your bolster just about up to your lower back lie over your bolster take your arms out to the sides and then from here pull your fingertips towards the backs of your wrists and with your thumbs make little circles in one direction and little circles in the opposite direction let the inner leg soften and then reach the fingertips back towards the floor softly and once again pull the fingertips in pull the thumbs over the fingers and then release the hands let the elbows gently drop down towards the floor opening across the front of your chest and let your eyes be soft and take a few breaths here just feeling the experience of your handstand journey today okay all of the different iterations kind of like water we don't favor one over the other they're all useful they're all important and they mean different things depending on the circumstances so when we think about the progression of handstand it isn't that being on your hands is the best form or the right form or the form for you I'm going to let the arms come down drop the blocks away from the sides as you gather your legs back up together spread the feet apart and roll to one side and as your hands make contact with the floor very slowly make your way up to a seated position and as you come to sit place your hands on your thighs take a moment for yourself to reflect on this journey of handstand and bring your hands together in front of your heart thank you so much for joining me for day one and I can't wait to see you tomorrow
Comments


You need to be a subscriber to post a comment.
Please Log In or Create an Account to start your free trial.
