Description
About This Video
Transcript
Read Full Transcript
So, in this sequence, we're going to start standing and then we'll come down to the floor. The standing is just to open and stretch and open the front, and in the floor pieces we'll be working on some core stabilization on the way into locust and cobra. You will need a block, a belt, and two blankets. We'll be using those later. For the standing part, just let your feet be hip width or a little wider apart.
We're going to do something I often call yin-yang because the positioning of the arms is a little bit like a yin-yang circle and you're going to be going from side to side. So we exhale in place and then inhale, side bend away from the lifted arm, stretch out, exhale, circle gets a little smaller again, and then we change sides. Inhale, stretch away from the lifted arm, exhale, back to center, and around. Inhale, keep the weight equal on both legs, pretty much equal, exhale, back around, inhale, reaching long, extending over, exhale. This begins to feel like a little ball of energy that you're spinning around.
It's quite nice. In qigong, they tend to pulse in and out with the arms a lot because that helps to bring gather and bring qi, which in yoga we call prana, very similar into the body. So you're sort of reaching the arms but you're really bringing this into your spine. One side shortening, thereby strengthening, the other side lengthening. So now after this one, just bring your arms back around and let the hands and the arms settle and pause a moment and notice what you feel.
Now we're going to do a static position. I'm going to turn to the side to show you this one. This one is a squat. Now I think most of you are probably quite familiar with the utkatasana squat. In the utkatasana squat, the knees go out in front of the toes and it's great for strengthening the knees and the quads and so on.
I'm more interested in some strengthening around the upper hip area and the pelvis. So you are going to look down at your knees. Your weight's going to go into your heels here instead of equally distributed and your little toes might be reaching forward like really helping you to stay upright. That's great. And put your hands then on the outsides of your knees and you can see in the picture that my knees are barely in front of the ankles now as opposed to utkatasana the other way.
So as you push your hands to your knees, you're going to press out on your hands with your legs and not allow the knees to move out. As you do that, you might feel that what that does is that widens the thighs in the pelvis and that widening the thighs in the pelvis also allows for a spreading of the bones of the pelvis. And then you can release the hands and just maintain that activity. Now with the hands here, it's less work on the back and the hips. So if you want to challenge yourself a little more, you can take the hands forward and you'll feel as you keep the weight in the back rim of your heels, your knees will stay over the ankles and you'll feel the work in the back.
Now you don't want to overarch the back and you don't want to round the back. You want a nice little curve here in the lumbar so your tailbone's going up a little but we want to quiet the front ribs back a little bit. So the shape should be the shape of the neutral spine, the natural curves. Back of the neck is long. Okay, and then coming up, push down in your heels as you stand up and just notice what you feel.
They're very exhilarating. So after the squat, we're going to do Garuda arms. So Garuda is considered to be the eagle pose and there's a fun little thing that you do with the legs normally with this. We're going to just do it with the arms. And you can start with your arms, elbows lifted in front of you like this and just bring the right one towards the center and take the left one across and intertwine so that your hands are together.
Now if you discover that that is a strain or you can't even get there, it's actually quite nice to just kind of hug yourself like this. Your back, it's nicely stretched and it's just gentler and easier. Okay, so whichever one you're doing, you'll start by lifting the elbows a little bit and looking slightly up and then you'll bring the arms down and the hands a little bit away from your face so that you can bow your head in your arms. Wonderful neck stretch. Just let go.
Sometimes turning your head side to side, you're going to let your knees bend a little bit and dip down through the tail and then you're going to slowly round forward. You're stretching your back both lengthwise and widthwise. This upper back rarely gets such a delicious stretch. Now you can stop anywhere along the way that feels like you're just a really sweet spot. Really yummy.
Some people like to go deeply, deeply all the way down but I'm going to just kind of stop you here. One more deep breath and then dip your knees a little deeper as you uncurl now from the bottom up. So that, I call that one sleeping Garuda. Eagles have to sleep sometimes too and then you're going to release the arms and the Garuda really stretches its wings and then you're going to rotate your arms this way, both of your arms, so that the hands come back behind you a little bit and your shoulder blades are reflecting the very thing that my hands are doing and they're supporting your chest up. So your heart has a beautiful support and then you're going to come across to the other side.
We're going to elbow across before we're taking the right side. A little bit of a lift, inhaling, exhale, elbows and arms down a bit as you let your head drop towards the elbows. Again, just a little gentle releasing of your neck and then you're going to start rolling down from the top, curling over, broadening, lengthening from the top down and bend your knees. This time I will take it deeper down. It's best to do this really slowly, I just found a spot that wants to be paused on.
And then continue, I'm going to say let your knees bend. Those of you with really relaxed hamstrings, you know what to do, let your legs straighten. Sometimes you get down with knees bent and then straighten. Take your breath and then deeply bend your knees, uncurl and then once again the eagle wakes up from its dream, stretches its wings, rotates and soars. And I like to bring this seed back to the heart.
Next we're going to do what I call Nuryev stretch. There was a great article about Nuryev in the New Yorker a few years back. Google them if you don't know who it is. It showed me what a nice even extended spine can look like and it starts at the foot. So you'll step one foot back, I've taken my right foot back, and as I raise the heel I take that as an opportunity to lift the front of my pelvis up like that.
You can almost imagine a wheel, okay, so you're rolling the wheel front up, back down. And then just pick the foot up and turn the toes backward. Now you're stretching the top of the foot, the top of the ankle. If this cramps your foot, it does happen sometimes. You're just going to turn your foot back here, it's not that critical.
So you're stretching the top of your foot and that stretch comes all the way up your leg, all the way across where your thigh and your pelvis meet. Roll the wheels back again and this time let your arms go up. And you can see it's not a bend in the spine that's particularly deep but very even and elevated. And then let the arms come down, step your feet back together, reveal the difference between the two sides. Then step your left foot back, raise the heel, let the pelvis tilt again, down from back, up from the front.
You can feel the belly starting to work. This is part of our preliminary work for the cobra where we'll be tuning in when we're doing the cobra and the locust. But in and of itself it's a wonderful feeling. And turn the toes back and inhale and sweep the arms up again, just feeling that elongated, you can feel a certain fascial quality to this stretch. And then release your arms down, step together.
And here you could even close your eyes for a few moments if you like. Just feel all the way through your body and notice what you've done without exerting yourself very much at all. Just notice what's happened. See if you can get C from the inside. Can you feel that your head is right over your shoulders and that your pelvis isn't drifting forward or back behind the center line.
That's a lot of effort to do that kind of standing. Just be effortlessly upright. So now we'll come down to the ground and we'll get the block, we'll be using this block in just a couple of minutes so we'll have it handy. Come down to your hands and knees and let's try to keep the knees right under the hips and hands right under the shoulders. And we're going to just do a few of these motions where you're rounding your spine, dropping your head and then sinking your upper back in, turning the tailbone up and lifting your head.
So sometimes people call this cats and dogs and sometimes people call this cats and cows. This would be the cat and then actually start from your pelvic movement and let that drive the rest of it. Now oftentimes when people do this cow shape they lift up out of it and I'd like to encourage you to keep your shoulder blades coming together. They're long lost friends, they want to hug and kiss. So don't keep them apart.
It actually helps with the functioning of many, many aspects of good posture. So exhale, turn from the hips and the pelvis, cat, inhale, drop, turning from the pelvis, lifting. Exhaling and sometimes I'll stay here for an in-breath because every time you breathe in you're expanding the spine. So breathe in, then exhale, turning the pelvis, exhale and then inhale as you're coming into this shape. Alright and then dog chasing its tail.
Your feet are going to be like the tail of the dog. You'll lift your feet a little bit and you'll swing your feet around to the left a little bit and then turn your head and your gaze over to the side and then you swing your feet around and look over your other shoulder. You're keeping your spine fairly neutral. You don't want to sink too much around just turning. So you're getting side bending of your spine like we did when we did the energy ball side stretching.
So then we're going to come up onto the back again and you'll be using the block, lie down on your back, lift up one leg and then the other and you don't have to be incredibly precise about the shape of your legs but don't just hang your feet down. It actually helps energize the pose better and helps you connect into pelvis if the feet are a bit lifted and flexed. So with a wider block, you can use this narrower width. If you have a narrow block in this dimension, you're better off on the wider position. That actually feels pretty good right now.
I'm going to stay there and then spreading the arms out, tuck the knees up a little bit and you're going to go about halfway down to one side, looking to the other, halfway down to the other side, looking away from the knees. Inhale as you come up, exhale going over. Feels kind of good to open the palm up on the side you're facing, inhale up, exhale. Going towards the rotating palm, inhale up. Now as you warm up, you can find that you can go a bit further over.
And as you're coming to the right, which I am right now, if you press the right knee more firmly upward into the block and towards the left knee, that helps to turn on your lower abdomen, the whole core area. It helps the inner thighs to become more functional and it helps to strengthen your belly. And then you will need that for this next piece. So the second variation, I'm going to go to the narrower width for this. The second variation, you start with your hands up, tuck in a little bit and then take your legs, the first few times do this a little slowly.
Your legs go to one side, your arms to the other. If you do it too quickly or if you just go too far, you'll end up kind of like in an awkward position that you have to work a little to get out of. So now as I go over to this side, I'm going to let this elbow bend a little and I'm really reaching through that arm and pressing the left knee up into the block. Inhaling coming up, my legs are coming to the right. My right leg is pressing more firmly into the block than the left and I'm reaching very strongly through my arms.
Inhale up and then you can speed it up a little if you like. It's kind of fun. Back and forth but keeping this balance, oh, I almost lost it. And over to the other side, keep the firm belly as you do this. Okay, one more.
Over to the right. You look in the direction of the hands. It helps with the balance. And then back up, good. And then you're going to put your feet down and just tilt the pelvis a couple of times.
Get used to that. When you tilt in such a way that your belly is pressed back and your back touches the floor, the lower back, that tends to, when you're lying down, it tends to have the chin come up. And then as you change that and tip so that your lower back is coming off of the floor, so you should be able to get your hand under your back, when you do that, it tends to tug the chin down again. So the whole spine is involved. Lower back down, neck curved, lower back lifted, neck comes down.
So this is a good prelude to what we're going to do with the block now, which is to come up into a flat bridge, I call this bridge plank. So you're pressing firmly into the block, take a breath, exhale, roll the pelvis, the heels of the pelvis are rolling this way so that you can press your lower back into the floor and then continue to slowly peel your spine up off of the floor. And then you might get to a point where you want to roll the arms under and lift the chest, but restrain the chest. So it helps actually to touch the lower ribs here. And that helps to center the work from here to here, and you're really working on turning the wheels of the pelvis.
You can have your hands here, good old belly breath. So you're lengthening this space, and this is a little trick I discovered. If I sort of hook with my fingertips or my fingernails even, and I tug upward on the hip bones towards my face, so I think upward because of when you're standing it would be an upward movement, and that causes the tailbone, the buttock in the tailbone to activate and move towards the knees. So away from the knees from the front, toward the knees from the back. Really helps with this opening here, which we started in the Nuryev pose.
You can raise your heels and try to lift the pelvis more, but quiet in the ribs. And then to come out with the heels raised, you can kind of sweep the arms up and just one rib at a time, really lengthening through the tail, roll down. A couple of pelvic tilts. Okay, so we're going to roll over onto the belly, and we're going to put this block out of the way for now. And on the belly, you're going to stretch your toes back and your arms forward and forehead right down to the ground.
Sometimes people feel like they need a little something under the forehead, so you could take a blanket and stretch it out lengthwise and put your forehead on that if you like. We're going to do some arm and leg reaching opposite sides. So with your forehead on the ground, you're going to lengthen forward from your left arm and your right leg reaches back. And then release that, inhale, exhale, reach, right arm, left leg, pause a moment, relax, inhale, exhale, reach long, left arm, right leg, relax. As you continue with this, I want you to begin to start pressing your belly back as you do the reach.
It's like you're trying to get your navel completely off the floor. And if you watch this part of my back, you'll see that there's a bit of a straightening of the back and a lift. Not doing this from the buttock, it's from the belly. So inhaling, exhale, press the belly back, reach, inhale, let the belly drop, re-center, exhale, belly goes back, reach arm and leg, opposite arm and leg, relax. One more time, each side.
Inhale, belly back, right leg, left arm reaching, relax, breathe in, exhale, reach long through the left, right, long, belly is back. Now we're going to just turn this into less of a reach and more of a lift, the same thing with the belly. So inhale, exhale, pressing the belly back, right leg lifting, and only if it's easy, lift your arm. It's the leg and pelvis work that's more important here. Inhale, exhale, belly back, lift the left leg, right arm.
Notice whether when you lift, your foot tends to turn out to the side, restrain that and try to turn the foot more to the inside. So inhale in place, exhale, belly back, reach long, left arm, right leg, just pausing a couple seconds, inhale, relax, exhale, belly back, reach and lift. Let's just do a couple with just the legs, inhale, exhale, belly back, leg, relax, inhale, exhale, belly back, leg, good. And then just to see if you can do this, we'll lift both legs, not the arms, not yet. So we're working into locust here first, really working this belly.
Inhale, exhale, press the belly, even my lower ribs are pressing back, and lift your legs. Now if I cheat, I can really lift high, so don't do that. Just keep the belly back, lift your legs, and feel both the belly work and the back of the leg and buttock work here, very powerful. And then I like to do a locust pose, a version of a locust pose where my hands and arms will come up once I've lifted the legs. The belly work is the same.
So inhale, exhale, belly back, lifting the legs, and then let the arms float up, shoulder blades together and back, and lifting up. And you're keeping the nose down so the back of the neck stays long, and then release down. Turn your head to one side. We'll do one more of those. Head centered, inhale, exhale, belly back, lift, even if you can only lift a little.
And then hands and arms lift, shoulder blades down your back, let your head come up, keeping the nose down. Exhale, come down. And this is a kind of a little shakeout, gentle shimmy left to right, just helps to relax the backs of the legs and the hips and the buttock and the belly, very soothing. Good. So for the cobra part of this, that's your locust, you're gonna now come up to being on your forearms, and you're gonna look to have your elbows right underneath your shoulders, your feet are a little bit apart, but let the heels roll out.
So that's really a rotation of the thigh. And I'd like you to sink your back in like you did for the cats and cows. Instead of lifting out of the back, let the upper back sink in. This actually requires less bend in the lower back when you lift up into your cobra. We're gonna actually start though with a forearm plank, interlacing your fingers together.
You're going to start peeling your belly off of the floor and let your back spread, keep peeling the belly off, turn your toes under, and then lift the pelvis and the knees. So you're looking to make a very straight plank, so lift the waist, not the hips, lifting the waist, and breathing, you might even gurgle, okay, let your hips come down. And the second one, so this one was done with a flat back, in the second one I'm gonna have you peel up in the same way, you're relaxed, even the head can be down, it helps relax the upper back, then move the base of the skull up, move the belly and the lower ribs back away from the floor, turn your toes under. Keep peeling, now the pelvis comes off, the thighs, the knees, and you're back to this original position. Let your hands part and turn the thumbs out, and then sink your upper back in without sinking your waist in, so sinking the upper back in, even just a little bit, what you'll discover when you do that is that it's a lot more work here, so that's the idea, and if you can only hold that a couple seconds at first, no problem, it gets easier as you do it.
So from that position, we're gonna come into the cobra, because you will have started to get the upper back movement that's so essential in cobra, not to have it all go into the lower back. So we're gonna put all these little pieces together, your cobra position is gonna be restrained from the belly, but enhanced from the upper back. You'll lift up into your flat plank, you'll let your chest sink, your shoulder blades come together, and then you'll put your knees down, move them back a little. Knees are down, start to lay the thighs down, still resisting, in the belly, the pelvis comes down, toes reach back. You can see my head is slowly lifting, the thumbs are turned out, and I haven't pushed out of it from my upper back, restraining a little bit from the belly, lifting your head a bit more.
So it's kind of a baby cobra here. In a way, reflecting something of what we did in that Nureyev pose, it's an extended spine, it's a back arch, but it's not severe in any one part of the back. So now, some of you might find that you can relax the belly work, so instead of continuing to push back, you might feel like, this is comfy for me to let go of that. In which case, do. But if you have any ify-ness in your lower back, that work of restraining there is going to be very beneficial to you.
So I'm going to start from this point for the high cobra. You'll turn your palms down, a little bit wider than the shoulders, and start pushing. So before then, you were pulling, now you're going to push, your toes will move back an inch or two, and you start to raise up. Now sometimes if you do this, just the first inch will tell you that this is not for you. So obey, she who must be obeyed, she is here, not here.
So you're pushing up, and you're just exploring. Where does this feel okay? Where does it feel like it's enough? And sometimes you might want to walk the hands, inch the hands back, come up a little higher, the base of the skull is not crushing into that opening between the neck and the skull, but opening. So we have our third eye, and we have another connection into the third eye, some of us think, some of us feel, that comes from the base of the skull.
And then when you come down, you begin pulling again, pulling forward, elbows come down, elongate your spine on the way down, and then you can do a little bit of this. So now you're ready to come onto your back, and now this is a nice way to, we can stretch the back body gently from being here, you're going to start with both knees bent, and let's pull the leg up, you can either hold on over the knee, or behind the knee, I like it behind the knee so this is free. And this pose is called pavanamuktasana, and it's sometimes called wind removing or wind adjusting pose, and it's the wind that it's referring to in yoga, there are winds that flow through the body that regulate the body's systems. So another word for a wind is vayu, pranavayu is up here, apanavayu has a descending grounding quality to it, pranavayu expanding, opening, so we want to even these out and have them get in touch with each other sometimes, instead of always moving apart. And this helps that, okay, so you're pulling the leg in, and by the way it helps to stretch the back after that last pose, so you're going to lift your other leg, extend it out and pull the toes back, and then you're going to just slowly, slowly come down, as though you were descending from the top of the thigh, and the foot just happens to come down, okay.
And if you feel like you want a deeper stretch of the back, you can keep that knee bent, and then put that leg down and other leg comes up, and you're going to bend the knee, hug it in, just feel that nice stretch of the back body, inhale, exhaling, feel your belly pressing back, and as it does, your back lengthens, lower back lengthening, lift the other leg and stretch out, long through the skull as you reach long through the tailbone and the heel, so we're constantly anchoring and moving away opposite ends. Another breath, and then bring the foot back, you could even hug both knees, maybe resist a little, so I'm tugging the knees towards my chest, but I'm using my belly and my legs, my psoas, hip flexor, to prevent that, and then as I slowly allow my legs to come in, I'm resisting the whole way. You really get a nice, nice stretch on the low back when you do this. And then putting your left foot on the floor, lift your right leg, and you can hold, working with the leg straight, you can hold on behind the thigh this way, or if you can pull it a little closer, you can reach higher, and then you're going to inhale and exhale, curl up. Again, it's a little bit of flexion, but it's not a huge amount of going in the opposite direction, just enough to lengthen the back of the spine where we've just compressed it.
Stretching the other leg out or choosing to leave it here. Two or three breaths, bring the leg down. And then exhale, bring the other leg up, you just take a time to notice how good that feels. And bending the knee, straightening the leg, if you can't straighten your leg with the knee this close to your shoulder, let the knee go away. Good.
Take a breath, and exhale, curl up, stretching the other leg out, taking the hands higher if you like, if that works for you. You don't even have to put this other leg on the floor, there's something about reaching out that helps this thigh to be grounded, lengthening the back. Bring the knee back, lay down, and bring your legs back to rest. So we're going to roll over, come up, and we're now going to do a couple of seated postures before our shavasana, and we will want the props. So one blanket behind, we'll sit on that, and we'll use that in a minute as well as the strap.
And the block can be behind, some people find that once they've raised themselves up on a belt, blanket, it's that B word, that it's too far to lean back, it's awkward. So you might or might not want a belt here, block. And then you're going to exhale and pull your left leg back, the other leg is slightly internally rotated and actively reaching through your heel. This is a version of Marichyasana 3. Marichy has a kind of a meaning to it that means light.
So when I first heard that, I thought of the central axis of the spine and the light that the lifting can bring to the consciousness. So we're grounding down by pushing on the knee, but we're also lengthening up. And then take a breath, exhale, let your left hand go back. I don't feel like I need the block right now. And hugging the leg in, let your right leg lengthen forward a little bit, this turns your pelvis a bit.
But don't overdo it. You see the leg will want to fall out, and it's more than you need, and it's not helpful in the pose. So a little bit of turn, reaching out through the right leg, and then you're going to restrain that movement for the rest of the twist. So the upper body's turning, you're letting your head turn a little bit. And then you're going to reach long with your arm.
I like this variation because the arm hugging in here really helps me to move my spine. The activity that I'm doing with my arm without actually moving it, as though I were pulling, trying to pull the forearm and glide it off my knee, but it's velcroed right now, it's not going to move. That allows my shoulder blades to wake up. So inhaling, feeling the groundedness and the lightness, exhaling, if there's a little more space to turn, turn just from the upper body without forcing it from the arms. Don't wrench yourself around from the arms.
Inhale, and this time what you're going to do is you're going to very small amount, but pull the right leg back, not to undo the twist of the pelvis, but to stabilize and reach this knee. Can you see the movement of my leg and arm? Reach the knee towards the foot. This really compacts and stabilizes the pelvis and the low spine as you continue to turn. My left shoulder blade is moving back towards my spine and down towards the waist.
And then for the last couple of breaths, you can slowly release the head back around to look at your foot on the right leg. So neck and spine turning in opposite directions, after an inhale, release the arm, turn your spine back, release your leg. So we'll turn the other way, pausing for a moment to feel the movement of energy and lightness, bend your right knee, put your foot down. There's actually a little bit of space between the foot and the thigh here. Pressing down on the knee to keep a sense of descending and lengthening up, exhale as you turn, you reach long through the left leg and place the hand behind.
And then inhale, reach through your left arm, hook the knee around the elbow and get that pulling action going. And then retract, retract a little bit from the left knee and hug the right knee towards the left foot. Inhale lengthen the spine up, exhale, turn. And you are endeavoring not to force this from the arms, but to actually use the middle of your body as you turn. You can see how the right shoulder blade is moving back towards the spine and down towards the waist.
And then after several more breaths, you'll turn your gaze back towards your foot, eye to big toe gaze. And then let go, unwind and stretch your foot out. So we've had a chance to move the spine in a lot of different directions. In this last piece, still on the blanket and sometimes you can do, this is composed called Paschimottanasana. Sometimes people like to have even two blankets.
Why would I use two blankets? Well why would I use one? I would use a blanket if I'm unable to sit upright and have my spine quite easily straight. If it's not easy for me to straighten, but I can work here to make it happen, that isn't good either because now you're really overworking the hip flexors. That makes it harder to come forward.
So you come up, I don't really need the blanket, but it makes the pose so much more pleasurable and accessible to use it. I like to keep the feet hip width apart so that the center of my ankle, the center of my knees and the center of my hip joints are parallel lines. And that actually looks a bit wide. It's not wide if I was thinking of this as my hip joint, but the hip joint is actually more inside. So bringing the feet there, that at least looks more like two parallel lines to me.
Paschimottanasana means the asana that stretches the west side of the body. So this is considered the east side of the body, this is considered the west. Stretching the west side of the body, reaching forward and we're getting back to the pelvic wheels. We're going to turn the wheels up from behind, around and down. Trying to keep the spine straight, scooping up and forward from the belly, lifting up from the sternum, descending from the tail.
This reflects an inner current as well, up the front and down the back of the spine. So you can start with your awareness more exterior, but you can also bring it more interior. And by this time in the practice, your body, your mind is probably really ready for that. So you might just work like this on the legs, sometimes putting the hands on the floor and pulling on your mat this way helps you get the wheels turning. You can also use a belt.
And you can put the belt around your foot, your feet and twist the belt and straight lines. We've got a lot of straight lines here and it just seems to help to have all these connections. If you soften the lines, you get a sense of the pose having this connection coming up the front and then this way and then at the same time you could think of the energy as coming down the legs, up the arms and then down the spine. So both of these ways of working again help to interiorize our awareness and just training ourselves to become more subtle. And the esoteric, you might be right here by the way before I get into any esoterica, you might be right here.
That might be your best Paschimottanasana pose, just upright. And if you practice this, you will gradually be able to move further forward and I'm going to give you an alternative pose in a moment if that doesn't happen for you. But there's a more lyrical way of thinking about Paschima, that Paschimo, which is that it refers to that central channel. And when you bend forward, you could bend forward with a blanket holding onto your feet or the belt and you breathe for a while in this forward position with or without the blanket. The pressure of your body folded over in this position gets pushed into the spinal area.
And I like to make it something that I can do where it becomes restorative. I don't let go necessarily of the legs, but resting in this and then when I come up, and I suggest that you can stay in it too, and these instructions you can hear, you don't necessarily need to see what I'm doing, but you can watch if you feel that would be helpful. I'm lengthening forward through the front of my body and releasing the energy down the back. And I also have this feeling of like a hood around me that's quieting my mind. And to come up, I'll put my hands somewhere between the knees and the hips and I start to back up and I come up slowly, allowing my chin to continue dropping towards my chest.
Now that my spine feels upright with my eyes closed, I'm gonna let my head lift and I'm gonna pause here just to feel that release. This is a moment to really pause and feel. Such a release of energy coming up and it's a cleaner, smoother, quieter, brighter, luminous energy that comes up into the head. I feel very solid and grounded and it's pretty failsafe. It happens.
So I just want to show you the alternative pose and this isn't a second rate pose by any means. And in fact, sometimes I don't, for some reason I might not want to do Paschimottanasana cross-legged forward bending where the feet are closer to being under the knees than wide like so. Traditionally this is done in full lotus position and the hands reach around to hold on to the opposite feet and that tradition doesn't work for me. So I modify and that's the beauty of yoga. You can modify and get the essence of something without hurting yourself.
So I sit in this cross-legged position, I don't think I'm gonna need the belt for this and I'm gonna come forward and it's the same thing, keeping a straight spine for as much of the forward bend as I can do and then perhaps if I can't go further forward, placing a blanket to rest my belly on to help that, so that as I release down, I'm not completely rounded. And sometimes you can put two blocks, you could have a block like this and the other one on top of it and you're allowing the support here and the breath, the hands can come behind one wrist resting in the palm of the other hand, shoulders relaxing and the same thing happens here, so I won't hold it this time but when you come up after breathing there for a minute or two or five, really, and you sit up slowly and you let your head stay down, bring your hands around and rest them and then let your head come up and just feel, I mean, you can go into, this could be, you're spontaneously meditating here, you don't need to do anything. I've had students just stay there, it's happened to me too, so it's very powerful and I was told at one time that this pose is called Yoga Mudra, this cross-legged forward bend is called Yoga Mudra, yoga meaning the cessation of fluctuations of the consciousness and mudra is a seal which is sometimes just a hand gesture and sometimes done with the whole body, so this is a mudra done with the whole body and the mudra is mud, I was told recently, mud means happy, so to make happy, to bring this quality of peace and happiness, so you're creating a gesture of yoga via this asana slash mudra and it becomes much more inwardly focused. After this you're going to, you'll be ready for your Shavasana and I'm going to suggest that you try tying your feet together with your belt, not quite together, but you're going to have them, I always tell my students when they put their belts away to leave them like this, because then they don't have to redo it and they don't have to remember how. So you want to leave some space between your feet, again it's those two parallel lines, and you're going to lie down, lengthen your spine as you lay back, so you're tilting the pelvis back, lengthening back, I'm going to inchworm down a little, you could even bend the knees, get your spine long that way and then release the legs out and you could take one blanket, lay it over your belly and your chest, some people like to use a sandbag here but you know what, a second blanket really does the job nicely too, it's very soothing, you can actually lie here like this for a little bit, I'm going to use this in a moment too.
So a couple things happen here, first of all it's very pacifying, the blanket's here, you're more aware of your breath, with the feet tied like this, because they're not allowed to roll out, something happens in the pelvis with the thighs inwardly rotated, especially if you even move the heels out a little bit, it's like almost a spontaneous closure of the floor of the pelvis. So speaking of a seal, this kind of seal is a closure and it closes the floor of the pelvis and this helps the belly and the heart to settle and after a few breaths like this, there is the closure of the throat aperture into the head, so you can lift your head with your hands, lengthen the back of the neck, here's another wheel like movement so that your chin falls towards your chest, you don't want to be here like this, you want to release down, right at the base of the skull, not touching the neck, and by now I think I'm ready to let go of the arms and the feet. So the closing of the lower aperture, very grounding, and here the brain gets pacified. All of the quieting, calming impulses of the brain are allowed to take place, rather than the activating outward turning impulses, and this is a rest, so we'll rest here for a couple of minutes. The eyes settle and fall towards the heart.
The heart opens with each in-breath like a lotus opening, and the eyes gaze into that image, and they feel and see and hear peace. Thank you. At any time, if you feel like you'd like to release the head out of this position, just lift your head and slide the block backward, and just rest a little bit longer. And then, when you bring your attention back to your breath, however long you stay, you notice, again, taste the rasa of your practice. Your breath has probably become quite subtle and soft and very shallow because you've come to rest.
And then, you can start stretching the toes, feet forward and back a little bit. You can slip your feet out from under the belt, move the blankets off to your side, bend your knees, roll to one side. You can use your arm to support your head by raising the right arm up as you roll to the right. After a couple more breaths, and do luxuriate here. Use your free hand, the right hand, bring it right near your chest or close to your face.
As you push down on your hand, you stretch your leg back, you let your head come up last. One more taste of the rasa, the flavor of your practice. Having a little space here for the seeds you've just planted to start to take root. Namaste.
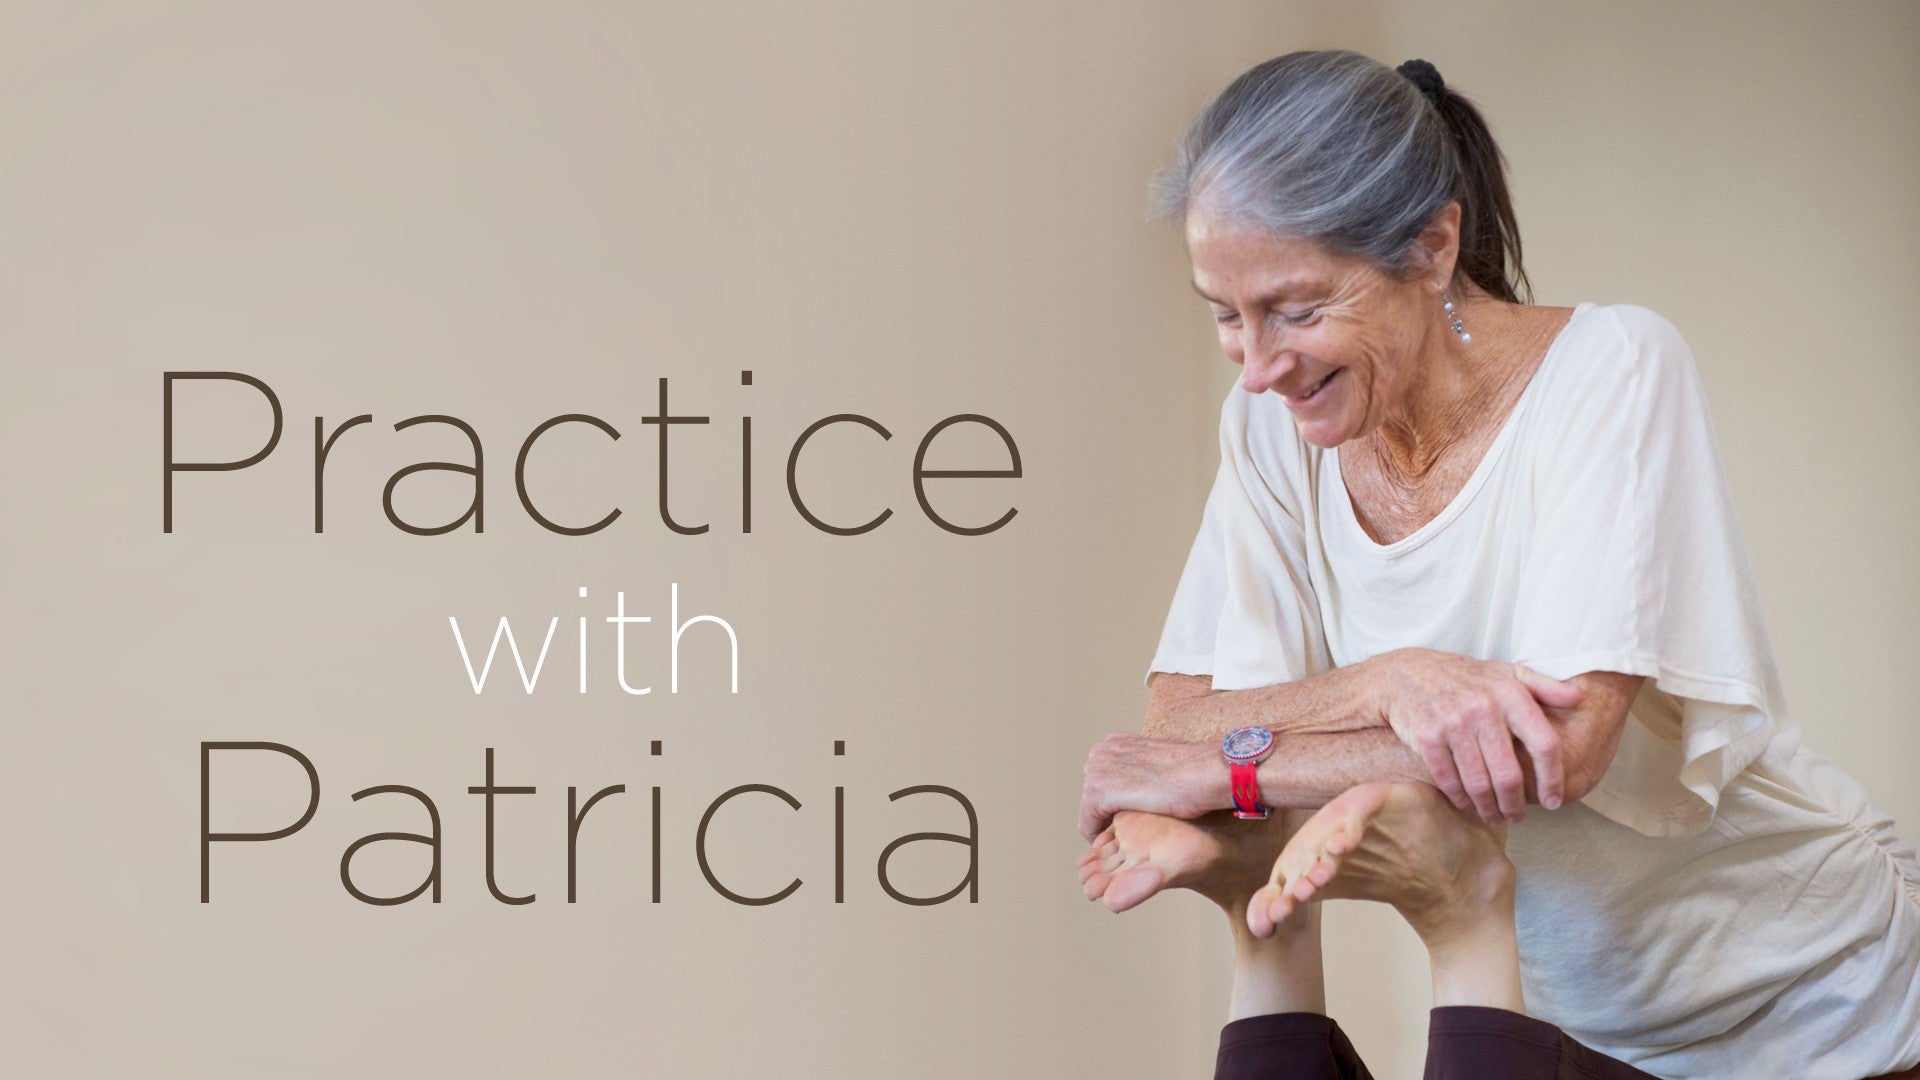
Practice with Patricia: Patricia Sullivan


Comments


love, blessings!

You need to be a subscriber to post a comment.
Please Log In or Create an Account to start your free trial.
