Description
About This Video
Transcript
Read Full Transcript
(waves crashing) Welcome, to Enhancing Immune Function. In this practice, we're gonna show how through Restorative Yoga, Therapeutic Yoga you can enhance and support your immune system. Through milking the lymph system, deep breathing, and through movement, as well as activating the thymus through beautiful restorative pose the whole immune system can get supported and enhanced, to help you in your healing process. Today I have with me, from the Cancer Center of Santa Barbara, Jody, who's been studying yoga with me throughout her journey, her healing journey, and I'm so glad that you're here today to be our assistant and model. So, let's have you come down onto your back, with your head here, and your feet can be here, so maybe your tailbone at the very bottom of the blanket.
And, using your stomach muscles, and feel free to bring your hands to the floor if you need to, tuck your chin towards your chest, and slowly recline back. I'll place the blanket just under your head here. So the blanket just gives a little extra cushion. How does that feel? If feels okay.
Good. Now would you like an eye pillow for your eyes here? Or, I know you don't like eye pillows, but how 'bout a scarf, which is a little bit lighter? Sure Okay. So this can be helpful for drawing the focus inside, and really allowing you to move and to your inner body, and to feel what's going on.
So we're gonna start in constructive rest pose, which is a wonderful pose for relaxing the low-back. It also helps to release the hip flexor muscles, the psoas and iliacus. The feet can be a little wider than hip-width, and the toes actually pigeon-toed, slightly turned in, and the knees resting together. And then taking a few moments here to just make sure everything feels good. It's the position of your body.
You're welcome to take your hands a little further out to the sides, or turn the palms up or down, just see what feels the best to you. And begin to let you bones and body relax down into the Earth. Softening from within. And in the beginning of the practice, taking a few moments to scan your body, from the top of your head all the way down to the souls of your feet. So exploring and entering in, observing the inner landscapes of your body.
And noticing today how you're feeling. You may become aware of places where tension or stress have accumulated. There may be areas that are going through healing process. And as you feel through the different areas of your body, this give you information to then work with in your practice. You may choose to breathe into those areas that need healing, or to begin to soften the areas of tension.
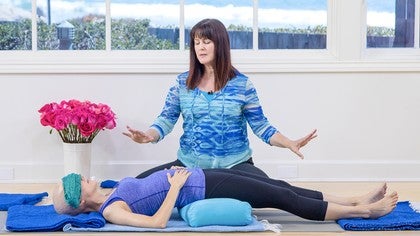
So when you've completed your scan, and you can take as much time as you need, and just begin to allow your belly to soften. And I'm going to invite you to take one hand to your belly and one hand to your heart. So it can be whichever hand feels the most comfortable. So under the hand that will be touching the heart, I'll have you lift your elbow, and I'm going to put a little prop there, a little blanket to just give you a little more access to your heart center. How does that feel?
Good (whispering) K And the hand can go below the naval at the place where the second chakra is, also known as the hara. It's an energy place in the body. A very important area that garners energy, and then can take it throughout the body for healing. So this is called the belly heart breath, and as you inhale, can breathe into the hand that's, into the space below where your hand is resting on your belly. And let your belly rise and expand, as you inhale.
And just begin to feel that movement of the belly rising and expanding as you inhale, and softening as you exhale. And you'll notice as you breathe this way, it creates this gentle massage. It creates a lymphatic massage, deep breathing, deep diaphragmatic or yogic breathing. And as you continue to draw the breath down deep into the belly, and feel the belly rise, you can start to expand that breath through the ribs, allowing the ribs to open. And even the chest to lift slightly at the top of your inhalation.
Beautiful. So very much like a balloon filling with air. Another image that I like to use is a pitcher that you would fill, from the top, from the bottom rather, to the top. And then as it pours out it empties from the top to the bottom. So drawing the breath into the low belly feel the ribs expand, the chest rising, and then slowly pouring the breath out.
And with each inhalation, breathing in peace, breathing in tranquility. And as the breath flows out, consciously release anything you're ready to let go of. Visualize the breath carrying it out like a breeze, as it releases from your body. Notice the rhythm of each breath, like an ocean wave flowing through you. And as this wondering milking of the lymph system is happening and the organs are starting to relax and soften, just notice how you feel as you breathe this way.
Experiencing the gift of each breath. And let that breath become now as an organic and natural as feels comfortable. And perhaps there's a place that's calling to you, that would like some prana, some chi today. And if you like you can visualize your breath as a color of light, any color that comes to you, that feels soothing or healing. And visualize breathing that light in to that area.
The light bringing healing, bringing prana, bringing energy deep into the cells. And notice how it feels to focus on drawing this wonderful energy into the body with each breath. Feel the sensation of it. Feel the body responding to each breath. Breathing well, breathing deeply is one of our keys to health and healing.
So even when you don't have time to do a full practice, you can do a pranayama practice, or the heart and belly breath, to really, or rather belly heart breath, to really create a wonderful, healing, flowing vibration throughout. It oxygenates the bloodstream, it releases toxins, and it brings prana in, it brings energy in. So this is a wonderful practice in itself. Also, if you have trouble going to sleep at night, sometimes when you're in treatment, or you're dealing with a lot of stress, it will be hard to go to sleep at night, this breathing pattern can be wonderful for guiding you into a deep sleep as it helps to relieve stress and accumulated tension. So now we're going to bring in some gentle yoga movements with this breath work.
And I'll remove this blanket from under your elbow, or you can just move it out of the way for those of you at home. And the feet now can walk about hip-width apart, and the knees are going to face the sky. So you may want to walk your feet a little closer towards your sitz bones back towards your hips a little bit. That's it. And just making sure that the feet feel comfortable the position that they're in.
Now you can relax your hands by your sides, and as you inhale, you'll gently arch your low-back keeping your hips on the floor. And as you exhale, you'll flatten your low-back down into the floor. So this is a pelvic rock, and the pelvis is gonna rock forward and backwards. So on the inhalation the tailbone presses into the floor a bit. The low-back arches, and as you exhale, engage the stomach muscles, drawing the low-spine, lumbar spine down into the floor.
This is a wonderful pose, for again, massaging a lot of the lymph through the belly, but it also releases tension from sitting, if you've spent time sitting today or this evening, really taking time to stretch that out, to release the low-back. Inhaling as the hips rock forward, feel the belly rise like a balloon filling with air. Exhale as you flatten and release the spine into the Earth. Beautiful. Now very important practice that we can add to this very movement is activating the kegel muscles, the pelvic floor muscles.
It's quite common for, well actually in women, for them to get weak through childbirth, and through the way that our bodies are designed. And for men, there's a link to prostate problems with an overly tightened pelvic floor. So, for women, you can do a pretty firm strengthening of the kegel muscles, activating the kegel muscles here. But for men, you're gonna do a gentler, almost like plucking a string on an instrument, when you're working with lifting the perineum in this pose. So on your exhalation as the stomach muscles pull in, you'll draw the pelvic floor muscles up and in.
If you're not sure what muscles those are, the next time you're urinating, you'll stop the flow of urine to feel the contraction of the pelvic floor. For women it's also the vaginal muscles, so on the exhalation, those draw up and in, and then relaxing on the inhalation. So as the hips rock forward, the belly rises, just softening that whole area. And then on the exhalation, contract and lift, and draw up. This can be done every day, and it can help prevent things like incontinence, and prolapsed uterus, and different problems that can occur with pelvic floor weakness.
So we're gonna add a step that makes it a little bit more challenging for you. So as you inhale, you'll arch your back once again, exhale, this time you'll flatten the spine into the floor, you'll engage the kegel muscles, you'll pause for a moment, holding there. And then on the inhalation, pressing down through both feet, you'll lift your hips up in to bridge pose. So lifting up nice and slow. Coming up just as far as feels comfortable.
Keeping some space in the low-back. And then exhale, rolling down one vertebrae at a time, like setting beads down on a flat surface, one vertebrae at a time, the hips are the last thing to touch down. And you can go back to the gentle rocking of the pelvis arching. Relaxing the pelvic floor, exhale, contract the pelvic floor, and then as you inhale, you'll float up into bridge. Good.
And find the bridge the feels right for you and for your body. And then exhale and rolling down. You'll notice if the feet are closer towards the hips it makes it a little easier to get more height, but this is a nice level of height for you, Jody, so don't feel like you have to go up higher if it's not feeling comfortable. Also, if you feel any tenderness in your knees here, try walking the feet wider apart. This will often give more ease to the joints, the knees, a little more gentle for the knees.
Good, and then when you're done, you're gonna come back up just one more time, because we're going to bring a bolster under your hips here for the restorative pose. So you'll sweep your arms out to the sides. You'll feel me slide that right underneath your sacrum. Good. Now, at home once you've taken your bolster and slid it underneath your hips, you'll want to check and touch the iliac crest.
The iliac crest is the protruding bone at the hips. So you can put your fingers on your iliac crest. So it's below the naval, and it's just above the hip-joint. So if you feel it, it's the bone that sticks out a little bit. Now just below that, if you slide your hands down alongside your hips, that's where the bolster should be positioned, the top edge of the bolster.
Not much higher than that. And the reason is, we want the bolster positioned right under the sacrum. We don't want it underneath the low-back. So, generally you can feel where the iliac crest is, and then the bolster is beneath that area. If it's up higher you'll find it's often not comfortable, so also check-in with your body and see what feels the most comfortable.
And from here, you can either keep the legs bent, which is the gentle variation, or feel free to straighten the legs one at a time. And as you extend the leg slowly, I see we've got you off the mat so, I'm gonna bring a blanket underneath your heels just so you have a little softness there. There you go. And if you're on the mat, it can also be nice to have a blanket under your ankles, because the heel bones can be sensitive here. So, that's a nice choice for that additional blanket.
So your hands can be wherever they feel most comfortable, a few choices would be your belly, overhead, or down by your sides. So finding for you the position that feels the best right now. If you do take your hands overhead, and they're not touching the floor, that means it's gonna be too strong of a shoulder-opener for you. So, find a position where you are feeling your hands, your backs of your hands or forearms on the floor, or prop under those areas if it does feel good to open in that position. We're gonna do a little meditation now in this pose, this is a gentle bridge pose.
Taking water through the second chakra. So the element of the second chakra is the svadhisthana, which is just located a few inches below the naval, is water. And water is also a wonderful mediation to use to enhance and support immune function. So I'd like you to just close your eyes, or if you have your eye pillow, or your scarf over your eyes, just take a few moments to visualize a beautiful stream of crystal-clear water, flowing down, and in to the space just below the naval. And feel this gentle water, just the perfect temperature, washing through the organs that reside here.
Flowing into the low-back. Gently washing from the belly up into the solar plexus. And feel this water massaging everything it touches. Relaxing everything as it flows freely through you. Feel the sensations, the warm water flows towards the heart, and as it does, it flows through the liver, the kidneys, supporting their health and wellness.
Nourishing everything it touches. And feeling the sensation of the waters. It fills the heart, bathing the chambers of the heart. The healing waters cleanses the chest, and flows through the bloodstream. And flowing into those areas that may need healing.
Cleansing, soothing, everything it touches. Water flows into the neck and shoulders. Warm and soothing. And feel it now as it bathes the arms, the legs as if flows outward, extending through the limbs, until the whole body feels the water washing through, and circulating through. And you feel it now in the throat, the neck, and moving gently up into the head.
And washing through the head. The face softening. The eyes, floating in their sockets. And feel your whole body cleansed. The water now flows out through the soles of your feet.
And flows through you until it runs completely clear. Whole body cleansed, nourished, as the healing waters freely flow from head to toe. And feel yourself now floating in the water. Held, carried, safe and peaceful. And preparing now to release from the pose.
Take a few deep belly breaths. And notice as you breathe, how open and spacious the front body feels. And when you're ready, you can gently bend your knees one at a time, taking your time, there's no rush. And then bringing your hands to the top of the bolster, you'll push the bolster forward so that it slides towards the heels. So taking the bolster forward towards the heels, and then bringing the hips down, and then walking the feet forward a few more inches, and pushing the bolster forward another few inches.
That's it. And then from here, you'll take your feet and place them on top of the bolster. We'll see too, sometimes you need to kick the bolster forward, even a little further so it's a comfortable position for your feet, they don't feel like they're sliding off the other end of the bolster. I'm gonna bring it forward just another little bit, there. Okay, good.
From here, you'll walk your feet apart a little wider than hip-width. And just take a moment to feel your back resting on the floor. Feel the gentle release after being in the pose, and just relax the muscles of your back against the Earth. You may even notice the feeling, the gifts of the restorative pose. Any changes that may have taken place.
And then, when you feel ready, you can let you arms slide out, similar to airplane wings out to the side, and a comfortable distance away from your hips. So finding just the right amount of depth there, and openness. And see how it feels to turn the palms up. Is that comfortable for your shoulders? Mm-hmm Kay.
Take a deep inhalation, and as you exhale, release the knees to the right, and as they relax down, you can slowly turn your head left. This is called the windshield wiper pose. It's a wonderful pose to connect movement with breath. As you inhale you'll come back up to center, and as you exhale, relax your knees to the left, and slowly turn your head to the right. Now this is a moving mediation so you wanna take it nice and slow.
Watch if you go too fast, because it creates a sort of mindlessness in the movement. The slower you go the more mindful, the more meditative this pose becomes. Each time the legs relax down the head goes opposite to the movement of the knees. Inhaling to center, exhale relaxing into the twist. This also milks the lymph nodes through the groin area.
It's wonderful for massaging not only the low-back but also the neck. And I will sometimes put a little more of a roll under the neck to create an even deeper movement of support for the neck here. So I'm going to create a small, cervical roll, and you can do this at home just by taking the blanket that was positioned under your head, and making a small roll for your neck. You don't want it too big. But you want it big enough that it's catching the occiput, so as you turn your head from side to side, you're feeling it supporting a nice release in that area.
I've used this a lot with people with neck tension, and have found it to be really helpful release for the congestion that happens in this area. Especially when we're looking at our phone or tablets. So it's a really nice way to create mobility, flexibility, and release tension. And you can always reposition your body so it feels more comfortable, or change the props if they're not feeling quite right. This is your time, your practice, so you want to make sure everything feels really good.
And adjusting anything that doesn't all along the way and throughout. When you find that place where it's really comfortable, you'll get the most benefit from the practice. And she's got a beautiful, slow rhythm here. Another thing this can be really helpful for is if you've been through some trauma, or challenges, or really stressful time, it creates an actual stimulation of the right and left side of the brain as you're moving from side-to-side. Which is found to be very helpful for trauma, for stress.
So, I'll often do this at the end of a session at the Cancer Center. Or, you know, if I'm working with somebody who's dealing with a lot of anxiety, so it's a helpful pose if you're finding that you're experiencing some of that in your own life. And just a few more at your own pace. Taking your time, enjoying the feeling of flowing with your breath. And then when you're done, you can come back to center, and draw your knees towwards your chest.
As you hold either the tops of the knees, or if your knees are tender, you can hold the backs of the knees, underneath the knees, or the backs of the thighs, and gently stretching the low-back. So this is always nice after the back-bend of gentle bridge to give your low-back a really nice, deep stretch here. This pose you can also create a little self-massage from rocking from side-to-side. So feel free to create a nice rock that feels comfortable and good to you. And even with this you can turn your head from side-to-side if you like, and massage across the neck.
While she's doing that, I'm going to reposition the bolster. And I'll add a blanket roll to the top. If you're really relaxed, and you're doing this practice at home, you might not bother to put the blanket on top of the bolster. You could just extend your legs as our next pose is going to be the supported final relaxation pose. So, feel free to choose or to feel in to what's best for your body.
If you need to, you could come up and position an extra blanket. I'll put a blanket on top of the bolster especially if somebody has longer legs. Their legs are shorter, I may put the blanket at the other side of the bolster to catch the ankles, which can be nice too. So we can see what works best here for you and for Jody. So, slowly, when you're ready, you can stretch your legs over the support.
And we want it to go right under the knees as she extends her legs straight. So go ahead and let your legs extend out. And the feet should touch the floor. If they don't you can always add a blanket underneath the feet. And again, the feet are, not, we didn't quite get it right with the mats, but we can add a blanket under the feet so that they're soft.
Or, I can use that to go over her if she was cool, course it's a summer day here so, I'll let you just relax here without a blanket. I enjoy using essential oils at the end of class. It's a wonderful way to bring in the gifts of nature. Things like lavender, which are very calming and soothing. Orange which is helpful for depression.
This one has quite a few that are good for reduction of stress. Would you like a drop? Mm-hmm. So putting a drop in your hand, rubbing your hands together, and then cupping your hands over your nose, and breathing in the essential oils. If you're not using essential oils you could always rub your hands together, and do a little bit of palming, where you gather energy in your hands, and then put your hands somewhere on your body that you'd like to send energy to.
It can be done also for the eyes. Also feel free if you're using an essential oil to anoint yourself with that oil. To place it anywhere that you'd like to send good energy to, or healing to. It can be nice at the top of the head, the third-eye, are good places if you're working with things like lavender. And then when you're done, you can rest your hands, typically in chevasana, in all the variations of chevasana, the hands are turned open to, opened to receive.
But it's important to feel in your body what feels the best. It might feel best to have your hands turned down on your body, or turned down on the Earth, so check in and see what feels the best, and take time to get really comfortable here, and really relaxed. This is a very important pose. Some people skip it, but I think it's one of the most important poses. It takes all of the good work that you've done in your yoga practice, and it settles it in on a cellular level.
It's deeply relaxing and incredibly nourishing for the kidney chi. And the kidneys are important organs in Chinese medicine, they are batteries of the body. And anytime we're in a healing process, we're using a lot of energy for healing. So you need to go to nature. Go to the ocean, or eat beautiful foods that are filled with life-force.
Or do poses like this that will nourish your kidney chi. Rest is one of the best things to nourish your kidney energy, and this is a very deeply restful pose. So once you're here, just begin to allow your body to sink down into the Earth. And feel the Earth holding you, embracing you. As a mother would hold a child with compassion, with affection.
And as you sink down into the support of the Earth, feel the Earth rising up to meet you. Feel your whole body letting go, and relaxing deeply, into the gentle pull of gravity. All of the muscles softening. Getting wonderfully heavy and relaxed with each breath. And as your body's relaxation continues to deepen, feel now the light within you.
The energy that's flowing through your chakras, your nadis, your meridian lines, enhancing your health and well-being. And feel this light, the intelligence that it holds as it flows into the places that need healing. Supporting your deepest healing on a cellular level. And let yourself rest in the embrace of the Earth. Feeling the light within you.
Supporting your healing journey. Just rest. Very gently, very slowly, begin to deepen your breath. Returning with each breath from your deep relaxation, and coming back feeling rested, restored and rejuvenated. You can begin to awaken movement, turning your head from side-to-side.
Wiggling fingers and toes, and stretching in whatever way feels good to you. And eventually you can draw your knees back towards your chest. Can slowly rock from side-to-side one more time. And then when you're ready, make your way on to your side, whichever side feels most comfortable. Fold this a little higher into your head so you have some support.
And you can roll onto your side. I'm going to pull this out of the way. So bringing your legs forward enough so that they're not resting on the bolster, that you can comfortably rest here for a few breaths. Now while you're on your side, just take a moment to wrap your arms around yourself, or you can bring your hands to your heart, and just take a moment to give yourself an embrace, a warm embrace. And feeling the genuine love and compassion that you hold for yourself.
And taking a few deep breaths, and when you feel ready you can roll forward just a little bit, and I'll remove the scarf, so you'll keep your eyes closed. (chuckling) And then gently pressing up to a seated position. You can sit right here. Bringing your hands into anjali mudra with the heart. (breathing in deeply) Namaste.
Namaste. Thank you. (laughing softly)
Therapeutic Yoga: Yoga for Healing
Comments


I'm so glad through the marvels of the internet and Yoga Anytime I can meet you in your home! Enjoy the practice, Sending my love.
You need to be a subscriber to post a comment.
Please Log In or Create an Account to start your free trial.
