Description
About This Video
Transcript
Read Full Transcript
Hey there, welcome back, good to see you again. My name is Robert, and I'm going to do my absolute best to share one of my favorite sequences with you right now. This sequence in short is like a sun salutation sequence in the beginning, that adds a fair amount of strength, upper body strength, core strength and squats. Quick little back story. Now this may or may not work for you in the way that it worked with the private client of mine but private client of mine knew to yoga, wanted to get a workout, bad back.
I thought, "How can I create the best sequence for him?" He benefited from it greatly, he felt strong, he opened up his hips, he got flexible in the areas that he needed but his back was protected and there wasn't a lot of forward bending and what not. I'm not guaranteeing that for you, but for him it worked and let's see what happens. Let's just go with it and I'll give you as many modifications, options, progressions as possible without overloading you with too much information. Let's do this right now. I've got these blocks.
If you don't have the blocks you can still do it, but it will be a little bit different. If you have something that you can use that's stable like these blocks, I don't know, books, something you might have in your house that's stable, that gives you a little height. Try that, if not order some blocks and I really recommend the cock style because they just feel a little bit more rigid and stable because you're putting a lot of weight on them. I start with them right around there, right around a little wider than hip width but ultimately I'm gonna be putting my hands on them and they'll be about shoulder width for the push-up downward dog stuff. We can start with our feet hip width, of course as we go I'll encourage you to breath and give you breath cues, but right now in mountain pose, when we pose, pose, ground, lift, breathe, before we begin.
Engage your feet. What does that mean, right? Engage your feet. Maybe like begin to feel the bottoms of your feet press down into the mat as if you were trying to gain more connection or stability or ground or foundation. Feel your legs, supportive and strong.
Your pelvis, mindful that it's not tilted too far forward or that your tail bone isn't tacked too far down, and you find this nice and neutral position and kind of even do this a few times. It actually is kind of funny. A little hip thrust. I think it's very beneficial for you. All joking aside, the movement can be kinda funny but if you really do work on trying to find that neutral position, it's significantly helpful throughout entire practice of yoga.
Neutral, core braced, long spine, stand tall. Pull the shoulders and chest open and back, and then pull the arms down, so when you pull the arms down there is this sort of like ignition of muscles through your triceps. The palms are engaged, fingers wide, just open back strong. Couple deep breaths. Some gratitude.
Something like, "Yes I can breathe and it feels good." You've gratitude and appreciation for a simple process that goes on and on and on throughout the day. Take this time to acknowledge it and say, "What's up breath, I like you." (chortles) Okay, we've done that, you're ready to begin. Get your feet about as wide as your mat and then open up your toes a little bit. Now I'll do that over here. About as wide as the mat and step back behind the blocks a little bit, open up.
Now before we really get going, just come down a little bit. When I say, "Come down," reach your butt back into like an imaginary chair and maybe even let your arms come out to counter balance. Pull your knees wide. It looks a little something like this. Now if you come down and it's impossible for you to do that with your heels down, maybe take your feet a little bit more narrow, mindful of the knees, but now you're gonna come down and lift the heels and do something like this.
Modification would be not here, you might not be able to have that movement, so it might be lifting the heels to create space in the hips. Hopefully that resonates and makes sense. It's like a sumo squat in the fitness world. Inhale. First move is that squat.
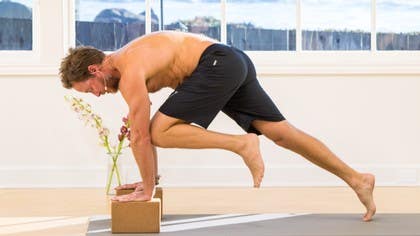
Now I'm gonna place my hands on the blocks and step back into plank pose push-up position. For the first one it's gonna involve a push-up, so we'll demo or give you a little quick, little tutorial on push-up. Bring the kneels down, shift your weight forward a little bit. What you do not want, I normally teach what you should do or what I encourage you to do versus what you shouldn't do, but this is all too common and damaging on the elbows, is here this as like a push-up. Joint is a nowhere land, no man's land, it's taking so much heat, it's terrible, so trust me it's terrible.
If you can get forward a little bit to where the elbow stays over the wrist and feels a little more supported, that's probably a little better. Down about half way, and back up. The arm almost creates a right angle, 90 degrees. Look forward, keep the belly engaged. Practice that a couple times because we're gonna be incorporating them.
If you feel like you just can't keep it over walk your knees further forward. Shift your weight. Now I'll acknowledge right away it's one of the harder push-ups to do. A lot of us are inclined or used to taking a wide push-up. This is known as a triceps push-up and it's for sure difficult, so youâ??ll get used to it over time.
The muscles might not be totally used to it yet. In this video, for practice sake just do a few, lowering down and up. The inhalation is when you lower, brace your core and exhale, push back up. Try not to deep too far forward, like stay in the actual strength of the arms, chest, and shoulders. We've got that, youâ??ll work on it if you don't have it.
What we've done, let's start over. We're kind of like breaking this down a little bit, so we're gonna start back here. Inhale, we're gonna exhale, squat. Plank, inhale, step back, knees down, keep inhaling, and exhale, push-up, crow toes all the way into downward dog. If you don't do it with the knees down it looks like this.
That's the exhale. Inhale. Downward dog if it's your first round, we're just starting here, stretch it out a little bit. If you've never done downward dog with these blocks you may notice immediately some freedom in the legs. Remember to bend those knees and send your seat bones, seat bone one, seat bone two up to the ceiling.
Get long, long in the spine. From here the next move is to lift your right leg up, and on the exhale simultaneously youâ??ll draw the shoulders forward over the wrist and bring that right knee up into your body and maybe toward the inside of your right arm. That's the exhale. Inhale, send it high, maybe even not that high 'cause the higher you bring the more strain might cause your little butt, so maybe it's just around right here. Exhale, inhale, exhale.
Now inhale, send it up, and exhale, step it to the outside of the block on the right. Land. You've already finished the exhale. You've already got a fair amount of height here with the blocks, maybe bring it up onto your finger tips, if you can, if that feels okay in your fingers, and now lift and lengthen your spine, lift your chest. Most likely you feel a little stretch in the inner right thigh, groin area.
Bend and straighten a little bit, see how that feels. Breathe in, now breathe out, straighten and send. Squat, finish the exhale, and. That's the right side. See my feet were here and I kinda had to adjust for the next one, so feel free to move your feet back.
Let's go. The next round we'll use the left leg, and I'll try to do it less tutorial and see if I can just flow a little bit more with you. Here we go. Inhale, exhale, squat. Inhale, plank, lower.
That's still the inhale. Exhale powerfully up, inhale left. See how low? I can keep it really low, you don't have to lift it up and do this huge thing, just lift it up, breathe in, and. Stay away from bringing it really wide because when you bring it really wide then you drop the hip and the back it's all tweaky.
Keep it up and centerline. Inhale, exhale. Breathe in last one, breathe out. Good. Breathe in, now step it, adjust, stay on the palms, maybe the finger tips.
Breathe in. Now on your exhale, there is this little thing I do, it might be helpful for you. I breathe in and then while I'm exhaling I kinda straighten, bend the back and launch. Finish the exhale, inhale, and exhale. I'm gonna keep going.
Now I'll just do it. Now it's gonna be like basically what I taught you but who knows? Maybe I'll add a little something, maybe I'll add more push-ups, we'll have a little fun with it. Make it some exercise but it's conscious movement. You're aware of your breathe, you're aware of your body.
Ready? Let's go. Breathe in, breathe out. Breathe in, breathe out. I will acknowledge that I did not teach that jump back thing, but I did it anyway.
What happened? That just happened. You can choose to jump back, if you can do it, or you practice for stepping back, lowering, and downward dog. I wanted to acknowledge that. Inhale the right leg and exhale strong in the core, belly nice and strong there, inhale, exhale, breathe in, breathe out.
Breathe in, breathe out, finish the exhale, continue to exhale. Breathe in, breathe out. Breathe in, breathe out, squat. Breathe in, breathe out and do a couple of push-ups. Breathe in, breathe out, breathe in, breathe out.
Two more. Breathe out, downward dog. Take a deep breath in, big breath out. Lift your left leg up, breathe in, and breathe out. Breathe in, breathe out.
One more, breathe in, breathe out. Now breathe in, breathe out, pose. I did it differently on the other side. Finish the exhale, now breathe in, and breathe out. Breathe in, breathe out.
Breathe in, breathe out. Breathe in, breathe out. Breathe in, right leg, breathe out. Breathe in, breathe out. Breathe in, breathe out, step it, land softly, finish the exhale, inhale, and exhale, squat.
Inhale, and exhale. Last one. We'll do the left. Breathe in, breathe out. Breathe in, breathe out.
Breathe in, breathe out. Strong, almost like push so hard into the ground with your hands or the blocks. Spread your upper back and really engage the entire mid section. Inhale, two more, exhale. Inhale, exhale.
Breathe in, breathe out. Breathe in, and breathe out. Breathe in, breathe out. Take a moment to breathe in. Take a big breath in.
One more time. That portion of the sequence. Now as you can see nice little sweat, I feel strong, I definitely feel awake and alive, core definitely has been tapped, a lot of squatting, inner thighs, hips opened up. We're gonna finish now with more squatting, just about 15 to 20 squats, moving to some balance, some standing poses and we'll take it on down. Now you can move the blocks out of the way, you don't need those.
I'll face you. It's the same exact movement. You've just done all these sun salutations, hopefully you feel alive and strong, sweaty maybe, and then take your feet as wide as the mat, open them a little bit. Open the toes up. Open the toes up, also free up a little space in the hips like we did with the previous squat.
It's the same squat. What we're gonna do, your moderate degree of lowering, how about that? Don't go too crazy, don't go too far. Think about staying in the muscle, not going so deep. That whole butt to the ground concept with heavy lifting, like we're not doing that right now.
What we're doing, opening up. There is a lot of breathing involved with this too. When I lower down it's an inhalation, I keep the chest up, long spine. When you come up, I'll do one slowly, and then we'll build into it. The breath is definitely a big part of this.
On your exhale when you come up, see if you can really slowly like, and when you do that there is this gripping in the palms. Palms up, make a fist, and like you're making a muscle, so you're actually adding tension and strength when you come up. When you come up also, try not to thrust up too much because again there is this low back stuff we wanna stay from. When you end up coming up, here is little demo one. Here just up and when you come up exhale.
The legs are strong, you're actually squeezing the buttocks quite a bit. I love that word by the way, 'buttocks'. This is strength and is also breath and everything else. 15 to 20, probably 20. Here we go.
Breathe in, we'll start nice and slow. Breathe in, lower, lower, lower. Breathe out, drive through your heels and. Breathe in, lower, breathe out. Breathe in.
Now it's a short exhale. Breathe in. Make sure you drive through the heels. Let's go back 10 more. Breathe in.
You can even do like a huge sharp exhalation but breathe in through your nose. I know that was probably a couple over 10 but we're gonna do five more. Breathe in, now four slow. Even change your arms up and open up. Breathe in.
Two more. One more. Inhale, and exhale. Feet back toward hip width, take a deep breath in three times. Through the nose and out of the mouth.
One more. That last little bit there is meant to slow the heart rate. You may or may not have had an elevated heart rate but you do enough of those squats, it definitely elevates and that little technique of breathing in through the nose and exhaling long through the mouth is a really nice technique not only for that but just life stuff. You find yourself at the office stressed out in argument with your partner, your family, your work, whatever, you don't have to do this whole like, "Hold on," but just find it within yourself to take a deep breath in and a relaxing exhale out, and sort of recess the stage or hold onto it because we're all pretty skilled at that, hold on and let it get all dive in and deep and just burst it over here. No, man let it go.
Just release it. Let it go. It's just making the choice. I don't do it all the time. I'm not Mr. Preachy up here but I do make an effort to let it go and it definitely has served me quite a bit.
You can see I'm little emotional about it. Enough of that. Triples. Triples. What we'd want to normally do is do all those squats and then follow right into triples as an active recovery but then I start with a ramble.
Triples. The most basic one would be both feet mountain pose, if you have any real balance challenges. The next phase might be bending your right knee, turning your knee out and placing the heel just above the ankle. Now by doing that you can see my toes are down, some assistance. Palms at the chest.
From here you can gauge how much you wanna put on that left side, how much balance you wanna put on the left side, but try not to kick over into the hip. Pull back to center, that's gonna take some glut strength and awareness. When you find in triples what happens a lot, as a teacher I see it and as a practitioner I do it, is balance requires so much focus but a lot of the time we're in it for minutes and we haven't even taken a breath in or a breath out. It's probably a great way and a great technique to challenge someone to a breathing contest or hold your breath contest. It's good to do a balancing pose because you don't even think and the breath, so what I want you to do is breathe.
From here, and I left out one key thing, but I'm doing it now by looking directly at you. Don't look right at me, I want you to find a place in your space that's not moving. Like you can see me, I'm kinda moving a little bit. Slide the foot up as I did if that's of interest to you, and if that's the case, press the foot into the leg and the leg into the foot and see if you can become one unit, right leg and left. We're breathing, we're balancing, palms either here, maybe they're up high now.
You may feel a burning in your left leg somewhere. That's good. That's good. That's a reminder that you're doing something to help improve your balance. Breathe in, and breathe out.
Shake it out a little bit. Balance. Make sure you breathe because it takes so much focus. Now right leg. Do the same thing.
Maybe take it step-by-step. One cool thing that I like to do sometimes and I won't do it now because I need to engage with you and make sure you're doing all right, is start with the foot down, knee open option and close your eyes. That adds a whole new element to it for sure. Even with your toes down, eyes closed, what you need, what I love about that, is that it requires you to recruit that much more focus and that much attention that it's a big part of the practice. Is you can't really think about something other than what you're doing just to hold yourself up, and that's kinda cool.
Try it in triples right now, and you're like, "This is so boring." Just close one eye, close two eyes. If you start to fall out, get all like Karate Kid and try to correct it, and then come back. It's good. It's good, like these muscles need to be alive and awake otherwise you're gonna fall somehow and those muscles aren't gonna be able to support you and you're gonna hurt your ankle, blah blah blah. Up, triples.
Deep breath in and exit. I'd say do maybe a minute on each side once you get that spot locked in. As you're balancing now we move into warrior two, this warrior two sequence. Come to the front of your mat. Let's clear that out.
How do we do that? By letting that go. By how? We breathe in, and we let that go. Let it go.
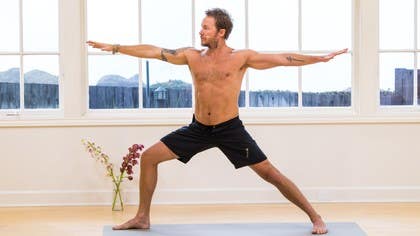
Here we let it go. Everything we've done is gone. Right now we're fully engaged and embracing this moment as it is and we're gonna step back into warrior two. Your right foot stays here, left foot, step it back. Now look down at your feet.
Different schools of thought, I'm sure, I'll give you two options. Right heel lines up with the left heel or the right heel lines up with the arch of the left foot. Something like that. It's up to you to find your distance. I would imagine you could probably go further than this, if you can stay here but don't let this knee go away over here.
That joint stacking concept, knee over the ankle or even a little further back. Now step back and keep playing around with like, "Where is this pose for me?" What do we talk about? In another sequence I did was like the building of a house. Warrior two is a really cool pose to talk about building the home from the ground up and then living in it, inhabiting it, like finding comfort in it. Here we go.
Feet, just like in mountain pose, lift your toes, spread your feet, and connect. Connect down, ground, root, all those cool words. Now play around with straightening and bending the right leg, make sure that, that again I can't say it enough, don't lift the heel and don't let that knee go further. Ground, knee stacked, strong legs. A little bend in the back leg will free up the pelvis now.
See here straight, well I can move it a little bit, I lied, but if I bend it now I can really move. Remember that moving we did before? Kinda sexy hip movement? bend neutral. That way.
This is engaged and my spine is neutral along my little back anyway. Here. Another thing is don't let that knee, there is a lot of don'ts, I apologize but it's important, try not to let that knee fade to the left. Push it out toward the pinky toe, probably forgetting 15 cues. That's okay, you're doing all right.
Here, there is a little stretch up your inner thigh. Definitely working the strength of your right thigh, your core. Now what do we do with the arms? Take the arms out, palm facing up for now, and then pull the upper back. Youâ??ll see it on the other side.
As you pull up your back together, shoulder blades together, then take the palms down and the gazing point is over the right middle finger, let's say. Couple of deep breaths. If you can't breathe you got to adjust the pose. The breath is like the architect really, it will design the posture and basically if you can't breathe in the pose, make the adjustment to where you can fully breathe. Here you've built it, you've taken the time, the materials, the money to build your home.
Now see if you can pose, I know we've been in it for a little bit but just a few more breaths where you close your eyes, and begin to feel and sense where you are, and it's little subtle movements in your hips and pelvis and you can do to really make it your own like, "Why am I even doing this pose? Oh, I get it." You see this straightness, point you toes forward. This is a pose to maybe bring this up, sometimes we practice this yoga as like for practical purposes. To strengthen our legs, to create more flexibility, to touch our toes, some of the reasons you may be watching this right now. Can you eventually work your way to where you're just practicing for the sake of practicing?
Listen to music, there is no real reason behind it, you're just listening to it for the pleasure. Can you find that in some of these postures? Little bend in the knees, breath, earning pleasure in the breath and then move toward position in this pose that feels like you can enjoy it, or maybe it's a combination, there is pleasure and there is actual practicality here. Maybe you widen your stands a little bit. Soft knees, lift up a little bit, lengthen your spine and then exhale, go ahead and bring your hands down, let your head to hang.
Couple of deep breaths. Maybe straighten one and bend one as you open up the toes on the right, kinda get into a little side launch. Breathe in, come back to center, and come back over to the other side. Notice any tension in the shoulders. You can hold on to a big toe at edges of your feet.
We're all built so differently. Knees bend, hands on the thighs, come up half way, strong core, strong legs, and you come all the way back up. Deep breath in, palms at the chest, breath out, let it go. We're all built so incredibly different that this pose is gonna look 30 times different for 30 different individuals, so I hope you're able to find that in each posture. Like, "This works for me," and not compare yourself to others or the photographs you may see.
Warrior two on the other side. Practice for sake of practicing my friends, but in the beginning I understand it's so overwhelming. Like, "What am I doing? What do I have to do? Oh now I have to breathe?" Once you get pass at, there is something to...
There is layers to this practice to look forward to. Warrior two. Feet, legs, hips. If you need more cues, we wanna do the other side. Let's enjoy living in our home for like 30 seconds here.
Close your eyes and maybe get a little heady about it and build it from the ground up. Let's go through those different areas that make sense to you to hold this pose up and then be in it comfortably. Comfortable and steady. Releasing tension in your jaw, your eyes. Straighten the front leg, hands on the hips, feel free to take another fold, if you like.
Turn the right foot forward, bend that leg and then send that left foot all the way up. What are we gonna do now? Breathe in, with pleasure breathe out. Let it go. Now we're gonna make our way down, down through a table top position.
We'll find table top and we'll start to quiet down and slow things down until we reach final relaxation. Table top, this is basically hands and knees pose. We've been here before, I'm sure. What's helpful for me after all that movement is like a clearing, like you clear the chalkboard, the blackboard, and that's with the spine, so we'll do some cow movement. Belly down, butt up, chest forward, breathe in, and exhale, round your back.
Breathe in, extend, and lengthen, breathe out. Breathe in, breathe out. Try this, coming to a mild, your cow pose may, we'll just use mine 'cause I don't know what yours looks like, I'm assuming it looks awesome though, is this is what I am. I'm gonna kinda mellow it out a little bit, keep that sense of length, so my back is not rounded. A little bit like so, crow my toes and see how long I can manage that length as I come into downward dog.
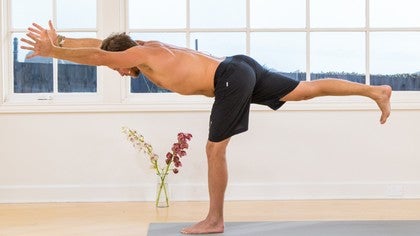
I don't know if that totally made sense but maybe I get an A for effort. My friends from downward dog really I want you to treat downward dog if you can, if you're at that level of winding down, like a warm down pose. The way I like to do it, as if my knees are bend and I begin to straighten my right leg, keep my left bend and then really kick over, like my hips over to the left and maybe even tent up onto the right finger tips. That helps sort of bring another sensation up through my rib cage, inside body, under arm. Try the other side.
Back to center, breathe in and child pose. Now we've been on our shoulders quite a bit, push-ups, different things like that, downward dog, so see if you can now find your child pose that makes, there is no effort in the shoulders whatsoever, zero muscular effort. This one is of my favorites, my hands come back underneath my seat, drate my shoulders forward, breathe in, and now exhale. If this hand version doesnâ??t work you can let the arms come down by your side and let your shoulders rest on your knees. Begin to slow the breath.
Breath falls in and falls out. Let it be natural and relaxed. Loose yourself up into kneeling pose and let's actually take a few moments on our back for final relaxation. Spin around, and lower, maybe hug your knees in and rock side to side. Take your arms out, bring your feet down.
Actually draw the bottoms of your feet together and let your knees open up out wide. Take a nice fulfilling pleasurable inhalation, and a relaxing calming exhalation. Inhalation, a long extended calming exhalation. The only thing I ask of you is that you set yourself up the best possible way for your optimal relaxation. Minimal to zero muscular effort, allow your breath to come and go, fall in and fall out, rest.
Rest your eyes, rest your brain, your jaw, your shoulders. Now feel free to stay here as long as you'd like. If you choose to come up to sit, come up to sit and if you're still lying down on your back, stay on your back, stay relaxed, enjoy it if you can, that concept to finding pleasure. Just wanna reitwerat that. In the beginning the practice can be very challenging.
It can be overwhelming and just finding where to put your right foot is enough for that moment. Over time, if you can begin to let some of that go and let intuition and instincts take over, to be able to practice for the sake of practicing is something, if you're gonna strive for anything in this thing called yoga, strive for that, to practice for the sake of practice just as you listen to music. Like just for the pleasure of being quiet and being with your body. With that said, you'd like to place your palms together at your chest, maybe bow your forehead towards your fingertips acknowledging your effort, you're showing up for yourself. That's huge.
I thank you so, so much for joining me. Namaste, Namaste, Namaste, peace.
Keepin' it Real
Mention
 |
Robert Sidoti (Teacher) |
 |
Deb T |
 |
Ch Marie d’I |
 |
Whitney B |
|
|
Susan J |
|
|
Debbie K |
 |
Erika H |
 |
YogaReadRun |
Comments

Glad you're enjoying YogaReadRun and I'm happy to be back!
Erika H, thanks for your honest comment :) Always a tricky or delicate dance as an instructor to find that balance where you're able to fully express your thought's or give clear and concise cues to help the practitioner learn more, AND allow for more flow, moving from pose to pose without too much talking. It's a discussion we have at YA and something I'm always working on. So again, thank you both for your comments, very good to hear from you and gives me an opportunity to learn and grow!!

You need to be a subscriber to post a comment.
Please Log In or Create an Account to start your free trial.
