Description
About This Video
Transcript
Read Full Transcript
(waves rushing) Welcome to Energy Shift. So for this session you're gonna need a blanket and a mat, a mat at a wall. So, be sure to go get that, hit pause if you need to go grab that, and then come on back. So there are many benefits to getting upside down. In this session we're gonna (blows softly), kind of flip our trip, get upside down, and my favorite part of getting upside down is when you feel your energy starting to get low, simply pop into a handstand and it can shift, just by changing and increasing our circulation.
So for those that can kick up to the wall in handstand, this practice is appropriate. If not, you can stay with us and still do Downward Facing Dog each time that we go up. So to start with some alignment cues. In handstand, Adho Mukha Vrksasana, we're gonna bring our thighs together. You can also have a bit of a space, so as if you're standing in Tadasana, but then take the arms up over head, so Urdhva Hastasana, flex the wrists and there you go.
You're on your feet and you're in handstand. But starting from the hands, 'cause that's what's gonna be rooting onto the floor, you're gonna press into the floor and then start to rotate the inner upper arms back, outer arms forward, so starting to cup out, scoop out the arm pits. And then from there it will broaden through the chest, broaden through the back. So again, rooting to rise. As you do that, that shoulders are gonna go down now, but up towards the ceiling.
And then the rib cage just draws back to find neutral and again, the pelvis finds itself to neutral, so which might be a little lift to the hip bones for you or a little drop down. So we wanna stay away from a big sway, back or a big tuck. You just want to find it neutral. The legs are super important when we get upside down. There's a little drawback in the inner thighs to soften through the low back.
And there's still an equal press of the outer thighs. So the legs are strong. And once you start to get the pose, you can start to play with where you ease up. But I find the more action through the legs, the longer your energy field can be. And then it just makes it feel so much easier and lighter in the pose.
So, again, starting, rooting, with the hands, feeling the shift, the rotation of the arms, to scoop out the armpits to broaden through the chest and the back, lengthening through the torso and then there's a knitting of the ribs in, so we're drawing in towards the core, pelvis finds neutral, legs are strong. And then the ankles, we're gonna go through a couple sessions where we have the feet flexed or feet pointed, it's really up to you. Many different traditions teach different ways, and I like to teach whatever works for you. So we're gonna draw, also, inner ankles in and up a bit. So, finding action even there.
Starting in Downward Facing Dog, we'll go through a little bit of a warm up. The nice thing about moving through a handstand practice is you don't need a ton of warm up. So, we're gonna go through here starting Downward Facing Dog, curl the toes under, lift the hips, finding the hands shoulder distance and just pausing here as you root through the hands, pressing the weight into the legs, so starting to work through the hamstrings. And I found the more open your hamstrings, the easier it is to kick up into handstand. So it'll just take some time, and just settle your breath.
And see if you can spread your toes, just waking up the feet. And finding a nice spread between the hands, but not overly spread between the fingers. Rooting through the entire palm, but feel a deeper press through the base, the pointer finger base to the thumb, and down by the inner wrist. And then even here you can start to practice that spiral inner upper arms coming forward, outer arms back, find that scoop of the arm pit, the broadening through the back. Feel the ribs finding neutral, then press through the thighs.
On an inhale, wave forward to plank pose. From here bring the heart a little bit forward, take the gaze forward. And we're gonna do a little activity here, where on an exhale you're gonna press and round, almost like you're coming into Cat pose. Round, press through the upper spine and inhale, start to come back to neutral with the heart a little bit more forward. Exhale, press through the floor, tuck the chin lightly.
Inhale, come back to neutral. Exhale, press, gonna feel the weight in your hands. Inhale, neutral. Two more. Exhale, press.
Inhale. Last one, exhale. Inhale. Lift the hips, take it back Downward Facing Dog and then slowly walk the hands back to the feet. And you can take your feet hip distance apart, put a little bend in the knees.
Take the hands up behind, interlace, fists up and then start to bring the fists up and over. Put a little microbend in the elbows as well. So you can either keep knees bent or start to straighten and then just let the head go. On the next exhale, let the hands come back down. Walk back out into Downward Facing Dog.
Okay, we're gonna go through that one more time. Press the thighs back and just hold here five breaths. Again, still feeling and rooting through the hands. Got that rotation through the upper arms. And then draw in lightly of the rib cage finding neutral.
And see if you can get more into the legs to warm up the hamstrings. On the next inhale go ahead and wave on forward back into plank one more time with the press. On an exhale, press through the upper back, tuck the chin, feel the weight in your hands, inhale, come back to neutral. Exhale, press, feel that round. Inhale.
Three more. Exhale, press. Then inhale. Exhale. Inhale.
One more. Exhale, press. Beautiful, come back to plank, walk the feet back into Downward Facing Dog and then the hands one more time in the forward fold. Take the hands by the sacrum, interlace, and maybe this time just take the goofy interlace. Just lift up, give a little microbend through the elbows and let the head go.
So even right here, you can find the action in the legs of the inner ankles lifting up, outer ankles drawing in, might start to activate through the legs here a bit. If the legs are straight, lift the kneecaps. If they're bent, just engage the quadriceps. Exhale, release the arms. Walk back out, Downward Facing Dog, and this time just come right down onto the knees.
We're gonna take a moment to warm up the wrists a little bit. So flip the palms backwards, so fingertips facing the wall, and from here that might be plenty. And for some, you can start to shift your weight back as if you're gonna sit down towards the heels. And just pause. Finding a place that feels like a nice stretch, not overdoing it, just warming up.
And so they come back up, flip the palms. Take one hand, start with your right, let's flip the right palm down, and then just slowly rotate your weight as you put a little bit of weight on the right hand, just lightly, this might be sensitive. It's not often that we have our hand in this position. Just stretching out many of those antagonist muscles. The ones that are working in the opposite direction when we're doing handstand.
And then flip and then the opposite, take the left hand over, just nice little circles. I'm just checking out the range of motion. Then looking for a stretch, staying away from any red-hot sharp pain, right, we just want this to feel nice. Good. And then back onto the hands.
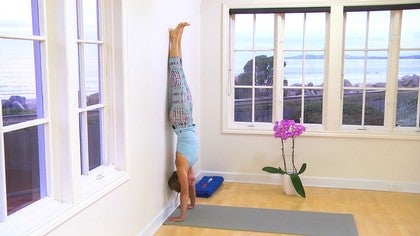
We're gonna go ahead and turn towards the wall and into Downward Facing Dog. So for the first one, we're gonna start hands six to eight inches away from the wall. And our goal is gonna be flex the feet, press the heels up. So we'll go up about 30, 40 seconds, hands six to eight inches. And when we come up, you're gonna inhale step, exhale, kick to come up.
So if you're at home and you're walls are painted, put on socks and be careful not to slam the wall. On an inhale, step forward, exhale kick to come up, right. So first one, we're gonna kick to come up, heels are gonna flex and press up. So from here, instead of sinking down, I wanna root through my hands, press up, and now I'm activating, I'm finding that spin in my arms. Good, broadening through the chest, through the back.
And my gaze can come towards my fingertips, right, not just soft. I'm checking in that I am not tucking my tailbone, I'm not fluffing my tailbone, finding neutral. My inner thighs are drawing back lightly, but not forgetting about the outer edges of my thighs. Got a few more breaths. And I always have to tell myself in this pose, just embrace that shaking, the unggajamaya for the shaking of the limbs.
As we're building shoulder stability and strength. Got to just sink in two more breaths. Press up, try to get a little bit longer. On an exhale, slowly come down one leg at a time. See if you can land lightly.
And then turn and put your bum on the wall. Knees can be bent and just come into Rag Doll. So anytime we go upside down, taking the time to just fold forward and not standing right up for risk of getting light headed. So grab opposite elbow, let the head go, and then start to work the legs towards straight again. It doesn't matter if you have bend or not, or if it's available, start to work towards straight.
I'm waiting for my flexy friends, put that microbend in the knees, so we're not hyperextending. And then even right here, let the shoulders go, break a couple of yoga rules right now. I know every yoga teacher in the world will tell you to pull the shoulders away, but for right now, just softening and letting go. Let the shoulders kind of come up towards your ears like earrings. Okay, exhale, release the hands to the floor, and then we'll come right back into Downward Facing towards the wall.
This time scooting the hands in about five, six inches from the wall, if it was difficult getting up the first time, keep the hands further away. So as we creep in, only if that first round felt all right. And then come back in to your beautiful Downward Facing Dog. Right, and check the hands, shoulder distance apart. Right, because that is where we're rooting.
So we really wanna double check, wrist creases parallel. And when you're ready, take an inhale, exhale to come on up. This time press the floor, point through the feet. So just feel the difference. You can give those little, as if you have high heels on, so press through, big toe mound, pinkie toe mound, not that I know what it's like to wear high heels.
(laughs) Good, and you can spread through the toes. And just notice what this does to your legs is it's a little different to draw the inner thighs back now. Good, and then always starting from the floor, root to rise for that scooping of the armpits. Good. Ribs draw in if they're jetting out, right, but only if they're jetting out.
Check in with the pelvis and the tailbone that we're not tucking and we're not fluffing, and that it's finding neutral. And just taking a few more breaths here. Notice if your energy starts to sink, like your head's dropping down, press the floor away, rise the feet a little higher. See if you can reach up higher in the wall, yeah. Two more breaths.
And exhale, one leg down, then the next. This time, in your forward fold, you're gonna bend, I'm gonna turn this way so you can see, you're gonna take your right arm around, the right calf, sweep it through, grab the left shin, and then the left comes around the left calf to grab the right shin, knees are bent, let the head go, right, so maybe staying here, or for some, starting to straighten the legs. So this draws the torso in. And then in this version, lift the shoulders away from the ears. Get a little shift of your weight forward, so we start to line up as we get more and more warmed up, the sit bones over the heels.
And again, activating through the feet, so lifting the arches and by doing that, take the inner ankles up. And then draw the outer ankles in. Exhale, release the hands. Turning back to the wall, bring your hands this time in Downward Facing Dog, if the first and second were easy getting up, bring the middle fingers to touch the wall. So this time when you come up, instead of taking the gaze forward down to the fingertips or a little in front, you're gonna have to take your gaze behind you.
So this can be a little fun, just a fun little drill, because sometimes you're bum will shoot you off the wall. So inhale, take a step forward and then lightly, you've gotta go up lightly, come up, good. So now, press, and this one you choose. You can go feet flexed, feet pointed, and then find the hands pressing. So it's like you're pressing down, you're rooting, but you're still drawing energy up and rebounding all the way up through the arms, shoulders, lifting.
Stay here a few rounds of breath. The tendency I see here is that like, "Oh, my goodness, I'm close to the wall, foom, "I can just let my body rest." But we don't want the body resting on the wall. It's only the heels. And again, you choose. You can flex the feet to try to reach up even higher, extend your energy, right, keep the bum off the wall, even the calves, see if you can keep those off the wall.
Play with the feet, whichever position you like. Right, while you're giving all of this effort, see if you can soften the eyes just a bit, and the jaw. Good, and when you're ready to come down, slowly, one leg at a time. And we'll come back into a forward fold. This time, we're gonna take the hands underneath.
Take the back of the hands to the floor, toes to the wrist creases. And then start to bend the knees, flex the elbows, let the head go and starting to straight the legs. As the legs straighten, draw the torso down. And then spin as you take the elbows back towards the calves, you're gonna scoop out the armpits. And so this should feel nice on the wrists, and just let the head go.
Again, shoulders are lifting up lightly. You might draw back the bellybutton to spine. You can here, you play with shifting your weight again a little forward to bring the sit bones over the heels. That's, so we release. Bend the knees, come back to Downward Facing Dog to the wall, and then you choose, five to six inches or six to eight, whichever is more comfortable for you.
And this one is bit more of a core exercise. We're gonna go up with a kick up with right then the left, left is gonna come down then the right. So we're gonna go through this a few times on each side. So when you're ready, choose which leg you're gonna kick up with first. And we're gonna step forward with the opposite.
So inhale, step. Exhale, kick to come up. So it's right, left, left comes down, so you're drawing in, right touches. Left comes up, so checking in if you have a favorite side you like to kick up with, I obviously do. Good.
Then switching right comes up, left, left comes down, right. Left, and I might've just repeated this same side. Good. Right, left, left, right. So see how lightly you can touch and how lightly you can touch the wall when you lift?
It might sound like you're smacking the wall and that is okay. Good, a few more. Keep pressing the floor away. And when you've had enough, go ahead and come into a forward fold. One more time, hands underneath, toes to wrist creases, bend the knees to start, and then straighten the legs.
Then slowly release. Come down to your knees. For this next one, you're gonna reach for your blanket, bring it onto a wood floor, tile floor. It won't work if you have a rug. So you're gonna lay it out.
We're gonna come into Downward Facing Dog. And work between Downward Facing Dog and plank. And from there we're gonna really feel that drawing upward. It's almost like an instantaneous Mula Bandha, Uddiyana Bandha to start to activate the core, the core muscles that are required to go up. So come on in to Downward Facing Dog.
So you might feel a little awkward. And good, on an inhale, just come forward. Exhale, lift the hips as far in as you can. Good, exhale, go back. We're gonna do 10.
Two. And slow. Three, and so the slower we move, the less momentum that carries us. And four. And you can play with which you like better to do, inhale as you draw up, or exhale will give you more space.
And because I always lose count, I think that's about three more. Good, one more. And then bring the knees down and come back to your mat. From here, we're gonna get back into Downward Facing Dog. And we're gonna do little fire balls at the wall.
So we're gonna practice hop ups. So that activation of Mula Bandha Uddiyana Bandha, that's what we want, that's what carries through when we're working through a Vinyasa, that light jump forward. But here, the goal is just to find either feet touch or maybe catching a little hover. So again, find your comfort place with the hands. Maybe it's four or five, six inches from the wall, or maybe a little further.
And to do this, you're gonna bring your feet in slightly closer, about six inches closer than you are in a regular Downward Facing Dog. Good. On your exhale, you're gonna bend your knees, take your knees out, and bring your gaze forward. So careful, if you go too hard, you don't wanna hit your head on the wall. So you're gonna gaze forward and then lightly spring up, hips lift, so maybe catching a hover, maybe feet touch, so it's there to protect you so you don't go all the way over.
Shooting up, maybe touch, maybe not. And come on back down. Right back in that squat and see if you can land light. Little frog jumps, whoops touch. About three more.
Good. Last one. Good, nice and slow. One more forward fold. Your choice, if you're feeling it in the wrists, then come back here, Padahastasana, or fingertips to the floor or hands behind the calves.
Good, and one final one. For those who are practicing to get handstand in the middle of the room. I'm gonna teach you a little kick stand. So you're gonna come to the wall, Downward Facing Dog, probably about, let's go five, six inches will be close enough. So when we kick up, we're gonna take heels or toes up, your choice, and then you're gonna take the back of your head to the wall.
So it creates almost this third contact point to find balance. So, when you're ready, find your hands, inhale step, exhale to kick to come up. And then take the back of the head to the wall. And you can maybe play one foot off, maybe two. So not stretching, not straining through the neck.
If this feels like too much, come down. It's just a nice, little contact point, to give a little bit more balance. And then when you're ready, come on down. Back to the knees. And from here we're gonna just wind down, coming all the way to the floor with some wrist stretches.
Okay, so go ahead and come down to a comfortable seat, and then lean forward creating fists, and take your knuckles together and the back of the hands to the floor. And as you do, lean in and see if you can press the knuckles towards each other and start to straighten the arms. All right, you might be here, they might be here, they might be much more straight. Keep pressing. See if you can create those fists still, and then still sliding the knuckles together.
Nice, then release. Take the arms out, press the palms as if you're saying stop. And then slowly, one finger at a time, just roll it down, like pinkie, ring, middle, shoom, make a fist. Great. Flip the fists up.
And then same thing going backwards. So pointer finger, shoo, middle finger, just roll it out. Good, stretch them down, press out wide through the palms, and then come back, come back to that stop. Good. This time start with the thumb.
Choo, choo, roll them all down, create that fist. Good, roll the fist up. Start with the pinkies. Roll it down. (sighs) Bring your hands into your lap, and just close your eyes.
So choosing right now, a lot of times what I do for building energy, you're just kind of shifting my energy is to do a practice similar to this. So I like to just sit for a few moments. If you feel like you need to drop in and take some time, feel free to lie in Shavasana. We'll just take a few moments just feeling this energy. Getting upside down can create this sweet little vibration.
If you'd like to stay seated longer, please do. Thank you for joining me for energy shift and getting upside down with me today. Hope to see you soon.
The Vinyasa Show: Brenda Lear
Mention
 |
Brenda Lear (Teacher) |
 |
Rob W |
 |
iOS |
|
|
Irina D |
 |
Aniuska A |
|
|
Brenda Tollefson |
|
|
Magdalena G |
 |
Frederic M |
 |
Lauri K |
|
|
Tray H |
|
|
Louise D |
Comments


You need to be a subscriber to post a comment.
Please Log In or Create an Account to start your free trial.
