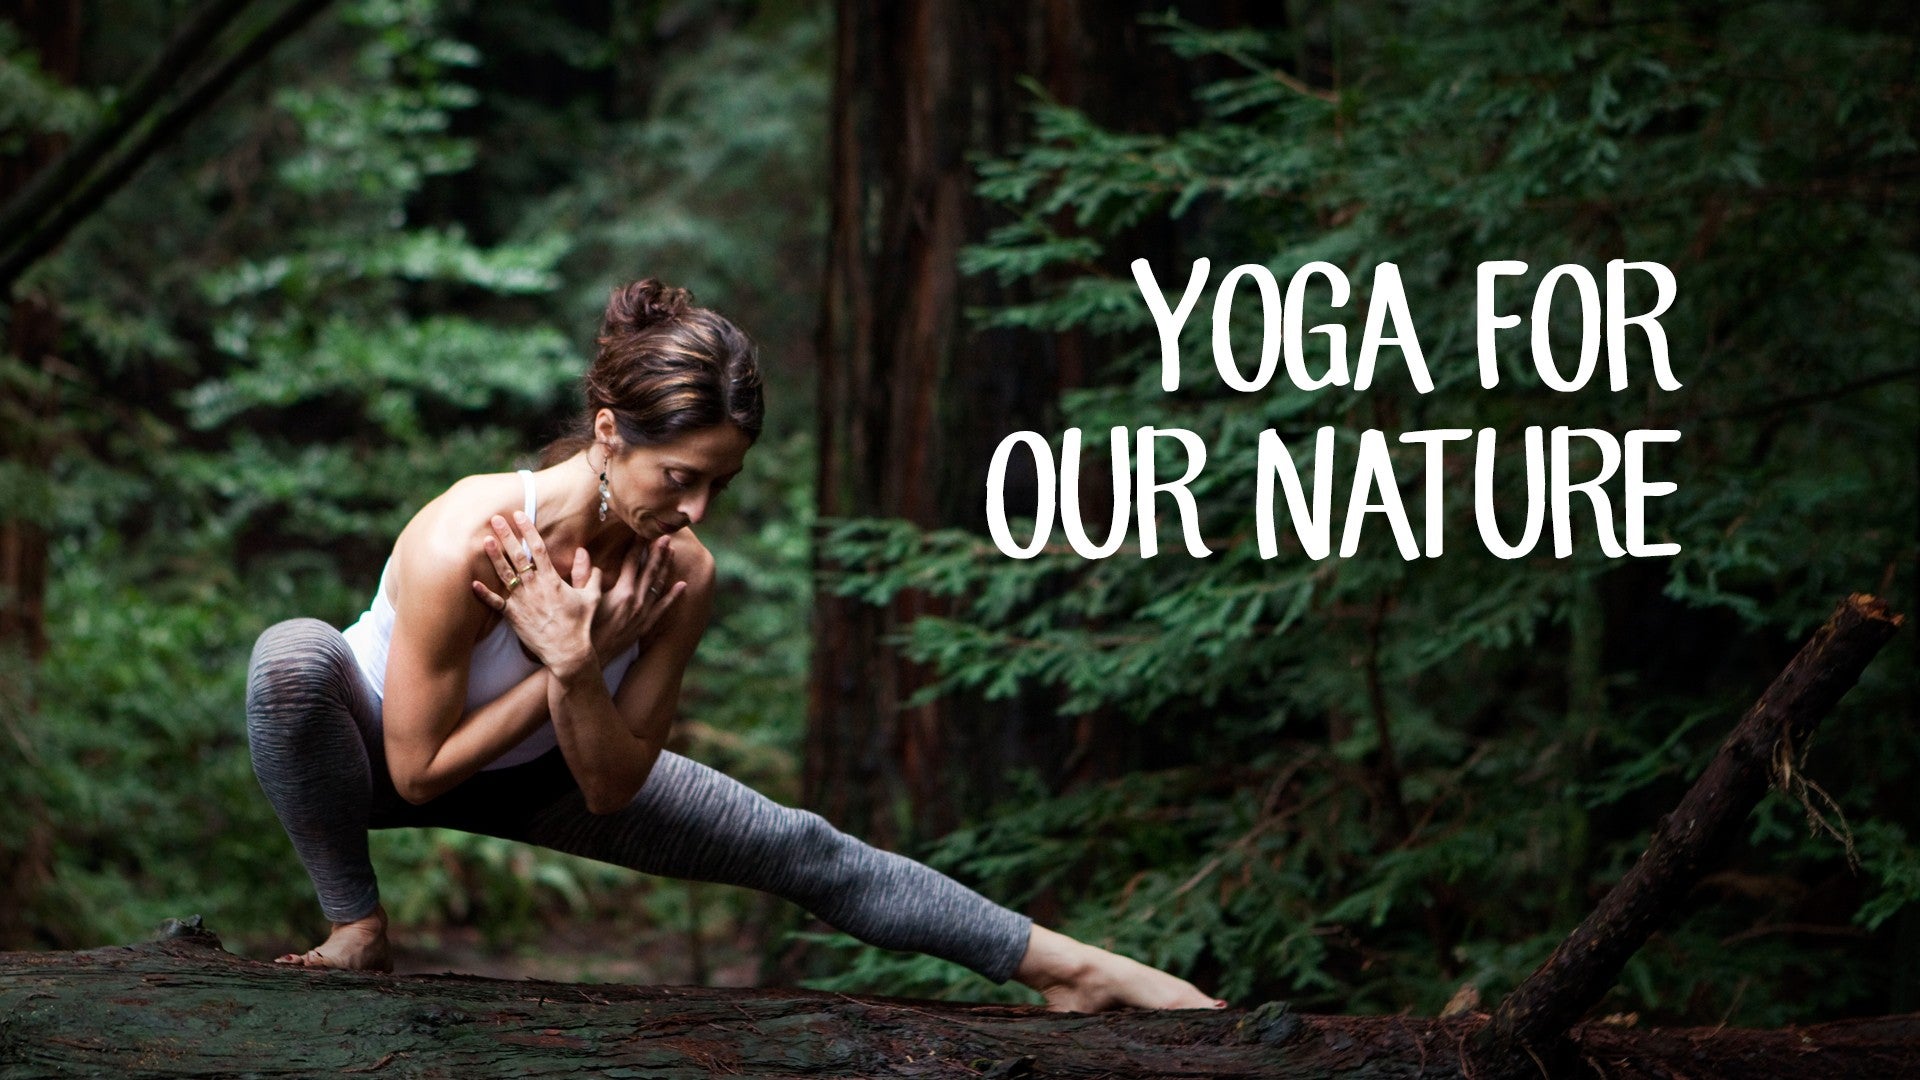
Description
About This Video
Transcript
Read Full Transcript
(ocean) Hello and welcome to the Pitta-Reducing Shorty Practice. I'd like to offer you this class as a way to help reduce potentially some of the stress we might be experiencing in our day-to-day lives and to have a class that's not so much goal-oriented, it's just a place to flow and relax and have fun and maybe smile a little bit more in the afternoon, morning, or evening, whenever you get to practice. So, we made it this far. Let's try our-- practice on our back is where we'll begin and all you need is a strap for this practice and a block for sitting toward the end. But for now we're gonna be on our back, so if you find a comfortable place where you can hug your knees in towards your chest.
I often like to take a position on the back when I am feeling stressed or in a sort of competitive mind-state or goal-oriented mind-state, just to try to let the ground underneath me support me for a moment. And if you're comfortable, close your eyes and allow yourself to yield into the ground to let the earth literally support you for a moment. And with a couple deep breaths, maybe exhaling through the mouth, sighing, making any sounds that you need to to liberate your body of some stress from the day. Something that may have created a little bit of excess heat, frustration, or impatience. And when we're ready to step more into our practice, I wanna invite you to hold on to your kneecaps with your hands and move the knees forward away from the chest so you can start making little circles with your knees.
And in this little Pitta-Reducing Shorty Class there's not really a right or a wrong way to do any of the poses, so I want you just to have fun and try to release some tension in the body. Go the other way with your circles as slow or as fast as what makes sense for you right now. Breathing in, breathing out, remembering there's no right way to do the poses. I'm intentionally choosing poses where we're not putting a lot of work in the upper body, which can tend to bring a little bit more heat up toward the head. So come to a neutral position, hold onto the front of the knees, but let your knees now separate.
So we're gonna let the knees move forward and then come toward each other and as soon as the knees touch, pull them back in toward your belly and chest. So the knees are gonna go wide, circle out, come back in, and bring the knees toward the belly. So just allowing yourself now to make these circles with the knees and finding a rhythm that feels good for you. You're always welcome to close your eyes if that's a better way for you to practice to go at the right speed for you at this moment. And the next time your knees touch, circle in the reverse direction.
Go out, then gather the legs in toward the belly, and then move them forward. Go out, circle in, and just a couple more times playing with that range of motion. As you can see, we're just moving through positions rather than staying. And then, knees touch, let your legs come up into the air, arms rest at your side, and just shake the legs out. Just completely shake the muscles away from the bones, hopefully that feels good, and then as soon as the legs are ready to stop shaking, put the left foot down, take your right hand up for your calf or the back of the knee, and just allow your hands to go up as high as they need to for you to start to feel your right hamstrings beginning to stretch.
And where we feel the stretch, you wanna relax the face, relax any goals, and just take a big breath in and a big breath out. And we'll drop that left leg to the floor, open your arms out to your side in a T shape, and when you exhale let that right hip leg roll over to the right side as far as you're comfortable and then come all the way back up. And three more times, exhale all the air out, roll to the left, come back up. Exhaling, rolling to the left; it's okay if your right shoulder lifts. Come to neutral, and then our last time exhale all the air out.
Inhale, lift that right leg up. Squeeze both knees into your chest then put the right foot on the floor, left leg up in the air, catch the back of the knee, the calf, and slide your hands up as high as you need to in order to feel your left leg hamstring stretch. So right in the muscles, trying to aim for the middle part of the muscle versus toward the origin. Take another big breath into your left side and then put the right leg all the way down. Arms out in that T-shape, and this time turn your palms to face down and stabilize with your hands as you roll your left foot over to the right. Exhale.
Inhale up to center, exhale as your foot rolls over to the sides, inhale come up. We've got two more to go, exhaling. Left foot to the right, back up to center. Last time, exhaling over to your sides. We'll come around to that neutral position, hug your knees in and rock and roll your way up towards seated position.
We're gonna come around into that cross-legged position. If you need any height to make your knees a little happier add any padding, otherwise sitting nice and tall. We're gonna do the seated cat-cow with your hands holding the knees, round your spine, lower your chin towards your chest. And then as you inhale, bring your chest forward and lift your gaze up. And a couple more times, exhale rounding the back.
Inhale, bringing yourself forward and up. In your rhythm, exhale back. Inhale forward and up. Last one. Exhale, round your spine. The seated cat-cow, inhale, look up.
And then back toward neutral. Then let your ribs start moving in that three-dimensional way like you might do maybe on all fours. Again, we're just reducing the amount of effort we're putting into the shoulders and upper body intentionally. Then at some point we let the circles go the other way. And there's no right or wrong way to do the circles but see if you can feel like you're creating some space in the belly area, around your digestive organs, maybe one more circle around.
And then come back up to neutral. Try to sit up nice and tall, raise your arms out to your side on the inhale. If we turn towards your left as you exhale, little twist, inhale back up to center. And then turn to your right as you exhale. The little twist, inhale back up to the center.
Lower the arms as we finish that one round. We'll try again, arms out to the side, exhale, turn to your left and your twist. Inhale, arms out to the side, and then exhale, turning to your right and your twist. Inhale up to the center and then exhale, arms down. We're gonna do starting the other direction.
Inhale up, as you exhale turn to your right as you exhale. Inhale up to the center and then turn to your left as you exhale. Inhale out to the center, arms neutral, and then lower the arms all the way down. One last time, inhale, arms up. Start going to the right as you exhale.
Inhale neutral. Exhale left. Baby twist. Inhale back up to center and then arms down towards your side. Let's turn over so that you end up on all fours facing this small little edge of the yoga mat. And when you get to your side edge here, if the knees can be together or close to each other it will sit back towards your heels, and as you sit back walk your hands over to the right maybe off the yoga mat.
Touch your left hand on top of your right hand and at some point lower your head down between your arm bones. And let your head drop between the arm bones, it's okay if your head does not touch the floor, and then feeling as your belly presses against your thighs maybe a little bit more breath awareness going into your back body. Take a big breath in as you stretch through that left side of the torso. One more exhale, with the head releasing between the arms. Then let your hands wander over to the left side so left hand might be off your yoga mat, right hand on top of the left, and then lower your head down between your arms, take a big full breath in toward the belly space and feel again maybe a little more space around that right side of your lower back, maybe through the side of your ribcage, maybe through the side of your chest.
And just keep asking yourself "Does this feel good?" And if it doesn't feel good, make any little minor adjustments. One more big breath here. And then one more breath out. Walk your hands straight out in front of you. Then we're gonna walk the hands in toward the knees and come up to stand on the knees.
If your knees need more cushion, make sure you add a little bit more cushion. We're just gonna keep the hands at the waist. So rather than using the arms in this one, what I'm gonna have you do is move your hips back in space as we turn so that the right ear is gonna come down and touch the floor. And then engage your back muscles as you rise up on an in-breath, the shins are rooted, and then turn so that your left ear is gonna come down to the floor on the exhale. Little ways to engage and strengthen the back.
Inhale, come up. And again, as you exhale turn so that your right ear is gonna come down to touch the floor. Engaging your back muscles, root your shins as you come up. And again, looking so that the left ear comes down to the floor. Ground your shins, inhale, come up.
Last time. As you exhale, let that right ear come down to the floor. Make sure you press down though your shins as you come up, and then turn so that your left ear comes down to the floor on exhale. And ground those shins as you come all the way up. Then from our neutral position, if we can step forward with your left foot and lunge through that front leg. You're gonna take your arms to the inside of that left leg and try to feel again how much your hips wanna come forward toward the front of your yoga mat.
You can walk the hands out a little bit more in front of you and then from that position we might stay right here and allow your chest to reach a little more forward in between the arms, or at least heading in that direction. Does this pose feel right for you? If not, make little adjustments. Some of you will bring the hands back in under the chest and some of you will like coming more forward. If you're noticing that things feel okay, you wiggle around a little bit and maybe even bring yourself down to the elbows and forearms for some of you, and if that feels a little extreme and you're noticing you're not breathing very well anymore, go back to a higher version.
The left knee can drift away from the left shoulder but try to keep that whole left foot on the ground. And take one or two more breaths where you are here to open the front of that hip. And then if you've come down to the elbows we're gonna put the hands back on the floor, tuck your back toes under and lift your back knee. So we'll step the left leg back and you end up just for a moment in plank and then make a little transfer back into your downward-facing dog. And then we'll come down with the knees, and you might walk your hands toward the knees so it's easier when you lift your spine.
Take the right foot forward and then bring your hands to the inside of that right leg. So again, adjust the position so that it feels good as you bring that left hip forward and as you bring your chest forward through the arms. Does this feel like the right amount of opening and stretch for you? And you know it's the right amount when your breath is slow and stable and rhythmic. And if that's true and you want to explore maybe another place in this adventure, you might bring your hands a little bit more out in front of you to go deeper.
And if that feels interesting, there's more permission to go deeper into the pose. You might explore coming to that edge where your elbows come down, and your right knee might even drift away from the right shoulder. In today's practice, try to keep your whole right foot rooted into the ground, even if the knee is opening to the sides. And then take another moment or two here. If your elbows came all the way down, bring your hands in under the chest line, come up to straight arms.
Curl your back left toes under, lift your back left knee and then we'll slide back into your downward dog position. And with your feet apart, maybe wider than your hips and shoulders, let your hips swing over to the side so much that your feet are forced to turn to the longer edges. And then come around to the center, you're on the ball of the foot, and swivel over to the opposite side, getting a nice side body stretch. And then moving slowly from side to side. Moving from your feet towards your hips.
So the feet start the movement, eventually feel it through the side of the hip and waist. And then a couple more times, allowing yourself to go side to side at the pace that feels good for you. You're breathing in, then breathing out. Then from that exploration, one time just trotting through the legs, bend the left knee, straighten the right. Then do just the opposite for just a moment, stretching the back of the leg.
Then we're gonna come down to the knees so we're not spending too much time on the arms. And this is where you wanna grab your block and your strap and we'll come into the shape of vir rosenum, where you might turn your block so you're on this medium height or flat height. I usually go for the wide version for a little bit more surface to sit on, and then come up to a seated position. So in your seated position, if you'll take your strap and unroll it and you want to have, if it's a buckle, the buckle in one hand so the buckle's not hitting the ground. Then we'll let the arms come up into the air above the shoulder line.
So try to create a little bit of tension in that strap and try to look straight ahead with your ribcage right over the pelvis, versus with the ribs out in front of the pelvis. So as much as you can, you're bringing attention to the backside of the pelvis and grounding. When you're ready to inhale, the hands might slide wider apart as you take your arms back behind you. Keep that tension and then inhale the arms up overhead, and then keeping that tension as the arms come forward and down. So again, trying to go up with your exhale going back.
And if you need to keep adjusting the hands, wider would make it easier, the hands narrow would make it more challenging. Since we don't want to make this practice too challenging, make sure you've got plenty of distance between the hands so it's easy to glide back and forth. Just a couple more times for a little shoulder vinyasa. One more coming up, and one more going back and down. When the arms come up, this next round, let's take the left arm in towards your ear and then reach that right hand either up between your shoulder blades, and the top hand is gonna walk down toward that lower hand and catch the strap or meet the opposite hand and clasp the fingers.
So from behind your back your fingers might be clasped in that way. Whatever feels like the easy choice for you. Please choose the easy choice today. And if it feels comfortable, you might lower your gaze or even close your eyes and bring your attention back down to your pelvis and see if you can sit into the back of the pelvis, let those front ribs stay right over the pelvis. Even if it means you might not get the biggest stretch up into the chest area if you choose to stay a little more neutral in your lower back.
Take a few moments trying to lengthen from the armpit up toward the top elbow. You're relaxing the face, deepening the breath. And then we'll slowly, slowly release that first side and as you take the arms back up into the air then holding the strap with that right hand and reach left hand up between the shoulder blades. So you're either tugging on the strap or bringing your hands together. Oftentimes when we gather the strap we push the ribs forward and do a big back bend, so see if you can come back into a neutral position as if you are standing upright, where your ribs aren't in front of you, the ribs are over the pelvis.
In that way, with that clasp, neutral spine position, soften the gaze or even close your eyes and just try to feel the flow, the movement of breath coming in and out. Just noticing "How does this feel right now?" Do we need to ease up on the strap? Do we need to create a little more space so that it's easier to breathe? How can we make this not challenging? Take maybe one or two more breaths.
And then releasing that side as you're ready, and we can get the strap out of the way. We can sit with a block to the side, and as we sit with a block to the side, I'd like you to bring your feet out in front of you. And with your feet out in front of you, this one's called tar rasina, so it's a little different. Rather than pulling the feet in toward the pelvis just notice how far does it feel comfortable to move the feet away from the pelvis. And there's no right or wrong position, so you might explore how far to go.
Might use the block in just a moment. So if you're reaching forward towards your feet, maybe pressing your feet together, allow yourself to start to bend forward from the hips, to drop the elbows toward the outside of your shins, and imagine somewhat of a forward shape and not being worried "Am I doing this "right or wrong?" But "Does this feel good?" Can you come to some forward position where you're bringing awareness to the hips, stretching, opening. Perhaps you feel something along your spine. I have the block here as an option. If you're coming forward and you'd like support for your head to make it a little bit easier.
So you could rest your head on the prop, could turn it taller if that's the right position for you in coming forward. The whole point is to make this a little bit easier. Elbows could even come, just to give you one last creative option, to hold your head in this way. So which one allows you to breathe a little bit more? Which one gives you a little bit more permission in your body to keep going deeper into the adventure of the pose?
With the breath as your companion, and allowing time again to take you a little bit further into the shape. As always, way more interesting with your breath. And taking two more rounds of tar rasina. And then taking the spine up nice and tall when you're ready moving your props to the side. Then use your hands to help you bring your knees back together.
If you can turn back toward the long edge of your mat and as you turn toward the long edge of your mat we'll get ready to move back down to the floor. And as you move back down to the floor, trying to find that comfortable space where you might do one more hugging the knee in toward the chest, any rocking side to side, to help prepare you again for a little short shavasana, the feet on the ground arms at your sides. And always know you have permission to have the knees here buckle in toward each other as one closing shape or to let the legs be all the way down to the ground for your shavasana, whichever one is best. So your choice. And then wiggle around until you feel stable in your seat.
Feel the contact point where the back of the head is touching the ground. Notice and feel where the back of the shoulder points are with the floor. Feel the elbow points on the ground, the knuckles, the wrists. And places that are meeting that cool surface. Notice which parts of the back of the ribs are touching the ground, and notice which parts are not touching the ground.
Where is there space? Allow things to be, naturally unfolding, as you bring your attention down to the back of the hips where they're meeting the ground. Sense and feel where the back of the legs are in relationship to the earth. Any sensations down around the calves. The heels.
Allowing yourself to yield into the earth. And in that yielding, in that softening, a little bit more waking to the present moment. And surrendering to awaken to the breath and the slowing of the breath as we decrease all movement. And can we cool our pitta by going into shavasana with a little bit of inner smile. Knowing we're taking care of ourselves in this way.
Taking a few minutes each day to tune in to more of a yin-style practice. To maintain that fluid, juicy quality of the body and the mind. And taking the next few minutes in silence. Surrendering to awaken. If you have the time to stay longer in shavasana you might hit pause about now and join us when you're ready.
Everybody else, just making little twinkling movements with your toes and fingers. Circular movements for the joints and wrists and ankles. When you're ready, bend your knees, slide your feet to the floor, and then find yourself over onto your right side, perhaps with your eyes closed. And leaving behind what you are able to leave behind, and perhaps coming up with your eyes closed. As much as possible, keeping your senses inwardly focused as you come to a seat with height or without height.
Hold onto the knees, lengthen up into your spine. And then a quick little practice for bringing your senses inward, a little mini time-out from a stressful day or time in life is where if you open your eyes and you bring your thumbs they're about to go into the ears, the san muki mudra, index middle finger would go over the eyelids and keep the eyes closed. Ring finger is beside the nose but you breath through your nose, and the pinky's outside the lips just as a gesture reminding us to keep the mouth closed. So as soon as you're ready, we'll put the thumbs into the ears, block out all the sounds, and take five breaths, keeping the senses inwardly focused. When you're done, return your hands back to your knees.
And when you're ready, begin. When you release the hands down from the face, can you try to maintain that feeling that you had in san muki mudra? The sense of staying calm, relaxed, deep inside. And perhaps we try to recall that feeling throughout the day or when we meet a stressful time. Keep our pitta cool and calm.
With the hands gathered in front of the heart center, with gratitude for the practice of yoga and all the teachers' teachers, passing down this wonderful practice. Namaste and thank you so much.
Yoga for Our Nature: Dosha Jam


Comments


You need to be a subscriber to post a comment.
Please Log In or Create an Account to start your free trial.
