Description
About This Video
Transcript
Read Full Transcript
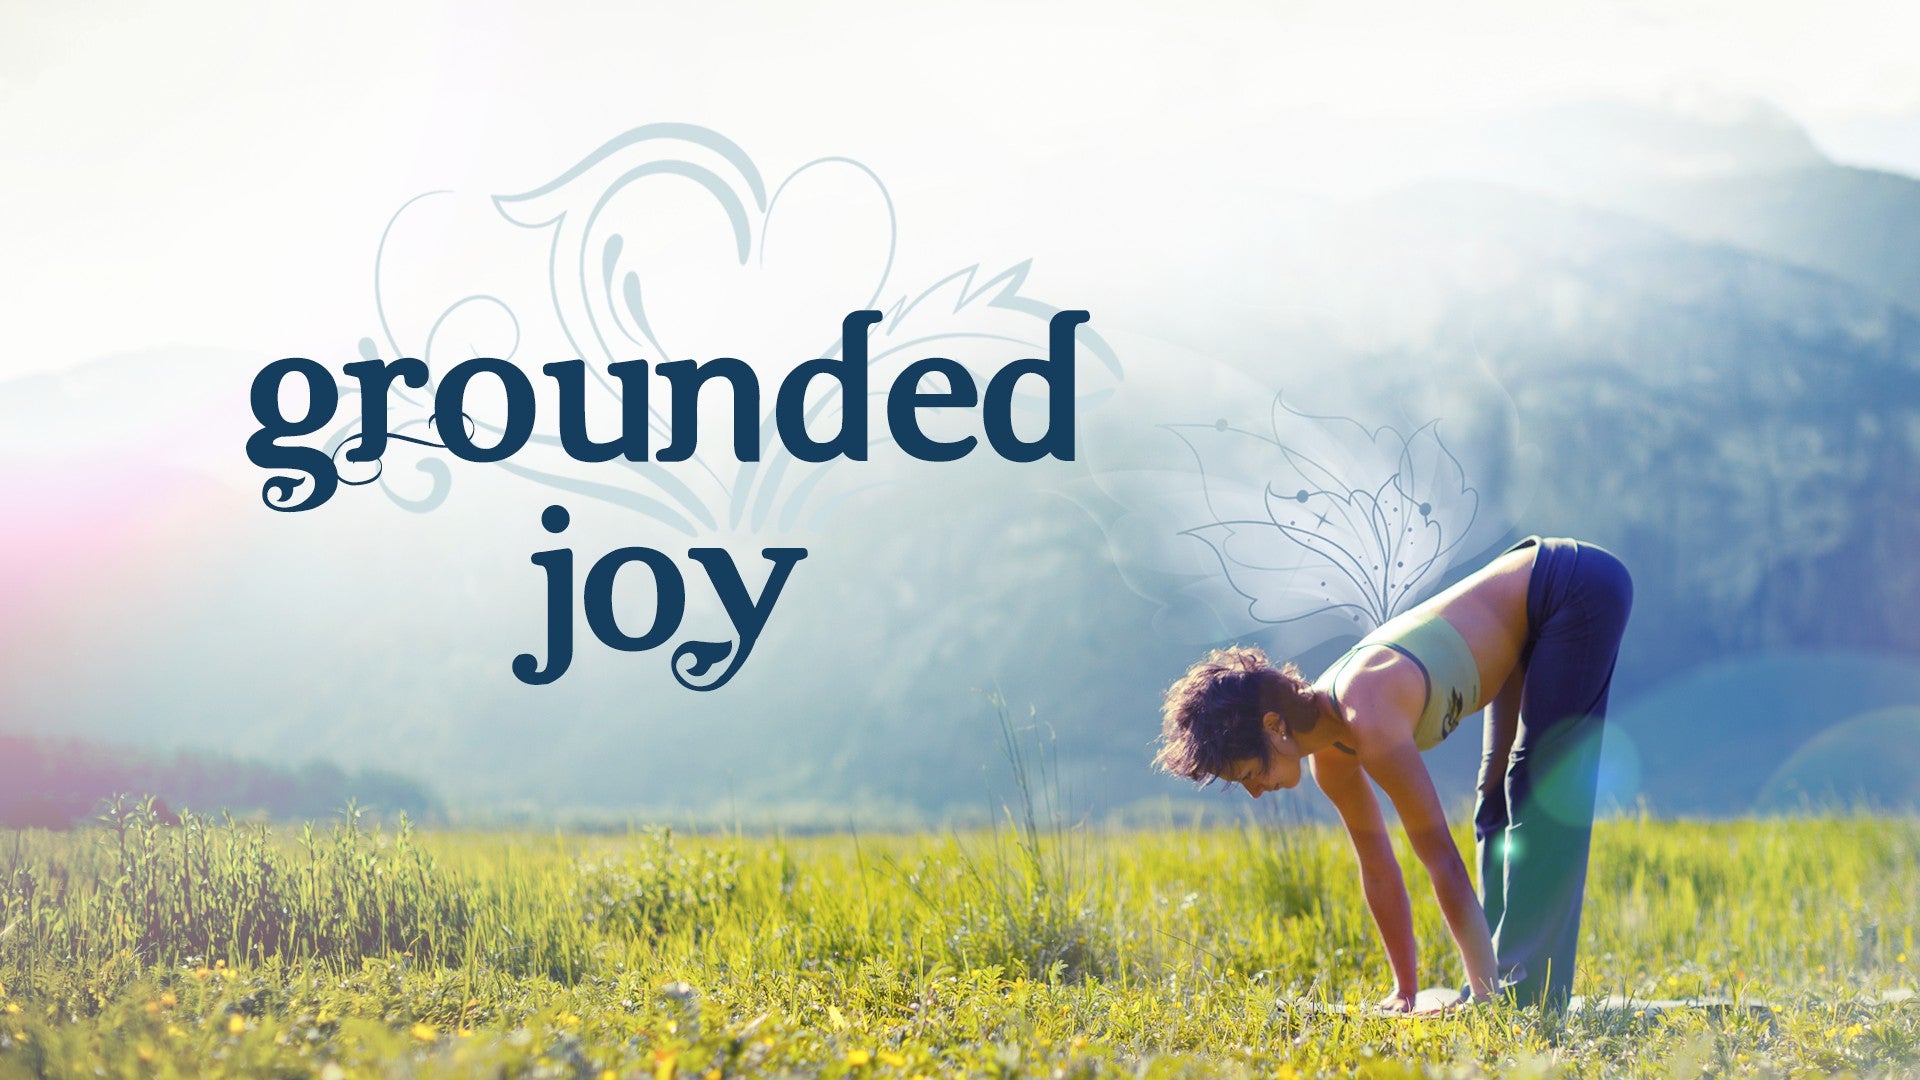
(ocean wave crashing) Hi. Maybe some of you are familiar with the concept of root to rise, leaning your weight down into the earth, to go up. So I've been playing with that for a long time, and now I'm getting really interested in the width of the body. So not only expanding, but also contracting into the center. So let's explore that together in a seated position.
So you can get comfortable, maybe you want to put something under your sit bones. Let your hands come down on your thighs. Maybe for some of us, if we slide the hands back a little bit, then the shoulders will center into the middle of the joint. Let your eyes close. Take a few breaths.
And ground your experience. And then let your hands come together, and just rub a little bit of heat in between your hands, feeling the friction, the energy, the heat. And then pause, and turn your hands so that one is facing down and one is facing up. And then start to link your movement with your breath, inhaling your hands come apart, and exhaling they come back together. Soften your jaw, and your mouth, and your belly.
Feel the simultaneous movement, down with the breath, and up, as you inhale and exhale. And then turn your hands so that they're more in a prayer fashion, and take a few breaths, linking movement to breath, by inhaling expanding and widening, and exhaling contracting into the center. You might find a little ujjayi sound to the breath as we're moving into a flowing practice. And just check in now. And one more here, as you inhale and expand, can you feel the back of your ribcage widening, the back of the diaphragm filling up with breath?
The back of the lungs expanding. And as you exhale, compressing into the center, but being aware that the center is hollow, spacious, because there's more energy in space than matter. Letting your hands come down to your knees, one more breath here, allowing anything that's tense in the body to drain, to release. And then slowly letting your eyes open. So let's come up to standing.
Take a stance at the front of the mat. Spread your toes, root down into your toes and your heels, and soften your knees a tad, so that not only do you feel the weight sink into your feet, but you feel your lower back isn't lurching forwards. So the lower back starts to relax, the lumbar spine starts to relax. Center the shoulders in the middle of the joint. Take a few breaths, and as you root down into your feet, intensifying the weight into your feet, feel the crown of your head lengthening up.
And now on inhale, widen the ribs, widen the back of the diaphragm, and look up. Exhaling, bend the knees a tad full forwards over your legs, let your head release. Inhaling, come up halfway, lengthen the spine. And plant your hands, exhaling, lean into your finger pads, rooting, bend your knees, and find the shock-absorbing quality in your legs as you hop back, really landing in your legs, and straighten your legs a little bit more, where it's comfortable for you, with the feet together in downward-facing dog. You might wiggle your feet back, find yourself being comfortable here.
Press into the index finger and the thumb, and then lengthen the shoulder blades, keeping space in between the scapula. Let the head hang. Let's roll into a plank pose, taking it slow here, and just pause. Let the inner knees magnetize towards each other, and feel fullness to your back body, and a hollowing in your armpits. Exhale, come all the way down onto the ground, to start.
Inhale, tops of the feet on the floor, and roll up through the spine. A spinal roll into a cobra position. Exhaling, come up onto the knees, or maybe for some of you, tuck the toes and come up into a plank pose. Pitch the hips back, separate the feet, come into downward-facing dog. Allow for a few breaths, feeling this quality of rooting your hands and feet, especially your toe pads, and your finger pads, and then, with that rooting, feeling a hollowness coming up into the belly, up through the armpits, up into the palate, the rebound force.
Exhale, bend your knees. Find a strength in your legs, and again, that, kind of as if you had trampolines in your joints, and then step, or hop, towards the top of the mat, inhaling there, and exhaling, folding forwards. And then coming up, root down. See if you can keep a softness through the body as you come up. The intensification of the weight is into the feet, and then exhale, your hands down by your sides.
Let's try it again with a little less talking this time, so you can find the widening quality of your breath, and the lengthening quality to your body. Inhale the arms up, softening the knees, letting the organs hang from their ligaments. Exhale, folding forwards, up and over the groins. Inhale, finding a link to the spine through the crown of the head, and exhaling, hopping backwards, stepping if you like, to really land in the legs. Feet together, downward-facing dog.
Inhale, rolling in towards a plank pose. Maybe you will need to wiggle the feet back to get a nice long plank pose. And then exhaling. Some of you might prefer to take chaturanga position, or come on to the belly. Take cobra, or you can push your toes back, roll over the tops of your feet and find an upward dog.
Just being gentle in the low back here. Exhaling, I like to take my knees down, separate the feet, slide the hands back a tad. Lean into the finger pads, tuck the toes, and just pop yourself up into a downward-facing dog. That way, you actually don't have to fidget around too much. Let your head hang.
Let's start to feel that leaning quality, and intensify it now into the index finger and the thumb, and the big toe, so that it rebounds up to lengthen the inner bicep and the inner thigh. Seeing if you can dive up into the wholeness of the central channel of the spine, and find a bit more space in between the pieces of the spine. So let's exhale, bend the knees, finding that quality, and stepping or hopping forwards. And exhale fold. And inhale coming all the way up.
Exhaling. So I really didn't talk much less in that one. Maybe we'll try it again with a little less talking. Breath and movement, it's a habit of mine. Inhale, the arms come up.
Exhale fold. Just feeling, inhale lengthen. Exhale, dog pose, feet together. Inhale plank pose. Exhale lower.
Inhale soft, wide shoulders, upward dog or cobra. Exhale spinal roll, downward-facing dog. And breathe. Rooting and elongating, widening and centering, soft eyes in the back of the skull. Find the bounciness in your joints.
Land and then inhale, and exhale. Root into the feet, elongate the body. Widen the diaphragm, inhale and exhale. Step your feet hip distance apart. Big toes can be a little bit more in than the heels.
Inhale, let the arms rise, without pitching the upper body forwards or the groins. Exhale, soften the knees, fold forwards over your legs. Take your big toes, inhale get long, and then exhale, fold the feet, elbows wide. Let the top of the head release towards the floor. Let the elbows widen so that the base of the neck has some breathing room.
Root into your feet and intensify the weight into your feet. Lengthen the inner thigh line. Inhale, come up a little bit. Exhale, release and just rag doll your arms, palms facing up, let your head hang. Root down into your feet, and on the inhale, come up as if you were one piece, one muscle.
And exhale into the center. Rooting down, inhaling, coming up, widening. Exhaling, continue to feel longer and heavier into the feet. This time, let's lean into the heels, let the feet come up, and see if you can slip the hands under the feet at the same time, which is kind of fun, or you can do it one at a time. Exhale, fold forwards.
Again, feel the breadth of the base of the neck, and feel the full weight of the head. Let's just take a few breaths here. Feeling the back intercostal wall behind the lungs expanding. And maybe shifting the weight a tiny bit forwards, so the sit bones rise sort of shamelessly. (laughs) Come up a little bit, slip your hands out.
Exhale, rag doll your arms. Let your shoulders get gooey. Lean into your feet, soften the knees a tad, and inhale, come up as if you were one piece, one muscle. Exhale. So center your right foot, take your hands at your lower belly, this is sort of your power center.
And it's also a natural dome in the body below the navel, moving back towards the spine. So let's let the left leg rise, and we're just going to float a little bit in a transition, it's sort of similar to a tai chi movement. So let's shift back as if we were going into triangle pose, trying not to take the knee too far over the toes. Stabilizing around the knee joint, and just let the toes tap on the ground, big toe especially, and then just come back up. So it's sort of a teeter-totter, with your torso shifting forwards and your leg leaning back.
See if you can make it as smooth as possible. And also, see if you can sort of floss through your muscle tissue, so that it doesn't feel like there's avalanches of tension anywhere, like in the low back, or in the quadriceps. I love this movement, because it just reminds me to be aware in the transitions as much as kind of landing in the final pose. Make sure that knee doesn't move medially inwards as well, so keep it steady. This time, let the big toe land, and then the second toe, maybe the third toe, fourth toe, and then the fifth toe, and then allow the heel to land.
Let's come up moving into triangle pose, so the back arch and the front heel sort of line up. Move your left hip bone more towards the floor, so it lines up with your knee. It's almost as if your belly is rolling to the right. And then clip your right hip joint back, come up and over the hip joint, and take your hand where you'd like to have it. Some people can come onto the floor, and if you did have a block at home, for a lot of this sequence, you could use the block underneath your hand.
And for a lot of people, that will give a lot more space in the front hip joint, so it's up to you. But I'm going to do it without a prop for today. So we'll just let the hand come comfortably, let the left arm rise up. And as your belly is rolling down and to the right, your chest can roll up and to the left. I learned that from Angela Farber.
So the shoulder blades drop and widen, and you're in shrikon asana. So we're going to try that rooting again by bending into the knees, really feeling your feet, and then you lean into your feet, see if it's possible to float your bottom arm off. And if that power through your legs and your inner thigh line can kind of dive up to the front of your spine, you can feel that it's quite comfortable and not compressive in the back. Let's let the hand come down, shift the weight into the right foot. And again, you might want a block for this one, but shifting into ardha chandrasana, or half moon pose.
So we're going to rise up the back leg. I like to be up on the fingertips. And again, I'm going to take this left sitting bone and sort of roll it down, sliding the belly to the right, so that my sacrum area is nice and wide. And then I'll roll the chest, ribcage area, right lung rolls under the left lung, and rise. So if you have no knee issues, and this is interesting to you, bend your bottom leg, really root down, and then as you press the earth away, and the earth comes up towards you, you might be able to float the bottom arm.
Looking down is a little easier here. And then exhale, rotate yourself so that that back leg is still airborne, and your hands come down onto the floor, or on a block. Let the inner thigh of the back leg roll up, and breathe for a couple of moments. If it's interesting to you, root down into that bottom leg by retracting the leg, and then extend, and allow the rebound force to come up through your body. Maybe take your arms out to the sides.
Let's slowly, as if we're doing that tai chi transition again, let the back leg land, and inhale and come up. So make sure if you have wider hips that your feet are kind of underneath your sitting bones instead of on the same track, for parivrtta trikonasana, or the revolved triangle pose. So let the left arm rise up, and also the left hip bone here can roll towards the front of the mat, allowing the whole left side body to open away from the spine. And then clip the pubic bone way back, and come down. So block might be interesting here, or you can take the hand on the inside of the foot, depending on your twisting mobility, or on the outside of the foot.
I like to just check in with my sacrum here to see if it's relatively level. Take a breath. This is a really nice place to sort of pull the right femur bone back into its socket. And, as if your hips were a steering wheel, you can sort of turn them to the right. I could stay here for a long time, but let's move on.
Let's roll the left lung under the right, so you're moving from the inside. And slide the right arm into an opening. And breathe. This is a little bit trickier, but if you bend the knees, keep them in track with the ankles, and then see if you can sort of lift up and flow for a moment, without compressing the right joint, right hip joint. Let's come down, and inhale, press into the back foot to come up.
Take the arms forwards, and just slide them back, letting your shoulder joints relax. Also, again, that flossing feeling through your joints, so inhale forwards, and exhale, take the hands behind you, get a little slumpy here, to take your hands into maybe fists together, like that. Or maybe a reverse prayer. So you can start the reverse prayer by having the pinkie fingers together, and then maybe each finger finds each other. And you see if you can have the shoulder blades sliding down the back, and wide.
So inhaling, allowing for a little back bend to happen in the upper chest, and then exhaling as the pubic bone tries to find the tailbone. Come up and over the right hip joint, and fold any amount. So it's so personal what these postures look like. For some people, you know, they're more comfortable coming quite deep, whatever that really means, because depth can really just be your experience of the posture. But maybe it looks like it's quite flexible, but people feel it differently.
Sometimes coming up and just being here, you can create more space in the right hip joint, and actually move around the joint space, instead of compressing it, if that makes any sense. So, from here, we can sort of bend down, and really intensify the weight into the right foot. And then start to shift the weight forwards, and the crown of the head moves forwards, lengthening the spine, coming into virabhadrasana three variation. You can breathe here. If it's possible for you, and you sort of feel the pelvis is floating up on top of the right femur bone, you can come into a little bit of a teeter-totter here, and a standing split.
And breathe. For some people, it might just be better taking the hands down on the floor, and then you might soften the elbows towards each other, and come a little bit further forwards. So a lot of us can just roll open here, but I kind of like to bend this knee, take it behind the standing leg knee, and then keep the internal rotation of this leg, and see if I can maintain that as I reach the airborne leg into the sky. Let's exhale. That's probably enough on that right leg, and just fold.
Again, rag dolling the arms. Lean into the feet, inhale, come up as if you're one piece, one muscle. And exhale. So might be a little quicker on the other side, just because we know it. So let's start with the hands at the lower belly power center.
And just start with that really fluid, soft tap, and standing, and you can bring this knee right into the chest, which will help to open up the lower back space. Just exploring the stability in the left knee. The connection to the midline. And then maybe, let the big toe drop. Second toe, third toe, and if you can spread your toes enough, you can actually articulate each one, and come up.
So again, heel to arch alignment, roll the right hip forwards, let the belly slide to the left. Then come up and over this left hip joint. Take your hand where it's comfortable. Roll the chest in the opposite direction of the hips, so chest is rolling to the right, left lung is rolling under the right lung. And there's space in the scapula.
Bend, retract, intensify the weight, especially into the front foot. And maybe float the arm here. See if you can feel an evenness on two sides of the spine, the tone in the body. Shifting into ardha chandrasana. And again, rolling the right hip down and the left chest up.
Seeing if you can keep a neutral wide back. And then again, if you'd like, bending and floating for a moment, so this is not easy, it's a challenge to feel the legs feeding up into the spinal line without compressing, and over-trying. And then roll the belly down to the earth. To center here, take a breath. And then maybe bending, and seeing if you can catch the rebound force.
So we're sort of, we're intensifying the weight, but we're leaning into the earth. So it's not like we have avalanches of tension everywhere, like kind of bulginess in the back and the thighs. We're just seeing if we can keep an evenness of tone all through the back and the legs, up through the crown of the head. And let's take the back leg down and come up for revolved triangle, parivrtta trikonasana. So inhale, let the right hip cone slide forwards, let the arm come up.
Then exhale, clip the left hip bone back into the socket, find your space of rooting with the arm. Maybe check in with the pelvis. Feeling the right lung roll underneath the left lung. I like to move from the organs sometimes, because it's moving from deeper inside the body, and somehow, for me, that keeps the skin a little bit soft. So if it's there for you, bend, and float, or continue to keep the bottom arm grounded.
And you know, if I was doing this at home, I sometimes take a little bit longer in those postures. So you can slide the arms forwards, and just floss through the shoulder joints. Just relaxing, inhale forwards, and exhale with soft shoulder joints, finding the reverse prayer, or maybe the fists together. Inhale, find a little back bend, and exhale, folding over the front leg. And choose your space.
Remember to move around the joint spaces, as if they were pockets of air. And coming into the standing split. Maybe the hands come towards the floor. You find that internal rotation of the top leg, so that the big toe line gets really bright. And exhale.
Forward fold. Get liquid soft, and then root down, wide in the ribcage with your breath. And inhale, come on up. Exhale. Beautiful.
So let's look at handstand, without actually going into handstand, which is a really nice practice, especially if you don't want to weight bear on your hands. So take the feet together, and soften the knees again. So when you soften the knees, you're actually sort of letting, what I mentioned before, is the organs hang from their ligaments. So there's actually like a downward movement, an intensification of grounding into the core of the earth, and the lower back is getting longer. And then with that, we're going to take the arms up over the head, to keep them shoulder-distance apart.
And then flip your hands as if you were pressing into the floor. So flip your hands up, and this is going to take a nice flexion into the carpal tunnel. Magnetize the elbows towards each other, so there's this sort of like wrapping in, where the outer sides of the armpits and the ribcage get nice and wide. And we're going to explore this a little bit in different practices, but as the back is neutral and wide, you can kind of rest into it. Like leaning the spine back into this hammock that you've created through your back.
And then just like bend, and then extend, and press, so you get a bit longer, and you just feel this core align, from your big toes all the way up through the crown of your head. Then take a breath. Common mistake in this posture is to just thrust the ribcage forward, which is easy to do. See if you can keep the ribcage soft down towards the pubic bone. And exhale.
So that might be just interesting for you to try, but if you want to flip it upside down, let's take a look at it. And so we'll come to the front of the mat, and just without too much ado, inhale the arms up over the head. Exhale, fold forwards. Inhale, lengthen the spine. Exhale, feet together, downward-facing dog.
See if you can make that quiet. Inhale into the plank pose, exhale lower. Inhale, finding the sacrum moving in and up, the tailbone moving down towards the pubic bone. And exhale, downward-facing dog. So take one leg forwards, the one that's most comfortable to take forwards, and you're going to find your kicking leg.
And then, as you root down into your hands, finding the index finger and the thumb, you're going to lengthen the bicep line again, so that you feel like the inner armpit, sort of the minor area way deep in there, is deep and hollow. This'll stop you from getting iron rods in your chest, from doing this stuff over and over again. So allow that back leg to float, and then, as you lean down into this bottom leg, you're going to think about, and this helped me immensely, is taking the space in between your shoulder blades up first, and then taking your hips up over top of that, if that makes any sense. So, space in between your shoulder blades comes up first, and then the hips come over. And that prevents you from collapsing in the chest, and going into a pack bend.
So let's try that. It's also kind of like a puffiness through your kidneys. And just do it a couple of times. Like get comfortable with that. And for some people, if you really catch it, you can bring the top leg up, and maybe you just find that little relaxation through your knees, aiming the heels up and breathing.
So let's come down, rest in a bit of a child's pose after that. Slide the hands back, let the forehead come down. Just weeble, wobble a bit. Get liquid soft. And roll up.
We are going to do it on the other leg, because oftentimes we have one side that we really love to move up from, but that can create like a torque through the pelvis and an asymmetry over time, so even if you're not successful on the other side, it's just nice to explore that space. So let's try that. So just coming into your downward-facing dog. And it's kind of like, kind of like you're a pit bull here, like taking your elbows out to the sides, and then kind of like pit bull legs, and then shew, wrapping the inner elbows in towards each other. And taking one leg forwards.
And then think about that, the space in between your shoulder blades is coming up and over your hands first, and then your hips. And just do it a couple times. And then maybe if you catch it, it's interesting. And you just find that soft, wide open back, it's like you have a hammock, and you can rest your spine into it. The fingertips are super strong here.
So let's come back into this child's pose. And just wiggle a bit. So I didn't mention this, but some people, when practicing handstand, might like to go to a wall. I've found that kind of just jumping up and seeing if I can find the space on my own in the middle of the room, has led me to be a little bit more confident without using the wall as a crutch. But if you want to use the wall, please do.
Sometimes it just prevents you billing a lot, which is actually okay, too. But let's come forward into either a kneeling position or cross-legged, so let's do a little wrist release now, which I really like, after any hand-balancing practice. So take the thumb into the center point of the palm, wrap the four fingers around, and then take the arms up. Bring the shoulder heads back into the joint, and then turn your fists here, and like mainly your thumb, down towards the floor. See, you'll feel like a nice stretch coming into the top of the hand, kind of an opening through the hand bones.
It just feels really nice after anything that you've worked with on the hands, or tu-da-ran-gas. And take a couple breaths. Let's let the hands come down, just shake out the hands a little bit. Take the fingers out to the side, and just allow your one ear to come towards one shoulder. You can turn the chin down towards the chest.
Roll across the chest, and find the other side. Letting the breath be wide in the back of the diaphragm, and the intercostal wall behind the lungs. And let's lie down for a short shivasana. So usually, I like to do shivasana for at least 10 minutes. But for the purpose of this class, we'll do it a little bit shorter.
Maybe you want to pause it and take as much time as you need here. So just set yourself carefully and set your head at zero, so your chin's not lifting, or jutting down. Your ears feel open. The two sides of your pelvis feel really wide, so that the sacrum can sort of float up in between them, into the warmth of the low belly. Soften the soles of the feet, and the palms of the hands.
And just feel the front of your body receiving breath like an empty silk shirt. Attend to your breath. The heart and its emotions. The body and its sensations. The mind and its thoughts.
You might want to stay here a bit longer, but let's just take a few bigger breaths into the body. Rolling over onto one side. And take your time to come up. So I like to close my practice with like a little meditation or a bit of breathing, because I feel like I'm right after movement, to drop in and the body's a little bit more relaxed, so let's just close with that same breathing exercise that we did in the beginning. So letting my hands come together, softening the eyes.
Feel a touch of the eyelashes. And just rub a little bit of heat in between your palms. And then turn your hands so that one is facing up, one is facing down. And then inhale, linking your breath to your movement, feeling the grounding and the elongating. Exhale and the centering.
Just for a few nice long breaths. It's nice to do with the palms facing each other, because there's quite a bit of energy that emanates from the center point of the palm. Hands come together and then they turn, so that they're more in prayer fashion. Then inhale, feel the widening. And the centering of your breath along the horizon.
And this last breath here, the next time you exhale, kind of feel the skin pulling into the center of the body, so you just feel grounded and completely here. You can open your eyes. Namaste.
Grounded Joy: Lydia Zamorano


Comments


You need to be a subscriber to post a comment.
Please Log In or Create an Account to start your free trial.
