Description
About This Video
Transcript
Read Full Transcript
Oh, namaste, nice to have you here with us. This will be a routine design to help, again, the shoulder mobility, shoulder flexibility, and help, if we can, to reduce any discomfort we've got in the shoulders. We'll do a lot of things to help move the shoulder in different planes. I want to just mention that I'm sitting up on two blocks for this beginning part of the sequence, two blocks, two blankets, for this beginning part of the sequence folded and stacked one on top of the other. This is really helpful to elevate the spine and make room for the chest and shoulders.
And if we're trying to help those shoulders, we'll take whatever we can get. So you might even use two or even three blankets to help get your body and spine upright so we can get the maximum out of the shoulders. Let's start with what is known as horizontal adduction. We'll take the left arm across the body with elbow bent. Use the right hand to assist it across a little further.
This will be the first part of the stretch. But then we're going to practice shoulder and scapula up and down motion. So shoulder coming up, shoulder going down, shoulder up, and shoulder down. And especially for this sequence, I want you to focus your attention on the actual movement there, the feeling experience of the motion. Feel the muscles that control the scapula as you hold your arm toward the chest.
A couple more here. And then let it go. We'll take the opposite side across, again, horizontal adduction. Use the left hand to assist a little pull in. Now we're working with the right shoulder going up and down and up and down.
Again, what does it feel like? What muscles move you up? How does the shoulder joint feel? If there's discomfort there when you're moving, maybe a little bit less today, and work into it over time, you can always come back to this routine and keep working with these activities. Up and down.
Two more. And one more. And let's let it down. Quick easy shoulder roll. Take out any tension that may have come in.
The next one will be for the side chest and shoulder joint. We'll take the left hand to the head. Feel and side bend. And then release. That's our work.
Side bend. The goal here, as we go side bend, you're going to reach up with that left elbow directly toward the ceiling so you feel all of this side body opening. Let's do a few more together. Side bend, reach up with the elbow. Feel what that's like to create that space here.
And I've got the hand on the head so we don't have so much concern about shoulder motion overhead. And one more. And let go. Let's do the opposite side. Hand comes to the side of the head, we're side bending, and I reach up that right elbow to the ceiling.
I'm looking to draw up all of the side body. And over. As you practice this more and more, maybe if you've got a more established practice, maybe if I say, can you even feel the skin moving over the ribcage? Our nervous system comes right out into the skin, the actual nerves come right out into the skin, and the mobilization of that tissue can really help change a pain experience. One more time.
And then release. Let's take the two hands now beside you and behind you. Beside you and behind you with the fingers facing forward. We'll start there first to roll the shoulders back, see how that opens the chest. I'm going to press the hands down through the blanket and backward away from my bottom.
And then release. Let's do it again. Press down through the blanket to lift and open the chest. And backward away from the bottom. So you're feeling experience here as we practice together over and over, the shoulders back, and feel how the chest is given that opening.
Feel the muscular strength that comes around the shoulders, the triceps, as we practice the down and backward movement. Two more with me. Shoulders back, press down, and open the chest. Last one together. Shoulders back, push down, and then press backward through the hands to open the chest.
We're going to keep this one and breathe. Ready? Right into that chest. Inhaling. Exhaling.
Can you get that breath up to the collarbones? Again, if not today, we keep practicing, and over time, we get that experience, full motion. And then pause. If you'd like to take a quick shoulder roll, move out any tension that may have gotten caught up, and then let it go. We're going to bring a block into the practice now to help learning shoulder motion that we'll take into some of the side poses.
A block just helps bring the floor up to us and make it a little easier. We'll start with the right arm, with the block, and we're going to focus on the bicep area, the shoulder, and shoulder blade. We'll start by turning the bicep out to the side. That's all I'm going to say right now. You go inside and feel.
If I turn the bicep out to the side, what other actions occur? When the bicep out to the side, you might feel the chest is cued to open without even me saying. Bicep out to the side. Let's add a little push into the block. Feel how the shoulder blade begins to prop open the chest, and then ease off.
We'll do three more together, bicep turn, a little push on the block. Again, feel how the space comes here. This is very important for our standing poses later, and of course, if we're trying to build shoulder health, shoulder strength, shoulder mobility, this is going to help us to do it. All right, let's change sides. Block a little away from the body, fingers pointing to the side.
Again, first attention is at the bicep area. Turn the bicep out. Feel what happens. Just that one instruction, turn. Noticing.
How is the chest influenced by that little turn of the bicep? Actually, it's a big turn of the bicep. Turning there, notice how the shoulder blade is given a firmness, a stability. That's what is actually opening the chest area. For rotator cuff problems, maybe even frozen shoulder, getting these actions into the shoulder joint can be so helpful, and it's so safe to do here.
Two more with me. Turn the bicep out. Get that chest action. One more time. Chest out, and then ease off.
One more time. Let's do a few shoulder rolls. Take a feel into the body. What's it like to move and mobilize those shoulders now compared to the earlier attempts at this? We'll take our next step, a side angle pose, a side plank.
We won't need the blocker blankets anymore. Let's put them off to the side. And we'll do this together. We'll take the right hand down with the fingers pointing away from the body. The right leg down long and flat.
The left leg is behind with the toes pointing directly that way. Let's start with what we just learned with this bicep turning action. Turn the bicep out, and notice that we get that same chest opening experience that we had in the seated posture. Once more with me, let's turn the bicep out, feel the shoulder blade support open the chest, and then ease off. Then we'll do this side plank together, turn the bicep out, press down through the floor and get the chest action.
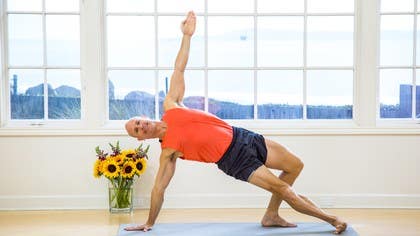
Now with both legs, the right and the left foot, we're going to press up into a side plank. We're going to express the full pose, left arm to the ceiling, hold the bicep action of the right arm, shoulder blade, chest opening, come down and take a break. If you need to roll the wrist out just for a minute, let's do it again. Fingers pointing out, let's turn the bicep. Learn that shoulder blade chest opening, here comes the side plank.
Press with your right leg, left foot, and come on up. Holding that bicep action, shoulder blade opening the chest, here's the full pose. Let's do it together, five, four, three, two, down and rest. Take a break. The side plank is too much, even just being on your side and working the shoulder action is a great place to start.
Over time we'll build there together. Second side, left fingers pointing away. Let's just start two times together. Once again, discover that rotation action and the opening in the chest. There it is.
We'll take it into the plank now, bicep turns, shoulder blade helping to open the chest. We've got the left leg and right foot, press up, holding the action here, we'll take the right arm up, holding, left arm action, and coming down and rest. If you need to come off the hand, little wrist roll, one more time. Turning the bicep out, shoulder blade supports open the chest, using both legs to lift up. The meditation is on the left arm action, holding open the chest, coming up, three, two and then set it down.
Take a break. Our next pose will be a side angle pose, we'll bring the block back into play and we'll start on the right side. To set up, let's have the right foot down on the ground and the hand on the block. We'll step back the left leg and come up into the pose. This is where we're heading, but let's set it up from the right arm action that we know.
Pressing down on the block, before you lift the leg, turn the bicep out, shoulder blade opens the chest. You can see that happening now. Now I'm going to come up into the pose, left heel rolls down. So the meditation, once again, right arm action to open the chest. Getting that right arm action, sweep your arm, left arm over, and let's hold the pose.
And release the left arm, come down with the back knee, take a little break. We'll roll the wrist out, let's practice it one more time. Shoulder blade action, fingers facing this way. We'll turn the bicep out, shoulder blade opens the chest. See that rotation happen, ready?
Keep the right arm action and we're up into the pose. Bring that right arm, sweep the left arm up and over. Breathing. You have to keep that consciousness going back to what we're doing, that right arm turn. And then release the left arm, come down and rest.
Switch it to the other side. Block is at the ready, left foot. Let's do the actions. Right hand presses into the floor, we turn the bicep out, that presses the shoulder blade and opens the chest. Then we'll use the back leg, we'll bring it into play.
Lift up the knee, let the foot and heel down. Focus your awareness and attention on the work of that left arm and shoulder. Bring the right arm in. Now we're in the pose together. Focus your consciousness, you have to go back again and again to remember that action.
And then release the right hand. Come down, take a little break. If you need to roll the wrist, roll the shoulder, anything you need to do to recover. And one more time. We'll do the left arm action, turning, shoulder blade opens the chest.
We'll take the back foot up, roll the heel down. It's all one connected action. Taking the right arm over to fully express the pose, side angle, a few breaths. Feel the left arm action. And come down and take a break.
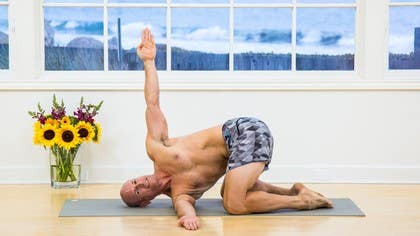
Let's put the block just a little bit off to the side and take a child's pose to rest. Recover for just a few breaths. And then let's press up out of child's pose. From here we're going to move into what's known as dolphin pose. We're going to use a block to help with the spacing of the arms and shoulders.
That's basically what it's going to look like how my hands surround the block. So start over here. Place the block down on its flat level and the hands come around on either side of the block. I want you to pay particular attention to the position of the shoulders. While we're here, we can come onto forearms and knees.
Let's practice this together, dropping the shoulders toward the block, then pushing the forearms into the floor to press the shoulders away from the block. Twice more. Shoulders dropping in and in our pose this would be the incorrect. Press the forearms down and support the shoulders away. This would be the correct.
One more time. Toward, press the forearms down and move the shoulders back. Now the challenge, keeping the shoulders held back in the correct position. Curl under the toes, lift the knees, and here's where you have to practice the shoulder stability, holding the shoulders back. If you feel confident to move in, if the shoulders will allow it, you're going to walk in.
But holding those shoulders back away from the block. Hold for five, head down, neck soft, and head should be away from the floor, and walk the feet away, and lower the knees down. Child's pose right now. Take a little rest. Let's practice again.
It was a quick rest, I know. Hands down on the floor, supporting the shoulders. Use those forearms and hands to press the shoulders back away from the block. Curl under the toes, lift the knees, support the shoulders, support the shoulders away from the block. Again if you have the mobility to come in a little bit without losing the stability and lift of the shoulders, you come into your comfortable max.
Let's hold it, head down, soft neck. Feel the work in those shoulders. And then walking back, come down and rest. Again a child's pose. Take a break.
And then coming up, we'll take it to the next level. And if any time your shoulders are just not ready for this, you can just be in the forearm and knees position to practice that, and we can build again over time. Let's work again a little bit deeper, hands on the floor, doing the work that we do. Press the shoulders back, lift the knees, walk in, here's your challenge. Join the legs and feet together without letting the shoulders fall to the block.
We'll take one leg up. Hold for five, four, three, shoulder strong, two, touch down the foot, walk away, come down and rest. Challenging pose. Eventually this leads us to pinjamayarasana, lifting the legs both off the ground. And coming up for the final side.
Place the forearms down, fingers surrounding the block. All right, shoulder stability lifting up. Keeping the shoulders strongly held up away from the block. Walk in any amount, second leg lifting. And again, shoulders holding back from the block.
Head off the mat for five, four, three, two, touch down your foot, walk back. Let's take another child's pose and rest your head down. And then press up out of your child's pose. And we'll take away the block and bring back our double stack of blankets. Remember, that's to help lift the spine.
So we've got that shoulder mobility, and we'll need a strap for this. The first part of the pose will be drawing the left leg under in what's known as the Janu Sureshasana position. The second part of the pose, we're going to loop the strap around the right foot. It'll be the left hand that will be grabbing the strap. We'll take the strap behind the leg, take that left hand behind, and notice it's palm down, palm facing the floor, and we're going to feed ourselves that strap.
Now for sure, if some have shoulder pain and a lot of limited mobility, grabbing the strap might not be possible. If that's the case for you right now, you can just work on taking that left hand behind and even touching the blanket and working the shoulder blade as you see me doing here. If you can grab the strap again, palm down, grab hold, right hand just off for stability. We're going to start by pushing that right leg straight, and you'll feel that by straightening the strap is trying to draw the shoulder, left shoulder, around the back. Bend the knee again.
Feel how the shoulder recovers. Right in the knee, we get this traction, this draw of the left shoulder back, and it may be tempting as you practice this, I push the leg straight that the chest just wants to turn off to the side, but we're going to minimize the chest and spine turn and focus on, here it goes, that shoulder draw back, and we'll do it one more time. Pressing through that foot, the strap takes the left shoulder around and back, and then knees off and let go, we'll change sides. Extend the left leg, we'll bring the right leg in, a little help from the hand, and if your knee doesn't go down, maybe nice to have a block here for you so your knee doesn't feel too challenged. Strap around the left foot, remember when I take the strap behind the leg, right hand is going to grab, palm down, comes around the back, palm down, we'll have to bend the knee a little, there we go, and now we're going to work to straighten that leg.
So I push, and the tension on the strap draws the right shoulder back, and then I undo a little, and again pushing through that leg, right shoulder is drawn back. That temptation again is, as I push the strap, the whole chest turns, that's a different focus, great pose, but we're going to work on the shoulder today, I push to the strap, shoulder draws back, minimal chest, two more with me. Push and turn. And last one, push, let the shoulder be drawn, and then take a break. We will put the strap off to the side.
We won't need the blankets for just a bit until Shavasana. Lie down on your back, and we'll work a final core strength and shoulder pose. We'll take the arms out to the sides, 90 degrees of the body, make a T shape, and bring up both knees. So the practice here is to turn the legs off to the side, in this case to the right side, any amount you can do without losing contact of the left shoulder. So that's about my limit right there.
Past that, my shoulder would have to come up. So there's a strength of pushing into the floor. Come back to middle, and we'll go the second side. And if you notice, my knees are pulled a little in over the belly button, over the chest, as I send it to the opposite side. I go as far as I can go until the shoulder comes up.
That means I've gone too far. I have to press the ground with the backs of the arms. There's about my limit, holding, focusing on that shoulder and upper body strength. Come back one more each side. Breath in, shoulders contacting the floor, turning.
You might find you go a little bit further this time. Hold with that middle strength. Come back. Last one. A breath in to prepare.
Exhale to turn over to the left side. This time it's the right shoulder that has to work to keep contact with the ground. Come back to middle, and touch the feet down. We're going to head into Shavasana. So if you'd like to take one blanket for behind the head and neck, remember not under the shoulders.
This just supports the head and neck very nicely. Rest the arms out to your sides, one leg at a time. Extend them long onto the floor. Relax any tension in the legs and let the breathing settle. Soft fingers, soft arms, soft shoulders.
Relax the jaw, the face, the eyes. As we've been focusing on the chest, let's keep that attention there and watch the breath slowly move and open the chest. A wonderful image that you can bring along this chest movement is the current of the ocean. The inhalation is one directional movement of the ocean. The exhalation is that opposite direction of the current.
That slow moving current would draw all of that sea life slowly back and forth. Move out the current. Inhale. Thank you. And softly rest your hands on your tummy.
One leg at a time. Bend the knee and stand the feet on the floor. And take your time as you turn over onto your side. Rest your head on the blanket or on an arm. And the slow, easy press up to sitting.
Take a moment to find a comfortable sitting position. We'll close the eyes and take the attention inside one more time. Rest that body. Om. Namaste.
Thank you so very much for being with us in the shoulder sequence. I look forward to seeing you again soon.
Yoga Rx: Nathan Briner
Comments
I can't get my arm over my head in side angle, hopefully that will change with practice. Very grateful for this session 🌾
You need to be a subscriber to post a comment.
Please Log In or Create an Account to start your free trial.
