Description
About This Video
Transcript
Read Full Transcript
Oh, namaste everyone. Nice to have you here. In this tutorial, we're going to be working with the knee joint, and in particular, opening the knee joint. The back of the knee joint is what I'm referring to. In a lot of knee problems, you may have seen, either with osteoarthritis or just injuries with the knee, it's sometimes very challenging to open the knee fully. The muscles that would be primarily responsible for that are the quadriceps and, believe it or not, the hamstrings. They're a major part of helping the knee feel stable and powerful. So we're going to talk about a couple of key concepts in yoga where we can really bring out the health of the knee joint and the strength of the muscles surrounding the knee. The first thing we're going to talk about is how in Tadasana to begin to open up the back of the knee. There's a tendency to just push back the knee joint, as you saw me do there, but it seems to be no muscular support around the knee or even around the hip for that matter. Try that with me now, not to hurt yourself, of course, but just to push the knee back with no muscular support. And what you may feel is that the back of the knee feels pressured and you may even feel that in pushing the knee back, it makes the lower back want to arc. There's not a lot of support there. Let that go. Shake out the legs for just a second and let's try it in a different way. First thing to try, see what happens when you curl your toes up from the floor. I'm doing that now. Toes come up from the floor. Notice what happens. Then drop the toes back down and see what you feel. Once again, curl those toes up. The first thing I want you to notice is that your leg bones seem to move backward. Let's drop the toes and see what happens. You notice when you drop, there's a tendency to feel you come back forward. Let's try it one more time. Toes coming up, leg bones go back and all of a sudden you may start to feel, ah, there are my heel bones. Let's do it one more time. Toes up, thighs back, heel bones down now and let's try pressing straight down through the heels. The next thing I want you to notice is how this brings this muscularity around the leg bones. There's a firming of the leg muscles. Feel there. And then let it go. Toes down, relax your legs and you'll feel the leg muscles have turned off. Let's try that again in Tadasana. I'm going to turn to the side to show you how this looks from another angle. In Tadasana, let's just try, just for a moment, that loose feeling again where we just drop back the knees, no support. And you can see in my leg, there's a backward bowing in there. Then relax that again. Let's try the new technique we're learning. We're going to curl up the toes and you feel the thighs. You can see them moving back in me.
I'll drop my toes and the body comes forward again. Toes coming up, thighs go back and I feel that muscularity begin to surround the leg bones. See if you can feel that now. Toes staying up, strong leg muscle action. Then drop the toes. It helps to drop them to really feel the work come out. Then once again, curl the toes up. You feel the thigh bones go back. Leg muscles are lifted. Now you feel those heel bones push straight down through the floor through those heel bones and take a moment to experience how your leg muscles are holding onto the legs. Let's get that feeling. Then let that go and see again what happens with no real effort where you just push the knee joints back. I feel my low back arching. My knees feel compressed and there's just that uncomfortable feeling in the back of the knee. So let's see if we can do that and add a little bit more to it. This will be an exploration together. We're going to curl the toes up. The thigh bones go back. There are my leg muscles on. I push straight down through my heels. Just take a moment to experience Tadasana this way. And then our job is to not let the thighs come forward as we raise the arms. Let's do it. Press down through the heels and take the arms up. My toes are still up. Feeling there. It's a lot of work. And then rest the arms down and relax the toes. Shake out your legs. Let's do that same arm lift from this angle. Just the way to see it a little bit differently. So once again, I curl up those toes. The thigh bones go back. Feel the muscles lift and support and then press down through the heels. You can feel how this really energizes around the kneecap, the patella. Then we'll keep the thighs from puffing forward. We'll hold them back and take the arms up. And holding your pose right there. Can you continue to press right on down straight through those leg bones. Push through the heels to keep the muscularity of the legs. And then relax the arms and shake it out. Shake out those muscles. So that first part in Tadasana actually expresses itself in basically all the other poses. In the beginning when you learn this stuff it can kind of feel like grunt work where you're just gripping those muscles. Over time as you grow with experience, as you grow with that inner understanding and feeling which is what everything yoga is all about, it becomes a little bit more subtle. Obviously it becomes a lot more subtle where the leg muscles are able to hold the bones and joints but doesn't feel like concrete. The next step we're going to do is talk a little bit about hyperextension. And we're going to use the understanding through triangle pose and work our way out of the tendency to hyperextend. I'd like you to take a nice wide stance to feel this. And we'll just do a simple turn of the right leg. Commonly in triangle pose or in pyramid pose, the front leg, I'm going to do it right now, hyperextends.
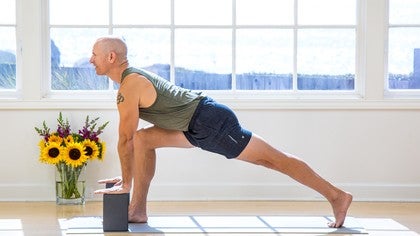
There's no support in the leg. You can see I can wiggle my quadricep muscle and I can wiggle my kneecap. You might even take your hand, I would recommend it. Take it down there and see if you can wiggle your kneecap, kind of feels a little funny, or you can wiggle your quad, there's no support for that knee joint. And we're trying to bring health here. If you let that go for just a minute, let's get out of that hyperextension, we're going to find a way to fix that. The first thing to do is to press the ball. This is the ball of your foot where the toes emerge out of the foot. We're going to push the ball of the foot down, kind of like you push your gas pedal in your car. Pressing down on there firmly. You can't see it move right because the floor is in the way, so I can't actually make it move that way. But I'm pressing down and slowly from that downward pressure also reach your toes out. That's two things. Push down with the ball of the foot, stretch your toes out, and then slowly see what happens as you start to straighten that leg, that right leg. And you'll start to see that those leg muscles of mine are starting to come on and it doesn't seem possible anymore. I'm going to let it go to do this, to hyperextend. Let's go through this together again. I'm taking the ball of the foot, I'm pushing it down, kind of like pushing a gas pedal, little bend in the knee, and then I stretch the toes out. This is the key. I'm going to get back on the mat here. This is the key. I keep the pressure of the foot and I keep the elongation of the toes. This is what holds it, all right? Pressure of the foot, elongation of the toes, and then slowly, I'm going to straighten that knee. Slowly, slowly, slowly. I feel the leg muscles pulling up. They're surrounding and supporting that knee joint. The challenge of this, of course, is if we were to take the full pose. Let's try it together. Triangle pose to the right side. Ball of the foot down, toes out, a breath in, and as you exhale, the meditation is ball the foot, toes out. Ball the foot down, toes out. Ball the foot down. Let's just take it a half way. Pause right there, feeling again, ball the foot down, toes stretching out, and again, see how that knee is supported. The calf, the hamstring, everybody is working to keep that knee healthy. Then come up, turn the feet in. Let's shake them out. So taking that practice over and over again will really help anchor the understanding of the actions in the triangle pose and the other poses like pyramid pose. It's very common to hyperextend the knee there. But come back to this. Come back to this and understand these at more and more deeper levels. I think you'll see a lot of change happens. We're going to take this now into a few extra poses. You'll need two blocks for this so we can challenge this possibility and see how it works in different poses. I'm going to grab my two blocks here, and we're going to do a lunge pose. A couple of ways you can get in, you can either come in from knee down or just step right into it from a standing position. So we're going to focus on this back leg right here, and very commonly in a lunging pose, you'll see what looks like, I'm going to call it a sway, a sway in that back leg toward the floor.
We're going to push down through the ball of the foot. Remember, that's where toes emerge out of the foot and press back through the heel. Now, look how that changes my knee, how it lifts. And then I'll relax that a little bit. You see the knee go down. Once again, I'll push the ball of the foot straight down, straight down to me means that way, straight down, and then push out through the line of the leg, the heel. There goes that knee up again. Lower the knee down and rest. So that's the beginning understanding. I want to take it a little bit deeper and move the action up into the hip, the hip joint where the thigh connects to the pelvis. So we can do this work again, come up into the lunge with me, push the ball of the foot down, push back through the heel, feel the knee lift, but now we're going to try to get that intelligence all the way up to the hip. So for a moment, I'm just going to show you knee. Look, there's the knee going up and down. You can see that pumping, but it hasn't touched my hip yet. I'm going to push down through the ball of the foot, stretch back through the heel, lift the knee, and now I'm going to start to bring that right up into here. Here it goes. You see my whole hip lift. Now I'm supported not just at the knee, but all the way through the hip socket, and eventually we'll talk about this too. The organs are supported upward as opposed to see my tummy come out, my hip go down, the knee go down. Let's take a rest. My right leg is tired from working like that. We'll like to shake it out for a moment. I'm going to give you another challenge pose. Here we go. Let's come into the lunge again. Now we're going to take it up into warrior one, high lunge. Let's see if we can keep that back leg and hip. Here we go. Knee support all the way up into the hip. Challenge pose with balance. I keep my leg, my hip, my knee lifted, and we're going to hold for five, four consciousness in that back leg, three, two, set it down. Let's change sides and see how we do on both sides here. Second leg forward. Let's try it again. Lifting the knee, come up. Here's the process again. You can work with me. Press the toes down into the floor, stretch back through the heel. There goes my knee. I've got that part settled, but now we need to bring that lift all the way up to the thigh bone into the hip joint. You just saw that happen again. I'll undo. Let's try it one more time. Press down through the toes, push back through the heel, lifting the knee, and here comes my hip also. And then we'll set it down. Let the muscles rest just a second. We'll do our challenge pose, which is the warrior pose, arms overhead. Let's set it up. Toes curl under, lift the leg. Let's go through our process once again.
Bring the ball of the foot down, stretch back through the line of the heel, lift the knee, and then bring that lift all the way up into your hip joint. Here comes the challenge pose, keeping the leg lifted. That's your meditation. Back thigh lifted, back thigh lifted, back thigh lifted, back thigh lifted, all the way into the hip joint. And we'll hold for five, four, three, two, and release down. Let's let the leg down and take a break. So these actions that you're learning here in these few poses, they're actually expressed in a number of different poses. So many poses require that stability from the legs, from the knees, and from the hips. And with practice, and it does take practice, to really feel these things so they can be called your own. With practice, we can start to see how to express these things in the different poses and really build up a strength and power in the legs and bring the health into the knees that we need. Om. Namaste. I look forward to sharing with you the next sequence.
Yoga Rx: Nathan Briner
Comments
Grateful for your teaching 🌾
Doing rehab squats elastic band resistance work is getting better what a complex
Joint is I will use this to help with my healing it is very challenging to heal I heard there is fourteen ligaments to the joint I totally agree with what you say thanks
You need to be a subscriber to post a comment.
Please Log In or Create an Account to start your free trial.
