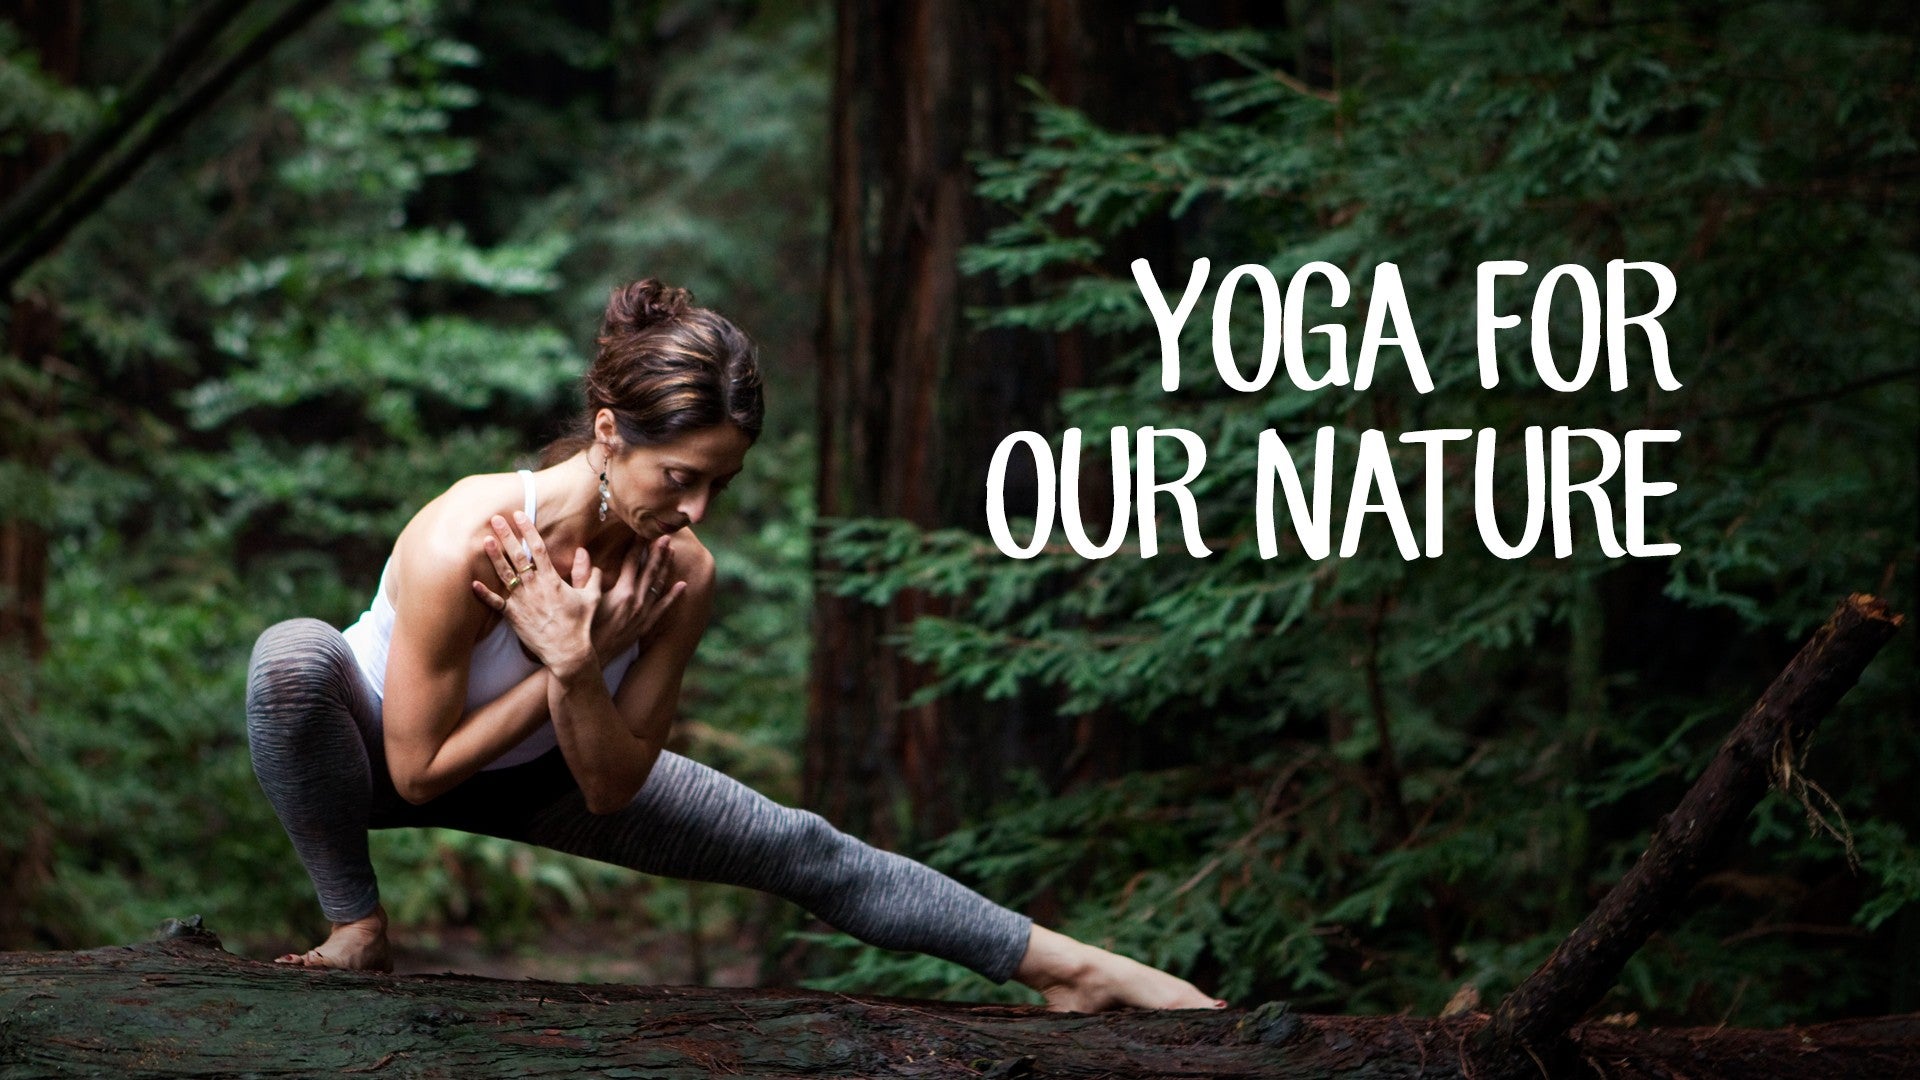
Description
About This Video
Transcript
Read Full Transcript
Hello, welcome back. I'm looking forward to sharing with you a bunch of my favorite movements that are very playful, very light, and meant to help compliment the perhaps pitta season of life that you might be in or experiencing where there's a lot of tension and work and stress. And so this class is to help release tension and create a little more fluidity and playfulness in the practice. What we'll want is a blanket and a strap, and that's all we need for the class. We're going to begin with a blanket, a thin folded blanket perhaps underneath your head. And if you come down onto your back when you're ready with your feet on the floor, slide the blanket so it's thin and supporting the back of your head. And when you feel supported there, please grab your legs and invite your knees in towards your chest and just a little gentle rocking side to sides. And then we might put the hands on top of the knees and make bigger circles with the knees, just gently massaging that back body into the floor, particularly your hips and lower back area. We use your hands to actually move your legs the other direction a couple times. Let's pause now, put your feet on the ground and take just your right knee into both hands and while holding that right knee, circle your right ankle four times in one direction to try to get rid of some pops and cracks in that joint, and then go the other direction four times. After four, if you'll take your hands to the sides of your pelvis and take your right leg straight up in the air and now keep the bowl of the pelvis neutral as we move your right femur, your right leg four times in one direction, could be a small circle, medium circle or large circle that starts to maybe wake up some of your low belly muscles as we keep the pelvis from moving. Move your leg the other direction four times and observe again just your range of motion in this ball and socket joint. After four, that second direction, let's catch the right knee with the right hand, take your left leg to the ground and your left arm back towards your ear and just take a really long, wonderful stretch on that left side. Take a big breath here, one more breath out. Let's bring your knees in parallel and then drop your arms down to your side. Now keep your knees together and circle your knees around one direction four times, keeping your knees parallel. As you go around, just try to feel your lower belly area slowly waking up here with the circles. Go the other direction four times and still bracing your arms. Exciting things outside the window. Then come on back to center. Put both feet on the floor and now reach over for your left knee. Catch your left knee for a moment and circle your left ankle four times. One, two, three, four. Other direction one, two, three, and four. Slide your hands to the pelvis and take your left leg up and see if you can feel your pelvis doesn't move as your left leg circles around four times. One, two, three, and four. Then go the other direction maybe four times. One, two, three, and four. After that, grab your left knee with your left hand. Take your right leg to the ground and take a giant, wonderful, long stretch on that right side. Reaching from fingers to heel. Take one more breath. Then we're going to bring both knees in and this time we're going to do a little practice of lifting your forehead to your knees. I'll call this the O shape. Then we go into the X where we drop the legs down and wide, arms wide so from top view it looks like an X. Gather your legs back into our little O shape. Gathering into the X shape and coming back, gathering into the O shape. Try to have smooth transitions down into the X. Smoothly gathering those legs in, stretching out to that X shape, and then go ahead and pause until we finish the O. We'll set the feet down and then notice where your strap is. Now we need the strap and we'll take that around the bottom of your right foot. Take your right foot up towards the sky. Leave enough room to slide your hands down the strap to have a straight right leg. So classic strap to foot pose. And then while we tend to that right leg, just for a couple moments we can bend the knee and straighten the leg. Bend the knee and straighten the leg and then keep the legs straight. Transfer the straps to your right hand and then bring your left knee in to your left hand. And open the right leg out to the right, open the left leg out to the left and try to find that place where you feel somewhat centered and balanced in the pelvis. So your left buttock is still on the floor and you want to notice it doesn't feel like you're falling to the right. You're opening to the right but not falling to the right. And take one more moment stretching long through that right leg. Take everything back to that center line position and then put the left foot up into the strap. So both feet are up. Slide your feet wide, maybe as wide as your shoulders, and then bring your knees down towards the sides of your chest. So eventually bring the shoulders and the arms a little bit closer to the earth, our variation of happy baby pose. Perhaps rock a little bit side to side. Once again, massage pushing that lower back area into the floor. And after a little gentle rocking side to side, let's go ahead from here, release the feet from the strap. Set the strap for just a moment down. And then of course we have the left leg to go up. So with your left leg going up, take the strap there around the ball of the foot. And as we go up, bend the left knee before we get super committed. Straighten the leg, bend the knee, straighten the leg. And then keep that stretch in that left leg, toes pointing towards your face. If we gather the straps into that left hand and then take your right knee into your right hand and slowly open the right knee to the right and the left leg to the left. Notice again, right buttock is still on the floor as we open a little further into that left inner leg and groin area. Take one more moment, just discovering that stretch here. And then come back all the way to that center position. Okay, now we can set the strap out of the way. So we put the feet down onto the floor. Let's go ahead and turn over onto your right side. So I want to encourage you to open up your blanket so you've got a little bit more cushion that goes all the way down to your hip. So for a lot of people, the side of the hip gets a little bony here. And if we can now, use your right arm for a moment as your pillow.
Keep your knees bent, maybe about hip height. And allow your left hand to be just in front of your chest. From here, we'll start to bring your left knee and elbow to touch. And then stretch your left leg back behind you as you reach long through your left arm. And then bring your elbow and knee back to touch. Inhale, reaching long. And then elbow and knee touch. Inhale, reach out again long. And then come back to touch. Alright, now from here, if we take the hand to the floor and then take your left leg back behind you and with your legs straight, just simply start to make some little circles. Lean into your left hand to keep your shoulders stacked. And try to feel that your left leg is far enough back behind you that your left glute stays turned on. And if you don't know, touch the left glutes. So you can feel that those muscles are working as we make those circles. Alright, let's bring the knees together for a moment. And then stretch your legs straight. As soon as the legs go straight now, see if you can allow your lower right arm to be all the way straight and your head relaxes into that arm. So in this position now, as we inhale, let's take your left leg toward the sky and your left arm towards the ceiling right above the shoulder. As you exhale, take your left leg down and reach your left arm overhead so your hands might even touch. Take your left arm and your left leg up and try to keep your core engaged so that you don't fall backwards or forwards. Inhale again, left leg and arm come up. And exhale, left leg and arm come down. One more time, left leg and arm come up. And left leg and arm comes down. Alright, let's slide your left hand back in front of your chest again. Lean into that left hand. Now we're going to keep the feet together as one and lift both feet and your head up to wake up that upper left waist, the oblique muscles. Bring your head and your feet down. And again, inhale, come up. Identify that left waist is engaging to help pull your head up toward your feet. Lower down. Let's do one more in that way of coming up and then releasing down. Okay, last one in this way. If we take the left leg up about six inches, not very far, now stay here and take your lower right foot to come up and touch your left foot. And then take that right foot down and bring your right foot back up to touch left foot and come on down. Right foot to come on up. And as you want to move maybe into more challenging shapes, if you wish, I always call this one fish out of water pose because as you try to bring your lower foot up, usually we flop around a little bit. Not super graceful. So I'm going to stick with the first variation of lifting the lower foot up. But no, you could always try with your arm at your side. Good luck.
All right, let's go ahead and finish that part. And when you're ready, we'll go ahead and roll over onto your back. And we'll come to do a moment of hugging your knees and towards your chest. Okay, from here, stretch your legs up in the air, arms back by your ears, our upside down downward dog. Hug the legs in, lifting forehead to knees optional. Lift the legs up, take your arms back, hug the knees in. One more time, inhale, stretch your legs long. Sorry, stretch your legs up toward the sky, arms by your ears, and then hug your knees to your chest. Okay, let's see if we can remember all these same poses on the second side. So turn over onto your left side. And we have the bent knees, and your left arm is your pillow for a moment. With your knees bent, and settled position, bring your right knee and elbow to touch, and stretch your right arm and your right leg away from each other. Bring your right knee and elbow to touch, and then stretching long. Elbow and knee touch. Float that right leg back, reach through your right arm. One more time, elbow and knee touch. And then we stretch nice and long. As we come to this neutral, now right hand in front of your chest, take your right leg back in space behind you so your glute muscle is working as you make these little circles with your right leg. And let it, again, make small or medium circles. Whatever helps you wake up your right glute if you experience glute amnesia like I do from time to time. One more moment, circling around. Let's bring the knees back in, and get ready to stretch your legs straight in a line with your hips, your shoulders, your head, and we'll put that left arm on the floor straight. So the head and rest here on the arm. Right arm comes straight up in the air above your shoulder. Left leg, right leg, sorry, floats up about six inches, eight inches a foot. Try to keep your core engaged as you take your right leg down, and right arm overhead, and maybe your hands touch. Right arm, right leg, lift up. Find your balance. Right leg and right arm come down. So this is so nice to try to find some length through that upper right side of your waist or chest. One more time, right leg and arm comes up. Keep your balance. And then go ahead, lower down. Slide your right hand in front of your chest. And in this one, we keep the feet together and lift your head and both feet up so your head is moving towards your ankles. Come on down. Try to lift your feet together. The head moves towards your feet. Come on down. Lifting the head and bring it towards your feet. Release. One more time, lift your head, bring it towards your feet, and then come on down. Right now, the right leg floats only about four or six inches off the lower left leg. Lean into that right hand and bring your left foot up to your right foot. Lower left foot. Bring your left foot up to touch your right foot. So again, we hopefully feel your right obliques engaging to bring your foot up toward the top foot. And if you want to try with your right arm at your side here and try, again, what I call the fish out of water pose and see if you wobble around. Or maybe it's easier for you to access your center here. It's certainly not for me, ever. Try it one more time in the way that works best for you. All right, and then go ahead and release that leg and we'll come one more time now onto your back. When you're on your back here in this way, lift your feet. Let your arms come way out to the side, maybe shoulder height. Let's unwind a little bit here the spine by bringing your legs to the right, halfway over, then look to the left. Come back to center with your eyes and knees. Legs go to the left and turn to look to the right. Come on back to center. One more time. Legs to the right, eyes to the left. Come on back to center, legs to the left, and eyes to the right. And then come on back to center. Just grab your legs and come out the best way for you to a seated position. From seated position, let's go ahead and slide your feet over to the left. And if it works for you to take your left foot underneath your left hip, tuck your foot under your hip, that knee doesn't bend so well, you keep that leg straight. So keep the right foot to the inside of the left knee line. Right fingertips out to the side as the left forearm comes up parallel to the ground. So please let your left hip move with you as you reach to the right and a little bit behind you. Bend your left elbow and follow it back to open up the chest. Follow your left hand, reach over to the right. Bend your elbow, open your chest as you look over your shoulder. Two more times. Inhale, reach across the room. Left hip moves. Open the chest as you look behind you. One more time, reaching across the room. Follow the elbow back. And then when you look forward, take your hands behind you. Anchor for a moment with your feet right in front of you. Hold on to your elbows and then take a little turn to your left and then roll your spine back towards the floor. Hold onto the elbows and make a little turn to the right and roll back a few inches towards the floor. Come back up. One more turn to your left and roll back a few inches. Come on back to center. Turn to your right and come back a few inches. As we come up to center, let your hands reach wide. Slide your feet over to the right and if it works to tuck your foot under your hip, tuck the right foot under. If that's the tighter knee, straight leg works just fine. So left foot lands inside the inner leg. Left foot hand out to your side and bring your right forearm parallel to the floor. Okay, so please let your right hip move with you. Reach over to the left and a little behind you. Follow your right elbow back behind you. Inhale, reach out long. Reach to the left. Follow your elbow back. Inhale, follow your right hand to the left. Elbow pulls on back. One more time and now reach across the room. Pull that elbow back. Then we'll end that part and slide your feet all the way around so you can come to all fours position. Now you might take your blanket and fold it so that you've got a little more cushion for your knees and some real estate here in front of the blanket for your hands to be on the sticky mat. Please separate your knees about hip distance apart and look down between your hands. While looking down, let your hips swing generally just loosely side to sides. Then if we can narrow in that movement and specifically now move the tailbone in little circles. So trying to target tailbone and sacrum. Little circles. Eyes might enjoy being closed so you can tune more into these joints, the bones of the body. And then let your attention go up to the lower back and belly area and make some movements. It could be circles or cow movements addressing lower back and belly. How can we work out any stiffness or tightness here? There's no right or wrong way to do this. Now the ribs. Let your ribs try to move in a three dimensional shape. Can you bring a little bit of attention into every corner of your ribs? Just try to press a little more energy into those bones, the muscles between the ribs. And now look at your shoulders from this position and let your shoulders move around and try to feel how do they want to move together or as a team. And then after wiggling out all that stiffness perhaps here, let's pause and maybe slide your knees an inch closer together as you put your elbows down. And if you're sensitive here with your elbows on the floor, fold your sticky mat in once so you've got a little extra padding for your elbows. So whatever works for you here, let your elbows stay rooted, knees slide a little closer together now and take your left knee up into the air behind you as high as your pelvis. Keep your left knee bent and your upper body stable. The left knee is going to reach out to the side and we'll draw a big circle with that left knee. A big circle out to the side with your left knee. And let that knee try to reach towards your left shoulder. And notice that the upper body is still stable and move as best as you can. Feel that range of motion again, strengthening and stretching. Take your left leg to the back of the mat, take your right leg for a moment to the back of the mat and you're low and behold in our forearm plank position. Let your pelvis come down to the blanket, thighs to the blanket. Look forward on inhale like you're doing your cow pose. And then come into that cat position in your spine. Lift your knees and your hips your thighs and look back towards your feet, round the back. Bring your thighs down, inhale, look forward and as much as you're comfortable, lift the gaze and then exhale, lift everything up, look back towards your feet. One more time in that way, looking forward, stretch the front line, exhale, drop your head and look back towards your feet. Alright, so we'll bring the knees back down, bring your knees in under the hips, stabilize your upper body as you take your right knee up into space as high as your pelvis, stabilize upper body and then begin circling your right knee in one direction, maybe four or five times without moving your upper body as best as you can without moving the upper body. Alright, after those wonderful little circles, we'll slowly stretch. Now this next time, your right leg to the back of your mat, left leg to the back of your mat and then come on down and let your pelvis settle onto the blanket. Point your toes straight back and as your elbows slide out wide, stack your hands so you have your left hand on top of your right hand and take just a moment with your forehead down on the hands. Take a big breath into your belly, let your belly press into the floor as you breathe in and feel your belly peeling away from the floor as you breathe out. So we're going to try to keep breathing into that central belly area as we do what I call a salute here, where we let the left hand stay attached to your forehead and lift your left elbow and hand up like you're doing a little salute. Left elbow is up and then lift your right leg. We bring that back down, same combo, left elbow, right leg, lift up and then we release down, left elbow, right leg comes up, lower down and then one more time letting that left elbow and right leg come up and come down. Switch out so right hand is on top, glue the back of the hand to your forehead and inhale, lift your right elbow and your arm up and then lift your left leg.
Come on down, left leg, right elbow, lift up and release and you don't need to lift very far, come on up to feel the benefit of that work. And one more time, inhaling, lifting up and then releasing down. Please bend both knees with your feet up in the air above your knees, let your feet move side to side like wind show wipers. Breathing back into your belly, loosening up any stiffness or tension here in the hips. Alright, from here let's bring your feet down to the floor, bring your hands back by your chest and as you come up towards all fours, let's take your blanket and fold it one more time to give a little extra cushion for your knees as we come up to the kneeling position. Arms just for a moment, relax at your sides. Once you're stable on the knees, we'll make a shift to put some weight on the right knee and take your left foot forward into what would be a lunge like shape. You can draw your hips back so you're really standing on top of that left leg, left knee and take your arms up towards your ears. Let's catch a hold of the right wrist with your left hand and we'll start to reach a little bit forward and circle over to the right and we're going to kind of stir the spine here, stir the body up while balancing on that knee. So there's no right or wrong way to do this but just kind of generally loosening up what you can loosen up here while holding on to that right wrist. And then as you're coming around into those circles, you can make that even more exciting as you come to neutral, curl your back toes under, lift your back knee an inch or two and you could try that same work with your back knee up and discover it's a little bit more work to stabilize. So your choice maybe one or two more times circling around. And then we'll let the arms come down to the side, put your right knee to the floor blanket and bring your left knee to the blanket and switch out and bring your right foot forward. So rather than going into a deep lunge, we're going to stay right on top of the left knee, take your arms up over your shoulders and reach for your left wrist with your right hand. And we might make really small little circles depending on how your back feels, how your shoulders are. And some might start to make a little bit fuller circles. I'm just going to show you, you can go as really big as you want, whatever feels interesting in your body. What can you loosen up here in this way? And then we can do that same work if we find center for a moment. Find that same work, curl your left toes under and lift your left knee off the blanket a couple of inches. Keep your lower back long and try making similar circles. So just starting with small ones, you can maintain your center, your balance and working towards slightly bigger circles. Going around and around. All right. And then from here we might just come all the way around and let your back knee come to the floor, drop your arms down to your side and then take your right knee to the blanket. We can lift the knees up off the blanket and set that blanket aside for now and then reclaim your strap as we come to a standing position. So if you open up your strap, maybe halfway so you can fold your strap in half and let your hands walk in so your strap might be about as wide as your hips and then create a little bit of tension. So keep the tension in the strap as your arms come up overhead and then keep that tension as you reach a little bit over to your right sides. Kind of like we were doing in that lunge, bend your knees and you can go over to your left sides. We can kind of swing with the knees bending in between back and let the tension stay in the strap as you go from side to side. And again there's no right or wrong way to do that move. For me it's nice to feel way into that lower back even as I stretch the arms away from my waist while pulling on the strap. It's just lovely work. Just trying to make maybe one more full circle around. Keep the tension now but let the arms drop right down in front of your thighs. Keep that tension as the arms go up and try not to let your ribs swing forward in space. Hold onto the strap, come down. If you want to challenge that shoulder area we might bring the hands an inch closer together.
Keep that tension and go up and the tension as we come down. One more and that way of going up, rounding your feet, take your arms down and we'll transfer that strap right behind your back so that the wrists face forward, the palms face towards the front of your mat or the front of your legs. Now please roll your arms back away from the collar bones. Squeeze up high between your shoulder blades and maintain that tension in the strap as you move your arms away from your back and then bring the strap back towards your thighs. I'll turn sideways just for a moment so you can see. Keep the tension and take the arms back and then come back towards your thighs. One more, arms are already rolled back away from collar bones. Stretch back and then come on in. Alright, so that's for good postural awareness. Let's get rid of the strap now and have a little bit more fun at the top of your mat without any props. So next piece is if you'll stand on your right leg, take your right arm out to the side and up with your right palm facing away from your head. Lean into that right leg and take your left leg out to the side. Turn your toes in slightly towards the floor. Left arm, right leg comes down. Do the same side again. Left leg and right arm reach out at that diagonal. Turn your toes in toward the floor. Come on down. Well again, left leg, right arm reach out at the diagonal. Release. And then one more time and we'll hold. Left leg out, right arm up. Turn your toes slightly in. Release. Stand in both feet and let your left arm reach up towards your ear. And then stand on that left foot as you take your right leg out with your toes turning in toward the floor. Right leg, left arm drops. Again, left arm lifts. Right leg lifts. Toes turn in toward the floor.
Release. Again, left arm, right leg. Turn in and release. Last one with your left arm up. Right leg out. Turn the toes in. Hold. And then let it go. Alright, so this one, this one is for balance and coordination. So let your hands please slide over to the right and then kick your right leg over to the left like you're kicking a ball to the left side of the room. And your hands go to the left and your legs swing out to the right. Hands to the right, leg to the left. So let your arms and your legs move opposite each other and your right leg might need to come down and touch the floor every now and then. It would be a very human thing for that right foot to need some grounding. So we're going to keep swinging that leg out to the sides. Arms move opposite directions. And you're doing an incredible amount of work on that standing left leg. Lots of work in that right outer hip glutes. And this we might even say is good yoga for your brain with the extra coordination piece put in. Right to left, right to left. And I like to do these for about one minute on each leg which when you're done you can really feel that work you've been doing and the standing leg probably more than the leg that's moving. But both are getting some wonderful work. Let's pause. Put both feet on the floor and just feel again the effect of that practice. It's nice to maybe also get the heart rate up a little bit. So other side, left, hands swing over to the left. Stay on your right foot and kick your left leg to the right. And the leg goes to the left and the hands go to the right. And we criss cross over the midline. And try to keep your hands parallel and know it's really normal for that left foot to need to come down and touch the floor. And as we get more comfortable with the practice we might notice that that right foot in this case stays down more. In the beginning that right foot, that right ankle might be a little wobbly. So with practice this tends to go more smoothly and do your best again to keep working at building that strength in your standing leg. Ankle, foot, hip. And feel your glute area in that left leg as you're swinging the leg wide out to the sides. And gradually working up toward one minute in each leg. All right. Let's go ahead and stop here with both feet on the floor. And just notice again your heart rate, how things are going. If we stand now in your left leg and bring your right knee up toward your chest. And we do our external rotation like you're about to do tree pose. Keep your leg like this and reach your left hand forward and try to raise your right foot to touch your left hand without leaning forward. Put your right foot down, stand and lift your left knee. External rotation, try to bring your left foot up into your right hand so they touch without leaning forward. So we're going to keep alternating. Lift your right leg, external rotation, lift your heel up, put the foot down. Lift your left knee, external rotation, lift your heel up. So as we step back and forth, imagine you were looking in a mirror at yourself and your upper body isn't moving as your lower half of the body is moving. And it's not required that you bring your foot to touch your hand. It's just a gentle direction to build a little more strength in that range of motion that we might not be using in other poses. Just a couple more little steps side to side. And then we do a similar thing now as you reach behind you. I'll turn so you can see the back side. So I bring my left foot up toward my right hand. Bring that foot down and bring my right foot, sorry, towards my left hand. Right foot down, bring the left foot up towards the right hand and then step it down. Right foot to left hand and left foot to right hand. So you're reaching behind your back to the opposite heel. Lift your heel high enough that you feel your glutes turn on to bring your heel to your hand. Opposite heel and hand. Opposite heel and hand. Let's do one more in that way to wake up that back body. Opposite heel and hand and then stop. Let's turn and face that small skinny edge of your mat and have your right foot forward and your left leg back so that you're up on the ball of your back foot the whole time. Try to keep your heel from touching the floor. Keep your left arm by your hip and your right arm up by your ear. So step 100% into that right foot as you bring your left knee and arm up and then step back to touch the ball of the foot to the floor and we're back where we started.
Step into your right foot. Left knee and arm lifts and then we step back. Left knee and arm lifts and step back with your right arm up by your ear. So we can go faster or stay at this speed we started with and my intention always is to keep my right big toe on the floor. It's almost a foot meditation. Trying to keep my right big toe on the floor so I don't go too fast or compromise the work by getting ungrounded in my right foot. Interesting work of strengthening all these little muscles from your right foot up into your hip when we keep the right foot connected to the floor. And this is work again for circulation, it's playful, it's light, not taking yourself too seriously today. Noticing every day is a little different with balance. Let's go ahead from here and stop. Take a moment, just listen to your heart rate, feel how it feels to be a little more dynamic in the movement. When you're ready, right foot forward, take your right leg back and rise up please to the ball of your foot. In this case we will have the left arm by your ear and the right arm back by your hip. Stand in that left foot and see what it feels like to bring your right knee and arm up. Step on back, touch the ball of the foot to the floor. And then again, right knee and arm comes up, step on back with your left arm up. Right knee and arm lifts. And just notice now, is it appropriate to go a little bit faster? Comes maybe a little bit more aerobic like. And as you're swinging back and forth, keep left leg and arm moving together, right leg and arm moving together. Meditation on that left foot, left foot down, left foot down as you go at your speed. It makes sense for you. And keep the integrity in the pose, integrity in the base. Heart rate might go up, it's pretty exciting work. Playing with that balance, the coordination. I don't think we have yet done any official asana. We're just playing again with warming up the body. Let's go ahead and stop both arms down. Shake it out, take your arms, your legs out. And after loosening up now, let's bring the feet a little bit wider apart. Turn the toes out a little bit and as you bend your knees, try to keep a nice long torso. So as if you're standing in mountain pose. When we settle into the feet, you'll take your arms straight out in front of you like you're holding a ball in your hands. Follow your thumbs down to the right and then up. It's like you're drawing a figure eight shape in front of you. Go down to the left and up and back down to the right. And as we go through that figure eight shape, we keep the knees from moving, the hips from bouncing. We're trying to follow the hands with the eyes and move through all these different joints of upper body and shoulders. Some friends of mine do this work called Edju and this is one of those moves. We're keeping the base stable and work through the joints of the upper body. One more time now. Now follow your pinkies up and over and let your pinkies carve out that figure eight shape. Still with your knees nice and stable, hips stable. Sink into your feet while carving out the figure eight shape. Now let your arms come down and as they come down, slide your hands to your inner knees and sit a little deeper so you can move your hips back and your spine comes a bit forward. Press your left knee out to the left as you turn to look over your right shoulder and then come on to center position and press your right knee to the right as you look over your left shoulder. Come on back to center. One more time. Let's look over the right shoulder. Press left knee out. Come on back to center and press your right knee out and look over the left shoulder. I like to end this part with a forward fold from here with the fingertips finding the floor and then inch your feet a little bit wider apart so your toes are facing straight ahead. With your toes facing straight ahead, you're walking your fingertips forward and let your head drop down between your arm bones as you root your heels to the floor. Some of you might enjoy palms on the ground. If it's difficult to put your hands down, we might have need to secure a couple blocks if that's helpful. But for now, if it's possible, fingertips or palms on the ground and take a moment to let your hips stretch as far back away from your shoulders as you comfortably can. Take a deep breath here, rooting hands, rooting heels. Take a deep breath in, deep breath out. Let's walk the hands in underneath the shoulder line. Heel toe your legs and feet towards each other and when your feet feel relatively grounded, bend your knees, press against your thighs and come all the way up towards standing. Now with your feet more under your hips, let's go ahead and take a few moments just to roll your arms and shoulders back. A few little loops. And then let those arms go in reverse just a few times going forward. They can move separately if that feels better for you. And then let your hips make a few little hula hoop-like circles. It's alleviating any tension we might have here. Anything we gathered. And go the opposite direction with your hips a few times. Alright, so from the circular movement, any last little shaking out we need to do. And I want to invite you to come down either to the floor for a sitting meditation or for Shavasana. And if you do sitting meditation, you might have a blanket and your ankles crossed in front in some way. If you come down for Shavasana, like I'll be doing, you might take your blanket underneath your head for a little bit of cushion and come down onto your back with a little bit of support under your head. So you might have bent knees on your back or for some of you straight legs works. Whichever position that you choose, ultimately we're looking for those qualities of stability and ease here. If you're in Shavasana, so much ease that none of your muscles in your body are actually working. If you're sitting, you'll maintain as many muscles as you need to to keep your core awareness. Maintain the inner spine, the length of the inner spine. So we can take a moment in any shape that you're choosing to just be a little more reflective, a little more curious about how these warm-ups have made your body feel. It's the core temperature like after doing that dynamic movements, balancing.
Doing coordination work. I'm just overall noticing the state of the mind. We feel energized, alert, calm, neutral. Just witnessing. See if that breath work, the concentration, everything you've done helps you land a little bit more in this moment. Cultivating more presence. Understanding what it feels like to be healthy. Developing. And by receiving the support of the ground, you might start to take slightly fuller breaths in and out. Exhale any way you're comfortable. If you're on your back, we'd start to bend the legs and take a moment maybe with your feet on the floor before rolling to your side. And eventually, from your side, working your way upright to a seat. And that feels, again, stable perhaps with a little height underneath your hips. So as you nestle into what feels like a good pose, take a moment, tune into the inner lift of the spine and a couple breaths just to help balance from the floor work if you are on your back. Big breath in, big breath out. And one more time, a big breath in, a big breath out. The hands gathered in front of the heart center, enclosing this part of our practice. May others always benefit from our practice. Namaste. And thank you so much for practicing and playing with me today in class. I hope to see you again soon. Take care.
Yoga for Our Nature: Vitality Boost


Comments


You need to be a subscriber to post a comment.
Please Log In or Create an Account to start your free trial.
