Description
About This Video
Transcript
Read Full Transcript
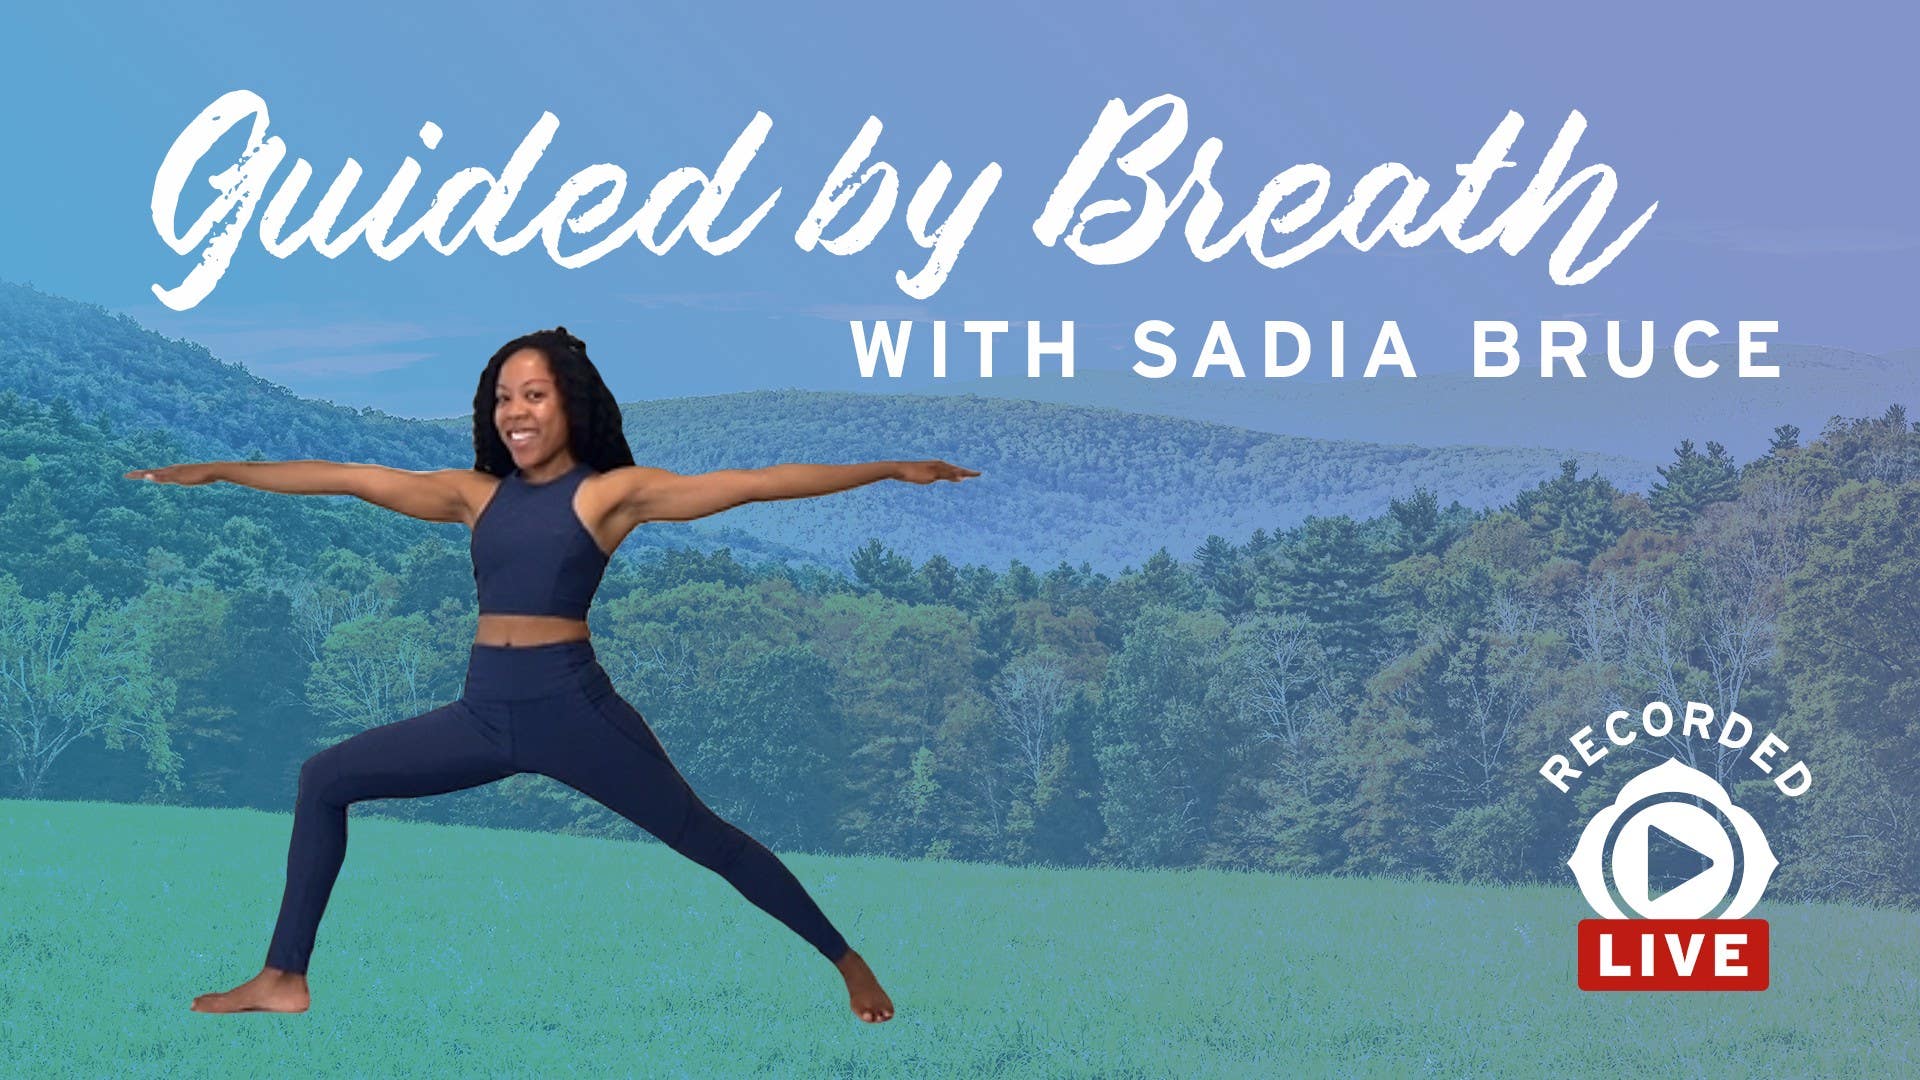
Hi there. Welcome to practice. Welcome to this episode of Guided by Breath. I am your guide, Sadia. I'm so glad that you're joining me for this practice. In this practice, we will be opening the heart, opening the fronts of the shoulders, finding a little extension of the upper spine in particular, but also just length and fluidity in the spine. So themes that are familiar if you've been practicing along with me for a little while, but it should be a good time. We're going to focus our efforts. So these efforts that we do in practice, they can be channeled towards a particular end. Today, that end is creating a single backbend shape, but in three different ways, shapes that are possibly quite familiar to you. So hopefully this will be enjoyable. For props, you'll need two blocks and a yoga belt or yoga strap. And go ahead, my friends, and grab your yoga strap or whatever you're using as a substitute. And you just want to make a loop in the strap that is about shoulder width apart. And how do you measure that? Well, you create the loop. Remember belts, like childhood belts that were like this? I do. I guess it's very specific era of time, the D-ring belt. But find a loop and you can use your eyes just to guesstimate the length. And then for true measurement purposes, you'll slide. Today, you'll slide the belt just on the wrist is fine. Yeah, wrist is fine. Place the wrist through the belt. Are your arms as wide as they would be if you were just extending them forward, shoulder width? That's how you know. Your strap loop is the proper size. And notice how I did that in one shot. So you know, you've been teaching for at least a little while, able to right away make that loop in the strap that's the perfect size. And then you'll set that off to the side. Your two blocks, my friends, we're going to begin today in a supported back bend. This supported back bend will be on two blocks that are on their lowest height. So maybe you've seen, you've done supported back bends. Typically they're done with the blocks a little bit higher. But today, lowest height, widest facet is on the floor. And these blocks are about maybe three to four inches or so apart. That's arbitrary number, but maybe start there. And you'll measure how will you measure? And you'll just take a look at this before you recline yourself, but you'll sit maybe six inches or so ahead of that bottom block.
Get our hips width apart. You'll slowly descend yourself onto your upper body, onto that, that bottom block. And you want it to hit somewhere. Let's say, I think I could come down a little bit mid back area. We want this block to support your thoracic spine, so mid to upper spine. And then once you've done that, you'll step your feet to the floor, lift your pelvis up, lengthen your tailbone forward and replace your pelvis back down. And then hands interlaced behind the head. And really it's less about the interlaced and more about heels of the hands hugging the sides of your skull to lengthen your neck a little bit as you recline. And you'll slide your hands up your head so you can lay your head down onto the block. My block is a little bit too far away. And you adjust to yourself accordingly. But essentially we want the upper chest to be supported or the upper back. And we want the back of your skull to be supported. Well supported. So it may mean that you have to move that block closer to your body. So more of the real estate of your skull is supported by the block. Then once you've set that up, arms will go next to your body. Once more, press into your heels to lift your pelvis up, lengthen, place your pelvis back down onto the floor. So why do we do that? To maintain space in the lumbar spine, lengthen the lumbar spine. In all backbends, we want to actually find length in the spine. That's priority number one. So arms next to your body, begin to inhale. And with the full length of your inhale, sweep your arms around and up. Arms can be actually as wide as you like. Lengthen through your fingertips and then grab opposite elbows, draw your elbows away from your hips. Draw them away from your hips. And as you do that, and it's a gentle, I don't want to use the word pulling because it's got a little, it's a little, little hard edge, but you are in fact kind of, let's say drawing your elbows away from your hips. And as you do that, so there's some activity going on in the muscles in order to make that happen, but you're not bracing or becoming rigid. Just gentle activity of drawing elbows away from the hips. Breathe into the sides of your body. Nice, full, long, complete inhalation that fills the belly, the ribs, the upper chest. Keep drawing the elbows away as you exhale and feel your, your abdomen, lower belly kind of draw in and up. Maybe you feel some other sensations there. And then friends slowly extend one leg and then the other. So the legs are extending straight along the floor. And then slowly release the backs of your hands onto the floor like a little yoga snow angel. Draw your arms towards your body, any amount that feels comfortable. And you may have to readjust, like roll the shoulders underneath the body. Let the, the elbows be soft. And this requires a little experimentation. So you don't just want to assume the position. And if it's not comfortable, you're kind of stuck there. Sometimes we have an odd habit of doing that. Let yourself arrive and you can, you won't, you won't ruin anything if you lift your arms up, if you adjust your body and then lay the arms back down. Just let the heads of the shoulders be heavy. Let the elbows be heavy. Let the backs of the hands and the forearms be supported by the floor. And you'll know that they are when those fingertips are in fact curling in towards the centers of your palms. Check in with the back of your neck. See that there's no, no pulling. So you want to, you actually want to maintain the natural curve of your, your cervical spine there. Great. And then once we have established all these little physical conditions. So alignment, I like to tell people, you know, it's not actually a, it's not a prison, it's a seat belt. So we're getting ready for this ride of surrendering the weight of our bodies to the blocks and to the floor. The seatbelt of alignment of setting up the body as we just did allows us to really drop into this experience of being supported. The upper chest is lifted, which allows us to breathe a little bit more deeply. And we often think of, oh, take a deep breath. Even that language, take a deep breath, just receive a deep breath. This shape allows you to do that. So let yourself now with the seatbelt on, go for this ride of full breath in and long breath out. Go for this ride of, you know, shoulder heads, heavy arms, completely supported by the floor.
And it's just the softening of the body that allows for even more deepening of the breath without effort, without effort. That's also key. And you just breathe here. You may find, you know, as you're, you're just breathing this way, do a scan of the body. Are there any areas where you could soften a little bit more? And it's quite subtle. So you ask the question and then you listen really, really deeply. And when you do find areas of bracing or holding, you just soften or at least invite those places to soften and give them time. So breathing in and out through the nose, receiving full and complete breaths in, letting the exhale draw you a little deeper into this experience. Great, friends. And slowly as you're ready, you're welcome, in fact, to stay in this position for an hour. That actually would be highly advanced practice. But let's move a little bit, shall we? So begin to receive breaths in that are maybe a little bit more, a little brighter, a little more active. Make small movements with your fingers and toes. Step very slowly and do this on your own time. You don't necessarily have to follow my exact cueing, always on your own time, gently, tenderly and curiously. And then slowly to exit this today, and there are many ways you could do it, but today I'd like us to roll onto one side, roll onto one side, and then very slowly, come up to a seated position and do it exquisitely slowly because I don't want to jar us out of the echo of the work we just did of extending the spine and opening the chest. I am going to sit myself on top of a block. It's just my preferred seat. We're going to be sitting for a few moments here, but you're welcome to sit as you like, but again, transition to that seat in a way that is nice and quiet. Great. And then once you are upright, give energy, body, nervous system a little chance to also make that, to finish rather, making that transition. And perhaps you feel some sensation associated with that or not. See that your sitting bones are rooted into whatever it is you're sitting on. And how do you know that that's true? Move around a little bit, move around a little bit and let the movements be small and quiet so that you can listen deeply and clearly. Move around a little bit until you find that weight is evenly distributed, both sitting bones, lift the crown of your head up. Perhaps you still feel the imprint of the block against the back, maybe even against the head. And can you friends actually with your body, can you kind of effect that sensation that you had when you were on the block? So can you gently coil the upper spine into the chest, lean the head back into this imaginary block and lengthen the neck. And feel that, feel the effort required to recreate that sensation and then soften around it a little bit. Let the shoulders relax, heavy your arms, draw your upper arm bones slightly back in space and feel how that creates a little opening across the chest. And then relax your eyes and your cheeks, your jaw. And just feel, you know, the poetry inside of the simplicity of just sitting in a way that allows your breath to move through your body with, you know, minimal obstruction. Bring your palms together at the center of your chest. Let's start with the sound of just a single ohm, a nice, low, resonant, deep ohm, ohm as if you're oming just for your inner landscape, the inside of your own body. So inhale your breath. Exhale your breath. And inhaling for ohm, ohm. I didn't feel that the resonance in that silence that follows the sound.
Good. And then bring your hands to your belly, friends. Soften again, the shoulders heavy, the arms. And do a little bit of simple three-part breath here. So as you next inhale into the nose, see if you can draw that breath deep down into the belly so that the belly expands. And of course the hands can feel that expansion. Again, like that, just breathing in, receiving a breath in and allowing that breath, drawing it down into the belly so that the belly fully expands. Feel that pause at the top of the inhale. And as you exhale, feel the contraction of the belly. After your next exhale, bring your hands to your ribs, so fingertips wrapping in front, thumbs wrapping behind. As you do that, the shoulders may want to hike up. Just encourage them to soften. And then these next few breaths, my friends, please inhale deep down into your belly, draw the breath down into the belly, but then let it rise a bit up into the ribcage. Feel that tremendous expansion of your ribs. And as you exhale, feel the ribs contract, feel the belly draw in and up. A few more just like that on your own. Great. So inhaling to draw the belly, the breath deep down into the belly, expanding it, allowing that breath to rise up to expand the ribs. And then exhaling, feeling the ribs contract, feeling the belly contract. And then friends, as you're ready, releasing the ribs, bringing your hands to your upper chest, maybe the fingertips can rest on the collarbones there. The next few breaths that you take, allow that inhale, draw it down deep into the belly, feel the belly expand, but then let that same breath expand the ribs and let that same breath now expand the upper chest. Great. And as you exhale, chest falls, maybe feel a little movement in the collarbones, ribs contract, belly draws in and up a few more just like that. And they keep going like that. Breath in, belly, ribs, chest, breath out, belly, ribs, chest. And perhaps you're feeling, you know, those three regions of the body pretty discreetly as you breathe, but now I invite you to find fluid breath. So still a three part breath, but now rather than these divided layers, can you let it be like a little, a little gradient of breath. So as you breathe in, belly, ribs, chest, belly, ribs, chest as you breathe out. And confession, the order in which you visualize this belly, ribs, chest, chest, ribs, belly doesn't matter. So allow, you know, allow this to work in you naturally. And you can name it in any order, well in the order that works for you. So you've got, you've got two options, belly, ribs, chest or chest, ribs, belly. So how, and you can ask yourself this, how is the breath drying down into my body and then leaving the body? How is the body responding as it receives this gorgeous wave of breath in and then as it helps to release this beautiful wave of breath out? Keep breathing, rest the backs of your hands on your knees or your thighs and you take a few breaths there. So you can release sort of this visualization of a full and complete breath, but allow it to continue to occur in you without effort. Maybe I should say trust that it is occurring in you. Right, lower your chin to your chest for a moment. Float your eyes open if they're not already open and float your head up. And then let's come to a tabletop position. So blocks can come towards the front of your top of your mat and you'll find a tabletop position, wrists under your shoulders, knees underneath your hips and you pause there. And once you're there, you know, arriving there, let's do some, some hip circles and maybe some, you know, I'm, I'm calling out movements, but really what I actually want you to do is to move your body in a way that makes sense for you. So everything, what I'm saying is actually more invitational, more suggestions than anything else, particularly when the movements are kind of fluid and organic. You want to, the point, you know, of practices is less to follow instructions perfectly and more to drop a little deeper into your own body home rather than, you know, someone else's telling of, of how you should feel and what you should do. But I digress, walk your hands forward. So you're in puppy dog pose, rest your head on the floor. So arms are extended, hips are stacked above the knees. Allow your chest to sort of open. A lot of folks, a lot of teachers use this language of allowing the heart to melt towards the floor. And you can use that and be like, I haven't found an alternative yet that I like. So allow your heart to melt towards the floor and breathe in. As you breathe out, friend, I want you to knit your front ribs together, broaden your back body. So we'll feel as though you're lifting your body up. Ears will come somewhere in line with your upper arms. But then as you breathe in, I want you to let the front body open as it does and allow the chest to move towards kissing the floor as you exhale, feel the belly firm, knit to your front ribs together, broaden your back body. A few more like that. Inhale, moving at the pace of your breath. Someone's like a little, little cat and cow action inside of puppy dog. Maybe helpful to think of it that way. Be mindful as you do this, pay attention to what's happening in your neck at the back of the neck. Can you do these movements without compressing the back of the neck? The next time you exhale and you've lifted the front body up into the back body, ears are in line with the upper arms. Can you feel, you know, the difference in effort required to maintain this shape? So it requires a little more work of the shoulders and of the arms. Slowly walk your hands back towards you, not so that they're under the shoulders, but actually a little forward of the shoulders and tuck the toes under, send your seat back to your heels, look forward and then hover your knees away from the floor, keep looking forward, slowly lift your hips up and back, keep looking forward and then release your head towards the floor and then allow yourself that pleasure and that luxury of arriving into downward facing dog, pedaling through your feet, pressing one heel down and then the other, all these things I'm suggesting, but you're welcome to please experiment. Softening the elbows, moving the head around, right, and then at some point coming to stillness and then walking your feet up to your hands, towards the top of your mat, walking in a weird way and how, how, what do I mean by that? I don't know. You, you show me and then once you are near the top of your mat, feet are about hips width apart, not a prison, but a seatbelt so we can enjoy this ride of forward folding, allow the crown of your head to release to the floor. Knees are soft to allow us to spill the pelvis forward and why, what is the connection? Your, your hamstrings, depending on how open or released they are, you bend the knees more, more or less according to, you know, what, what allows you to have that, that we call it the anterior tilt of your pelvis. If you like anatomical terms, release the crown of your head to the floor, grab opposite elbows for the first few moments. It may feel actually quite good to sway from left to right and you can do that and please enjoy that if you're doing it, but then also please at some point come to, to stillness in center. You can release your hands either to the floor or to blocks and just be in, you know, this, this keep saying it's like illusory stillness. So we're, we're still in the outer body, but of course there's tremendous movement of breath in the body and this is what I want us to feel right now. So as you breathe in, belly expands, ribs expand, chest expands. As you breathe out, you already know because you experienced it a little while ago, chest falls, ribs contract, belly contracts. So it's like, you know, I'm speaking, speaking with my, with movement. It's like, you know, that expansion and contraction is happening even in this shape. It's happening in all of the shapes. So what we're doing when we practice is remembering this, this breath, body connection. Begin to inhale with your inhale hands, see your shins, lift the center of your chest up and then exhale forward fold. Right again like that. Inhale, prepare pose, lift the center of your chest, lengthen the crown of your head forward and then exhale release. Keep going like that. And I want you to be fluid about it. So it may start to feel weird or look weird. That's great. Can you feel, you know, the sort of spectrum of movement that exists between these two shapes of prepare pose and forward fold? And can you move as your breath? So the inhale comes, you lift your chest to receive the breath and the exhale comes and you forward fold. So a few more like that. Maybe find, feel that little like undulating movement of your spine. Great. And then the next time you inhale, please sweep your arms around and up. Elbows can stay soft. You sweep the arms around and up, look up and touch your palms. And as you exhale, you draw the hands down the center line of your body and you'll pause for a moment in Tadasana Mountain Pose. Soften your knees, soften your elbows, soften your shoulders. And how about it? It's the last, last show in this season. It's a little calmly dancing child for you, just as a, you know, see you next time gift. But let it be slow and fluid. And it's like there are many approaches to this. You could laugh and it could be this funny thing you're doing. But actually, if you allow yourself to be curious about, you know, what's happening in your body as you do this facing forward the top of your mat, it's so interesting. It's crazy shifting your weight in the feet from one foot to the other, but also on just a single foot, you can shift the weight on a single foot. What's happening as you move your pelvis, how does that affect your spine? How does your spinal movement affect what's happening in your shoulders? Just fluidity, right? I think we're at a, there's a, in the somatic world, it's a crisis of rigidity. And we need to, we are the crusaders and this is, this is our, this is our superpower. All right, so let's start to wind that down and do it very intentionally. So rather than just abruptly stopping, finding a way, sustain motion.
And I want you to know in your brain that you are going towards Tadasana. So very slowly approach that stillness. And then once you do find that stillness, I want you to be still, but be inside of the echo of all that fluid, that fluid movement. And there's an energetic, you know, there's a qualitative difference between standing really rigidly in Tadasana, but being in Tadasana, being in Tadasana, you know, performing Tadasana versus being in Tadasana. Great. As you inhale, friends, we'll begin to bend your knees, round your spine for it. Now, as you inhale, unfurl your spine, let your arms open. We'll do that a few times. It's similar to what we were doing just now, but little different relationship to gravity. So now the torso is upright. So you're trying to exhale as the, the spine is flexed and curved and inhale as you lift the chest and open the spinal, step towards the center of my mat. That may be a little bit better for your, your view there, but breathing and opening to breathe in, exhale, forward, flexing the spine. Good. Almost feels like a shoulder roll. Great. A few more like that. Fluidity, fluidity. I find that when I do these fluid movements in between some of the more linear shapes, the linear shapes take on a completely different, different texture. So you can slow that down as you're ready. Great. Inhale, sweep your arms around and up and then start to exhale, hinge forward into that standing forward fold. Inhale to prepare pose. We're just doing a sun breath. Exhale and forward fold. Inhale, sweep your arms around and up, look up and touch your palms. Exhale, draw your hands down the center line of your body. Again, like that. Once more inhale, sweep the arms up. Exhale, soften the knees and hinge forward. Inhale to prepare pose. Exhale, forward fold. This time, interlace your hands behind your back in that standing forward fold. Elbows together, heels of the hands towards each other. Let your shoulders round forward. Feel that. Feel what's happening in your upper spine as you do that. And then broaden across your collarbones. Lift the heads of your shoulders up towards the ceiling. Feel how the elbows draw closer to each other. And as you inhale, bend your knees, lift your chest up, draw the knuckles back. Send the crown of your head forward. You take a few breaths there, just like this. Every breath in, opening the chest. But can you keep the architecture? I tend to say this a lot, but soften inside of the shape, around the shape. Great. With control, without snapping the hands apart, release the hands. Reach the hands back behind you. And then this time, as you next inhale, come all the way up to standing. Keep reaching the hands back behind you. Once you're standing, lengthen your tailbone, lift your chest up, lengthen your tailbone more. Breathe in, lift the upper chest. Breathe out, release that. Great. And then grab a hold of the strap that you made the beautiful loop in a little while ago. Loop it around your wrists behind you. And then stand in tadasana, somewhere around the top of your mat center is fine too. Lift your toes and spread them. Let's get kind of established in the feet, ground the feet down. Hands are, wrists should be able to press into the strap and the strap should be taught. Draw the fingertips down towards the floor and draw that arm slightly back. And then returning to the feet and the legs, send your inner thighs back, but lengthen your tailbone. As you breathe in, let that breath expand your upper chest, which you felt before, so you know it's it's real. It's not just yoga, yoga teacher speak. Let that breath expand your upper chest and, and facilitate that expansion by lifting the chest up. Simultaneously press your wrists into that strap, reach your fingertips down towards the floor, but also a little bit back behind you as you continue to lengthen your tailbone. So it's all just this continuous like this loop of actions we're doing with the body to create this kind of unified experience. And really press the wrists into the strap, but you don't have to like press so much that the mind braces, the body braces. Let the strap support you as well and support the arm. So a couple more breaths here. And who knew that just standing with the reaching the arms back behind you could actually involve so much work. So if you're, if you're feeling it now, there's a lot of sensation now. Good. You're on the right track.
One more breath and lift the chest up and then exhale very slowly. Release that. Release the, the strap. You can set it off to the side and then just let the arms relax next to your, next to your body. And feel whatever is there in that the echo of that experience of opening the front body while the spine is long. Inhale, sweep the arms up. Exhale, soften your knees and hinge forward. Inhale to that prepare pose nice and fluid. And then exhale hands. So the floor downward facing dog. Lift your hips up and back. As you inhale, lower your knees to the floor. Open the chest, but look, look, look down and forward slightly. So really exaggerate that length in the back of the neck. And then as you exhale, child's pose. Relax your elbows, relax your arms, and just take a couple of breaths there. Good. Come back forward. Step your right foot forward. So preparing for a little lunge here, you can tuck your back toes under. Lift the back knee up and slightly walk it back a little bit. So we're releasing the front of that left hip. I'm going to grab my blocks and place them underneath my hands. Little underneath my, my which are underneath my shoulders. Great. And we'll pause here. Untuck your back toes. Great. Now I want you to draw your attention to that, that back foot and let's actually tuck those toes again. So tuck the toes, spread the toes. Yeah, let's keep the back toes tucked under. Now take a few breaths here. I'm feeling called myself to lift my blocks up. So why don't I, I'll suggest that to you too. I want to have a little bit more lift of the chest. I'm going to draw my blocks back so that they are underneath the shoulders. Press the hands down into the blocks and lift the chest up.
This back toes are tucked under and our, our work here, at least for the first few moments is to establish, right? Those physical conditions of square the hips, draw the right hip back, left hip forward. And we take a few breaths here like this, pressing the hands down, lifting the upper chest up. Breaths, give the shape to your breath. As you breathe in, let the breath fill the upper chest. And what happens as you breathe out to your experience in the shape? Release your arms by your sides. As you breathe in, sweep the arms around and up and then interlace the hands behind the head. So we did that to start and we'll slide the heels of the hands just gently up the sides of the head to lengthen the neck a little bit. The elbows can be wide and as you breathe in, can you lift your chest a little more without lifting the chin? Great. Take a couple more breaths just like that. Take one more breath in. Great. And then exhale, release that, come to center. I'm going to walk the blocks forward and lower the height of the blocks and you should too. And then untuck your back toes, untuck the back toes, spread the toes, press the top of that back foot down into the floor. And then if it's accessible to your body, lift your back knee off of the floor. Try to keep drawing that right hip back, spin your inner back thigh up towards the ceiling, lift the center of the chest or send the heart forward and let the breath help you find that. So take another couple of breaths here, one more breath in there and then as you exhale, you can release that. Great. Hands to the floor, switch sides. Between sides, you might like to find some hip circles or again, whatever movements feel right for you. Hip circles, one possibility, but the possibilities are endless. You choose whatever works for your body. And some folks don't like that. Whatever works, what does that mean? Well, it's really an invitation for you to listen even more deeply because if the answer is, I don't know, the answers are there. You just have to have to attune to them. So that's the work, that's the practice. So you'll step your opposite foot forward, the left foot blocks are on their highest height underneath the shoulders. We'll tuck the back toes under so we can lift that back knee up and walk it back a little bit gently, noticing how that creates some more length in the hip flexor on that side. Hands are on the blocks. Interesting. Notice how this side may be interesting for you as well, what the differences are. We take a few breaths here just like this. Letting yourself be in an expression of this that allows you to keep breathing. That's the primary focus of all the practices that we do together. Your breath, is it moving freely and fully? Lift the center of the chest, back of the skull, lengthening. Release your arms as you breathe in, sweep the arms around and up, interlace the hands behind the head in the non-dominant kind of awkward way, lengthen the neck, widen the elbows, lift the chest up. And there's work involved, but the other work, sort of a meta work, is to do the efforts in the body, but can you find that sweet spot where you're not bracing and grasping for whatever experience. You're doing just enough to approach that, you know, that mysterious place we call the edge, your edge. One more breath in, with an exhale gently release, you walk your blocks forward, lower the blocks to the medium height, untuck your back toes, and pause for a moment, you can shift your hips a little bit back. And then as you're ready, if you're ready and interested in doing this little experiment, press the top of your back foot into the floor, all 10 toenails, lift your chest up and breathe as you're here. Nice full breaths in, long breaths out. Quite a lot of activity and sensation going on, but meet it with breath, meet it with curiosity and with breath. And if the sensation that is there is so much that you can't be curious or brief, then you want to definitely dial it back a little bit. Alternative is to keep the knee on the floor and just work on actively pressing that foot into the floor. And you'll find sensation and interest there too. Take one more breath in. As you exhale this time, let's just gently release, step that left foot or left knee rather to the floor. Let's find a little child's pose, sending the seat to the heel.
Shift your hips a little bit from left to right. It's quieting and releasing the hips, the hip flexors, letting them soften rather. Great, pause and just observe. As you inhale, come forward to baby cobra, lift the center of your chest, the back of your skull. Exhale, lower yourself down and press back to child's pose. It's a few more movements like that. Inhale to baby cobra. Great, exhale, lower it out. Press back to child's pose. This time as you inhale, come to stand on the knees and just unfurl your spine. So round yourself up as you finish the inhale and open the arms with soft elbows. And then exhale, child's pose. Again like that. Come to stand on the knees, little fluid spine, curling the spine up, opening the arms, and then exhaling to the child's pose. Arms are extended this time as you inhale, come forward to cow pose and then exhale to downward facing dog.
All right. I would like us to step the right foot forward. So you do that as you need. So I'm not going to cue how to step. You can take one step. You can take several steps, steps, steps, steps, whatever works for your body. And then you'll pause in a low lunge and welcome to use blocks underneath the hands if you like. We'll be here just briefly as we organize the pelvis. See that the feet are at least hips width apart. You can widen the stance. We're going to come to stand so you'll need to have a nice wide base of support. And then as you inhale, just lift your torso up. And then once you are upright, draw the right hip back, left hip forward. Great. Interlace your hands behind your back, your lower back. Use your thumbs to encourage your tailbone to lengthen. Draw the elbows towards each other. Take a few breaths here. I want you to feel the breath moving through the body. So as you inhale next, whenever that inhale arises, let the chest expand. Begin to slide the hands, the knuckles down towards the floor. Slash, straighten your arms. Draw the hands back towards your back heel. I'm going to take a few breaths here. Breathing into the upper chest. Great. With incredible control, release your hands. Reach the fingertips towards the floor. On and inhale, sweep the arms around and up. Let the elbows stay pretty well extended. So nice and clear. Oftentimes we've got our elbows nice and soft, which is also beautiful. But in this case, please reach through your fingertips. As you breathe in, lift the center of your chest up without lifting the chin up. And we'll take a couple of breaths in this high lunge. And take one more breath in. And as you breathe out, slowly descend hands to the floor. Step back into downward facing dog. Paddle through your feet. Maybe it's a nice wide downward facing dog.
I'm doing this thing now where I'm shifting my hips from left to right. Not something I've done lots in down dog, but it's interesting. And why am I doing it? The body sort of led me there. So allow your body and your breath to lead you wherever they lead you. So in practicing, we're practicing, you know, trust, trust, self trust. Let's step the left foot forward. However you like. Step, step, step, one step. Find a lunge, hands on the blocks or hands to the floor. Just want you to find some spaciousness or some clarity in the low lunge. And then as you inhale, you'll lift your torso up. Arms will relax for a moment and then interlace them behind your lower back the non-dominant way. The elbows draw together. Square the hips from left to right, both hip points facing forward. As you inhale, the chest will lift. Start to draw your knuckles back towards your back heel. Receiving nice full breaths in, long breaths up. With control, release the hands, sweep the arms around and up. You take a few breaths there. So without lifting the chin, lifting the chest. Take one more breath in as you exhale. Just releasing in a soft way, hands to the floor. Downward facing dog. If you're wanting to move through some series of movements to get to down dog, please do. And then lower your knees to the floor and come to lie down on your bellies. Great. And once you're here, sphinx pose. So just come up onto your forearms with your elbows underneath your shoulders, palms spread, lift the center of your chest up. Feel the collarbones brought in. Let there be little isometric movements. So you're drawing the hands apart. Feel the upper chest, expand with the breath. And in fact, can you let that lift of the upper chest be just purely a consequence of the breath movement? So I want you to try less is what I'm saying in many, many words. Do a little less, let the breath do the work. And then at some point, start to introduce a little bit of effort for this lifting of the chest. So try to work with your breath to create that lift of the chest. You may feel called to lift your elbows away from the floor some amount. Try to keep the bicep spinning up to the ceiling. And then slowly lower yourself down onto the floor, stack the hands for a moment, rest your head on your hands, shake your pelvis, your hips a little bit out from left to right. Great. And then my friends, please bend both of your knees and flex your feet. Send the inner arches of your feet up towards the ceiling. Bring your arms next to your body with the palms facing down, your forehead can rest on the floor. Crawl the hands back, feel that broadness across the collarbones that you're doing.
Feel that broadness across the collarbones that we've been exploring. Feel that lengthening of the crown of your head up towards the ceiling. Firm your pubic bone down, lengthen your tailbone. And in fact, stop lengthening your tailbone and feel what that does to the rest of the body. Breathe into the chest as you exhale, firm the pubic bone down, lengthen the tailbone and feel the shape. If it's accessible to your body, you'll grab your ankles, hold your outer ankles, and maybe it'll stay here. Or maybe with an inhale, you feel called to lift your chest. Any amount doesn't have to be a lot. Press your ankles into your hands. Keep your chin slightly tucked in the crown of your head forward.
So, dhanurasana, bow pulls. Our knees are bent, the spine is long, there's this upper back bend happening, the neck stays long. Flex your toes actively. Press your hands, your ankles into your hands. If you're not holding your ankles, arms can be next to your body. You just lift your body up, keep flexing your feet, press your ankles into some imaginary second pair of hands. Now take one more breath in. As you exhale, you can release that. Rest your head on your hands, and then windshield wiper your feet from left to right. And do this very deliberately, very carefully. Kind of neutralize the spine. Release your legs, press back into a child's pose. A little counter pose.
Lift your chest up slightly, look up between your hands, thread your left arm underneath your right, and find a little twist in your child's pose. You can rest your head on the floor if that works for your body. And take a couple of nice, full, easy breaths there. Unthread your arm, opposite side, thread the right arm underneath, rest the head on the floor. A few nice, easy breaths there.
All right, unthread your arm. Come, my friends, to stand on your knees, keep your toes tucked under. If you need to pad the knees, go ahead and do that. If you don't have any padding nearby, you can fold your mat. Ah, that's very helpful. Tuck your toes under, draw those inner ankles in, lengthen your tailbone. This time, friends, hands behind your lower back. Draw the elbows towards each other, lift the center of your chest up. So you've had practice doing this, lengthen your tailbone more. As you begin to breathe in, lift the chest, allow the chest to be lifted, and maybe you help it along, but without so much effort that you're bracing and actually can't breathe. You can keep the hands on the lower back, or you might feel called to send your hands to your heels. Keep the chin just slightly tucked so the back of the neck is long, and let the collarbone spread. And we'll take a few breaths here, marveling perhaps at the fact that this is the same shape that we just did on our bellies.
Actions are the same, but sensation might be different because we're in different relationship to gravity. How trippy. Take another breath in. And use an exhale. You can breathe here forever if you like, but use an exhale to lift both sides of your torso up at the same time. Great. Sit on your heels if that's accessible for your body, and just pause for a moment. And then, friend, come to lie down on your back. Draw your knees into your chest so you're in Apanasana, a wind-removing pose. Knees into the chest. Rock along your spine from left to right, maybe making circles with the knees. Organic movement, whatever is calling to your body. And then, please step your feet to the floor, ankles underneath your knees, arms next to your body. You pause here. As you inhale, press into your heels and slowly lift your pelvis up so we're never, never, never in a rush. Lift your pelvis up. Once the pelvis is lifted, roll the shoulders underneath the body and feel how the hands is kinetic chain from the shoulders to the fingertips. The hands now want to turn upwards. You can keep them that way, or you might like to interlace your hands underneath your body and roll the shoulders underneath a bit more. Either way, press your hands down, forearms down, upper arms down. Good. Draw the inner thighs together and lengthen your tailbone. You may marvel at the fact that this shape is the exact same shape that we were in just moments ago when you were on the knees, which is the exact same shape we were in when we were on the belly. It's crazy. Let's now drop into this particular experience. Heels press down, inner thighs spin towards the floor, lengthen your tailbone. Breath. What is it doing? We already know. Expanding the belly, the ribs, and the chest. Can you give the shape to your breath a little bit more and feel as that inhale helps us find a little more brightness in the chest and sort of space and clarity in the lumbar spine as we exhale and the belly draws in and up.
Take one more breath in. And then as you exhale, release the hands, release your pelvis down onto the floor. Draw your knees into your chest. Step feet to the floor once more and just windshield wiper your knees from left to right. All right. Knees into your chest. Extend your arms either into a T shape or a cactus shape. As you inhale, stay there and center. As you exhale, let the knees fall to the right and turn your head to the left and keep going like that. Begin to inhale, center. Begin to exhale, twist, knees and head opposite directions. A few more like that on your arm, um, centering to, you know, let the body be in a shape that allows us to breathe in. Exhaling, finding the twist. Pause on that one side for an extra breath. When an inhale arises, come to center and exhale, twist in the opposite direction and pause. Great. And with an inhale, come to center. With an exhale, lift your head and upper back off of the floor and breathe in and lengthen the legs. Coming to Shavasana, final resting pose, extend your legs, extend your arms, palms face up, take up as much space as you need. And then take that ride off into Shavasana where there's no effort at all. You're completely supported by the floor, by the earth. Breath is full and complete and completely effortless. And friend, you can stay resting in Shavasana for as long as you like.
If you'd like to seal up practice with me in a seat, begin to make your way onto your side, taking your your time to do that. You take a couple of resting breaths there on your side, and then with such care and tenderness and all the rest of it, you'll bring yourself up to a comfortable seated position, sitting well, spine is long, lift the chest, lift the crown of the head. Bring palms together at the center of your chest and bow your head to your hands thanking yourself for practicing and honoring your body and your breath, the connection between the two and your beautiful commitment to deepening that connection, to becoming so familiar with your own inner landscape so that when you go participate in that outer landscape, it's much more skillful and soft and easeful and curious. The light in me sees and honors the light that's also in you. Namaste.
Guided by Breath: Sadia Bruce


Comments


You need to be a subscriber to post a comment.
Please Log In or Create an Account to start your free trial.
