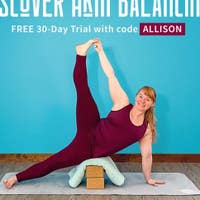
Pump Up Your Bakasana
Description
About This Video
Transcript
Read Full Transcript
Hi everyone, welcome back. So today's practice of pump up your bakasana is to demonstrate different ways to use props for the bakasana family of arm balancing. And really what I love about this practice is that there isn't one way to approach these poses and that every setup has something to offer, something unique to offer to every practitioner. So you'll need a blanket, a bolster, and two blocks. I have not one, but two assistants today. This is Brando. This is Rocky the rocket. And you know, we'll just see how it goes. So come into any comfortable seated position for yourself and bring your arms out in front of you. So they're shoulder width apart and then take your fingertips, point them down towards the floor for wrist flexion and do the opposite. Take the fingertips up towards the ceiling for wrist extension and do that a few more times, warming up the wrists. Then from here, bring the palms of your hands to face down towards the floor. Take your thumbs closer towards each other. Point the fingertips down towards the floor, sort of angled in towards each other. Circle the wrists around without moving your forearms. So the forearms are incredibly steady. Lift the palms up ever so slightly and then pull the thumbs back in towards each other. Undo that two more times. There's a sense of steadiness in the shoulder girdle and control as you circle your wrists and then do that in the opposite direction. So the pinky fingers are moving away from each other as you circle outwardly and the thumbs move towards each other as they come in. Okay. And from here, cross your right arm on top of your left arm, hold your hands, pull your elbows out to the sides. Take the knuckles down towards your lap, pull them towards your heart and lift the knuckles up any amount. Then from there, you'll reverse the direction pointing your knuckles towards your heart, down towards your lap and out in front of you. Okay. Then the elbows, point the knuckles down towards your heart, towards the ceiling and then reverse. And you'll do that one more time. Lift up and then straighten out the arms and you'll cross with the left arm over the right arm. Hold your hands, bend your elbows, knuckles down towards the floor, towards your heart and then up any amount and reverse the direction. And you'll do that two more times. So a nice fluid, easy motion, feeling out the rest. Okay. Good. And release the clasp. Come on to all fours for tabletop. Have a block handy. So you can do this with or without the block. With the block, it's a little bit more challenging. Okay. So you'll take the block between your heel and your right buttock and have your hands about shoulder width apart, but bring the hands in a little bit closer if you can. Okay. So instead of being the wrist directly underneath the shoulders, bring them slightly closer to your knees. Then from here, lift the block up and back behind you. Point your knee out to the side.
Then bring your right knee in towards your right arm and maybe there's a connection there. Pause for a moment and see if you can round your spine just like you would in bakasana. Then maybe that knee comes close to the right upper arm or even makes contact and circle down and around, lift the block up, point the right knee to the right, circle around. Okay. Pause, push into your hands, round your spine, any amount and down and around. Point out, come closer, make contact, round the spine, any amount and then lower the right knee down, release the block and come over to the other side. So you start to get used to this connection between the lower body and the upper body. Okay. Hands pulled back ever so slightly, lift the block up, squeeze the heel into the block, turn the leg to the left, take the knee out to the side and then pull the knee in and up towards your left upper arm. Pause and round the back, any amount and then bring the leg down, up, turn the thigh to the left, bring the knee towards the left upper arm, pause, round, up and back. Turn the leg out, pause, round. Every time you round, you're lifting the abdomen up and seeing if that left knee comes just a little bit higher without losing the block and then lift up and lower the left knee down. Take your block out and keep your block with you.
You'll make your way down onto the mat. I'm going to move my props over just a little bit so I have some room to move my arms. Make your way down onto your belly and have your feet about hip bone distance apart, maybe even wider. Lock in your right hand. Okay. And then from here, you'll lift up into shalabhasana. Okay. Now you can keep the block here and squeeze the block with your right hand, lower down, switch the block behind the back, squeeze the block with your left hand, inhale up. Okay. And go back and forth between those two movements or bring the block back into the right hand, squeeze, inhale, lift up into shalabhasana, swim the arms and pass the block, take the block down to your left side, lower down and then inhale, rise back up, squeeze the block with the left hand, lift the arms overhead, pass the block, squeeze with the right arm and then lower back down. Do that two more times, one to each side. Lift, pass, bring the block down to the side, keep squeezing the block with your left hand, inhale up, keep the breath steady and smooth as you pass the block and then lower all the way down. Move your block aside, take your hands to the mat and press yourself on up. Grab both of your blocks now so that you can elevate the floor as you take the blocks to the top of your mat. Place your hands on your blocks at any height that's convenient for you and step your left foot forward. Tuck your right toes under, steady yourself and then from here you can start to kind of climb up, notice what's happening in the front of the right hip as you bring your torso a little more upright, maybe you bend the knee more, shorten or elongate your stance. Then from here keep your right hand on the top of your right thigh like you're smoothing the right hip flexor out. Bring your left arm out in front of you and pull your fingertips back in the direction of your shoulder. Take a breath there, then release your hands to your blocks, spin your right heel down to the floor, inhale up into warrior two. From warrior two take your left forearm to your left thigh, bring your right arm overhead for extended side angle. Then from here we're going to come into a little bit of that cow and cat action so you're going to pull your right arm down and the left ribs forward and then as you take the right arm overhead you'll lift the left side ribs away from your left thigh. Pull the left side ribs forward towards the left knee and then pull the left ribs away from the left side body so it's a lateral cow cat in extended side angle. Good and do one more round. Okay as that arm comes overhead, bring the left side ribs forward again towards the left knee. Take your hands down to your blocks as you spin onto the ball of the right foot, elongate the spine, take your left palm to your left thigh, turn your torso to the left, keep the right thigh lifted in case it's dropping and then stay here, lift your left arm up towards the ceiling for a twist. As you exhale lower the left hand down, lower your right knee to the mat, take your blocks so that they're on the lowest height and give yourself some room between them. Push down with your hands, broaden your shoulder blades, lift your left heel up and then either drag the left foot back or maybe just like that tabletop you can lift the left foot, slide the heel back by pulling it towards your buttocks and lowering the left knee back into tabletop. Let's switch sides. So you'll step your right foot forward, tuck your left toes under, establish yourself in your feet and as you're working there take your hands to your right thigh. Okay you'll pull the abdomen back as you bring your torso upright. From here take your left hand to the front of your left hip like you're smoothing the front of the left thigh, right hand out in front of you and pull the fingertips back. Take a breath here. Then on an exhalation lower your hands back down to your blocks, spin your left heel down to the floor, inhale up into warrior two. From this warrior two take the right forearm to your thigh, lift your left arm up into overhead, lateral cow and cat. You're going to pull the right side ribs forward as you lower the left arm to your left thigh. Take the left arm overhead as you lift the right side ribs away from the thigh. Pull the right side ribs forward, lift your left side ribs up towards the ceiling. Now as you're doing this notice if there's movement at this right thigh, right, is the leg straightening and bending. Can you keep it steady as you find these lateral movements, these side bend movements of your spine? Good and then the next time the left arm comes overhead pull the right side ribs forward, turn the torso so the hands come back down to your blocks, come on to the ball of your left foot, take your right hand to your right thigh, inhale, elongate your spine, exhale, rotate, okay, lift the left thigh up in case it's dropped, then maybe that right arm comes up. On an exhalation lower the right hand back down to the blocks, make sure that they're even, lower your left knee down to the floor.
Then from here push down into the blocks, broaden your shoulder blades, lift the right heel and then maybe drag or lift that right foot up, pull it towards the buttocks, maybe point the toes and then settle that lefty right foot back down to meet the left. Okay so from here we'll come into a wide legged forward bend. So take your left foot, step it forward, tuck your right toes under, lift the right knee up, then walk with your blocks towards the long edge of your mat, your toes pointing forward and maybe a little more space between your feet. With this version we'll come into a head supported version of wide leg forward bend. Take your hands to your hips, come up right, inhale, lift the chest, inhale, hinge forward and then place your forehead onto your blocks pretty much where your hairline meets your forehead. And you can rock a little bit forward and back until you find that sweet spot of support. Lower your hands down, you can reach them wide towards your toes and take a few breaths into the back of your body. Good then from there take your fingertips to the floor, lift your chest halfway up, walk your feet in just a little bit, turn your toes out and then again fold forward. Okay so this time the legs are turned out as you support the head. Breathe into your back body feeling the shoulder blades as they expand, the middle of your back expand and your lower back. Good inhale, lift halfway up again, turn your toes to face forward, take your hands to your hips and inhale all the way up to stand. Okay so let's come to sit, grab one of your blocks, you can place the other block aside, don't place it on your cat, they won't like that. Okay and we'll come into the first prop variation of bakasana. So this is a great one if you're giving your wrists a little bit of a break okay or you find it challenging to balance on the hands then you can balance on your sit bones. So take the block between the inner feet, squeeze the block, tilt your torso back, hover the feet away from the floor. Okay and then from here pull the torso and the thighs closer together. Okay this is probably even more work than bakasana. Okay so gravity is not usually our friend so much in this position as it is in the arm balance. Take your hands out in front of you, pull the knees in, lift the chest up and then from here you can mimic the arms pulling the fingertips back. Hug the block, straighten the legs just a little bit and this is like when you're trying to lift your feet away from the floor. Okay so it's a little counterintuitive in the head right now but it'll make sense. So imagine your feet are on the floor and as you pull your heels towards the floor it's as if your feet are coming away from the floor in the actual hand variation of the arm balance. Okay then bring the feet onto the imaginary floor, pull the heels towards the buttocks to mimic lifting the feet away from the floor. Do that one more time. Lift and then pull the heels back. Good and then really step. So that can be your first variation of bakasana. The next variation that we can try is a head supported variation. So you're going to take those two blocks again, stack them one on top of the other. They're both set up on the lowest height and horizontally and that way they're more steady. Okay so we'll set up our bakasana. You can bring your feet together or slightly apart. Bend the knees out to the sides and take your hands down to the floor about shoulder width apart. So already you have the proximity of your upper limbs being closer to your lower limbs. So now with the head supported variation you've already shifted your weight. Okay so when your head is supported your weight has already been shifted so you're working on that pulling the heels up towards the buttocks. So very similar to what we did in the seated version. Okay so elbows back, hands come down. Okay you're going to find that place where the forehead meets the hairline. Okay and so I'm a little close so I need to pull my hands back, lift my buttocks up a little bit more, then see okay this is the place where I need to be. Then from here can I pull my heels towards my buttocks. Okay so the head is supported. Maybe you do one foot at a time. Maybe you alternate. Okay and then feet come down. Head lifts up. There's variation number two. Now that was going well. Okay maybe you do practice bakasana on your hands. Then you might try this variation. So you'll take that block same deal. Place the block on the lowest height horizontally between your feet. Set up your bakasana so now this without head support. Take the hands to the floor. Support the knees on the upper arms. Hug in. Squeeze your block. Shift your way forward and then pull your block up towards your buttocks. Okay and then block a little bit away from the buttocks and hamstring curl. Pull the block up towards the buttocks. One more time away and draw it back in. Okay feet come down. There's another propped up version of bakasana. So you can see sort of this evolution and there are lots of steps in between but different ways that you can incorporate your blocks or your props in general into your arm balancing practice. Okay now grab your bolster. Make your way down onto the mat.
So this is a supine variation of ekapada bakasana or one-legged bakasana. So to give my hands something to press into I'll hold my bolster. There it is. Okay and then I can bend my elbows any amount. I lift my head a little bit. Lift my shoulders up so that I can allow my shoulder blades to broaden. Sometimes they'll get stuck right if you're pinning them down against the floor. So give them a little room to breathe. Pull your left knee in towards your left elbow and then slide your right leg forward. Ekapada bakasana. You can practice straightening your right arm. Your left arm will stay bent. Okay maybe bakasana. Pull the feet in together. Lift the right knee up towards the right arm and then pull the right knee into that upper arm. A little bend to the right elbow. Slide your left leg forward. Straighten out that left arm. Push into your bolster. Take another round of breath here and then bring the left knee in bakasana. Push your bolster up towards the ceiling. Good. Lower the head, shoulders and feet. Okay continue on with this variation or you can try the next one. So with this next one the bolster will move aside. Grab your blanket and your blocks and you'll set them up towards the middle of your mat. Okay and it really is your choice whether you want the blocks to be horizontal or vertical. I like the blocks being vertical in this sense because then I feel more of my shin making contact with the blocks. Okay but if you want a wider base you're welcome to turn them horizontally. For padding in case the shin is sensitive to the surface of the blocks then you'll add a little height plus padding with the blanket folded over and you just want to be mindful that right the blanket is covering the blocks in such a way that it's not misleading. Okay come to your feet. You're gonna stand in front of your blocky bench. Fold forward. Take your fingertips to the floor and then place your right shin on top of the block blanket. Then from there take your hands to the floor and your left upper arm is going to come very close to your left knee. Maybe you can bring them to touch. If that's the case shift forward onto your hands and as you shift onto your hands keep the right shin supported and then pull the left heel like you have that block pull the left heel up towards the buttock and then you can work on straightening this right arm. Lower the left foot down shift back and switch sides. So I'm gonna move my blocks over to the other side. Okay I step forward take my fingertips to the floor as I support my left shin on the blocks. If you want more support you can support the left knee right so you can shift your pose back more. From here I take my right arm right so I make this connection between the right upper arm and the right knee. Hand comes down. Left hand comes down shoulder-width apart. I shift forward. As I shift forward I can feel the pressure of the right knee pressing into the back of my arm. Then I want to think of scraping my right foot up so the heel comes closer to my buttocks. Shift there we are. Okay and then if you want to bend or straighten the left arm go ahead and do that. And then from there foot comes down shift back and then that side is over. Okay so if that was going well let's go to the next variation. So with this one I'm gonna move the blocks behind me and I'll remove the blanket. Okay because with the blanket it's totally fine to have it there but the ball of the foot will come to the block so you really do want to feel the good surface of the ball of the foot making contact with the surface of the blocks. Okay so for the setup I want to place the ball of my right foot onto the middle of the block then I lower my right knee down to the floor. From here I set up the arms very similar to what I did before. Left upper arm connects to the back connects to the front of the left knee. Hands are shoulder width apart. Now I'm gonna lift my right knee up and that's going to shift my entire pose forward. Okay I keep this left knee bent I'm gonna straighten my right leg a little bit more but when I do that I'm gonna pull my left heel up and back. Okay so it's one more step into ekapada bakasana. Then the left foot comes down right knee comes down and then the right knee can come forward to sort of dismount. Alright I'll show you on the other side. So I'll take the blocks move them to the left side of the mat. Okay you test. So the left center of the ball of the foot goes to the center of the blocks. Left knee comes down. I shift my hands over just a little bit. Walk my right foot forward. Okay I can test here. Test here. So the right upper arm connects to the right knee. Hand places down. This setup does not move. It does not shift. Left hand comes down. Then from there I start to lift the left foot up. Make sure I have good bearing in those blocks. I lean forward to feel more weight come into the back of my right arm and then slide the right foot back as I straighten the left knee. Ekapada bakasana or one legged bakasana. Good. Right foot down. Left knee down. Slide it forward. Come up to sit. Alright we have one more in the bakasana family. Parsva bakasana. Side crow. So you'll take your blocks.
Place them horizontally so the short edge of the mat lines up with the long edge of your block. Again I find having some padding here can be useful. So my hips, the side of my hips will come onto the support of this stack of blocks. So I start kind of on my side and then eventually I will come more onto the right side of the hip. So the feet come in pretty close like a squat. Then I turn my torso to the right. Now it's not important you can connect the arm or they can be separate. I'll have the hand shoulder width apart. I'm going to do this side without connecting. Okay. I lean forward. So now more support is underneath that right hip. And with the more support underneath the right hip maybe the feet feel lighter and can swish out to the side. Bend both of your elbows or try straightening your right arm. Left arm will remain bent but maybe you straighten that right arm. Turn your right side ribs towards your right arm. Good. Lower the feet down as you push back and we'll come over to the other side. So left side hip comes to the blocks. Okay. This time I'm going to connect. So I lift and turn. As I lift and turn I'm going to hook my elbow to the outside of my right thigh. Bring my fingertips down. Bring my left hand down. And then from here I can adjust. I can bring my knees in a little bit closer. Secure that hook a little farther as I rotate my left ribs towards my left arm. I bend, shift and lift. See if you can sweep your feet out to the right and then roll the right side of your ribcage down towards the floor. Then upon exit push the floor away as the feet descend. Alrighty. So now we're going to wind down a bit. You can move your blocks and your blanket aside. Grab your bolster and bring your bolster towards the front dish of your mat. And scooch up towards the bolster as close as you can with the soles of your feet on the bolster. Then make your way down. Take the soles of your feet together, the knees out to the sides for a supported Supta Baddha Konasana. You can also do Suha Konasana with the ankles crossed. Interlace your fingers and then give yourself a little traction. So pull the elbows out to the sides without losing your grip. Turn the palms. Press the arms overhead. Press through the knuckle mounds. And then bend your elbows. Flip so the palms of your hands face the top of your head and reach the arms away from you. You can even internally rotate your upper arms a little bit here. It could be quite interesting feeling. Then bend your elbows again so your palms face your heart. Find a little traction on the wrists. Flip the palms to face away from you. Lift the arms overhead. Turn the palms to face your head. Press up through the backs of your hands. Good. And then release your arms down by your sides as you straighten your legs for a brief Shavasana. Just take a few breaths here to feel the support of your practice. There are many ways to prop to set yourself up and that we don't always have to do the one way that we're asked to.
There can be such a compilation of things that we can do, which is really interesting and fun and explorative. So I encourage you to explore these variations and beyond. And you're welcome to stay here for a few more minutes. Otherwise, bend your knees, taking your feet to the bolster. Roll to one side. When using your hands, press yourself up into any comfortable seated position. You can sit on your bolster if you'd like. And close your eyes. Take your hands to your heart. Thumbs to your heart to uplift it. And thank you so much for joining me and I'll see you for the next one.
Comments


You need to be a subscriber to post a comment.
Please Log In or Create an Account to start your free trial.
