Description
About This Video
Transcript
Read Full Transcript
Welcome back. I'm excited to be here with you today. We have a lesson focused in backbends and we're going to use all of the techniques, the ideas, the concepts from the previous lessons in these backbends. I think you're going to love it. We're going to use the core, we're going to use the pelvic setting, use the leg strength. I'm going to start out today a little differently lying down on the tummy. Join me on the mat, tummy down. We'll take a few seconds here to just relax. You can fold your hands, make a pillow for your chin. We'll take a few moments to take a breath and settle the body down. Our first movement is going to be the pelvic tuck that we've been using in previous lessons just done from this new perspective. To start, try rolling your waistband up away from the floor toward the ceiling and then let it relax back down. Again, roll the waistband up away from the floor. Try using only the abdominals right now. It's easy to get the glutes involved but we're going to try to keep them quiet. In backbends, you keep doing your pelvic tucks, just want to share something. In backbends, the primary hinge is here at the hips. It's really important to keep the spine healthy and happy in backbends and get the benefits. Let's try a few more. Lifting the waistband by engaging the abdominal muscles and then relax and do one more. Abdominals and then relax. The next step, we're going to set the pelvis in place using that little waistband lift. Tuck your right toes under, bend the knee and bring the heel as close as you can to your tail. Set it back down. Same leg, same thing. Tuck the toes under first, set the pelvis, a little abdominal curl and then bring the heel towards your hip. Last one, right toes under, set the pelvis, bend the leg. Set it down. We'll switch to the left leg now. Gently do a little waistband lift like we've been doing. Tuck the left toes, bend the knee. What we're doing here, as we set the pelvis and use the abdominals, bending the leg starts to bring awareness into the hamstrings and the hip joint. Tuck the left toes, set the pelvis and curl and let it down. Next, we'll go for a little quadriceps stretch. Start with just a gentle tuck, lifting the waistband a bit from the floor. We're going to use the right hand to capture a right ankle. You can keep the head low or just a slight lift away from the floor. Let's start again with that lift of the waistband and that's going to be the primary active stretch on this pose. Lifting the waistband more and more, you'll start to feel the front of your right leg for sure. And then you can start to add some activity from the glutes just a little bit to roll the tailbone straight back to the other end of your mat. Hold there, release and let go. Second side, little waistband lift. Bring the left leg in, capture with your left hand. You can either keep your head down or lift the chest just a little bit like I'm doing here. Again, the waistband up and gently rolling the sacrum and tailbone towards the other end of your mat. And I'm doing it this way so we really feel where that hip hinge is rather than lifting up or pulling up the leg which will often put it into the lower back. And then gently release. One more time each side. Little waistband lift, right leg, quad stretch and then rolling the sacrum and tailbone toward the other end of your mat. The other end is that way. Holding there and feeling the pelvis turn against the quad stretch that we've created here. And then release. And second side, waistband lift. Roll the hips towards the other end of the mat. Feel where the hip hinge is. That means where the pelvis and the thigh come together. This is what's going to protect our lower back as we get into the deeper back bends. And then release to let go. Next stop, we're doing a baby cobra. If you take your hands right alongside your chest, start with a little waistband lift and then bring the chest up. Holding here, keeping the pelvis rolling toward the other end of your mat. And we use the abdominals and a little bit of hip strength to do that. Come back down. We'll do two more. Waistband first, pelvis rolling towards the heels and then lifting the chest. If you hold the chest up for a minute and now let go of the abdominals and the hips, you feel how you sink right into your lower back.
And that's what I'm trying to keep us out of today. Lower your chest. We'll reset one more time. Little waistband lift. Rolling the pelvis towards the other end of the mat. Now create your lift. And we have the full support, the center of the body. And then rest. Fold the hands underneath your forehead and we're going to lift the arms and the upper body together. Waistband movement. Raise up the hands, the upper body and hold. Come back down. We'll do two more. Set your pelvis and coming up. Holding here and rest. And if you're ever curious, you can try that same experiment we did before where we let go of the pelvic position. And you'll feel again, it goes right into the lower back. Something we don't want to do in the deeper backbends. Set the hips and pelvis one more time with that upper body lift. Holding here and then rest. We'll tuck the hands in next to the chest. Tuck the feet. Press up. And we're going to do a few cat and cow and sideways spinal movements. This is just to release and relax the whole area of the spine. Join me in this movement. It's left, it's right, it's arching, swaying, all sorts of movements for the cats and dogs. A couple more. And then come to neutral. Once again, we'll set it back down to the floor. We're going to take it to the next level with a locust pose. We'll start by gently raising the waistband and setting the pelvis by rolling it towards the heels. And couple options here. You could rest your hands on the back of your hips or if the shoulder mobility is there, could you capture your hands, interlace the fingers? And let's do the lift. The nice thing about having the hands here at your bottom is you can coach your hips in the direction I've been suggesting towards the heels. Hold here. And if the pelvis has moved in the right direction, you'll feel tons of support in the abdominal area. Rest down, unlock the hands. Rest your forehead on your hands. Let's do it one more time. You choose the right hand position for you. I'm going to lock the fingers, waistband a little up, and then setting the pelvis toward the heels, lift up the shoulders, lift up the chest. This is a great opportunity also to remember taming the ribs. If the ribs fall out like mine just did there, I drop into the spine. I'll recollect my ribs now if you can see. See how they come back in? And that makes the abdominals support the spine. Hold and then rest. Forehead down on the hands. One more back bend from this perspective, and that is cobra pose, bhujangasana. We're going to set the hands closer to the front edge of the mat. Set the pelvis, waistband lifting, ribs gently held at home, not letting them flare out. Press the floor, come up about halfway, and bring your attention to the hips, what they're doing. We want to, and I'm going to do it now, hopefully making it obvious, I'm going to tip. Can you see them moving? I'm rolling the waistband up from the floor. A little adjustment of my arms to help the pose, keeping the ribs in, and then coming back down. The goal in this pose here is feeling how the hip hinge, as I spoke about earlier, is doing a majority of the moving. It's doing a majority of the moving. That's important for the spine.
One more time. Gently tuck the pelvis, raise the waistband, begin to press up. We'll pause about halfway there. I'm going to do a little bit more of that waistband movement. There we go. I'm moving from my hip joint, not the spine, from the hip joint. Ribs in check, and now I can really create the lift in this pose. Spine feels very happy, not compressed in any way. So let your hips be the guide to your pose. When the hips stop moving, then be careful because the only other movement possible is in your spine. Gently come down, rest a second with your forehead on your hands, and then we're going to push back up into all fours and practice that all over-the-place cat and cow movement. You could go side to side and get the hips involved too. You want to take out any residual tension in the muscles. Hips side to side, spine side to side, nothing specific. Whatever you intuitively want to do, you do. Spine could go up and down a few times. Full cat-cow. Just a couple more, and then let's take it into a downward dog. Walk the hands a bit forward, tuck your toes. Arm bones are supported as we raise up, and a great opportunity to pedal out the legs again. Let your hips really sway. When you bend one knee, hips sway to the opposite side. This is again taking out any residual tension from the backbends. As you're learning to move the hips in the way that I'm suggesting, sometimes we grip so hard that there's residual tension after we do the pose. Over time you learn to be a little bit easier on the way you use the muscles, but still get the same powerful lift. A couple more pedaling. Let's pause and dog pose. Feel the support of the arms, the movement of the chest toward the belly button, heels reaching into the floor as best as you can, and then come down to your knees for the next pose. This is a moment where if you have a blanket or if you want to fold your yoga mat in half for yourself for a little extra knee cushion, you might really appreciate that for this pose. We're gonna do a kneeling lunge, and I'll start with my right knee forward. And for this pose we'll start out allowing the hips and the right knee to go forward. Call it a kneeling lunge, and then coming back. This is just to further open the body before we get deeper into the pose.
Dropping forward, coming back one more time. Forward and back. To set up this pose, I'm going to do a little waistband back, tailbone gently down. I'm going to use my left hand, lean forward a little, to catch my back foot. Before I do anything else, I'm going to reset the pelvis. Waistband back. If it's available to you to grab with both hands, please do. You don't have to go way forward with the body, the hips, the knees here. We can just stay here and work on the hips, the movement of the hips. Ribs in check, and then gently gently gently let go. We'll switch right into the other side. Right leg back, left leg forward. If you again you need that padding under the knee, fold it up as much as you need. Take a few minutes to drop in, to ease into the hips, and then coming back. Into the hips and back. Again, easing in and back. Then before we catch the leg, you can see here I tuck back just a little bit. When the waistband goes back, the top of the thigh comes forward. That's just the biomechanics of how the hips works. You want to feel that. Lean in a little, right hand grabs, reset the pelvis, tailbone down. If it's available to you to catch with both hands, let's do it. I recommend not pulling your leg deeply, deeply into the hip. It just puts too much stress on the front of the leg. Instead, work on the movement of the pelvis. You could even let the leg out a little bit to get more awareness in the movement of the pelvis. Ribs gently back, and then soft release the leg. We'll step back, dog pose, holding here. One way that you can use dog pose as a counter pose for backbends is a little bit more than normal to take the tail a little down towards the heels. This creates space in your lower back. Let's do just that then. Tail, tailbone, slightly turned down towards the heels. Then look forward and raise your heels. Step the right foot forward into a full lunge position. As we've done, gentle tuck of the hips, support into the hamstring. We're coming up into crescent warrior. Hold here, gentle tuck, shin pressing back towards the back foot, back leg pressing to center, the net result. We have an uplift without a feeling of strain on the lumbar at all. Holding here. Right shin pushing backward into the body. Left heel and straight leg coming forward into the body. That meets in the middle, and we can lift up. Hands to the floor, back to downward dog. Gentle tuck of the tail. Very, very gentle. Nothing almost imperceptible just to get that length in the lower back. Raise the heels, look forward. Left foot forward for the crescent warrior. Very gentle tuck of the pelvis until you feel the connection from sit bone to the knee. Bring yourself up into your crescent warrior. Left shin pressing back into the body. Right heel through the straight leg coming into the body. And you can see as I do that, I'll do that now, I get this connection and lift and the action in the pelvis so we can raise the arms. Again, with no strain on the lumbar. No strain. And then hands down. To a downward dog. Practicing the little, little tuck of the pelvis so the lumbar, the low back feels long. Knees down. Knees and feet together in this child's pose so that you feel that your low back is given a little rounding shape to counter pose from the back bends. Holding here. And then press yourself up out of the child's pose. Our next pose is camel pose or ustrasana. To take camel pose we're gonna come into a kneeling position. Knees a little bit apart, feet a little bit apart. And I'm going to direct your attention again to the waistband action we've been using throughout this class. The first move is to move that waistband back. And again, I'm using those words rather than take the tail down because it's gonna make you pinch the buttocks together. And I don't want that. It locks up the pelvis.
Instead, waistband back. Feel the fronts of your hip joints open. Relax it. You can even touch as I'm doing here the fingertips right in the center of the low abdomen. Tell that area to roll back. One more time with me. Touching that area with the fingers, telling that area to go straight back. And you can feel how the pelvis turns over the tops of the legs. With the fingers there, now let's take it a little bit deeper. We're gonna lean back, not by from the ribs, but from the pelvis. Keep turning. Keep moving the waistband back. Waistband back. So that this area is very much open. And then you could stay here working on this if you have the mobility to take the hands to the heels. Let's do that. And I'm still taking the waistband back. Tailbone down. Waistband back. Tailbone down. That's where all the big movement happens in your back bend. Head to a position that you can work with there all the way back or some mid-range position is fine. Look up before you come up and we'll sit to recover. When I first started learning to use this method here, I didn't I couldn't believe how much actually the pelvis does tilt. It takes some time to feel that. We're gonna do it together another time here and see if we can get just a little bit more. Using again fingertips in the middle of the abdomen, tell the waistband to go backward. The waistband going backward tilts the pelvis backward. You can feel the fronts of the thighs. In response, they move forward. Keep going there. Waistband back. Low abdomen helping. Waistband back. You could stay here and just work on the strength of this pose or taking the hands back and keep working on waistband back. And then head in a position that you can be comfortable with. And then look up first before you come out of the pose. Take a seat in any position that's comfortable to recover. And then as a slight counter pose, we'll take thread the needle with the knees apart, toes together. Slide your left arm underneath. Take your left shoulder down and your head down. And let's not do much here. Just this position resting, gently turning the spine. One thing you can do to help is to lift the ribs just a little up. And my hope is you'll feel that lengthen the muscles of your lower back a little. And then unwind to the second side. The right arm goes under. And get another look at my back moving as I bring the ribs up just a little bit. There they're going now. You might see that my back is starting to lengthen. And that's what we want. If there's any residual tension in the back muscles, we learn to let that go. Come to center. I'm going to come back down onto the mat, tummy down, for another back bend. This is known as Dhanurasana or bow pose. To start, we use the same things to set the pelvis and support the spine. Waistband a little up. That rolls my tailbone towards my heels. Catch one foot, rather one ankle, from outside in, meaning outside to the inside. And the same on the other leg. For this round, just be here. Don't lift up at all, but work on feeling the lift of the waistband and the ribs be gently held into the body so they don't flare forward. And just even practicing this amount will develop the strength that will soon take you into the deeper levels of this pose. Gently release, relax, head down. Let's do another round. A gentle lift of the waistband, tailbone rolling towards the heels. Grab the other leg first. I grabbed right. I'm going to grab left now. And the other leg. Starting with that waistband lift, ribs in a little. To come in deeper, if you're ready for it, I'm going to push my feet straight up to the ceiling.
Check that the ribs don't fall out into your t-shirt. We want to keep the ribs back. And here, again, because I've set the pelvis, because I have the support of the abdomen, my spine is quiet. It doesn't feel pinched. And then gently down. And rest. Again, it's important to note that you don't have to come up to any particular height. Wherever you feel like you've done the work and you've got your lift, that's where you stay. If you start to feel the spine pinch, no good. No good. So we want to back off just a little bit and keep the spine happy. They'll ask you to press to hands and knees again. For the cat and cow movement, side to side. It's a great way to start. And then the ribs, side to side. And then the whole spine curling up to the ceiling, relaxing toward the floor. And a couple more. Taking any residual tension out of the muscles. And then let's do one more back bend together and that is the pigeon pose. We'll start with the right leg forward, sweeping forward to the right leg and the left leg back straight. In this pose, I have my knee forward of my ankle. Knee forward of the ankle and that helps protect the knee. It's very challenging to have the shin flush across the front of the mat. Then I do the same things that we've been doing, especially if you remember crescent pose. The front leg, gently drawing back. The back leg, gently drawing in. And I'll try to make that obvious now. I'll bring them together. There my body has shifted. I'll let it go and again. The net result is the waistband goes back and I'm able to start my journey into a back bend. My tendency because of long time ago an injury with my shoulder is to find motion by pushing my ribs out. So that's why some of us have to learn to tame those ribs. Keep them quiet and that helps to not pinch the spine. When we get the strength we need to go deeper in the pose. Gentle release. Use your hands. Use your back foot to lift nice and easy. Plank pose to transition to the other side. Here you get another look at the position of my leg. Knee is a little forward. Ankle is a little back toward me. And that helps protect the knee joint. I'll draw my front leg a little into the body. Back leg a little into the center as well. There's that motion. You can see me pulsing that motion. I'm gonna hold.
Waistband back just a little. Ribs quiet. Holding here. And then an easy release of your pose. Use your hands. Use your back foot. We'll come into that cat and cow movement one more time. Side to side hips. Side to side ribs. Up and down spine. Exhale to take the spine up. Full curve of the spine. Relaxed spine towards the floor. Fully up and fully down. One more counterpose now. Tuck the toes. Lift the knees. And we're coming into a version of Uttanasana to release the back. I'm gonna move away from you first by grabbing across the left ankle. Right hand out to the side. And I'm gonna take my left ribs, excuse me, my right ribs that I'm tapping into my body. I switch. Left hand across. And now I take my left ribs into the thighs. Switch again. Ribs. Right ribs pulled into the thighs. Switch again. Last one. And then coming to center. We'll come down to the mat. Seated, seated cross legs. Slide the hands forward. Only instruction here is just to relax. Let your back relax. Let your breathing into your back so those muscles can open and release. Come back up. Change the lock of the legs. Other leg forward. One more time. Quiet, relaxing, forward fold. Easy breaths in and out through the nose. And then we'll press up. Let's make our way onto the mat for Shavasana. Lying down on your back, knees bent for just a moment. Adjust the hips so that you feel comfortable in the low back. The low back is soft, not gripped. Mid back, upper back, soft. Let the arms out to your sides and gently tuck the shoulders underneath. Extend the legs one at a time. Almost a completely straight second leg. And then rather than shooting the feet forward, let the knees drop. Focus on that. Knees dropping, knees dropping. Before you let the energy out of the legs completely soften your abdomen. Then allow the legs to relax to their sides. Legs completely relaxed, arms relaxed, tummy relaxed.
Throat relaxed and eyes closed. Give your body into the floor. Stay as long as you like in your Shavasana. The longer you stay, the calmer your nervous system will be, which will help you be more ready for your day. If you're ready to come up, wiggle your hands, wiggle your toes. Bend your knees one at a time. Draw your knees into your chest for a moment. Give your legs a little hug. Lengthen your lower back and then gently release your knees. Turn softly over to your side and support your head with your hands. You can tuck your knees in a little bit more tightly. So again, help release your back. Softly open your eyes and then use your hands to press up to sitting. Thank you once again for being here. I really enjoyed sharing those ideas with you. If you have any questions or want to chat about it, we'd love to hear about it in the comments. Have an amazing day and I hope to see you soon.
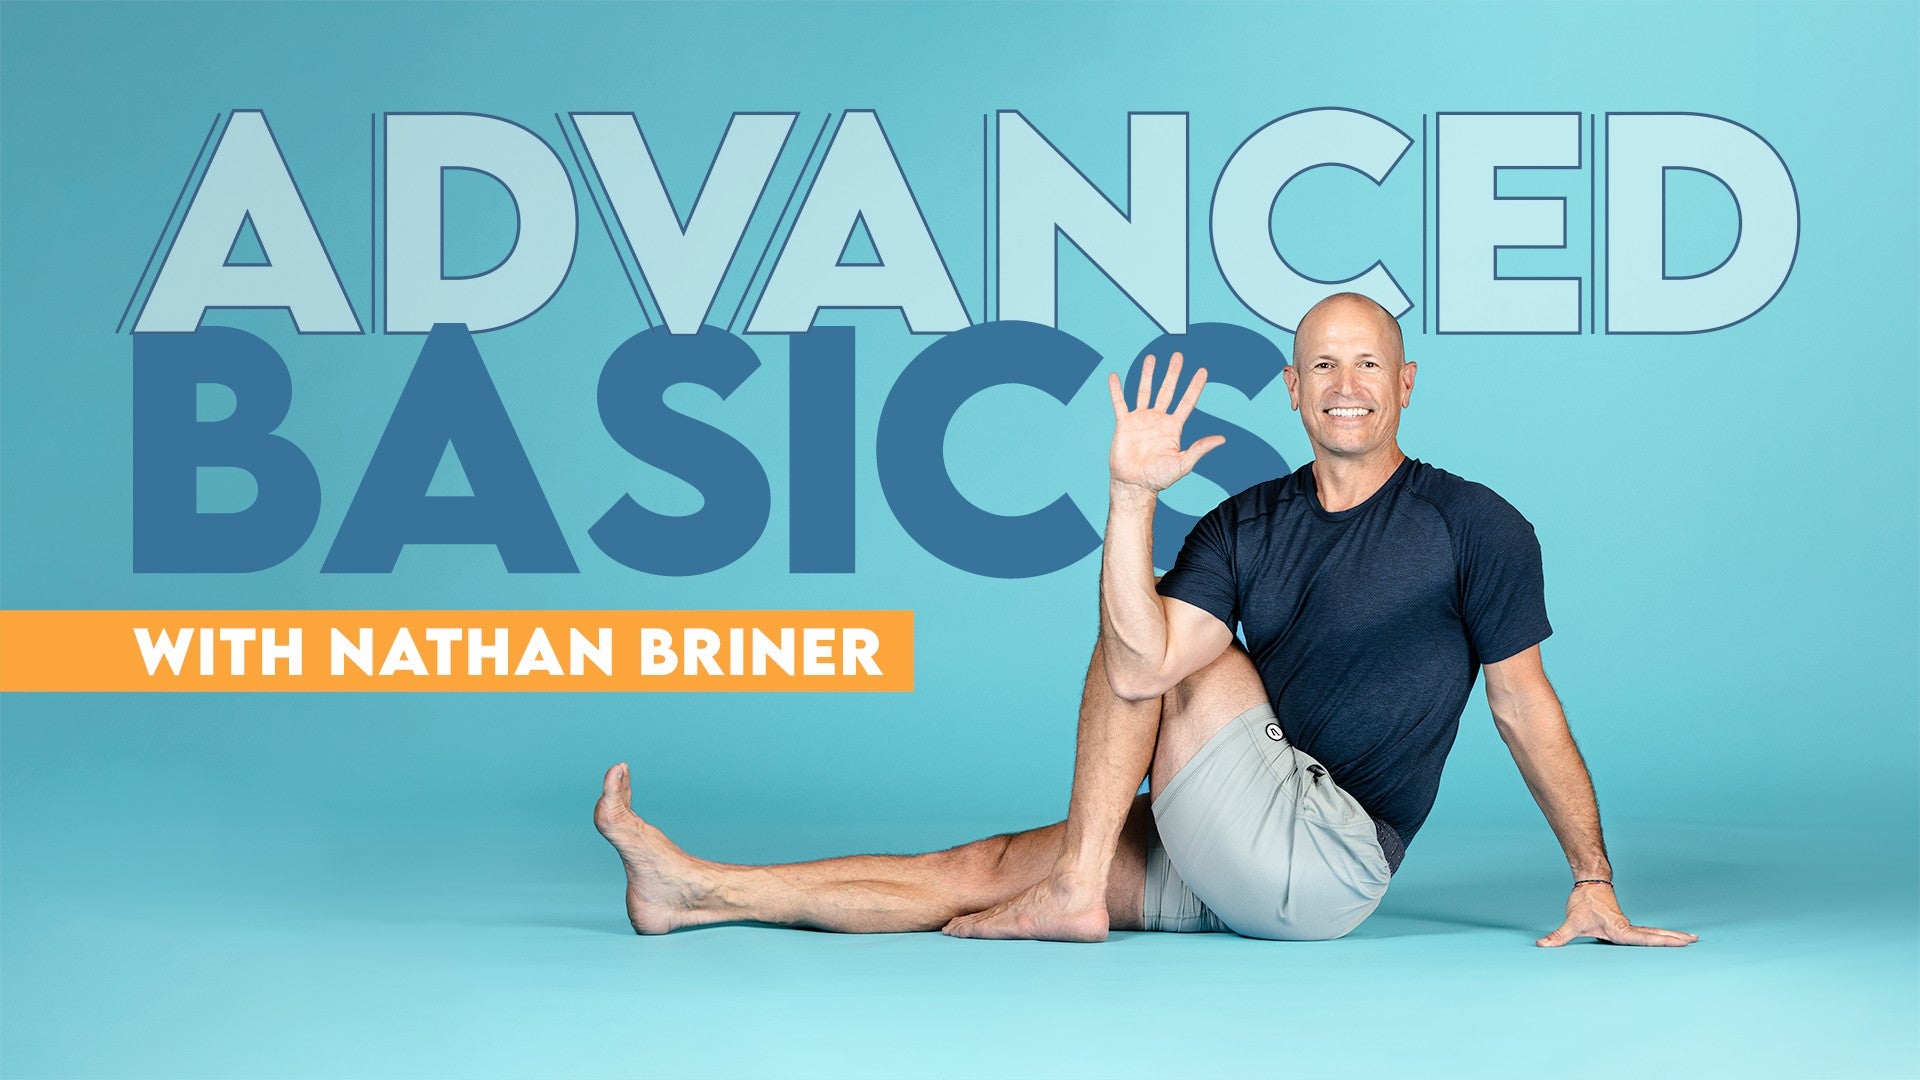
Advanced Basics: with Nathan Briner


Comments


 I especially found this back-bending session helpful and also enjoyable as I often experience 'pinching' in poses like Dhanurasana and Ustrasana.Following the cues produced an almost miraculously sweet result........ 🙏
You need to be a subscriber to post a comment.
Please Log In or Create an Account to start your free trial.
