Description
About This Video
Transcript
Read Full Transcript
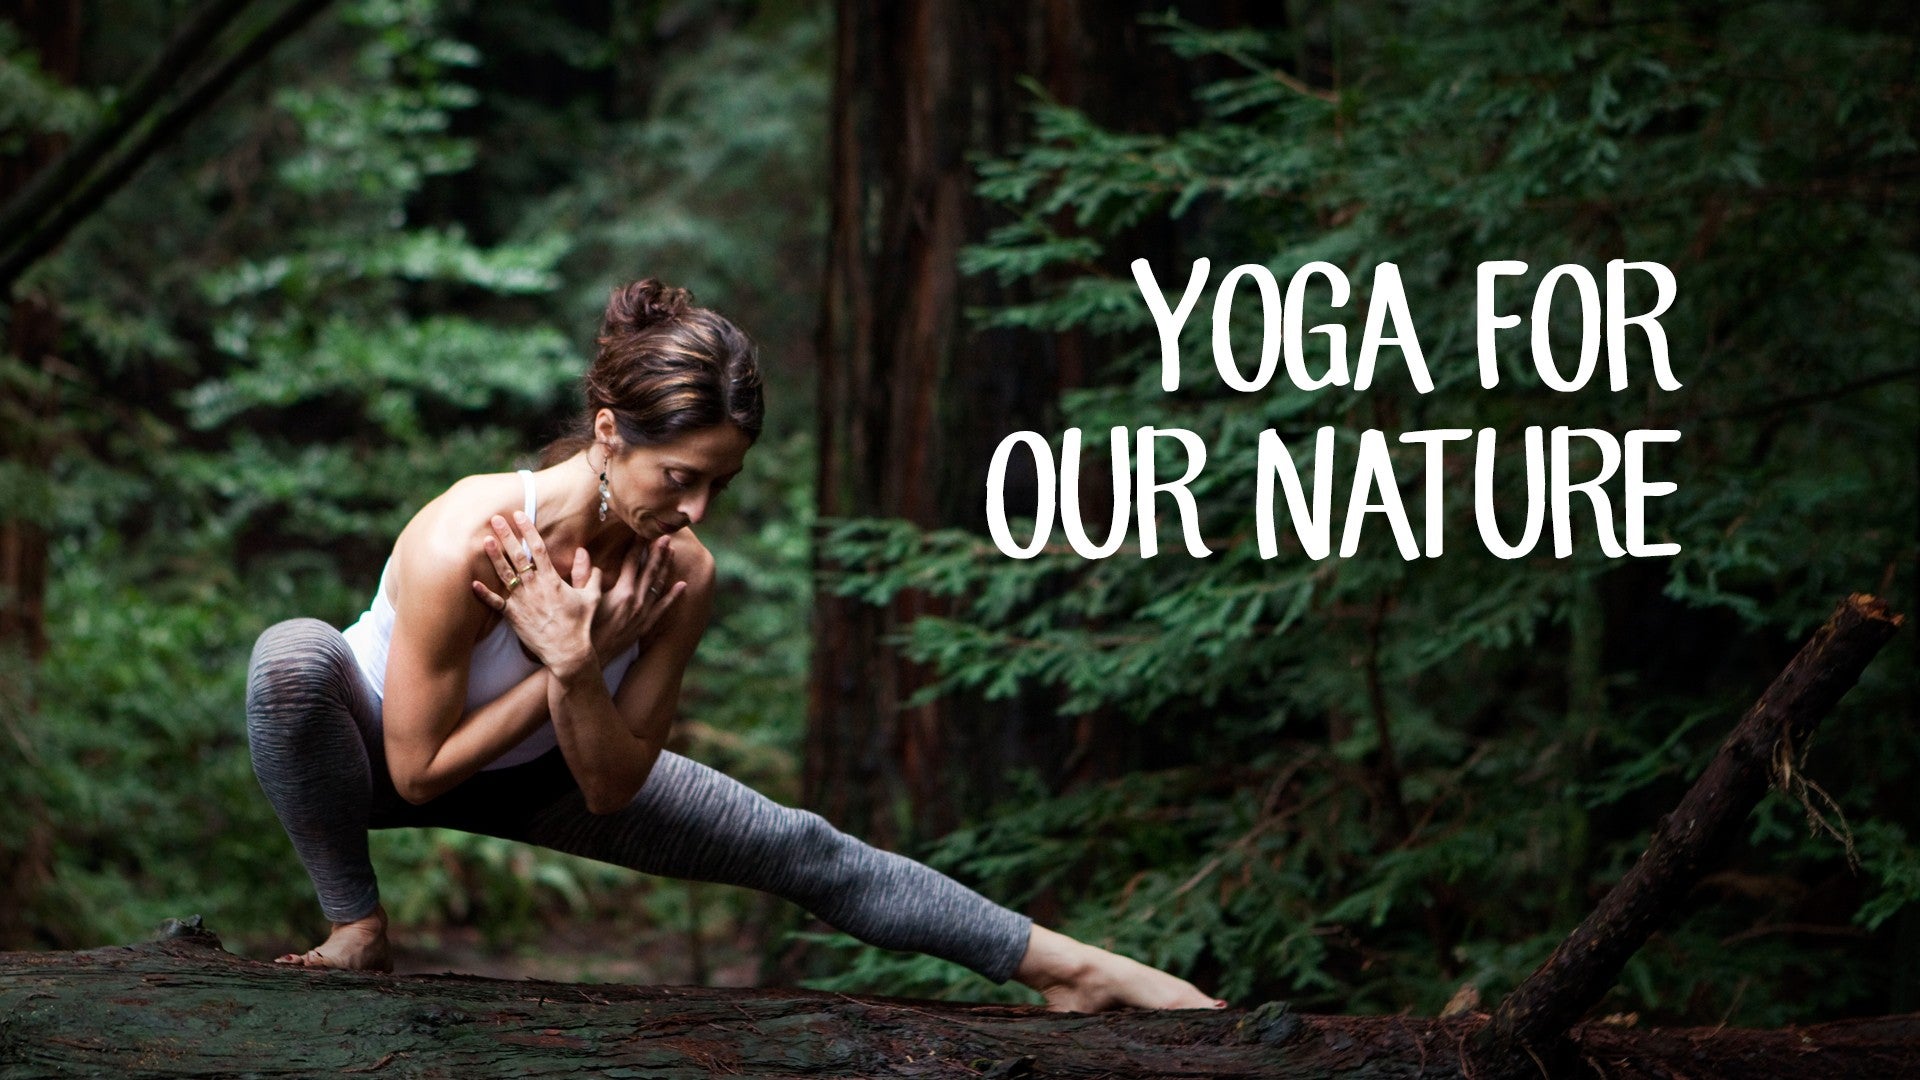
(beach waves) Welcome to our Ether practice. This will be a great practice for those of you seeking a little bit more space and lightness in your body. And to help make this a successful class we wanna have two blocks of strap and a blanket nearby. I'm gonna have you start with a block and a strap for Virasana. And if you turn your block to the medium height, place that between your feet and then have a seat back.
This tends to make most people relatively comfortable. If you find you're not quite settled, you might stack two flat blocks instead of this one medium. And when you find you're in a good spot, just let your hands rest, face down on your thighs. And then close your eyes. And allow yourself, just take a moment with your eyes closed to wiggle your feet into the mat.
So you can feel some sensation way down away from the head. Widen through the feet, lengthen through the feet. And then sense and feel your awareness moving forward into your shins, up toward the knees. And see if you could imagine a little bit more hollow space behind your knees to invite your femurs to drop a little bit more down toward the earth. And now with your legs rooted down toward the earth, just start to turn your palms to face up toward the sky, relaxing a little more through the elbows, the arms and the shoulders.
Explore in your pelvis if you feel like you're sitting in a good way that allows you to find your inner lift from the base of the spine, bringing the awareness up toward the thoracic spine, the base of the ribs. And let your awareness stay there for a moment as you relax into the space of the belly. And giving yourself permission to soften and expand the belly as you breathe in. It's a gentle feeling of the belly drifting toward the back as you exhale. Need more space in the belly as you breathe in.
And a subtle pulling in of the belly toward the back on exhale. And then let your awareness start to come up into the chest and the lungs. And notice what it's like to breathe fully into your chest, fully into your lungs to create more space in these large cavities in the body. And as you exhale, try to maintain your inner lift, that receptivity through the spine, it connects you to the air and space above your head. Breathing in so your lungs are spreading east and west out toward your arms.
And then relaxing all the way to the base of the throat up toward the throat, up into the tongue, up into the mouth, a sense of space as you release your lower jaw from the upper palate. Sensing the space, moving all the way up through the upper palate to the crown of your head. Maintain your inner lift and just have a sense of the space that's above you. And then take a moment to just simply imagine the space around you starting to embrace you and support you and to help maintain this upright posture. And then keeping your posture let your hands come together in front of the heart center.
Let's take a moment to create an intention for your practice to make it more personal, more meaningful. Then keeping that in your awareness as we release the hands to the thighs and let your eyes slowly open. When you're ready, please find where your strap is and as we start to unroll the strap, if you happen to have a metal buckle, make sure you have the metal buckle in one hand so that doesn't hit the floor when you're reaching your arms back. So when the arms are ready to come up, let your arms be wider than your shoulders and try to have the strap tight. And just perfectly stretch like a good guitar string would be to make just the right vibration.
So as you breathe in, there's a generous breath into the chest as you stretch your arms all the way back with the strap, nice and tight. And as you inhale, just right amount of breath to fill the chest as you come back up and then let your arms reach out in front of you with the strap nice and tight. So keep trying in that practice to move with your breath. If it feels difficult in the shoulders, move the hands further apart. If it feels really easy, you might move your hands a little bit closer together.
And as you continue to make space in the shoulder joint, just notice that the ribs aren't moving when the arms go back. And also notice that you're looking straight ahead to your horizon, so your head is well-balanced over the spine. One more time coming up and one more time reaching forward and down. Okay, so a little Vinyasa in the shoulders and then if you can take your strap and just roll that up in a good way so that it's neat and tidy and we can stash that along with your block to the side of your mat. And then we'll come forward.
If you like extra padding, use your blanket under the knees, and otherwise have your knees side by sides and your hands open wide underneath your shoulders. So wide that you actually see the little webbing between each finger. As you inhale, we'll take your left leg into the air behind you. Reach out through the heel and then take a moment and balance as you reach out through the right arm and try to make more space between your left leg and your right hands, the same time that the navel is lifting slightly towards your back. Take one more moment looking down towards your lower thumb as you take one more breath here.
And then we exhale, put the right hand, left knee down. When you're ready, stretch back with your right leg all the way through the heel. Reach out as you're ready with your left arm, perhaps to the height of your ear and just keep reaching into that space with your breath, with your awareness from your left hand to your right heel. The center of the navel is lifted towards your back. One more big breath in here.
And then we'll bring the hand and the knee to the floor. So as the knees are down, we'll walk the hands back in towards your knees and stand on your knees for a practice called Vajrasana. If we press down through the feet, the ankles, the shins, as you inhale take your arms all the way up by your ears. As you exhale, we'll sweep the arms behind you, stack your hands above your sacrum and bring your right ear to the floor or to a prop if it's hard to get all the way down. And then as you inhale, lift your chest, sweep your arms out into the space beside you and come all the way up with your gaze.
As you exhale, arms again sweep behind you, stack around your sacrum and the left ear drops to the floor. Lead with your chest, inhale, come up. Sweep the arms out to the side. Exhale, hands above your sacrum, right ear to the floor on exhale. And just feel again that lightness, that spaciousness as you come up.
And then two, one more time bringing your left ear down to the floor as you exhale. And then inhale all the way back up. All right, when you exhale let your arms stay down at your sides. And then from here let's step your right foot forward to the front of the mat for a simple lunge with both hands on your right knee, just take a moment to dip a little bit forward with your hips to create some space at the front of your left hip. And then we're gonna take the left arm up by your ear and get even more spacious on this left side and rather than going toward the floor, I'm gonna have you lean back to stand more on top of the knee so your back body feels as long and spacious as your front body.
Then the opposite arm is gonna come up and catch the thumbs and spread your fingers wide and try to lift from the back of your ribs as you press firmly into your left foot. If it feels good, keep lifting the back of the ribs, the side chest, the gaze more up toward the ceiling and just notice that you don't lose the lift through the back side of the body. Enjoy that space, another breath in. And then as you exhale, arms down to the sides. We'll simply transfer that right knee back and then step forward with your left foot.
And then from here walk your hands up to your left knee and then send your hips back. Okay, so to dip a little forward with your hips, so you feel what it's like to have that open space on your left side. Increase that space by taking your right arm up by your ear. And then rather than staying in the depth of the stretch, ease on back to stand on the knee and then reach up a little bit closer to the sky with your right fingertips. And take the opposite arm up, hook the thumbs together and then start to soften through the front of the ribs so that your back body feels really long and spacious.
Press into your back foot as you stretch your fingertips more toward the sky. Take a moment opening up into your right side. A more big breath in. And as we breathe out let the arms come down and we'll gradually take a step with your right foot to the front of your mat for a wide-legged forward bend. Wins rather than feet together.
Keep your feet about shoulder distance apart. And then take a moment to set your hands down or fingers down and just gradually fold forward. Let's take a moment to appreciate the feet being a little bit wider in this first forward bend. Little extra space up into the hips just sometimes make a little easier to bend forward to reach down. And take one more breath just acknowledging what's there to experience in your legs today, in your back, your neck, your shoulders.
And then grounding the feet and then slowly come up in a good way for you to stand all the way up. Heel-toe your legs and feet a little bit closer together and then we'll take a big step out wide with your feet. So if we step out wide with the feet, I think three, 3 1/2 feet apart, put your hands slide up to the top of your hip bones and as you exhale let your hip bone strafe back in space a few inches so it's a little bit easier to put your hands on the floor. From here I'm gonna have you turn you left heel in a few inches and we're gonna shift the weight over to the left side so you can sink your hips over towards your left heel. Just be mindful of putting weight over on the pinky side of that left foot.
And then we might go to that next level by today taking your right toes up and then maybe bending that left ankle a little bit more as you stretch deeper into your inner right leg. And just tune in to the spaciousness here. And then as we get ready to switch and put your right foot down, it's a little bit turned in from your typical Warrior Two angle. We're turned in maybe 10, 15 degrees. Walk over to the right and as you start to sink the hips down, maybe lower than the right knee, gradually peel that left foot up and see if there's more space for you to sit further down towards your right heel.
Again, make sure there's weight on the pinky side of your right foot. Now drop in to that spaciousness here in the left inner leg. And then come back, you might enjoy trying that another time, get a little bit further into the stretch with repetition. And coming back and just easing into what we feel like good space for you. Just noticing where that range of motion is.
Then we'll come around to the center position with both feet facing straight ahead. Take your wide-legged position that would almost be like you're doing the splits. And then from here let your hands reach out little bit wider than your shoulders now, the ribs lifted toward the ceiling, chest bone lifted away from the floor. So you're more in a plank like position in your spine. As you spread a little wider gradually through your feet, just finding that edge where you feel safe and you feel spacious.
And just feel there's a constant tending to that lift through the inner legs up toward the floor of your pelvis. Attending to that length and spaciousness from your pubic bone up to your chest bone. And then all the way from that chest bone forward out through the crown of your heads. Just taking one more moment here. And then heel-toe your legs and feet a little closer together so it's easier to ground your feet.
Reach out for your hip bones and we'll come all the way back up to stand. Okay and then spread your arms out to your side and turn your right foot out first for Triangle Pose. As you lean over to your right side, just go slowly so that you're feeling all that space underneath you on this right side. Imagine this negative space is actually supporting you and holding you as you go further and further out to the sides. Use your legs to also help hold the space.
When we drop that right hand down somewhere below your knee, perhaps as low as your ankle and then pause. We'll take the top left arm up in the air. So now we'll reach that left arm straight down towards your ear so that you're actually opening this outer left ridge of the body. Ground your feet light on this lower right hand. And that to feel like we're working the space a little more on your right side today, unlock your right knee if you tend to lock the knee and then take your right arm up and then get a little bit more length on this lower side of your rib cage, as if your ribs were stretching out to your fingertips.
Sometimes we have to lift a little higher in your torso to get the right side to lengthen out towards your fingertips. Okay, let's reach both arms out to the side as if you have a block in your hands, you're reaching away from your head. And as you inhale with all that space to the side body, come up. Relax your arms at your side and then turn that right foot in, we'll turn the left foot out. Okay, again go slow, let your arms come up and feel like there's some space underneath here that you're softening into.
It's also supporting you and you keep reaching out, reaching out, reaching out and just find that interesting edge, there's new space through the side ribs, chest, fingers. Then eventually when the hand comes somewhere below the knee or somewhere above your ankle, pause. Make sure that we've rooted the legs so that you're not resting heavy on your hand, making it an arm balance pose rather than a standing pose. Then we'll emphasize now the right ridge opening as you stretch your arm down towards your cheek. Okay, spread open the palm, root through the right foot and then start to explore unlocking your left knee and just getting prepared for a little bit more room to grow in the left waist.
And let those ribs stretch out towards your fingertips. Imagine you got a block that you're pushing away from your head. And just enjoy some of that new space on your left side. Short-waisted people in particular like myself will start to feel like the ribs are puncturing the organs in these side poses. So try to get the ribs to come out of the organs.
Keep that length. And then inhale all the way up to center, arms down at your side. And we'll heel-toe the legs and feet just a little closer together. Big breath in, remember hands up above your hip bones. Lift your chest as you inhale and then lower your chin towards your chest as you exhale.
Imagine you're squeezing the block between your elbows. One more round where you simply inhale. Lift the chest up toward the chin and then squeeze the elbows towards each other behind you. And then we're gonna let the hips again pull back a few inches in space. This time walk your hands forward like you're doing Downward Dog.
And the upper body might start on the tips of your fingers and then you're pressing your hips back away from your fingers. At some point you might put your palms down flat. Hang your head between your arm bones and just try to feel this ease in the posture so there's less work in the shoulders, more opening in the legs, and just the tendency to feel as if somebody was here in the room or in your practice assisting you and pulling your hips back away from your shoulders. And just take a few moments spreading as wide as you need to with the feet, reaching as far as you need to with your hands to feel the ease in this posture. The heels heavy, palms light.
Let me take one more breath enjoying that wide-legged Downward Dog shape. And then from here we'll start to walk the hands over towards your right foot and as you walk your fingers toward your right foot, the back heel is gonna lift and then we'll transfer back into a Downward Dog with your right leg in the air and just take a moment and stretch long through your right heel. Make sure you spread your hands, you feel stable in the shoulders. And then if we lift that leg a little higher without disturbing the left leg below, see if you can feel the top hip roll open, the top leg bends with the intention today to make more space in the lower belly. And now can you feel if you dangle the head, shake the head out so it's not gripped and just try to find a way to make space in the low belly without compressing your lower back.
One more big breath in, enjoying that space. Let me start to square the hips toward neutral or release the right foot down and take the left leg up and just reach long through your heel. If it's problematic in the back, do that side type of shape. Just stay with this first action of lifting your left leg without disturbing the position of the right knee. Okay, others will go up higher.
We'll open the top leg, spiral, open the hip and then sink that right heel to the ground. I always say of a large dog at a fire hydrant. (laughs) Sorry. As we open up that top hip, the intention today are gonna make space in that lower abdomen on your left side. Get the neck out of the way, let it be relaxed.
One more breath and then we square the hips, left foot down to the floor. Lower both knees to the ground and then pause. Take the top of your yoga mat and we start to roll the top of your yoga mat all the way back so you got more cushion underneath your knees. And now we're gonna need the blanket out in front of you and we will also need both blocks. So as you walk your blocks forward, something like a pillow could also work just fine if you don't have a blanket.
Some of you will be more flexible and you won't even need the blocks but it's nice to have them available. Keep your hands on the blocks and keep the blocks down underneath your shoulders. We'll start to slide the left foot forward on the blanket and give yourself a few moments to breathe to make some room for your hips to come forward as you bring your chest and spine more vertical. So from here as we lift the left foot, things get really exciting as you start to fly further out with your left heel. And at the same time as we're sliding forward, we're lifting up from the base of your spine to the top of your head.
So it's a way to ease into the splits and just try to create some space in this way through the legs up into your spine. Take a few moments to breathe. Okay and to find just the right amount of movement to maintain your attention, your interest. And in your own time we'll slide that left heel back and we'll put the left knee down on the floor and just simply transfer with the right foot on the blanket, just have it interact with your right hip. Adjust your blocks if you need to and we'll simply gradually slowly slide the foot forward with the blankets.
Eventually point the toes to the sky and then find your edge how far you sink forward and down with your hips while lifting up and back with your spine. And just taking a moment again to appreciate that space in the legs that work up into the spine, up through the crown of the head. Take a few more moments to ease in and down. Okay and then we'll gradually slide that right heel in and with both knees on the floor, curl your toes under, then we can set the blocks out of the way. We won't need them for the rest of the practice.
Set your blanket off to the side in a good way and then we can roll the yoga mat back out and stand on the knees. Okay, so if you like that extra cushion, keep your blanket here. And with your knees underneath your hips, let your arms in your own time come up beside the ears and try to feel that your shins and your feet are right reaching down toward the floor. So what I'm gonna have you do is just to lean back into the space behind you. And with your legs working, try to also feel like the space behind you is also supporting you from collapsing back.
That space is there to contain you, to support you, to hold you as you ease further and back into your legs. Press down with your feet to spring forward back to neutral. And then one more time just leaning, easing the space behind you as you work through the legs down through your feet. Come all the way forward to neutral and then take the hands behind you with your fingertips facing down toward the back of your knees. Spread the fingers wide.
When you roll your shoulders back, squeeze the elbows in toward each other as if you had a block between your elbows. We'll lower the gaze down toward the floor in front of you. And the intention here is to take three or four breaths to get the chest lifted up toward the chin. And each time that you breath in, you wanna maintain the height of the chest as you ground your feet. Lift the chest a little higher with the next breath.
Maintain that height ground with your feet. Last breath. I might not even notice if I was looking at you that your chest is even lifting but you feel it lift from within. And after three or four breaths that way, just simply relax the effort in the chest. So it's one way where we practice learning how to do a backbend and breathe.
Because a lot of times we do backbends but we're not honestly breathing. So, if we can then the second time, you may bring more awareness to the breath by turning your fingers to face up towards the rib cage and the palms are eventually moving down toward the upper glutes. Elbows hug in, so now my arm bone is a little bit further back away from my collar bone. Hug the elbows and ground the feet and that same intention to simply take three to four breaths to get the ribs and the lungs lifted without dropping the head back, without gripping my throat, without gripping my eyes. So feel into that and just honestly again breathing in and noticing the shape of the back.
So our intention is to get that extension before we arch into a backbend. One more in, height of the chest and eventually gonna letting go of the effort. Okay, so hopefully the backbend then is free of any compression or tightness. And when you're ready just let yourself sit over onto the right or left side of the hip and then stretch your legs out in front of you. Okay, so tighter hamstring folks.
Use your blanket underneath your sit bones. I'm gonna have you put your fingertips or your palms down on the floor and everyone has different arm length, torso length. So, just find a relationship that works for you to get some grounding through your hands and then also grounding down through your legs. Okay, as if you had a strap around your sacrum all the way forward to your heels and you're lengthening through your heels as you invite your sacrum to move a little bit more forward into the body. Okay, let the chest rise up as if you're doing a little bit of that backbend in your seated pose.
Lower your gaze, lift your chest. And just feel for that spaciousness in the legs, the torso, the chest, your mind. We're gonna lift the spine, lift the gaze forward and then take your right foot over to the outside of that left hip area. So we're trying to see that this right knee is above the left knee and it might not work for everybody to make that full connection but as best as you can bring your right knee over the left knee. What I'll have you do is just simply bring your hands out in front of you to see that they're equal distance away from the yoga mat or from your hips.
While your left foot is reaching towards your face, we're gonna walk the hands a little bit forward. Ease the belly towards your right thigh as you look down and just invite a little bit more space into your left leg and your outer right hip. And so letting the eyes potentially even close as you start to pay closer attention to where your breath is needed. And then responding to the need of the sensation with the breath, and sometimes the sensations are mild, the breath is subtle and sometimes we hit those little corners. They're a little more intense and require maybe more breath, more oxygen coming in and out.
One more breath in that way and then we'll walk the hands back and so there's no pressure on that front right leg as we stretch the right leg out and then take your left foot over to the outside of the leg and eventually toward the outside of your right hip. So if you see your left knee is more or less stacked above your right knee. So the right leg is in the track with the right hip, the right foot pulling towards your head as your hands come forward. Okay, if it's already difficult enough here, try more height to get a little bit more length in your lumbar spine. And as you're ready, just let yourself soften forward, belly towards your inner left thigh.
The hands come forward. Just the right amount again for you to feel into your right leg that's grounding, the space your opening on the outer left hip or along the back ridge of your pelvis. And once again perhaps close your eyes and just begin more of the meditative phase of the practice and identify where more breath is needed. Where attention goes, the breath follows. The famous Yogi sayings.
And see if you can experience for yourself the truth in that statement. How that your attention going to your sensations really does make a difference. And the last breath before I walk the hands back in, we ground your right leg and then lift your spine up. Okay, so then when you're ready you can release the legs out. So with your legs stretched out in front of you, just make sure if you look behind you that there's nothing that you're gonna fall into.
Just make sure you know where your strap is before you go down onto your back which is where we're heading. So we ground down through your legs, lift up through your arms and try to reach for the sky with your fingertips, ground down with your legs. And then as you exhale just very slowly with your arms reaching in front of you, just lengthen the lower back toward the floor slowly, slowly, slowly, slowly until at some point we're all the way down. All right, at that first point please bring your right knee towards your chest and we can squeeze that knee in just to find that right position for the leg. And then we'll take the strap around the lower arch of your foot.
If you don't have a strap, something like a scarf would do or a belt. So as we slide the strap down to the lower arch of the foot, toes point towards your face. The hamstring is really tight. We stretch the leg closer to the front of your mat away from your head to create more length. Some of you will bring your leg more directly above your hip and make that 90 degree angle.
Today I'm gonna have us hold the straps with the right hand. The arm is straight as possible, shoulder is rooted as possible. Then with your left leg pressing down toward the floor, stretch your left arm back beside your ear. So we have more length and space on the left side. You can close your eyes and just start to tune back in to where more breath is needed.
Based on where you're experiencing those subtle or perhaps not so subtle sensations. Your right leg or you're feeling it in your back, you're feeling it in your left shoulder. And remembering Ayurvedic as encourages us to celebrate our uniqueness so we all hold tension in different places. Just notice where it shows up for you here. Take your left hand back down to the top of your thigh.
Keep that left thigh anchored. As you open your right leg out to the space to the right and just go slow so that you don't feel like you're crashing or colliding into the space to your side. You're just easing into the space on the right and without disturbing that sense of stability grounding on the left. Okay, so if you can sense that your belly is centered with the ceiling, your hips are squared with the ceiling, explore your range of motion with that awareness. One more breath in.
And then take the leg all the way back up to the neutral position. I can switch out with the strap and bring that left knee in towards your chest and right leg down to the floor and just take a moment finding the right spot for your left leg. The strap goes around the bottom of the arch. Stretch the heel up toward the sky. Walk your hands up and notice you need to let this leg stretch a little further away from your chest to have the right amount of space or is that leg ready to come right up above your hip, toes pointing down and walk your hands up so now the left hand is gonna hold the strap.
The right hand is gonna anchor down top of your right thigh. As you start to open your left leg out to the left, again remember open it slowly. It's easing into that space on your left side. Keeping the sense of centeredness in your hips, in your belly so that we're not collapsing to the left. We'll take a moment and feel again the space you're opening into.
One more big breath in here, one more breath out. And then in your way inhale, come all the way back up to the center. Release the strap from the foot and then hug for a moment your knees in towards your chest. Or if you like to tidy up your space before going to the next pose just a great moment to receive the support of the ground as you tidy up to be super efficient in your practice. That's a long strap.
Put your feet down on the floor. Let your knees open away from each other and just take a moment, last of the official Asanas with some instruction and in this way with arms out to the side, palms, elbows face up. Knees out to the side and if that's difficult in your hips, you want to take a block and take the time to rest it under your thighs so you've got some support. If you're comfortable releasing into the space, release in to the space. And once again close your eyes.
Just notice what that right alignment in your anatomical body, how that gives a little bit more ease and relaxation in the musculature of the body. And the little muscles in your face that relax all the way down to the large muscles in your legs. When there's relaxation in the muscles, just notice that's a little easier to breath, to trace the breath as it comes in and out. And as you become aware of the breath and you can become aware of the spaces between the breaths. Extra pause at the end of your inhale.
Extra little pause at the end of your exhale. Those moments when you truly drop into that pause, just notice how clear your mind is. And starting to choose to be in that space of centered, really in awe of the immensity of your presence when you are here. If you prefer to stay a little longer in that shape, stay longer at this shape or just let your legs one at a time reach out for Shavasana and just continuing in that investigation to tend to the subtle sensations. Follow them in with a breath until we're at home in the spaces between the breaths.
And eventually settling into the inner limbs and the different states of concentration. Bring a sense to that full experience of meditation. While receiving the support of the ground, a few moments to bring more awareness to the breath as it comes in. Simple awareness of the breath as you breathe out. Eventually feeling the space in the chest as you breathe in more air, starting to feel more stretch through the chest and ribs, and the heaviness that comes with the exhalation.
One leg at a time, please bend your legs and start to roll over onto your right sides. Just take a moment on your side to deepen your breath awareness. And eventually when you're ready, come up into a good seat for you whether that's Virasana or cross-legged seat. And doing that study of your posture so that you're sitting well in the physical body. So it's easier to sense and feel the breath.
Palms face up and a little bowl at the bottom of the belly. Nice and tall through the spine. And take three breaths to balance from Shavasana. Holding slightly after the inhale if you need a little bit more of an energy boost. Take a moment to pause after the exhale if your mind feels more anxious.
Try to balance in center right in the moment and bring the hands back in front of the heart space. And may others also benefit from our practice. Namaste. Thank you so much.
Yoga for Our Nature: Elemental Yoga


Comments


Om,
Melina

When you say the lower arch of the foot, just to check is this nearer to your heel? I usually use my strap towards the ball of the foot but this other way also felt good.
Namaste

Yes, strap closer to the heel gives me a fuller hamstring stretch, a feeling of more length at the back of the leg.The other way is fine too but it's great to notice the difference a few inches makes on your foot!


You need to be a subscriber to post a comment.
Please Log In or Create an Account to start your free trial.
