Description
About This Video
Transcript
Read Full Transcript
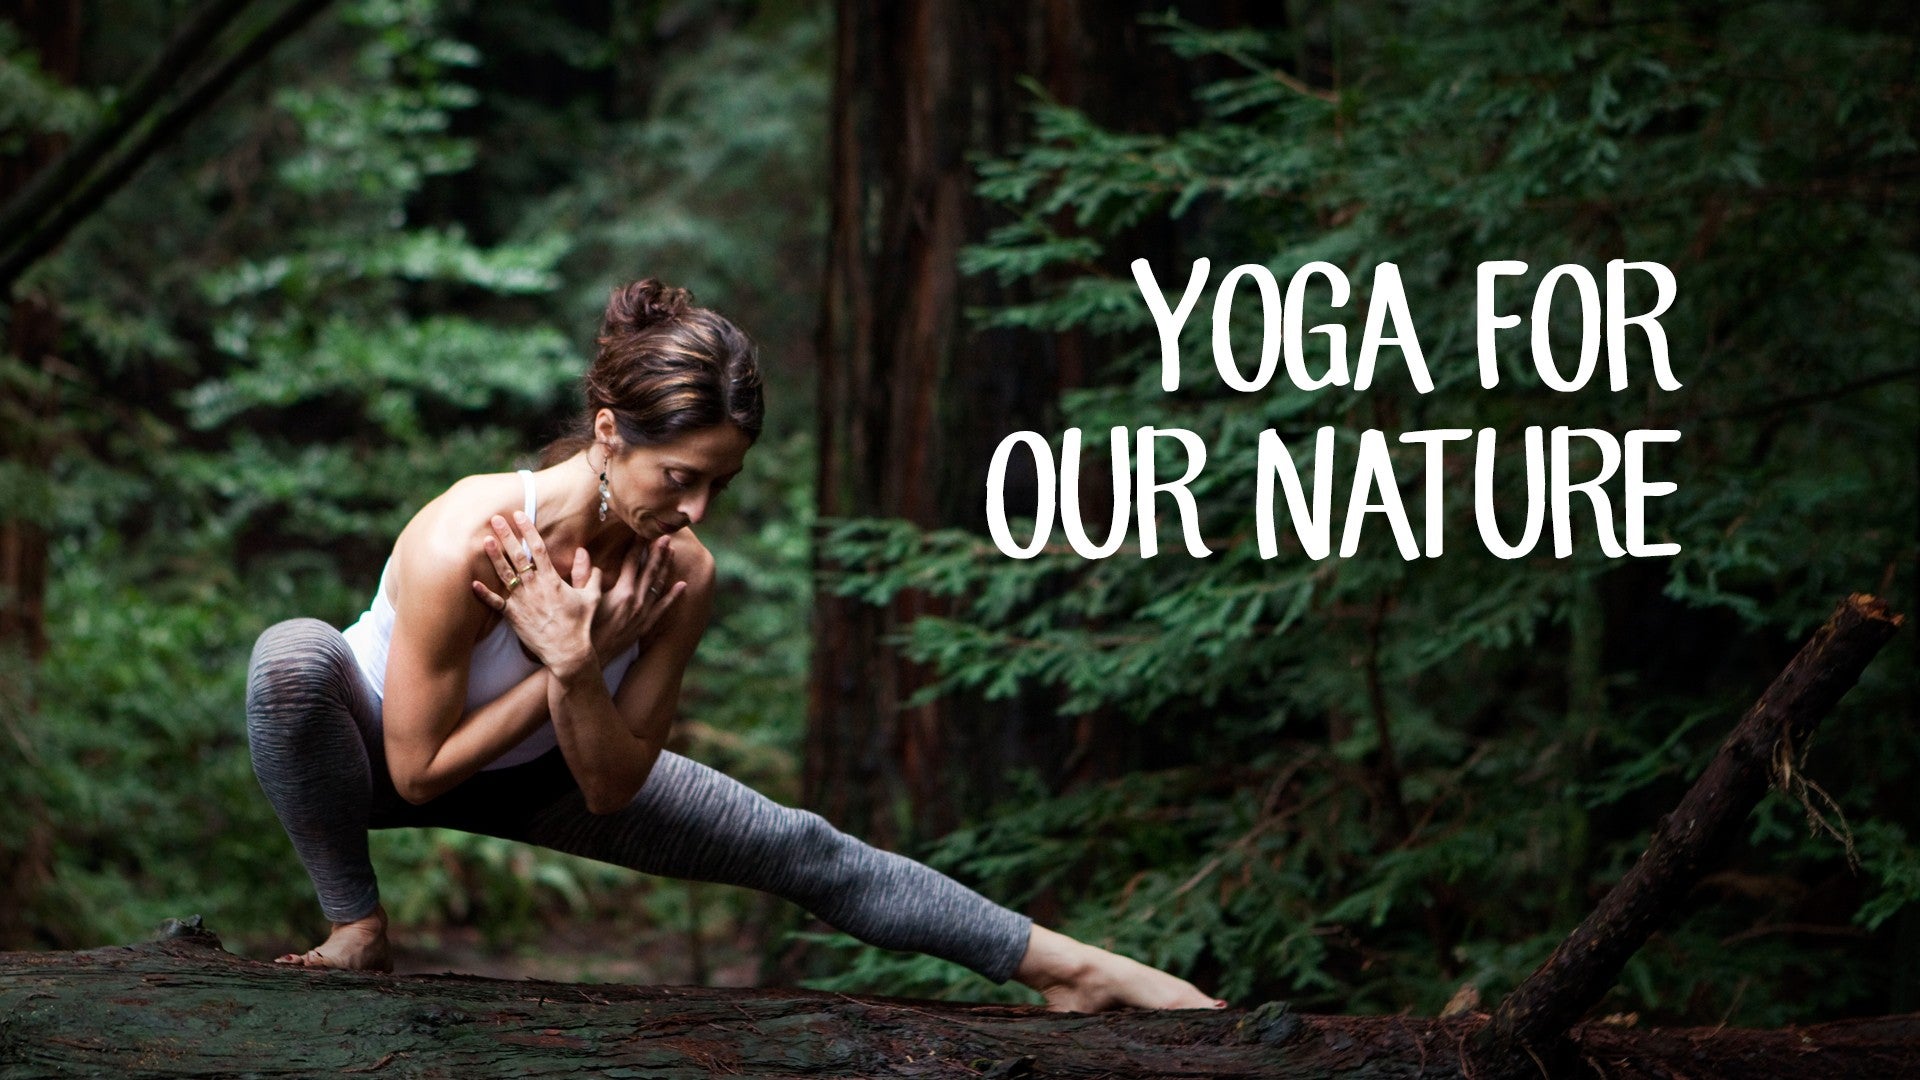
Hello and welcome back. For this next class, I'm looking forward to sharing with you all my favorite sequence using a bolster for nearly the entire class. So if you love your bolster, it's going to be a great class. We'll try to cultivate some of the kappa elements of earth and water in this class as we go into longer held poses and then encourage the body and the breath to soften into whatever shape gravity takes us into. So for beginners, again, if you grab your bolster and we're going to start on our back with the bolster underneath your head and underneath your spine.
With your legs out straight, if you adjust your bolster to be under the back of your rib cage, shoulders and your head and wiggle around so that in general that feels good for you with your arms somewhere out to your side, perhaps shoulder height or perhaps closer to your hips if there's any tightness in the shoulders. As an option, we'll bring the soles of the feet to touch, thighs, knees open out to the side and whichever leg position you choose, if you'll then take a moment and let your eyes relax or your eyes close as you try to make contact with the support underneath you. So take a moment to feel where the back of the head is touching the bolster, where the weight of the shoulders is falling back against the bolster, weight of the arms feeling that ground underneath and in general trying to allow more of the weight of the upper body to drop back into the support. Feel contact points where the back of the ribs meet the bolster, where the back of the hips are on the ground, legs potentially floating and the contact point where the edges of your feet feel the floor. So may we try to anchor in this way while then allowing this front body to be soft and to relax enough that you can start to feel the wave of movement, the watery movement way down in your belly and encourage some expansion on the inhale.
Feel the belly falling in slightly towards your back body as you exhale, maybe three or four really generous breaths down into this front of your body with the essence of your breath moving towards the belly and maybe eventually even towards your hips, towards your legs, allowing again that earthy quality to cultivate deep into your core and softening any rough edges as you inhale and invite that watery quality to create better flow in the body. And after this next exhale, if your knees are apart, let the knees very slowly come in together toward the midline until eventually your knees touch and then slide your legs one at a time down to the floor and if your legs were straight, gather them in closer so your legs are strongly pressing down into the floor, flex your ankles and then take your arms straight up into the air above your shoulders. We'll take the arms as far back towards your ears as you're comfortable, maybe towards the bolster and then take a big full inhale here and a few little mini vinyasas in between to make sure that our water body stays really fluid and warm. So get ready now, eyes open if they've closed, to reach your arms back up in the air, we'll come all the way up to sitting off the bolster, raise your arms up on an inhale above your shoulders and then smoothly rolling back to the bolster with your arms at your sides. As soon as you meet the bolster, take your arms again back towards your ears, then a big exhale grounds your legs, reach forward and up, arms rising above the shoulders and then exhale, arms lower down as you come back to meet the bolster, arms stretch back toward your ears and then again come forward and up with your arms completely off the bolster and exhale your way back to the bolster, when your head lands stretch your arms back, let's try to make maybe two or three more smooth transitions up on the inhale and then flowing back to the support on the exhale.
Stay here, arms reaching back toward your ears, exhale come forward, up off the bolster and maybe this last time that we come back to meet the bolster in this way, arms overhead, take a big breath and then last time we'll come all the way up to sitting, stretch the arms towards the sky, pause, take the arms all the way down and let's bend your knees and turn to your right side. So we're going to turn the bolster the other way, so it's facing that small front little edge of your mat and take the bolster right up against your right hip and your right thigh, we'll have both knees bent for starting, the right arm is going to stretch all the way down to the floor and if your head coming down to your arm feels uncomfortable, you might add an additional blanket height to fill that space if that doesn't quite feel right. All right, so as you get started, if we can from here take your top left arm towards the sky, take the left arm towards your ear and then take your right hand from below and catch your left forearm or your wrist somewhere in that zone and then give yourself a little stretch of tugging that left arm a little away from your waist. So this is the place we start and then you might explore as you're here stretching your left leg straight and then a little bit back an inch or two away from the long edge of your yoga mat, the front long edge. So ideally your left front hip starts to feel a little bit of a stretch and then just notice how that feels, you're in charge of how much stretch you create by tugging your left arm a little bit away from the waist or the chest and then sometimes people enjoy from here turning your left chest a little bit towards the ceiling and the head again just kind of moves along with the spine, there's no right or wrong position.
Just make sure you're moving into good space if you're turning your chest a little bit open towards the ceiling and good time again to relax the eyes, jaw, just general noticing again if you're moving into good space, keep this long rhythmic breath and just allowing your body to open into this new shape with the support of the bolster underneath your waist and the intention here to potentially create more length down that whole left side of your body. Let's take one more breath as we are here, before we bring that left leg back, if we bent that left leg, take your left arm down to your sides and then from here we'll come on up and then we'll make our transfer all the way over to the other side so your left side comes up against the bolster, knees bent so you can see the back view now and the left arm comes straight down to the floor, head resting on your left arm and then the right arm comes up towards the ceiling, take your right arm down towards your ear and reach up with your left hand for your right forearm or wrist and then just generally giving a little bit of tug or stretch on that right arm until you find enough sensation again to draw your attention inward and downward towards your waist. If you like adding the layer now the right leg would go straight and slide your foot back a few inches on the floor and then really stretch through that right leg as you reach through your right arm. So for me usually the front of the belly, front of the hip on that right side in this case would now also be feeling a stretch. If you want to play with more sensation that right chest turns a little bit towards the sky and people usually know pretty quickly if that's a good idea to head that way or not and just allowing again yourself to delight in that new shape, there's no right or wrong way to do it, just make sure it feels good.
Taking maybe one more breath here letting your eyes relax, draw, relax, settle in. Before we bring that right knee back in towards left knee and take your right arm down to your side and then we'll come all the way back up and as you come on up we're going to transfer that bolster now out of your way behind you so that you can come down onto your back. When you come down onto your back take your bolster with you, feet on the ground, knees stay bent and we're going to take the bolster in the air right above your shoulders and if you'll keep your hands about shoulder distance apart like you're doing plank pose. From here keep a neutral spine and as you inhale try to take that bolster back towards the floor behind your head and then bring it right back up as you inhale. Take your breath in and inhale and exhale through the movement of taking your bolster back and then back up.
So keep going in your own rhythm a few times and just feeling the weight of that bolster how that challenges your shoulders in this special way where we are in both stretching and strengthening my favorite combo and we'll do a few more just to warm up the shoulders in this way with that little movement and also bringing some strength into the shoulders. Next time that the bolster comes back, next time it comes back to meet the floor let's leave the bolster on the floor behind your head and then allow your hands to slide up to the top of the bolster so it makes it a little easier in your shoulders. Wiggle your feet now right within the edges of your yoga mat so they're on the mat not on the floor and then let your knees tip to the right like windshield wipers. Your feet nice and wide legs are pretty much 90 degree angles each leg as you tip to the right and then begin to potentially walk your left right hand over to catch your left wrist and stretch your left hand a little longer. Let your head turn as it might like to a little bit towards your right arm and then take one or two more moments to breathe here as you lengthen through that left side of your body.
Bring the knees all the way back up and let go of the wrist so they're neutral parallel as your knees fall towards the left side. When your knees go to the left adjust your feet so your knees feel comfortable and if you want to stretch longer in this case grab your right wrist with your left hand create a little bit of a tug on that right wrist as your knees tip more and more towards the earth. Big breath in down towards your waist towards the front of that right hip and come on back to the center position. All right now please slide your bolster down towards the outer right hip and towards your right leg. So when we're on the ground here we're going to put the right leg down on the floor straight and hold on to your left knee with both hands.
Raise your left knee in towards your belly for a moment and then take that left leg over to the bolster. When you land on the bolster let it support your knee your shin and your foot and we're going to try to take that left arm up towards the ceiling and stretch it over towards the floor on the left and ideally we're tracking that left hand with the eyes. So if your shoulder is uncomfortable here you take your left arm down closer to the side of your hip if it feels interesting we might take the arm shoulder height or even slightly inch your left hand higher up towards your ear. So another moment where there's no right or wrong way there's no right or wrong angle just notice what's helpful to stretch your upper left chest or into your inner left arm. I'm always in the beginning kind of making little movements just to see today which corner of my chest feels a little tight and then pause where I get some feedback that the area is a little tight and we're going to pause wherever you are if you found that little corner.
Take a couple of breaths, relax in your eyes, your jaw so you can tune back into again the legs of your breath the depth of your breath. Maybe over this next moment we're going to slide your left arm down to your side from wherever it went come on back onto your spine with both feet on the floor please transfer your bolster over to your left side to your hip height left leg on the floor we're going to take the right knee into your hands and pull that towards the chest for a moment then from here we'll turn on over to the new side where your right leg rest on the bolster and maybe your shoulders move with you as you turn toward the bolster. Okay you can pin that right leg down with your left hand right arm straight up in the air and then slowly let that right arm fall out to the side at an angle that works for you it could be higher than shoulder height lower all the way down by your hip or somewhere between kind of checking out where do you need a little bit of awakening in this upper right chest today and wherever that might be let your head neck area completely relax take a few moments maybe encouraging a little more spreading of your right palm here to help widen the muscles across the top of that right chest and see if that makes a difference for you being here for a moment receiving support under your right knee support under your right hand and then the opportunity again to breathe a little bit more into the chest last breath here before we take that right arm all the way down to your side and then roll onto your back and as soon as you get onto your back now we're going to take the bolster and turn it so it's facing that small edge again of the top of your mat and we're going to slide the bolster underneath your hips so as we get the bolster underneath the hips find that comfortable spot for you it's under the buttocks under the sacrum and we'll bring your left knee in towards your chest hold that with both hands and then take your right leg up towards the ceiling so from here keep your right ankle flexed and as you exhale slowly drop that right leg forward and down towards the floor it's not required for the heel to touch inhale the leg comes back up and then again exhale lower your right leg down towards the floor inhale your leg up keeping the ankle flex exhale as you reach forward and down with hopes that this repetition helps you open and lengthen this right front of your hip or maybe what people might identify as the psoas muscle maybe if we're lucky we get to stretch a little deeper into that area let's do two more times the leg coming down with that right heel reaching forward then over this last time when the heel comes down maybe we touch the floor or keep your leg parallel and just for a moment stretch that right arm all the way back towards your ear so the whole front of the right body gets a little bit of a stretch come on back now and bring both knees back in and then put both feet on the floor for a second so in case you need to adjust your bolster position you can do that and then we'll do the opposite now so we'll hold on to your right knee with both hands and take your left leg when you're ready towards the sky keep the ankle flexed and that left leg comes forward and down on exhale inhale the leg goes up be mindful of how much your pelvis is moving when your leg comes down and how that affects your lower back so if your lower back feels sensitive try to do less lowering of the leg so your pelvis isn't moving so much or just in general going for length on your left side as your heel comes towards the floor next time that your heel comes down let's keep that left heel on the floor or leg parallel to the ground as your left arm now stretches all the way back towards your ear and just imagine you can get a little bit longer on that left side without exaggerating the backbend just getting longer on that left side we're gonna bring both knees now in towards your chest area and find that comfortable spot in your back now where it can lift both legs up in the air and put your hands right on the inside of the knee line the inner leg line from here we're gonna let the legs open into a V shape with your ankles flexed now create some resistance and take about four seconds to bring your legs all the way back together with some resistance from the hands inhale legs open into the V shape create some resistance as we bring the legs in and again inhaling legs open with some resistance exhale closing the legs and we'll do that two more times inhale open slowly closing the legs on exhale one more time inhale legs open and then slowly closing the legs on the exhale and then from here if we bring the knees back towards the chest open the knees wide and this could be our working version of happy baby pose another variation we might work with is to lift the heels up above the knees and hold on to our ankles or potentially even grabbing the feet and just feel with this little ramp this little lift under your hips if that gives you access to a slightly new area of your hips or inner legs when we do a happy baby pose and just take a moment again to dial in to the pose and try to find where your stable shoulders rib cage the pelvis and then can we soften any rough edges with our breath as we make a little more space in the body right over this next moment let the hands if they're up towards your feet or ankles slowly release so we bring the feet back to the floor and as soon as your feet touch the floor lift your hips up we'll take the bolster out from underneath you for a moment and then transfer the bolster so many ways to use this bolster put the bolster right on top of your belly right between the chest or right on the sternum bone so this could be a modified child's pose or option for thread the needle where we can cross one ankle over the other so we kind of pull the bolster down towards the hips and then let your hands arms wrap around the bolster and just hugging that bolster down towards your sternum it can feel really grounding in the back body it's a nice way for me to feel my spine is very connected to the floor and just a really sweet way to use your bolster so take a few more moments just appreciating that feeling of grounding the front of your body to make more contact with the earth big breath in and out and see what it feels like when you switch the opposite ankle on top and just for a couple of moments new ankle on top and just continue again to let the weight of that bolster help you ground into this pose we'll soon be leaving the floor so just appreciating one more moment here so when you're ready over the next breath let's get ready to leave the floor and set your bolster over to a side so that we can work our way up to a forward facing seat now as soon as you come on up let's go ahead and turn the bolster so it's once again facing that small front edge of your mat and come on down to face the floor and slide the bolster enough forward that you can put your elbows down onto the bolster and I like for when I'm doing this pose to have my knees about hip distance apart so if we'll keep the elbows for a moment on the bolster join your palms together and like that prayer pose position and we let the hips go back in space as we lift the forearms off the bolster so the hands face the ceiling and then we eventually would try to bring the foreheads to the bolster and slide your knees back as much as you like if you want to get that deeper shoulder stretch anybody here working with shoulder sensitivity or lower back sensitivity the variation will be knees coming in towards the bolster so that your ribs stay on your thighs and there's no hanging in the back and you could bring your forehead to the front of the bolster here so again remember the nose isn't on the bolster but your forehead is just take one other moment or two just letting your elbows walk forward as much as you like to find that healthy stretch in your shoulders and hopefully that feeling of the stretch going way down your waist and maybe even into your lower back and taking one or two more moments here appreciating the bolster the shoulders waking up and then let's have the hands come forward as you lift your head up and then maybe the bolsters in the right place or slide it in towards your knees an inch or two so that you can stretch your legs down and take the front of your pelvis or lower belly onto the bolsters everyone's torso is a little bit different length but ideally we're trying to have the upper belly the bottom of the chest supported to come into would be maybe what we call sphinx pose it's a cobra variation to get a little bit of a support when we're doing our backbends so front of the ribs have support and maybe for some the front of the belly has supports alright so if you just allow when you're here to let your front ribs relax into the bolster as your head potentially lifts up and try to keep the length of your spine in your awareness so that we're not arching the head back and feel comfortable lowering the head maybe a little bit more in the forward down position just in general that we're trying to keep the length of the spine in our awareness see what it's like to breathe down through the spine in this way and to potentially again just allow for that gentle backbend shape to emerge if we sit a lot in our day this can be a wonderful counter pose from sitting or driving one of the poses that will hold longer when we get to the yin practice later in this season maybe taking two more moments here with the chest potentially lifted slide your hands onto the bolster close to the bolster and we push ourselves up and back I like to slide the bolster maybe a little bit closer to the knees and then put the knees up on the bolster with your left knee on the bolster take your right foot forward you can hold on to your right knee as we come into this lunge position and we can stay high and allow this left thigh to drape a little bit towards the floor for some it might feel interesting for a moment to take the fingertips down look towards the floor and continue letting this left thigh drape towards the ground this extra cushion for a lot of people feels fantastic underneath the knee I hope you're appreciating that and just maybe what different area it might bring you to in your left hip with that extra height so take one more moment in that forward variation let's walk the hands up to your right knee now lean back to stand right on top of your left knee and feel what it's like to take your arms up overhead and similar to what we did on our back or on our side earlier we grab the left wrist and reach up and over to the right and the head tilting slightly into your right arm think of pressing your left foot into the floor as you lift up and over to the right come around to center position arms down at your side and we'll take your left knee to the bolster curl your toes under for just one moment to stretch your feet while you've got that cushion under your knees and then we'll come back to keep the right knee on the bolster and take your left leg forward okay so you might hold your left knee relax your back foot and encourage this right thigh to sink a little bit forward in space and then from there if it feels okay your chest lands over your left knee fingertips on the floor and perhaps this helps you settle and create more that earthy quality in your legs and your hips let your breath help soften any rough edges now in that forward lunge position we'll do what we did on the other side we walk the hands up to the left knee and we push back to stand right on top of the right knee so now you've minimized the back bend as you take your arms straight up and in this case you catch your right wrist with your left hand and think of stretching up towards the ceiling and over to the left as your right foot presses into the floor and just take that moment of leaning into the sides big full breath down the right side of the hip and then up we come back to center position and then let the arms come down to your side all right so if we put both knees on the bolster curl your toes under and one more time get that stretch into the feet and then from this we're going to lift the knees up for just a moment then put the knees on the floor and transfer the bolster onto the backs of your legs on top of your calves and kind of wedge that into the top of the calf area if you stand up on your knees for a moment and take both arms up towards your ears when both arms are up we're going to drop the left hand down and try to reach your fingertips towards the bolster as you reach your right hand to the ceiling and then over to the left so that you can look back down at your left hands let your left fingertips kind of squish the bolster towards your calf and take your left arm up towards your ear arms are parallel and then let your right hand drop down behind you to touch the bolster push it down as your left arm goes up and over to the right so it's easier to look towards your right hand both arms come up parallel and then your left hand drops down to the bolster one more time reach up and over to the left take your left arm up towards your ear and drop your right hand down to the bolster and reach your left hand up and over to the right come on back to center with your arms down keep your bolster where it is and check out this variation where you sit on the bolster here it can be a whole new experience for your knees your ankles your feet in particular if the feet are tight and I find for a lot of people this bolster actually helps folks with knee issues actually sit in a Virasana like shape so just take a moment again just to feel how this lands for you and maybe how it helps settle the legs and to stretch the front of the ankles just a little bit more than Virasana that we might be used to with the blocks just taking one more moment as you are here we'll come all the way up off the bolster and then from that bolster if we just simply transfer your bolt bolster so it's facing the long front edge of your mat and then turn for a moment stretch out your legs and maybe shake out the feet a little bit side to side legs side to side and then we'll bring one leg at a time in so with the bolster under your hips see if that allows your pelvis to tilt forward enough for your knees to drop down towards the floor and we're gonna let the hands rest where they're comfortable on your knees or your thighs or making a little bowl in your lap and whichever one you choose you might try to lengthen through the curves of your spine sit in the best way possible to open the chest keep the head above your spine above your pelvis and then perhaps lower your gaze or even close your eyes if you're comfortable and just observe the benefits the effect of your practice today acknowledging the effort you put into your practice to the self-care using a little extra support today the bolster to cultivate those qualities of earth and water keep us stable and relaxed we'll be observing three to four more breaths in your seat cultivating more presence with each cycle of your breath and then in closing this part of the practice with the hands perhaps joined together in front of the heart space may others always benefit from our practice namaste thank you so much for watching the practice today and I hope you come back soon thank you.
Yoga for Our Nature: Vitality Boost


Comments


You need to be a subscriber to post a comment.
Please Log In or Create an Account to start your free trial.
