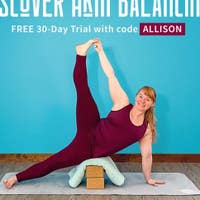
Partridge Pose
Description
About This Video
Transcript
Read Full Transcript
Hi, everyone, welcome back. Today we'll be exploring Kappinjalasana or Partridge Pose. So for today's practice, you'll need two blocks, a strap and a blanket. And we'll get started with the blanket. So find your blanket, open it up, and then take the short edges of your blanket and roll them. And kind of try to keep it smooth as you roll so that when you place your body on the blanket, you don't feel as many lumps. And if this is high, also remember that your body weight will flatten it a little bit, so it won't be as high. But of course, you can unroll it some if you find it to be uncomfortable in the bridge pose that will do. Okay, so come on down onto your back. Take your blanket and stick your blanket underneath your buttocks. And then release the flesh of the buttocks onto the blanket. If you feel that it's too far down towards your feet, you'll pull the blanket back up. Just lying across the sacrum and slightly below. And bring your arms out to the sides for a few moments. Be aware of how the back surface of your body touches the mat, touches the blanket. Separate the backs of your teeth, releasing your jaw. So it can be very stimulating and exciting knowing that we're working towards this arm balance that's quite complex and merges kind of the best of the arm balancing and back bending worlds. But as we progress into it, we want to create this sense of clarity as we move forward. Sense your breath. I maintain about 10% of your awareness on your breath as you stretch your left leg forward. So you're coming into a little bit of passive hip extension. You can place your hand on the front of your hip feeling around for the frontal hip point. Feel below. And then try to smooth the skin of the hip and the upper thigh down towards the knee. Okay, and then you'll switch sides. Bend your left knee straight in your right leg. And take your right hand to the top of the thigh. Find the frontal hip point. And take the hand just below that to the root of the thigh. So when we come into hip extension, this is the place that we want to move from.
And now smooth the skin down in the direction of your knee. Then from here, release your right hand. Bend your right knee. Shift your hips a little bit more to the right side of your blanket. And take the blanket so now it's coming into the space of your lower back as you roll onto your left side. Okay, and you may readjust a little bit here so that the blanket goes right between your ribs and your hips. Support yourself on your forearm so that your forearm is about parallel with the short edge of your mat. And with your top leg, bring the right knee forward. And then pull the right thigh back right from where you felt, right? So here's the hip point. The hand is right below the hip point. Pull the thigh back and hinge from your hip crease as you pull the knee forward and press the thigh back. So there's a little more active hip extension. And take one more holding the knee in and driving your right heel back. Keep the right heel driving back, push into your left forearm as you sweep your right arm overhead. It is quite active. And then as you exhale, release down. Switch sides. So you'll take the waist, your right side waist and place it right over your blanket. And pull the thighs back a little bit. Prop yourself up onto your right forearm. Find your hip crease. Lift the left knee in towards the chest. So you're in hip flexion. Then pull the left thigh back. Try to drive back with the heel without popping the front of the chest forward. Pull the front ribs back. Move back from the top of the thigh. And bend the knee in towards your chest. Drive the thigh back. Knee to chest. Press back. So you'll notice that when you're pressing back, your hamstring, the back of your thigh and your buttocks become much more active. Okay, now keep the left heel driving back. Circle the left arm overhead and then push into the right forearm. Then as you exhale, release. Roll onto your belly. And reposition yourself a little bit as well here because we're going to take the blanket and turn the blanket so that the long edge of the blanket is also parallel with the long edges of your mat. You'll place your belly on the blanket with your legs reaching straight back. Walk your hands back and then tilt a little bit from side to side. So your pubic bone is kind of hanging off of the blanket so that gives you a sense of direction in terms of whether you need to move further forward or further back. And then come to center. Pull the elbows back. Wide in the front of your chest. And then as you inhale, root the thighs down. Start to pull your pubic bone down towards the floor as you lift your head and chest into a cobra pose. And then lower back down. Keep your legs active. Engage your buttocks. Inhale, drive up. And then release down. You'll do that one more time. Inhale up. And to ensure that it's really the muscles of the back that are keeping us up, lift your pinky fingers, your fourth fingers, your third fingers, your index fingers. Here it gets hard. And lift your thumbs away from the floor. Okay? And that way we know that it's the spinal extensor that are keeping us up rather than the pushing of the hands that are creating this sort of backbend. Take another breath here. And then as you exhale, slowly release down. You can support your forehead on your hands. But if you don't reach, feel free to grab a block and place that block underneath your forehead. And you can rest your arms down by your sides. Feel your lower back broaden as you breathe. And bend your right knee. Reach back with your right hand. Find your foot. And draw the right heel down towards your buttock.
Press your right hip down towards the floor. It doesn't have to touch. Mine certainly is not touching. But that is the sense of direction. You also have your strap handy. So if this connection isn't made, then you can use the strap to connect your hand and foot. Okay? Release the right foot. Switch sides. Bend your left knee. Find your foot or loop your foot. Once you do that, draw the heel in the direction of your buttocks and your left hip down towards the floor without leaning your body to the left. As you breathe, continue to breathe space into the lower back. As you exhale, release the left foot. Return the left forearm to the floor and take a breath. Take your hands underneath your shoulders. Press yourself up onto all fours. Okay? Move your blanket aside, but keep your block nearby. So we'll revisit this pose that we've been more and more getting used to throughout the practices. You'll reach your right foot back. Spin onto the inner edge of your right foot. Then from there, lift your right arm. The left foot again can push down or kickstand it a little bit. Then lift your right leg up. Okay? Take your right arm over your head.
So now we're layering on. You can stay here or bend your right knee. Press back through the side just like you were doing in the sideline. Circle your arm behind you like you were doing as you were prone and see if there's a connection here. If there is, don't hold, but get as close as you can to the foot in the hand without actually touching. Okay? I know it's so tempting. And then inhale, straighten the right leg, sweep the arm overhead. Okay? If the two limbs don't come very close to each other or just for some sensory practice, you can take the block and then tap the foot to the block. And then pause there. Keep pressing the thigh back and behind you. And then lower on down. So you'll see it from the back side. Reach the left ball of the foot back. Spin onto the inner edge of your left foot. Turn the chest toward the ceiling as you lift your left arm up. Right foot here, kickstand it a little bit. Lift your left leg up. Take the left arm overhead. Keep pushing away with your right arm. As you bend your left knee, press the left thigh back. Circle the arm behind you. Get close, right? Maybe touch to know where you are in space, but without holding. And then straighten the arm, straighten the leg. If you want to make your arm longer, use your block. Circle the arm back, thigh back, ribs back, and then tap or touch. Be close. And straighten your left leg. And circle your arm overhead. Place the block down, left hand down, and then your left knee down. Okay? Find your blocks. Bring them to the top of the mat so if you find it useful to have them there as you're stepping forward. And step your left foot to the outside of the left block. Tuck your right toes under to lift your knee coming into your low lunge. Inch your sternum forward. Then circle your right heel down to the floor. Seal the outer edge of your right foot to the floor so that your inner thigh lifts away from the floor. Circle your right arm overhead and come into extended side angle. Then from here, your left hand can remain on the block or place it down onto the floor. If the block is on the floor, make sure it's on its lowest setting. You're going to take your left leg back and come into side plank. And see how that's coming along. From here, turn your chest back down to the floor as you come onto the balls of your feet into your plank. Then step your right foot forward. Okay? You can bring the block to the inside and walk your foot out if you haven't already done so by stepping to the outside. Spin your left heel down to the floor. Root the outer edge. Take your left arm overhead for extended side angle. Keep the inner left leg lifting up and away from the floor. So inner thigh lifts. Then from there, perhaps you walk or sneak that right foot back as you push into the right hand and you come into your side plank. Lift the left arm up. And turn the chest back down towards the floor as you roll onto the balls of your feet. From here, lower back down onto the knees. Sit back for a moment and grab your blanket. So you're going to take that same blanket roll with your blocks. Bring your blocks together. So you create kind of this long bench with your blocks on the lowest height. And then prop your blanket right to the sides of your blocks. So in a way, it's sort of creating this bolster for your body. Okay? I'm going to come down. So as I come down, the blocks might move forward. So you can kind of keep them in place with your forearms as you rest your belly on the blanket and on the blocks. If these need more padding, then go ahead, find a towel or a shirt or something and place that on the tops of your blocks. Tuck your toes under. Reach back through your heels and then lower both of your knees back down to the floor. Point your toes. So come back kind of into that cobra-like position. Press down, lift up, and then back down. Then from here, take your left hand out in front of you. Bend your knee by pulling your heel towards your buttocks. Take the right arm up and overhead circling back. Find the connection with your foot. Perhaps walk the left hand back as you press your hand into your foot and your foot back into your hand. Then as you exhale, lower back down. Hand comes out in front. Lower your right foot. Plant the top of the foot down so that the right leg is energized. Pull your left heel in toward your buttock. Circle your left arm up and around as you reach back to find the foot. Press the foot into the hand as you lift your chest. Move the front of your left hip towards the blanket. Then as you exhale, slowly release. Take the left hand back out in front of you. Walk the hands back. Move the chest forward and up. For a moment, think about pulling your ribs away from the blocks. They might still be on the blocks, but think about taking your buttocks, pulling your buttocks towards the blanket and your ribs back slightly. Does that deepen your back bend? Does it support your back bend? As you exhale, slowly lower yourself on down. Pull your hands underneath your shoulders. Press yourself up. Then we come into our favorite block support setup. Take your blocks, stack one block on top of the other. Then you'll grab your blanket, unroll the blanket, and then smooth it out. Fold the blanket and take your blanket right over your blocks again. It's important here to realize where the end of your blocks are. If it's confusing at all, having the blanket tail over like this, you can also have the blanket oriented this way. The reason for that is because in kapindjalasana, part of our body is moving back. As that part of our body is moving back, we can get disoriented, continue to roll back, and then we roll off of our prop setup. One way to help us even more is if you did it against the wall, so when you lean back, you're actually leaning into the wall. Since we don't have a wall, we're going to work with this, but I want you to be aware of where you're gauging your proprioception. You'll take your left hip and place your left hip onto the block setup. Walk your left hand forward. Set up your arm. Spin your bicep forward as you press into your index finger and thumb. Then reach your legs back. If it's helpful and if you have space, you might actually move your left hip a little further forward on your block setup. Then from here, lift your right leg up without turning the leg out. Keep your toes pointed forward. Circle your arm overhead. Then keep reaching back with your right arm as you bend your right knee. Perhaps you can find that space of your foot, and then press back into your hand. Again, even if there isn't a connection, this is really nice having this active exploration of capinjal asana. Of course, you can also take your strap and then loop your foot as you press back. Take another breath here. Maybe there's a hamstring cramp. It can happen. Then as you exhale, release the right foot and you'll release the right hand. Bend your knees. Then turn your chest down as you lift your hips up and pause for a moment. I'm going to do this from behind so you can see a little more clearly what is happening in the foot when I come to grab my foot. From here, take your right hip, place your right hip onto the blocks. Set up your right hand. Again, you can scoot yourself a little bit further forward on the set up if there's space. Spin the right bicep forward. Straighten your legs. Vasi stasana, your side plank. Then lift your left leg up without turning the leg out. Take the left thigh directly back as you bend your left knee. Push away with your right hand. Circle the left arm up and overhead.
Try to keep the left side of your chest facing forward as you find your foot. You can be active here. Pressing the left thigh back, reaching back. Hold the foot or loop the foot. Push away with the right arm. Maybe even look up toward the ceiling. Then as you exhale, place your left foot. Take the arm back down. Bend your knees and make your way back onto all fours. That's kapinjalasana or partridge pose. Move now your blanket to the back of your mat and take your blocks and have them close by. Rest on your back and use the blanket to support the head. The blanket comes all the way up to the tops of your shoulders. Bring your arms out to the sides to a T and open up your feet to about as wide as the mat. One slowly windshield wiper your legs from side to side. The legs don't have to come all the way down. The blocks can be nice as like buffers. Come back through center with the legs. Pull your fingertips towards your inner wrists. Your wrists now are inflection. Then take the hands as if you were going to bring them back into extension. The floor will meet you before you're able to do that. Press the backs of your hands into the floor. Notice how this can be an active release for the wrists. And then again pull your fingertips towards your inner wrists. And then find the activation pulling the tops of your hands down into the floor. Press, press, press. And now you're going to say hello to the ceiling by waving your hands. So pull your pinky fingers down towards your feet. Then pull your thumbs in the direction of your head without lifting the backs of your hands away from the floor.
So it can be interesting just to notice the range of motion there. Fingertips towards your feet. And then thumbs towards your head. And one more time. Wave to the ceiling by bringing fingertips towards your feet. And then thumbs towards your head. Good. And release. You can wiggle your fingertips a little bit. Walk your feet in. So in the practice of capinjalasana there's a lot of wanting of turning the legs out. So as a counter here, you'll move your blocks down as you take the outer edges of your feet together and allow the knees to come out to the sides for supta baddha konasana. And as your legs come into this position supported by the blocks, just notice how the corner edge of the block moves into your skin. So you can do that. That's totally fine. But another way to create a sense of release here is to actually lift the edge of the block that's furthest away from you. Lift that part up so that now the flat edge of the block surface meets the outer thigh. And you'll notice my hand is underneath my block. Right. So that you can see that it's clearly tipped. And then I allow the weight of my thigh to release down onto the block and that holds it in place. Sometimes it can be a little tricky to begin with, but eventually it becomes really nice because there's this merging of your body with the surface of the block. And take your hands wherever they feel comfortable. And take a few breaths here, allowing the inner thighs to soften the back surface of your body to release into the mat, especially the backs of the arms and the hands. And now if you have the block surface tipped, going to lower that down. Draw the legs in towards each other. Pull your knees in towards your chest. Give yourself a little rock side to side, circle, circle. And return to center. Place your feet down onto the floor and reach the legs forward. You can adjust your blanket if you need that's underneath your head or prop yourself as you'd like for a mini Shavasana. And let the jaw be soft as you feel the state of your chest or your spine, hips, and your limbs. Shavasana. Shavasana, Shavasana.
Shavasana. You're welcome to stay here for a few more minutes. Otherwise, awaken your breath. Twinkle your fingertips and your toes. Bend your knees, placing the soles of your feet on the floor. Roll to one side. You can use your blanket to support yourself. And using your hands now, gently press yourself up into any comfortable seated position using any props that you'd like to support yourself. And take your hands to your chest, touch your thumbs to your heart to uplift it. On the inner light in me, thousand dollars, the inner light in you. Namaste.
Comments

You need to be a subscriber to post a comment.
Please Log In or Create an Account to start your free trial.
