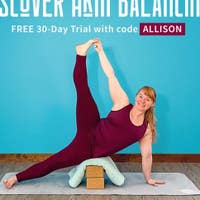
Basic Bakasana Breakdown
Description
About This Video
Transcript
Read Full Transcript
Hi and welcome to this practice of bakasana. We're going to break down the essential components of bakasana so that if you feel like you're missing something in your practice or you're just getting started, this is the place to be. Today you'll need two blocks, a blanket and a bolster. If you don't have a bolster, you can replace that with sturdy cushions or a stack of blankets. So sit in sukhasana or badakonasana and take your arms out in front of you. So one of the first things that we notice in bakasana is that our foundation is our hands. So you'll take your fingertips and pull your fingertips back in the direction of your shoulders. So this is wrist extension. And then you'll take your fingertips and pull them down towards the floor and under so that your wrist then comes into wrist flexion. You do that a few times, warming up the wrists, pulling the fingertips up and back in the direction of your shoulders, and then pulling your palms down towards the undersides of your forearms. And now take your hands so that the palms face down towards the floor. Pull your pinky fingers towards your outer elbows, so the bony part of the elbow. And then take the thumbs and pull your thumbs in towards the softer side of your elbows. It's almost like your index fingers and your thumbs create a triangle when you do that. Pull the pinky fingers back and then thumb side in. And now you'll circle with the palms of your hands predominantly facing down. So bring your thumbs in towards each other, pull the hands down at a slight angle. Okay, then pull the pinky fingers towards the outer elbows.
Lift the hands slightly up and back down and around again. So just keeping an eye on the forearm, right? That the forearm is very still as well as the rest of the upper arm instead of kind of turning so that the underside of the forearms face up towards the ceiling. That's what you're looking for right now. And reverse the direction of the circles. And then from here, turn your palms, so now they face up towards the ceiling. And you may start to feel that the muscles of the shoulders and the arms fatigue a little bit. And so you can always take a break. But what's nice is that you start to build more strength in the shoulders so that they're steady and stable, which is something really useful for our balancing. Okay, so you're going to pull your fingertips now down towards the floor. And then pull your fingertips up towards your shoulders. So as the fingertips move down towards the floor, you come into wrist extension. And as you pull the fingertips up towards the ceiling, wrist flexion. Okay, then palms of the hands face up towards the ceiling, making fingers in towards the inner arms, and then your thumbs towards the outer shoulders.
And we come into a circle, trying to keep the palms facing up the entire time. And then reverse the direction of the circle. Good. And then from there, release the arms for a moment. Now we're going to look at the shoulder blades. So your shoulder blades can do a lot of actions. And we'll focus primarily on four of those actions today. So I'm going to turn to the side so that you can see my shoulder blades a little more clearly. Have your hands in that same plank like position. Bring the shoulder blades closer together. You're almost thinking of the shoulder blades moving closer to your spine. And then you're going to widen your shoulder blades so that they're moving to the size of your rib cage. Draw the shoulder blades in closer together. That's called retraction. And then pull the shoulder blades away from each other. That's called protraction. So in your bakasana, when you're pushing through your hands, essentially you're protracting your shoulder blades. Okay. Then from there, bring your shoulders back to center. So you're neither protracting or retracting. You'll elevate, which is a shrug, right? We do this all the time. You lift the shoulders up towards the ears and then pull the shoulders down and away from the ears. Draw the shoulder blades up and then pull them back down. And then we'll do a circle. Okay. Incorporating those four actions. So pull the shoulder blades up towards the ceiling, bring the shoulder blades closer together, depress them. So you draw them down the back, protract your shoulder blades, move them away from the spine. Keep the shoulder blades moving away from the spine as you lift your shoulders up into that shrug. Pull the shoulder blades back down, forward and up. Now do the reverse, push the shoulder blades forward, draw them down, bring them back in towards each other, lift them up, press forward, down, and one more time around. Good. And then release the arms. Okay. So now that you've explored some of that movement of the shoulder blades and their potential, you're going to come into a hug. So take your right arm underneath your left arm. And in this position, right, it's very much like the shoulder blade position of Bakasana. Your shoulder blades are moving away from the spine and protraction. You're going to add a little bit of flexion, so even more of a Bakasana spine. Figure it out. Round your spine. And then bring the torso up, right? Side bend to the left, dropping your left shoulder down towards your left hip. Inhale back up through center and exhale over to the right. Back up through center, add a twist, turn the torso to the left, move back through center, and then over to the right and back through center. Okay. Flex the spine, round it, bring it back up, little side bend to the left, side bend to the right, come on up, turn to the left, back through center, turn to the right, and move to center. Good. Release your arms. Grab one of your blocks. You can remove your blanket if you're seated on the blanket. And take your block to your upper back. So it's on its flattest and longest length. Okay. And come on to all fours, right? Balance it out. It might fall. That's okay. Pause, readjust your block. Have your hands about shoulder width apart. So the same setting that you would have your hands for Bakasana. And you'll come back into that idea of retracting and protracting your shoulder blades. So it's as if you were going to pinch your block between the shoulder blades, dropping the chest down towards the floor, and then spread the shoulder blades away from the surface of the block. Do that a few times. And you're trying not to involve the spine. So you should not feel like cow and cat. Keep moving the crown of your head and your hips away from each other as the shoulder blades glide along your rib cage. Okay. Now we add the Bakasana spine.
So pinch the shoulder blades towards each other. Then broaden them. Okay. So now this should feel different. Round your spine. Drop your tail down towards your knees. Puff the block up towards the ceiling. And then look forward. Right. This is your Bakasana spine. And neutral. Okay. Drop the chest down, bringing the shoulder blades closer together. Widen the shoulder blades first without involving your spine. Now round your spine. And look forward. One more time. Find neutral. Draw the shoulder blades in. Spread them apart. Drop your spine. Look forward. And then release back to center. Okay. Remove your block. Place that aside. Have your hands still shoulder-width apart. Tuck your toes under. And lift your buttocks up and back into Adho Mukha Svanasana, our downward-facing dog. You can walk your feet out a little bit if your downward-facing dog is quite short. And from here, bend your knees. Bend your hips almost like you're coming into a child's pose. And then lift the hips back up. You do that a few times. And as you're doing this, notice when the knees bend and when the hips move into more of a deeper bend, that it's very passive, right? The body is moving closer. The thighs are moving closer to your chest. And that can be very much like Bakasana. The one difference is that we're not actively making this shape with our muscles. And so we'll see that difference in a moment. Keep reaching through the arms. And then as you exhale, lower your knees back down to the floor. Sit back. Grab your block. Okay. And you'll take your block between your inner elbows just to get a little bit off of the hands for a moment. So I like to take my block, place it on my thigh. Find the grasping of the block between the inner elbows. And I squeeze my inner elbows. You may feel the muscles of the chest engage as you do that. With your wrists, pull the fingertips back towards the shoulders. And if they need a rest, have them neutral or even bringing the fingertips down towards the floor. Okay. Then from here, pull the ribcage slightly down towards your hips as you lift your arms overhead. And then bring the block back down in front of your chest. Sometimes it's easier to do this with an exhalation. So take an inhale.
As you exhale, lift the arms up and send the ribs down. And back down. One more. Squeeze your block. Pull the fingertips back. Take an inhale. Exhale, ribs down, upper arms up. And then release your block. Place that aside. And we'll come back into downward facing dog and set up the legs of bakasana. So hand shoulder width apart. Tuck your toes under. Sit your hips back and really feel that you're pushing back. So there's a sense of length of your shoulder blade moving towards your pinky fingers. Okay. So press, lift, lift the buttocks up. And now take the feet all the way in towards each other. Okay. And it's okay if you move forward to adjust, but the knees will then come out to the sides. So inner edges of the feet together, push through the arms, bend the knees out to the sides as you start to squat down. And then lift, straightening the legs. You can even move forward, hinge forward into the hands to adjust for space. Bend the knees, lower the hips, and back up. And one more time. And if you feel comfortable, you can kind of experiment. What would it be like to walk my hands back towards my feet to now give more weight into my legs? Right. And then you can walk the hands back out, push through the hands, lift back up.
One more, bend the knees. Okay. Transfer the weight from your hands into your feet. Maybe you sit back a little bit more, maybe unsupported, perhaps. Okay. And then walk back forward and come on up. So it's a nice way to experiment with squatting by having some weight still in your hands, having that support before bringing more weight back into your legs. Lower down onto your knees and come onto your seat. Take your hands and place your hands behind you with your fingertips facing forward. Okay. Lift your chest. And then you can have your legs bent or straight for this. But we were talking a little bit in downward facing dog about bending the knees and the hips and how that was relatively passive for our body. So we want to actively draw the leg in towards the chest. And why is this important for your bakasana? Because often when we're approaching this arm balance, you may place the knees to the backs of the arms and you experience this slippage where the knees kind of slide down towards the floor. And so when we are in bakasana, we're actively bending and creating this compact shape. Okay. So that when we release, right, that the knee doesn't slip down when you take the seat away from the floor. So that's basically what we're trying to accomplish here is to find active hip flexion. So straighten the right leg, then bend the knee, bring it to the outside of the torso, try to pull your knee up towards your shoulder without your shoulder coming forward towards the knee, because that's something that definitely happens. And then straighten the right leg back out. Pull the knee towards the outer shoulder and forward. Now you're going to add one more movement, bend the knee in towards the shoulder, then straighten the right leg a little bit and pull the heel down towards the buttocks and back straighten, pull the knee in. Okay, straighten the right leg a little bit, and then pull the heel in towards the buttocks, maybe even point the right toes and place your right foot onto the floor. Okay, switch sides, take your left leg, straighten it out, take the leg a little bit out to the left, pull the knee towards the left shoulder. Okay. And maybe you feel that sensation deep where the thigh meets the pelvis. Okay, that's that active hip flexion. And straighten the left leg, draw the leg back and forward. And now you'll add that extra movement, draw the knee to the outside of the ribs, straighten the left leg a little bit, and then pull the heel as much as you can, bend your left knee as much as you can. You may feel the hamstring activation as you do that. And then straighten the left leg one more time, pull the leg in, straighten the leg a little bit, pull the heel down, and then release. Okay, so come off of your wrist for a moment, you can repeat that, or take it into Navasana into boat pose. So when you come forward, have your hands forward, and then you'll straighten the right leg, pull the knee to the outside of the arm, pull the heel down towards the floor, and then set the foot back to the floor. Okay, straighten the left leg, bend the knee to the outside, try to pull the knee up towards the shoulder as you bring your chest forward. Okay, straighten the leg a little bit, pull the heel in. Okay, keep doing that. Or, okay, you start off, pull the heel in, maybe you add the wrist extension, and then hover a little bit, straighten the left leg, pull the left knee in, pull the heel down towards the buttocks, and switch sides trying to create this connection between the arm and the knee. Pull the leg to the outside, draw the heels in, then you hover for a second, allowing the two inner edges of your feet to meet, and then separate, draw in, squeeze down, meet the inner edges of the feet, and forward, a little bit of a balancing act, or a lot of a balancing act, that's not good, and squeeze the feet in. And now that's over, so you're gonna lower your feet down to the floor, release your hands and straighten your legs. Grab your two blocks, so you'll place one block horizontally between your inner knees, and the other block horizontally between your inner elbows. So make your way down onto your back, and as you pull the knees in, okay, take that block, place it horizontally between your inner knees, then this block, you can rest it on your abdomen or your chest, and then draw the inner elbows into the sides of the block. Again, you can keep the wrists neutral, pull them into active extension, all of that is good. And then with your heels, take your inner heels, pull them in towards each other, and then the heels down towards the buttocks, so creating this more compact shape of bakasana. And then you'll tap your blocks, so again, notice that the thighs are away from my abdomen, and then as I come into the compact shape, they move closer, activating the hip flexors, and then I release, okay. So you do that two or three more times. If tapping the blocks is relatively easy for you, think about taking the block that's between your elbows, and passing it over the block that's in between the knees. Now, most likely it won't happen, but at least there's this sense of creating even more of a compact shape. And one more, and release back down, D block, move them aside, and make your way back onto all fours. This time, we'll start to take all of these ingredients and put them together for an upright bakasana. Take your blocks, and set your blocks up so that there's maybe three or four inches, or maybe your hands with between the blocks. Then take your bolster, and place your bolster on top of your blocks. Now, it is possible that you might need to raise the height of the bench, so you could take a blanket, or a stack of blankets, you can replace the bolster with that stack of blankets, to make your setup a bit higher, okay. So from here, you'll start with the inner edges of your feet together, and move pretty close to the block bench, so that when you lift up onto the balls of your feet, you can place your shins down onto the bolster. So you can place your arm onto the bolster, okay. Then from there, you're going to hinge, sit back, hinge, think of that downward facing dot, right, moving the buttocks down towards the heels. Place your hand shoulder with the part like you did in your tabletop, and take the forearms, so that they're flush against the side of the bolster, or a stack of blankets. Then from here, bend your elbows back into the bolster. Start to shift forward, feel your feet glide along your mat, and then point your toes. You pull your heels up towards your buttocks like you've been doing, okay. Push down into the floor, broaden the shoulder blades, and then puff the spine. Lift the imaginary block, and then release. Shift back, push your hands away, like you're pushing back into downward facing dog, as you drop your feet down to the floor. And we'll do that again. So forearms pull against the bolster, hands come down, maybe this time you keep the arms straight, okay. Shift forward, lean forward, point your toes, pull the heels up towards your buttocks, and then move the shoulder blades away from each other. Then puff and round the spine, lift the abdomen. Imagine as though the knees were getting lighter, that you're pushing down so much into your hands, that you can lift your knees away from the bolster. It's not happening, but that sense of activation of the hip flexors will happen. Okay, then shift back, release your feet down to the floor, and that's Bakasana.
So if you want to take those ingredients and maybe test out what does Bakasana feel like, perhaps without the block bench, then we'll move it aside and give it a whirl. Otherwise, stay with the block bench and do what we just did another time, okay. So hands, imagine that the bolster is still here, okay. The hands come down, the knees rise up to the backs of the arms, okay. And I start to shift forward. As I shift forward, I feel my feet getting lighter on the floor. Maybe I point my toes, then heels come up, okay. And then press into the floor, broad in the shoulder blades, broad in the upper back. And on your exhalation, lower the feet back down. That's Bakasana, okay. Lower your knees, sit your hips back. You can widen the knees apart a little bit and walk your hands over to the right. Lower your forehead to the floor, to a block. And move your left hip away from your upper left arm. And then walk your hands back through center and over to the left. Reach the right buttocks away from the right shoulder as you rest your head on the floor block. And make your way back through center. And then this time the hands can remain out in front of you or take your hands behind you, okay. Rest the forehead. And then press the backs of your hands down into the floor and pull the fingertips up towards the back of your forearms. You may do that a few times. And from there, take your hands underneath your shoulders, press your chest up away from the floor and make your way onto your back. And as you come down onto your back, take your arms out to the sides and to cactus arms. Widen the feet to about as wide as your mat and just a slight windshield wiper of the legs from side to side. And the legs don't even have to go down all the way. Just get some passive release here at the front of the hip. Press the buttocks forward to elongate the front of your right hip. And then as you drop your knees over to the right, firm your left buttock. Try to press the left buttock towards your right knee to open the front of your right hip. Come back through center, release your arms down by your sides and walk your legs forward for shavasana. And before you rest entirely in your shavasana, point and flex your feet a few times.
Press through the heels to widen the backs of the knees, countering some of that deep knee flexion that you experienced. Now, once you feel your body settling, release that movement and feel the back of the body as it releases into the floor. Shavasana. And if you'd like to stay here for a few more minutes, please do so. Otherwise, wiggle your fingertips and your toes. Bend your knees, placing your feet on the floor.
Roll to one side. And using your hands, gently press yourself up to any seated position, support as you'd like. And rest your palms on your thighs. And take a few moments here to reflect on the ingredients of bhakasana and how they may have served you in the adventure of this arm balance. And join your hands together. Thank you so much for joining me, and I'll see you for the next one.
Comments


You need to be a subscriber to post a comment.
Please Log In or Create an Account to start your free trial.
