Description
About This Video
Transcript
Read Full Transcript
Hello, everyone. I'm so glad you're here to practice with me today. I've got a great shoulder practice for you that focuses on both mobility and strengthening. It would be really helpful if you have a blanket in two blocks for our practice today. And I'm going to invite you to grab your blanket, and we're going to start on our back with your blanket folded, perhaps in this configuration, the shape, and then turn the long way so that you'll have some space for your head. And then when you come down with your head on your blankets, grab your blocks, and we're going to use them both. Turn the medium position, put one between the knees, the second block on your belly area, and let your feet wander a little bit towards the edge of your yoga mat so your legs just naturally fall in to hold that block in place. And then let your arms open up to your side. And explore, sliding your arms a little bit up and down to discover where's the best angle to get maximum contact with the floor under your hands, arms, and shoulders. You find that spot. Perhaps we can stop moving there. And then do any last checking in with your legs. There's any different angle for your legs or your feet to be at so that you're a little bit more at ease in the lower half of your body. And then over the next few breaths, maybe we let gravity do its job to pull us gradually slowly here towards the earth. And when you feel the support underneath you, maybe it'll be a little bit easier for you to feel the softening of your belly and the movement of the block towards the sky on inhale. See if you can feel the movement of the belly and the block towards the ground, the earth on exhale. So we're welcoming the support under our back as we open our front body and with time hopefully move that block towards the sky on inhale. And soft belly falling a little bit more in towards your back on exhale. Sometimes having something like a block on your belly just gives you a good focal point to concentrate on. The sense and feel maybe a little bit more is that center part of our body moving as you're breathing in and out. And sometimes as we're doing those deeper fuller breaths, we might even feel some tension drop out of our shoulder area. If that's a place we maybe habitually hold some tension. Celebrate maybe three more breaths here. Getting centered with the breath, welcoming the support of the ground. All right, now over the next moment or two, let's go ahead and get rid of that block that's on your belly and set that off to the sides. When you set that to the side, keep the one between your legs now. And as you lower your arms now all the way down to the side of your body, turn your palms to face up towards the ceiling. Inhale, let the arms sweep up towards your ears. Kind of looking for what range of motion feels healthy as you're practicing. There's some injuries in that shoulder area. You might notice one arm moves at a different pace or a different amount, and that's normal as we are asymmetrical beings. So we're really looking for what's your healthy range of motion, what's your pain pre-range of motion. After we do that little exploring, maybe one more cycle, just what feels like healthy range of motion for you. Maybe it increases with repetition. Here's when the arms are down. Let's go ahead and take that block that's between the legs and move it over to the left side. If you stretch your left leg now straight, we're going to tip over to the left and put your right knee or your right leg somewhat on that block. And I always use my left hand to hold that leg against the block as I take the right arm down to the side of my body. So now let's see what each side feels like individually. So if it's okay to sweep your right arm up by your ear, sweep the arm up, and we take the arm down to your sides. Inhale, sweep the arm up towards your ear, and exhale the arm down to your sides. So notice if it feels best for you to look up to the ceiling as you're sweeping your arm up towards the direction of the ear, down at your side. And be aware of there's, again, any feedback you're getting to not move your arm all the way through that range of motion that you stop when you have that kind of sense that that might not be safe. Just pause and air on the more cautious side. So we're just warming up. And through repetition, ideally now creating better range of motion. Let's do one last sweep up towards the ear. And then the right arm ends up all the way again down at your side. Let's roll on to your back. And let's treat the other side to that same movement. So transfer the block somewhere over on your right side, right leg goes straight. And then we're going to tip on to your right side, have the left knee propped up on a block, and then drop your left arm down to your sides. I always like to look straight up to the ceiling here. So left arm will sweep up towards your ear, whatever amount feels good for you right now. And the arm comes down, your hand could be gliding along the floor or floating. Inhale, left arm sweeps up and down. So your rhythm might be a little bit different than mine. But looking for that pain free range of motion, you'll hear the saying for me again and again that motion is lotion. So just notice how we are lubricating this ball and socket joint through repetition. Hopefully easy range of motion.
Maybe treating that to maybe one more cycle of your breath up. And then all the way down. Right now let's roll onto your back. And this time grab both of your blocks. And when you have both of the blocks in your hands going to hold that long narrow edge, let's raise your blocks up in the air so you're aware that you can hold them easily as you tip your legs in towards your chest. And I love these blocks because they give a little bit more weight for doing a little bit of strengthening while we also work on range of motion. So let's take your blocks, still hold them all the way back towards your ears. And they might end up here now on the floor. Hold your blocks as you swing them towards your feet, and then lift your head and shoulders. Hold the blocks as you swing them again back. So maybe they meet the floor beyond your head. Exhale, lift up. Inhale, roll back. And depending on the kind of block that you're holding, exhale, curl up. You'll feel that your shoulders get a little challenge. So they're developing a little bit more strength through that range of motion as you go back and forth. Let's do maybe one more time. Okay. Now next time that the arms reach forward, we curl up, let's drop the blocks down and bring your feet to again meet the floor. We're going to slide one block out of the way and put one block again between your thighs in that medium position. And as soon as the block is in place, put your elbows on the floor right beside your rib cage. I always call this the robot arms. Fingertips face the ceiling. So when your elbows press down, press your shoulders to the floor. It gives a little lift to the side of your chest. And then when we're here, we're going to lift the hips and squeeze the block with your knees. And then we're going to drop the spine and pelvis down as you raise your arms up in the air and let them travel all the way back towards your ears. When you lift your hips, bring your arms back to that robot position where your elbows press down, shoulders press down. Arms straighten as they sweep back towards your ears and your pelvis and spine are back on the floor. Lift up, come back to robot arms. Squeeze that block with your legs. Lower your spine as your arms stretch straight and reach back towards your ears. Again, lift your hips, come back to that robot arm position. We'll do one more time. Stretch your arms by your ears and stay with your spine and butt on the floor here. Reach forward, move that block out of your way. And when that blocks out of your way, move your feet to the edge of your yoga mat. Drop your legs to the right as your head turns a little bit to the left. Tip your legs to center. Legs tip a little bit to the left as you look a bit to the right. Back to center. One more time, little windshield wiper leg to the right. Gaze to the left. Center. Legs to left and gaze a bit to the right. All right. Tip back to center and maybe the legs come towards you as we rock up towards sitting. And I like to use the blocks to sit on. It gives me a nice little platform, something firm and solid. So I'm going to invite you to slide your blocks together to have a wide platform to sit on. And then as you are sitting, if you will, maybe cross your legs if that's comfortable to come into your cross-legged position right at the front edge of your blocks. Now to get started here, just a couple little shoulder shrugs as you orient yourself to the vertical position. And then let's transfer your fingertips to the tops of your shoulders and just do a couple of circles with your elbows going forward and up, forward and up. And then reverse going up and back. After you make a few of those moves now, let's bring your hands together in the prayer pose, lower right in front of your chest area. And then point your fingertips to face straight ahead. Pain your elbows into the rib cage as your hands open up to the sides like you're holding two plates. And really squeeze the elbows into your ribs and feel what's happening between your shoulder blades and the back. Now let your shoulders spread wide as you reach as far out to the sides as you can reach. Now bring your hands in front of you as you look a little bit down and spread the shoulders wide. We're going to keep the hands together, lift them up towards the ceiling and lift up and let your hands support each other and going as high as you can towards the ceiling. Now look straight ahead and come to goal post arms. Take a little rotation to your left, come back to center, little rotation to your right, back to center and now reach behind your back, lace your fingers together and stretch your arms a little bit straighter as you squeeze way up between your shoulder blades. Last movement there for the shoulders and then we're going to unlace the fingers and bring the hands back in front of your chest. Point your fingers forward, open your hands out to the side and squeeze elbows into the ribcage and send the shoulders wide and then even wider as your hands reach in front of you, look down, spread shoulder blades, lift up, the hands support each other and reach you towards the ceiling. Goal post arms, look straight ahead, little twist to your left, center, little twist to your right, center and when you reach behind your back, lace your fingers in your non habitual way. You see how that might take one arm bone back a little further than the other, squeeze between your shoulder blades and the release bringing the hands back into prayer pose. Alright now if we can reach back behind us and send your feet forward, so in this position when you're tipping back, let your hands, I'm going to turn so it's a little bit easier for you to see me, let your hands slide back to find the floor with your fingers facing forwards. Keep looking straight ahead out beyond your knees and we're going to do a little push up where you lift your butt off the blocks and then come down. A little push up, swing your hips maybe a little higher if you feel like that's comfortable, come down, think of it as a little tricep push up, going up and down, a little tricep push up, up and down. Let's do one more, little lift up and then down. Alright now if you cross your ankles and let's grab those blocks and transfer them forwards and we'll put them down towards the top of your mat as wide as maybe your shoulders and then we'll want them here to have underneath your elbows. So let your knees whenever you're ready end up and maybe hip distance apart and elbows on blocks about shoulder distance apart. Let your belly soften as you look down towards your wrist or fingertips on the inhale and as you exhale looking down spread your shoulder blades and look back towards your knees and feet. Belly soft as we look down or forward and then as you exhale belly lifts in and up as we round the back, feel how your shoulders are moving as we go between cat and cow. Maybe one more time and now see if we can get our self into more of a neutral position maybe knees a little bit closer together and we're going to tip the forearms off the blocks, point your fingertips more towards the ceiling as you drop your head between your arms and that hopefully feels like an amazing shoulder stretch. Try to keep track of your front ribs that they're a little bit lifted in towards your back so you're focusing more on elongation than back bending and really treating your shoulders to a few cycles of full deep inhale and exhale breaths to create a little more space. Our intention is to keep trying to spread your shoulders wide across your upper back. One more decadent big breath here as you inhale exhale spreading shoulder blades and then we'll come forwards and take just a moment to stretch your right leg to the back of the mat, left leg to the back of the mat and we're doing that practice now to strengthen the shoulders as we spread the shoulder blades here, firming your legs and then lengthen from head to tail and just see what that feels like now to really ask a little more of our front body and our cord to help us spread those shoulders. One more breath in, one more breath out. Then put your knees down and let's get rid of the blocks for a moment now as we come down onto your belly and when you come all the way down onto your belly we're going to send your hands down underneath your foreheads, elbows out to the edges of your yoga mat and let's put the right hand on top of your left hands, the right hand on top of left hands and now as you inhale let's go ahead and start to lift your right elbow and your right hand up so you do a little salute and we bring a little more strength into that right shoulder upper back. Lower down, right elbow and hand lift up and lower down and you realize maybe you don't need to lift all that far for that to be beneficial to build a little bit more strength and mobility in that right side. Up and down. Now let's try with your left hand on top and see what might feel different. So left elbow and left hand come up and then lower down, left elbow and hand comes up. We're trying to keep the pelvis neutral, try to notice if you're wanting to twist a little bit to lift that elbow higher and try to minimize twisting even if it means we lift less. Now as soon as you're done here let's slide both of your arms straight out in front of you. Forehead resting just above the floor or nose is just above the floor. Please keep your feet on the ground, lift your hands and your arms up and then stretch your arms back towards your hips like you're swimming and look down at the floor. Reach your arms again forward and then bring your forehead and your hands back down to the ground. Inhale, lift your hands, your arms a little floating. Swim your arms back towards your hips. Arms reach forward and then we come back in contact with the ground. Inhale again, lift up, swim your arms back towards your sides, arms forward and then lower back to the floor. This last time lift up the arms, hands, chest, swim your hands back and now leave your hands here as you lower your forehead to the floor. Now we're going to start with lifting the feet and as you lift your feet then start to lift your hands and your face and stretch your hands back towards your ankles and then lower down. A little lift of the feet, lift of the chest, stretch your hands back towards your feet and squeeze more between your shoulder blades. Lower down, one more time. Start with the lifting of the feet, arms, hands, reach back towards ankles, squeeze between shoulder blades and as the feet come down stretch your arms one more time out in front of you. Now see if you can bring your hands to touch. Big belly breath in so let your belly move towards the earth here. Belly in towards your back on exhale. You can either stay here or lift your forearms off the ground so your fingertips point towards the ceiling and have that wonderful stretch across the shoulder blades. You even feel like you're opening that space down towards the back of the heart. Big belly breath in, big belly breath out. Alright now let's slide your hands back towards your chest. Now as you come up if we like some padding for the knees which can often be wonderful especially if you're on a harder surface. Once you have some padding for your knees walk your hands forward so you're in tabletop position hands under the shoulders. Take your left hand right in front of your right hand. Let your hips move back a few inches as your head drops a bit between your arms here. Feel that deeper stretch down that left side of your shoulder and chest. Come back to tabletop. Put your right hand in front of your left hand. Keep your hands glued to the mat as your hips move back a few inches in space until we feel that fuller stretch down your right side. And then come back and then have both hands on the floor. Now please curl your toes under and we'll start to stretch your hips back towards your heels and come into that early version of downward dog where you're getting that stretch through both shoulders. Let your fingertips walk as far forward as you need to to feel a wonderful stretch through your arms into your shoulders and side body. Now as we tip back towards tabletop if we pause and then let your knees come off the blankets keep your knees bent and push yourself back into that bent knee downward dog. Challenging the shoulders a little bit more here. And tip your knees back down to the blanket. And that last time as you move your hips back lift your knees up maybe now working towards straighter legs. I like to in the beginning go from bent knees to straight legs and kind of bounce back and forth while giving my shoulders that opportunity to get a little bit more open cultivate a little bit more strength by holding my shoulders more or less in place as I'm moving my legs. One more time and then maybe we hold and sometimes wiggling your feet further back will give you that space you need to hold pushing the floor away with your hands letting the heels rise up and giving the shoulders that one more big challenge. And then the knees will come down and walk your hands back towards your blanket. So now if we fold your blankets and have that to sit on and come into your cross-legged position. So in sitting cross-legged now we're upright here and there's a few movements for the shoulders that we maybe didn't address earlier maybe we can get to them here. So maybe a few little shoulder shrugs after your downward dogs and then when you're settled here let's go ahead now and pause and start to bring your right arm straight up towards your ears high as you comfortably reach and down again repeating that movement all the way up as far as you can reach and down on this third time let's keep that right arm up and bend your elbow let your hand reach down towards the base of your neck bring the left hand up to capture that right elbow for a moment and then press that right elbow up into your left hand see if you can discover again a little bit more space in that right side of your shoulder the right side of your body as you lift your elbow up towards your hand take a second here notice what you're noticing take a big breath wherever you feel most of the sensations or the stretch and then as we let go let the arms open out wide to your side let's cross your right arm over your left and give yourself that hug open again the arms wide and then right arm over the left hug one more time open wide and then the right arm over that left and either stay here with the elbows moving away from your chest or if you have the mobility to do the eagle arms you might do a different shape here where you're holding the arms and what we call the eagle pose either variation the elbows want to drift away from the chest so that you feel that maximum stretch between your shoulder blades take a deep breath here and exhale when you're ready to unwind let your arms come back down maybe grab your knees feel the difference between your right left sides right then as you're ready let's take the left arm sweep it up towards your ear and come down on an inhale again reach up as high as you safely can with that left arm come down again reach up on inhale and keep the arm up as you bend your left elbow touch more or less the base of the neck area and see if that right hand might come over and catch that left right left elbow and then press the elbow up towards the ceiling and take a big breath here as you kind of notice how this side feels in comparison to the first signs where do you feel the stretch is there some tension and different edge here and see if you can bring your focus attention to that stretch if you can discover one here and then we'll open the arms wide out to the side and this time let your left arm cross over your right as you give yourself the hug open the arms out wide left arm over the right give yourself that hug open out wide left arm on top as you hug and either stay here elbows away from chest so you feel the space between your shoulder blades or if you have that mobility you might wind your arms around each other and do the eagle arms either way let the elbows keep floating enough away from your chest that you feel a full stretch between your shoulder blades and then maybe even I like to close my eyes and just sort of kind of direct the breath a little bit more into where I'm specifically feeling the stretch just notice the difference it makes when I'm taking that fuller deeper breath and through that exhale imagining some of that tension or stiffness kind of floating away my arms out to the side and then down grabbing your knees right so now we might do just a tiny bit tipping back and forth to find what might feel like a comfortable position for us to end our practice if you feel like this ankle in front wants to change she could also give a try and put the other ankle in front as we finish okay so we're going to wiggle into maybe what feels like a comfortable upright seat try to look out to your horizon line and sense when your head is over your navel over the center of your pelvis you notice if your shoulders again are are rounding forward and we might make the conscious shift to bring them a little bit up and back okay I always like to imagine I've got a block on top of my head to help me maintain that good healthy posture if you're comfortable here let your eyes look out beyond the tip of your nose for a moment with your eyes open looking maybe towards the ground still sensing the top of the head rising towards the sky so we're trying to maintain good posture some of you might appreciate closing your eyes and tuning a little bit more into your healthy posture here noticing the shoulders again are still in their place where they're lined up with your ears how much effort it takes from your back muscles to maintain this healthy posture it's taking a few moments here as you breathe in and out just to notice the efforts that you brought into practice today and maybe how your body might already feel a little bit different mind feel a little bit different as we've been focusing on our breath specific movements take a few moments here just to be quiet together and becoming present a little bit more present with each cycle of your breath we take a few deeper fuller breaths in preparation for coming back out into our day and realigning our shoulders back and down crown of the head lifted towards the sky trying to maintain your yoga posture perhaps throughout the day if you enjoy that gesture bringing the hands in front of the heart gesture as we close our practice may others also continue to benefit from our practice namaste thank you so much for joining me in practice today.
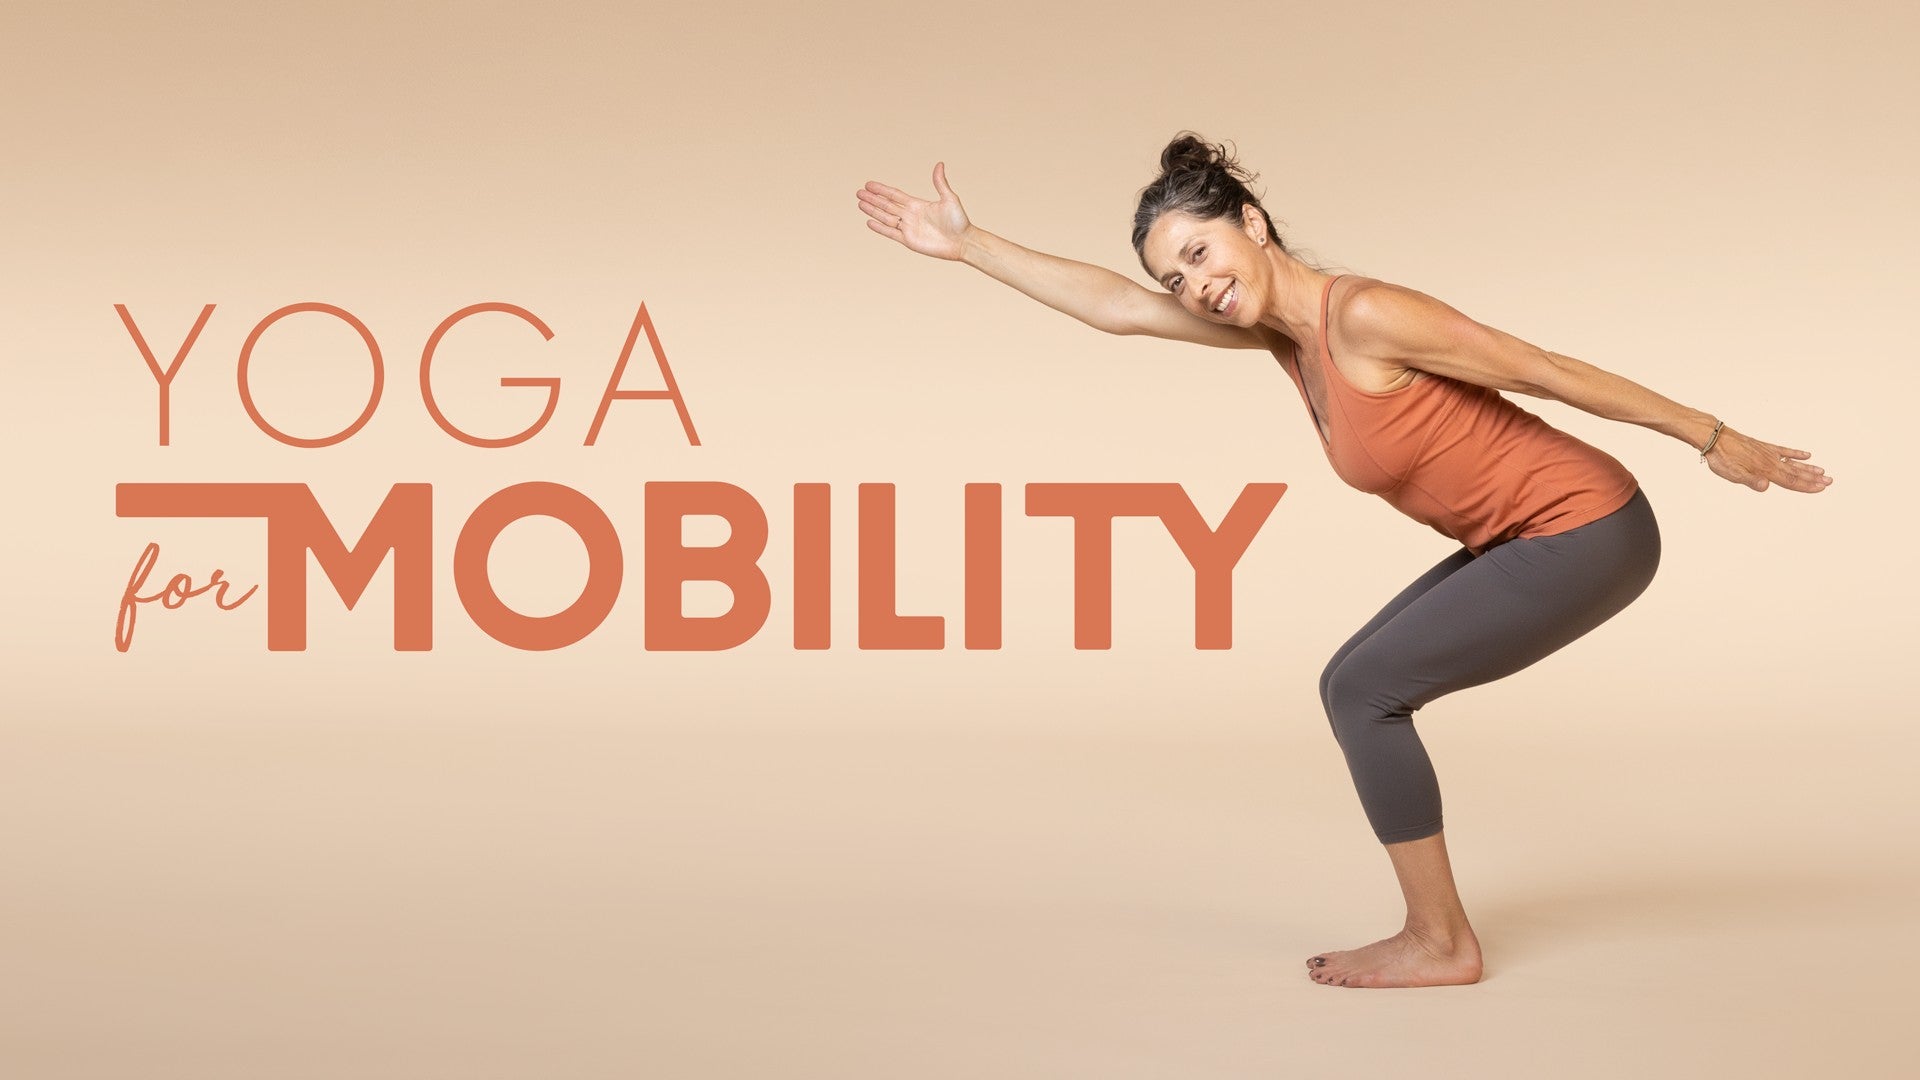
Yoga for Mobility: Melina Meza


Comments


You need to be a subscriber to post a comment.
Please Log In or Create an Account to start your free trial.
