Description
About This Video
Transcript
Read Full Transcript
Hi, we're going to spend some time freeing up the outer hip, technically known as the booty. You'll need a ball for this, and I have a blanket here for a head pillow. You can also get a head pillow if you like. See your feet about hip distance apart. I'm going to pull my shirt up so you can see the movement that's going to happen here.
As you inhale, tip your tailbone down towards the earth, arching your low back up slightly. And as you exhale, engage your abs. The tailbone is going to tip towards the ceiling. Low back moves in towards the floor. As you inhale, tailbone tips down, arching the low back up.
As you exhale, engaging the abs, tipping the tailbone slightly towards the ceiling, low back moves in towards the floor. Just getting a nice wave of movement that starts from your breath and moves up your spine from the tailbone through the low back. You may even notice that your head and neck are affected by this rocking movement. Next inhale, last inhale, arching, and as you exhale, just relaxing into the floor, and pause and rest. We're going to do some self-massage with the ball, and the area that we're going to massage is this outer hip area between the top part of the thigh bone, the femur, this is called the greater trochanter, and the sacrum.
There's six deep hip rotators there that often get locked up. So I can tip my knees to the left, take the ball in my right hand, and slide the ball in, and then tipping my knees towards the ball to increase pressure. A softer ball is going to be more gentle, like a tennis ball is fairly soft. A harder ball is going to be more intense with this pressure, like a lacrosse ball. And you're finding a tender point, leaning just enough weight where it has that hurts good feeling, and breathing.
Letting the ball melt into your gluteal muscles, and letting your glutes melt onto the ball. After about three or four breaths, taking the pressure off, letting the blood flow back in, and you can either come back into that same spot if it was extra good for you, or you can shift the ball a little bit and find another tender point in that neighborhood. The more you lean your knees towards the ball, the more weight you put into the ball makes more pressure. If it's too much pressure, you just back off slightly. And you'll know it's too much pressure if you're holding your breath, if you notice yourself clenching the jaw, or squinching up your face, that's too much.
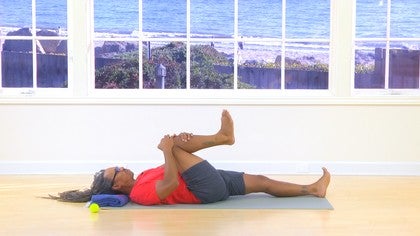
It should have that good, achy sensation. Then drawing the right knee in towards the chest and bringing your hands to the knee or the back of the thigh, and straighten your left leg out. We're going to take an exploration of the range of motion that's possible in this right hip. You can start off with the movement that's really smooth and easy. And as your movement gets a little bigger, you might start to run into some restrictions, some speed bumps in the movement, and those are great places to pause, to breathe, and bring some awareness and some softness into this hip area.
This also lets us know where we're starting, so you'll get an idea of how the rest of the practice affects your hips. Any spot you come across a tight bit, pause there, breathe there, soften there. And coming back to the center, holding the knee in towards the chest, and bend the other leg, place the other foot flat on the floor, then cross that ankle, the right ankle, over the left knee and let the right knee drop out to the side. Now we're going to get our friend the ball, tipping the knees over to the left and sliding the ball in towards the outer hip, and then slowly tipping weight onto the ball until you get that good, achy sensation. The amount of pressure depends on how far you take your knees towards the ball.
If you want more pressure, the left hip may even come up a little bit as you lean completely onto the ball. If you want less pressure, the knees can be more vertical or even off to the left. After about three or four breaths, coming off that point to let the blood flow back in, and you can reposition the ball and come into a new point. Or if you found a really special, tender spot, you can give it a break and then come back into it with the ball again. At the most, this should hurt good, have that good, achy sensation.
It's really common for people who have low back pain to have a lot of tightness, a lot of trigger points and tenderness in this outer hip area. And by relieving the tension in here, by getting more blood circulating, more space in these outer hip muscles, a lot of times it will free up the movement of low back. And decrease the pain in the low back. Oh, I found an especially good point. So that was three points with my ankle crossed over.
I'm going to do a few points with this foot flat, because bringing the leg in a different position changes the experience in the outer hip. Oh my. About three or four breaths. Okay. And this will be the last point in this position. And coming back to the center, tipping the knees a little away from the ball, slide the ball out.
I'm going to straighten the right leg out now. And then I'm going to bring the ball right into the side of the hip, the very side of the hip. And I'm below the crest of the hip bone, but above this bony protuberance that sticks out the greater trochanter. So right in this place where we often have muscles that feel like rocks. So I'm going to roll onto my side on the ball.
And I might need to shift my body weight a little forward or back to find the good spot. And I think I just found it. And melting into the ball for a few breaths. If I want more pressure into the ball, I can straighten the top leg out. If I want less pressure, I can place the top foot down and even press into it to lift my hip slightly.
About four breaths here. Getting into a muscle called the gluteus minimus on the side. And slowly rolling onto your back. And take a pause either with your knees bent or your legs out straight. Whatever is more comfortable for you.
If you do lay with your legs straight, it may feel like the side that you just worked on has a longer leg. And it probably does. If you were to get up and walk after doing just one side, you'd probably have a limp. So in order to do the other side, I'm going to turn around and face the other direction. On the second side, we're going to draw the left knee in towards the chest.
And you can straighten the right leg out and start to take that hip through a gentle exploration of possible movement. Start with what's easy and eventually work a little bigger towards where your edges are. When you find a tight spot, you can pause there, breathe, soften. Eventually coming back to the center with that left knee. Place the right foot on the ground and cross the left ankle over the right knee, dropping the left knee out to the side.
Get your ball, tip the knees a little to the right, sliding the ball in and leaning some weight onto the ball. You might need to shift a little to find just the right spot to breathe into, relax into, about three or four breaths on each point. Leaning just enough pressure where it has that good achy feeling, not so much that it's sharp pain or sharp sensation. Tipping the knees away, repositioning the ball and coming in, leaning just the right amount of weight for you. The right hip may stay down on the ground or it may come up depending on what feels best for this point where the ball is.
The third point, leaning weight in. The third point, leaning weight in. You can uncross that ankle and place the left foot down on the ground and do a few points with both feet on the ground. Changing the position of the left hip is going to change the quality of the points that you lean into with your weight. The third point, leaning weight in.
Go home. Tipping the knees to the right, slide the ball out, center your legs and straighten the left leg out. So with the legs straight, the left leg straight, you're going to take the ball right into the very side of the hip, then rolling onto the ball, onto the left side. The right foot can press down to keep a little weight out of the ball or if you want more pressure, you can straighten the right leg on top of the left. Be here for about four breaths, letting the body weight melt into the ball.
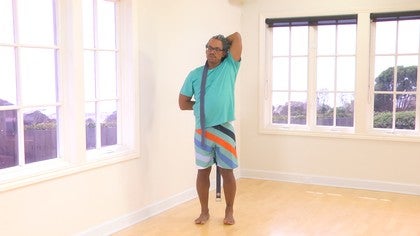
And then slowly rolling off the ball onto your back. You can set the ball out to the side and just take a rest. We're going to spend a few minutes stretching out the areas that we just massaged with the ball and our body weight, and for that I'm going to turn around to the other side. Take the right knee and cross the right ankle over the left knee, then you're going to take your hand and reach around the back of the thigh or the shin if you can reach. If you have a hard time reaching the back of the thigh, you can use a strap here to extend the reach of your arms, just wherever you can reach easily.
And then slowly drawing this left knee in towards the chest. If you have any sensitivity in this knee, lift the toes of the right foot and keep them lifted the whole time. That'll make your knee feel more stable. Just coming straight towards the chest with the left knee. I'm going to try a few different angles, so taking that left knee towards the outside of the left shoulder, as you change the angle, it changes the layers in the outer hip that are getting stretched.
You can start to take it over towards the right shoulder and pausing anywhere in between where you feel it get into some tight area in your outer right hip. Coming back to the center, turning the palms up towards the ceiling. Cradle the outside of the right ankle and release the left foot down to the ground. Inhale here, and as you exhale, engage your abs. To help engage your abs, you can lift your head for a moment, but if that's hard on your neck, you can release your head back down, but keep the abs working.
And we're drawing this ankle as if we were just going to slide it behind our head, at least in that direction. Keeping the abs engaged. Inhale, exhale, release the head, release the leg, release the abs, release the arms. Take a rest. And as you're ready, drawing the left knee up towards your chest, and then crossing the left ankle over the right knee, and let the left knee drop out to the side. If this knee is sensitive at all, keep the left toes lifted the whole time.
And take your left hand through the triangle of the legs, the right hand around the outer thigh, take a hold of the back of the thigh, or the shin, drawing the right knee in towards your chest. Breathing, softening with your breath. And start to explore the different angles, taking that right knee towards the outside of the right shoulder. Notice how that gets into a different part of that outer left hip. Taking the knee over towards the left shoulder, pausing any place where you get into a nice line that's ready for some breath, some softness, some more space in that outer left hip.
Breathing. And as you're ready, coming back to the center, turning your palms up, cradle the outside of the left foot and ankle, and release your right foot down to the mat. Inhale here, and as you exhale, engage your abs, maybe lifting your head to help with turning on the abdominal muscles, and taking that left ankle as if you were going to just slide it back behind your head. If this position is uncomfortable for your neck, keep the abs engaged as you relax your head back down to the blanket. Abs continue working this whole time, gently drawing the ankle behind the head.
Inhale, as you exhale, releasing the head, releasing the foot, release the arms, release the abs, and rest. Breathing. And then to finish, doing a few of those wave movements that we started with. As you inhale, tipping the tailbone down towards the earth, arching the low back up. As you exhale, engaging the abs, tipping the tailbone slightly towards the ceiling, low back moves in towards the floor.
Inhale, arching the tailbone down, low back up, abs engaged as you exhale, tailbone moves slightly towards the ceiling. Just a few times that smooth wave of motion from the breath through your spine. Last inhale, arching, filling up with breath. And as you exhale, relaxing completely into the floor. To take a final relaxation here, you can either walk your feet a little wider than your hips and let your knees rest in towards each other, or you can straighten the legs out, whichever one is more comfortable for you for your low back.
Take five slow, deep belly breaths. Open your eyes close. Your hands relax. Your feet soften. And just rest.
You may choose to stay in the final relaxation for a longer time. I'm going to slowly roll my way to one side. Pausing on the side with my knees up towards my chest. Slowly rolling forward and up. And to find a comfortable seated position.
I hope you enjoyed freeing your booty. Have a nice day.
Anatomy for Yogis: Arturo Peal
Mention
 |
Arturo Peal (Teacher) |
 |
Daniel C |
|
|
Sara S |
|
|
Shandi S |
 |
Yinet G |
|
|
Silvana G |
 |
Brigette H |
 |
Frederic M |
|
|
Esther |
 |
Zoe T |
 |
Maria F |
|
|
Rosemarybeer B |
 |
Kelly Sunrose |
 |
Sky N |
|
|
Karen R |
Comments


You need to be a subscriber to post a comment.
Please Log In or Create an Account to start your free trial.
