Description
About This Video
Transcript
Read Full Transcript
Hello and welcome back to the practice. In this class I'll be sharing some of my favorite ways to move from the seated position and for this class we'll need a handful of props. You want a bolster, a blanket, a block and a strap and we're going to start by actually sitting on the bolster and then taking a blanket and rolling the blanket up so that it's long. You've got lots of room in front of you and I find this a really nice way to help support your ankles and maybe even support your knees if the hips feel tight where we take this roll blanket up towards your bolster and then we're going to cross one leg in front doesn't matter which one we're going to do both and then you've got this extra lift that sometimes floats the knees up to the height of the hips and perhaps makes you a little bit more comfortable. So if you can find your yogi position and sitting up nice and tall your yoga posture and then take a moment in that posture to take a breath in and out just beware of breathing in and out as you relax into your seat and then if the eyes are open or closed whatever you're more comfortable in one more moment just allowing your spine to lengthen while you adjust to maybe some new props under your hips or under your ankles just tuning into what does that feel like. We're going to try to keep some of this length in your spine as much as you can as your eyes open if they've closed and begin to let your pelvis tilt forward and your spine to come forward as we put the fingertips down on the floor and then we might start from here if we have permission to get good feedback in the hips that we might wiggle the fingers a little more forward so that as you're crawling forward with your hands we might start feeling a little bit more across the back of the hips and as much as you're comfortable bringing the hands forward or bringing the head down towards the roll blanket you might start to feel into some new places in your outer legs and my hope is that more than anything the stretch heads a little bit more to the back of your hips so whatever version coming forward allows you to maintain the length of your spine as if you were sitting straight up and take just a few more moments letting maybe your elbows drop towards the floor forearms dropping to the floor just deepen into the sensations in the back of the hips. Let's walk the hands back towards your legs come on up and it could be really different when we take the opposite ankle forward and just seeing how that settles knees hips everything make sure that that works for you and then we'll do the same thing we'll let the pelvis come forward the spine come forward we start on the tips of the fingers this might be a good place to pause or we might start walking your fingertips forward the eyes might be looking down towards the earth and just notice what's happening in the outer hip maybe in this side it's the left hip that it's a little bit more clear gives you a little bit of feedback as you come forward as far as you're comfortable and maybe having that intention to drop the weight of the head slightly down and when the head drops down notice the feedback the impact that has in your hips coming forward let's take maybe one or two more moments just exploring perhaps dropping your elbows forearms down and that feels appropriate to add that little extra amount of sensation back into your hips and walk your hands back in towards your legs and then we'll lift the legs off the roll blanket and we can set the roll blanket off to the side for now we won't need that for a bit and we might even take your bolster off to the side and we will get back to using that later in class all right so now if we keep a block nearby cross your ankles whichever way you're most comfortable and settle into what you feel like is your cross legged seat we've got a block over on your right side turn the flat height and from here if you let your arms reach out to the side and come on up towards your ears we'll tilt over to your right side and bring this block in wherever it needs to be so you can put your elbow on the block and then turn your hand forward towards your knee we're going to reach that left arm across the room and as you reach the left arm across the room try to keep lifting your left ribs up away from your hip and inviting that arch to arise through the ribs through the waist it might feel good to look down towards your right elbow keeping that right arm firmly grounded to the block and in a sense try to feel like you're creating space between your right arm and your right ear rather than collapsing your ear towards your shoulder try to keep lifting your right ear away from your right shoulder just take one more moment if you want to start to reach that left hand a little more back into the space behind you and turn that left chest just a little bit more towards the sky it's okay to be looking down at the right elbow looking forward in front of you or if it feels good look up towards that top left hand one more moments we'll take that left arm down come on up feel nice and long on that left side and we're going to transfer your block over to the left let your arms come up and as you exhale reach over to the side and turn the block medium flat whatever height is helpful for you to anchor the palm faces the sky and take your right arm across the room down towards your head down towards your ear and invite the ribs to push out to the right so you're inviting an arch into the right side body okay now as you keep lifting those ribs up stretching the right hand across the room see if it's best for your neck if you're looking at your left elbow or is it feel better to look straight ahead or in this case underneath towards your right palm and when we look to the right palm maybe it's helpful to take that right hand back in space a couple of inches and then for me it's always feels a little easier to come to a neutral head position or in some cases some days I want to just look at my lower elbow try to keep lifting that right rib cage away from the hip and then we'll take that right arm all the way down come on up and then I believe we can get rid of that block now for a bit okay so stay with your cross-legged position and let your arms now both float straight up towards the sky one of my favorite things to do these days is a hands-free twist where we pull the elbows out to the side and would be like goalpost arms going to turn to your right and just notice how much rotation you have when you're not using your arms to pull you into the twist come back around to center position and then exhale and turn to the left and just feel what rotation you have come on back to the center and let your arms come down well again bring your arms back up towards your ears a little more in rhythm exhale shoulders down elbows wide let's turn to your rights and exhale fill your rotation come on back to center and then to your left and feeling that rotation back to center and arms down one more time inhale arms up exhale right into your twist turn to the right keep your elbows wide come back to center exhale to your twist to the left and come back to center let your hands reach behind you for a moment take your feet out in front of you about hip distance and let your legs do that windshield wiper move where they go side to side here with your fingertips lightly touching the floor just to stretch the front of the hips a little bit and do a little mini vinyasa's in between our seated poses to keep our energy nice and bright all right come up to center position now and stretch your legs forward if sitting with straight legs it's helpful for you to sit on a blanket please add a blanket underneath your hips we're going to take the left foot first to the inside of your right upper thigh so we would call this jhanu sirsasana and we'll have you do is take your arms up like we just did and let your elbows like we just did go wide as we turn for a moment towards your left knee you feel that rotation then come back to center again to your left exhale turn and then come back to center on this third time we're gonna stay facing your left knee and let your right hand come down to grab the knee as your left arm goes up towards the sky the arm is close to the left ear so we can stay vertical in this position grounding your right leg straight leg and we can start as an option to start tipping over towards that right leg like you're gonna come down and touch the foot and then come all the way back up again keep holding your left knee and lean to your side and maybe reach over and touch your foot or head in that direction come up and then one more time let's linger now in your variation where you're reaching to your right side if you catch your foot you might reach down and touch your foot I'm just kind of heading that way not being overly ambitious to grab the foot so major side bend from here inhale come all the way back up unwind your twist to face forward and then slide that left leg straight out in front of you it will take your right foot to the inside of upper left leg when you're grounded let your arms come straight up pull your elbows wide out to this side and then exhale turn towards your right knee and then come back to center try to keep your elbows this wide as you turn towards your right knee and then back to center so the third time we'll stay facing the right knee so navel faces the knee left hand catches the right knee and the right arm goes up towards the sky okay so we could stay vertical as we press that left leg into the floor or explore starting to tip over to the left and then take our arm body back up exhale as you tip over to the left and just feel how different your body is if the side is more tight or more flexible as we head over to the side reach and kind of imagine your right hand is heading towards your foot and try to keep holding on to that right knee as you tip to the sides and try to sense again your head is moving toward the direction of your left foot and then from here after that big side bend come on up take that right arm down to your side and bring that right knee up and we'll keep both legs bent for a moment right in front of you okay so look at that tabletop position fingertips on the floor behind you keep your pelvis on the floor squeeze your elbows in towards each other and just take a moment to lift your chest up lift your gaze up and then exhale look forward one more time keep squeezing elbows in lift your chest bone your sternum and look up and then releasing out okay now straight legs in the straight legged position this is where we want the strap so with your legs straight out in front of you let's say we put the strap around both feet and then gather the straps in your let's say left hands okay so you're trying to engage both legs and keep them straight sit up tall keep your left arm straight and we start with your right hand reaching towards your foot in that direction and let that arm at an angle reach open out to the right and then bring that hand back towards your foot or to the strap inhale reach out at an angle up and back and then come back to touch the strap or the foot inhale one more time going out wide and just like we've done before now imagine you're going to pull the left elbow to the outside of the knee or to the top of the knee and try to reach that right hand forward towards your left foot and then we come on up and out so all together we'd bring your left elbow toward outer right knee and reach your right hand to your outer left foot and then come up and out and one more time as we bring that right elbow down to touch the knee turn your body to open towards your right side and just for a moment try to keep reaching that right hand toward the direction of your left foot so you're doing your revolved seated forward folds inhale come up and out that one's a difficult one and then go ahead and switch hands so we've got the right hand holding the straps and ground both legs please reach your left hand out towards your foot and as you inhale swing the arm out to the side and up and then exhale come back towards your strap or foot inhale reaching out the sides and then come on back inhaling both legs still firmly rooting down as you reach out and then come back okay so next time that we go out to the side we'll invite your right elbow to reach over towards your left knee and then take your left arm up and over as if it was going to touch your outer right foot and then lift on up and then as you exhale bring your lower right elbow to left knee and reach your left hand to your right foot sounds like a twister game a game of twister doesn't it bring your right elbow to your left knee all the way over towards your right foot inhale reach out and that last time we'll linger just for a couple moments right elbow to left knee and then reach that left hand over towards your right foot ground both legs into the floor and then inhale swing the left arm up unwind your twist and then go ahead and set that strap aside with that strap aside bend both of your knees slide your hands back so fingertips or palms on the floor and that tabletop position this time with elbows hugging in chest lifting eyes looking up you can stay here or ground your feet and let your pelvis come up as high as your knees swing your hips back anchor your pelvis again elbows hug in chest comes up either stay here or swing your pelvis forward and up reverse tabletop and then come on down with your hips on the floor and this time we'll go for the wide leg position so with your legs out to the side turn your belly towards your right knee and let your hands reach out and frame that right leg so consider while we're here to keep the legs rooted to the floor and start to walk a little bit more forward with both fingertips and try to keep lifting your chest away from the belly try to keep lifting the chest away from your right thigh so in this pose if we start reaching closer to the right foot just in that general direction we'll emphasize the stretch on the back of the right hamstring and hopefully this whole left side of your back okay some might feel that more by taking your left hand to your outer right foot or your outer right leg someplace and not using the strength of your arms to crank yourself into the pose but to stabilize yourself and try to do that hands-free like rotation in your spine if you remember way back at the beginning of this class that that's not a huge move when the arms aren't involved in pulling you into the twist so just a moment to feel rotation all the way through the length of your spine maybe down towards your ribs and then swing your left hand over to the left and your right hand to the inside a line of the left leg okay so as you turn your belly towards the left knee firmly ground both legs and considers their room to walk your fingertips more forwards and then whatever position we get into make sure that you can lift your chest a little bit up away from the belly and so that we have lots of room to breathe into the chest and the abdomen and then considering this it makes sense to reach your right hand for your outer left leg or the outer edge of the foot and rather than pulling with the strength of your arms just try to imagine you do spinal rotation and tune into the axis of the spine and trying to move around the axis of your spine all the way up towards your head this is if your right ear was trying to listen to your left big toe really eventually bringing the head forward towards that left foot all right now let's go ahead and as we come up we'll let the right hand swing over to the right let your feet follow and tip over to the right side of the room so my feet are moving to the right my hand is moving to the right and I've got my right hand behind me to stabilize me as I reach over to the left and like we did in reverse tabletop we could lift the hips and just lift the hips and reach over to the right side of the room and bring the buttocks down swing the hands over to the left left hand behind your sacrum your feet and your hands are moving together so you tip to the left maybe lift your hips stretch your arm back behind you maybe one more time you get your rhythm your feet move with that left hand right hand is stabilized you like plank pose lift up sit on down let your feet turn to the left and follow your right hand behind you as you lift up and then we have that seat come on back down okay so those are just to keep you awake and energetic while we do our forward bends okay so now if you will grab a hold of your bolster and we're gonna use the bolster I'm gonna turn this different direction so that you can see me and I'm gonna have my block actually behind the bolster so I'm gonna do is sit maybe about the middle of the bolster about the middle of the bolster and I'm gonna put my feet up on this front edge of the bolster and have room to find where is that block and pull that block in so I can put my hands the palms on the bolster while I have my heels pressing together here so it's our bada konasa in a shape so as soon as you sit onto the bolster depending on your bolster it can pull the pelvis back we're gonna try to do is get the pelvis to tilt forward as we squeeze the block with the hands and press our hands down into the block it's like you're creating a little backbend in your upper body while encouraging the thighs to kind of work with gravity and eventually drop a little bit towards the floor I think of this is a great place when we press the heels together firmly to feel what we might call the mula bandha where you start to feel those muscles of the pelvic floor squeezing in lifting up and helping us have maybe better posture maybe a little bit more core pelvic support and just feel as your heels pressed together the inner leg line lengthens all the way to the back of the knees and knees drop down and try to keep a little back bend like feeling in the upper body just another place again thighs pressing down lower abdomen lifting up keep the back bend feeling and then releasing that effort with the block that takes a little bit of effort here and as we set the block out of the way can use your hands to bring your knees together slide your feet a little bit forward and we're coming back to a place where we're going to try to place the back of the shoulder blades right onto the floor so it's like you're doing almost a supported bridge pose or almost like you're heading into the beginning of a shoulder stand okay so you kind of wiggle your shoulder blades towards the floor onto the floor and the bolster comes up and supports kind of the tip of the shoulder blades and you want to basically find what's comfortable arms get to relax at your side and for some it might be a useful place to scoot the feet closer together and the knees can buckle in toward each other or if it makes more sense in your body to have your feet wide and your knees wide like bridge pose you're welcome to hang out here okay so see which one again gives you this little bit of lift into your chest area like you're doing again a really early version of shoulder stand or bridge pose something where your neck is completely free from touching the floor and at the same time your shoulder blades are somewhat grounded the more you spread your arms out to the side you might actually feel more contact with more of your shoulder blades we're gonna take a few moments after the forward bend just gonna end or move toward the end of our class now with just a little bit of restorative pose and try to encourage slightly fuller breaths down towards the bottom of your lungs into your diaphragm muscle we might have a little bit more access to in this position in this position I like to sense the flow of the diaphragm moving toward the hips say fill up my lungs completely and then that movement of the diaphragm maybe you could feel it more easily as it flows more underneath the ribs underneath your lungs as you exhale take just a few more breaths as you are here and then when you're ready let your eyes open if they close gather your arms in a little closer towards your bolster and then get ready to slide over to a side and then from your side just getting ready to come and maybe sit right on top of your bolster and see what it feels like with your ankles across the way you might normally sit without the rolled blankets so if you have access to drop knees down and then sit up nice and tall all right thank you so much for joining me in the practice today hope to see you again soon namaste
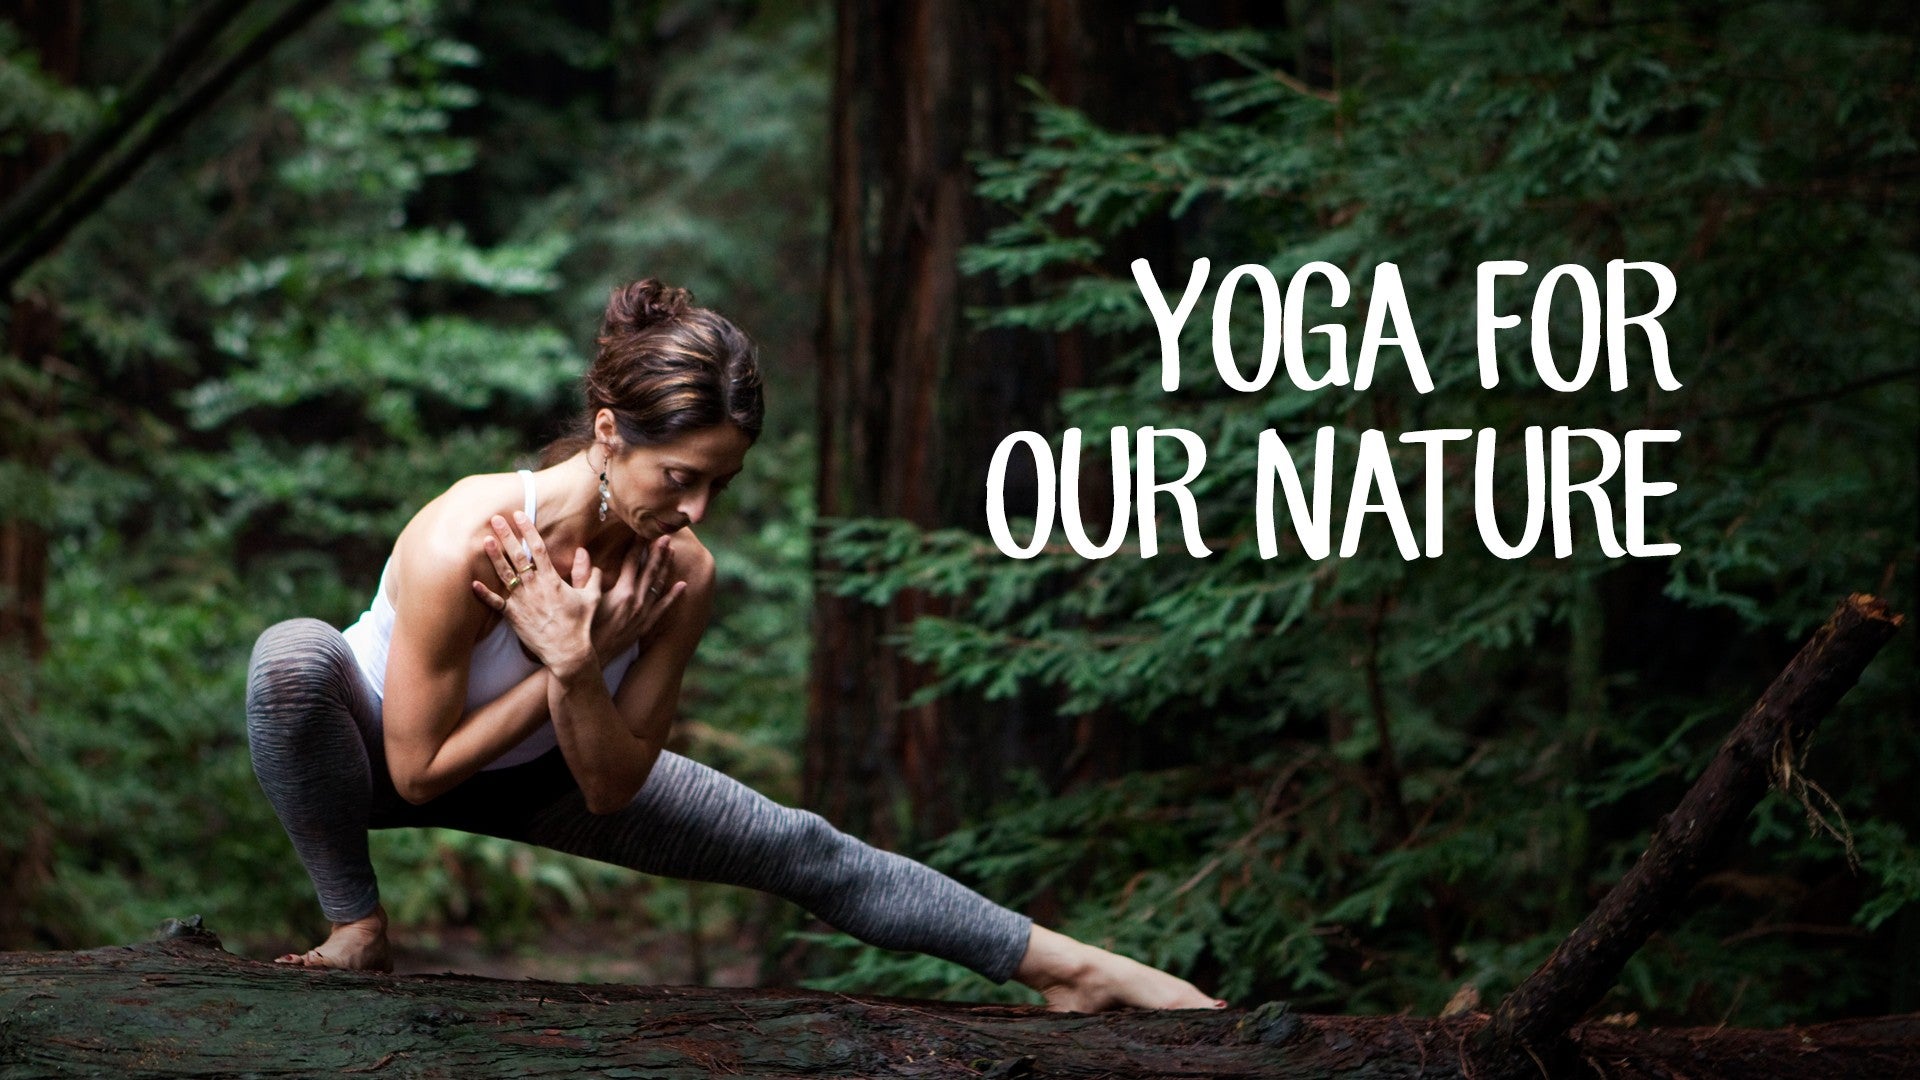
Yoga for Our Nature: Vitality Boost


Comments


You need to be a subscriber to post a comment.
Please Log In or Create an Account to start your free trial.
