Description
About This Video
Transcript
Read Full Transcript
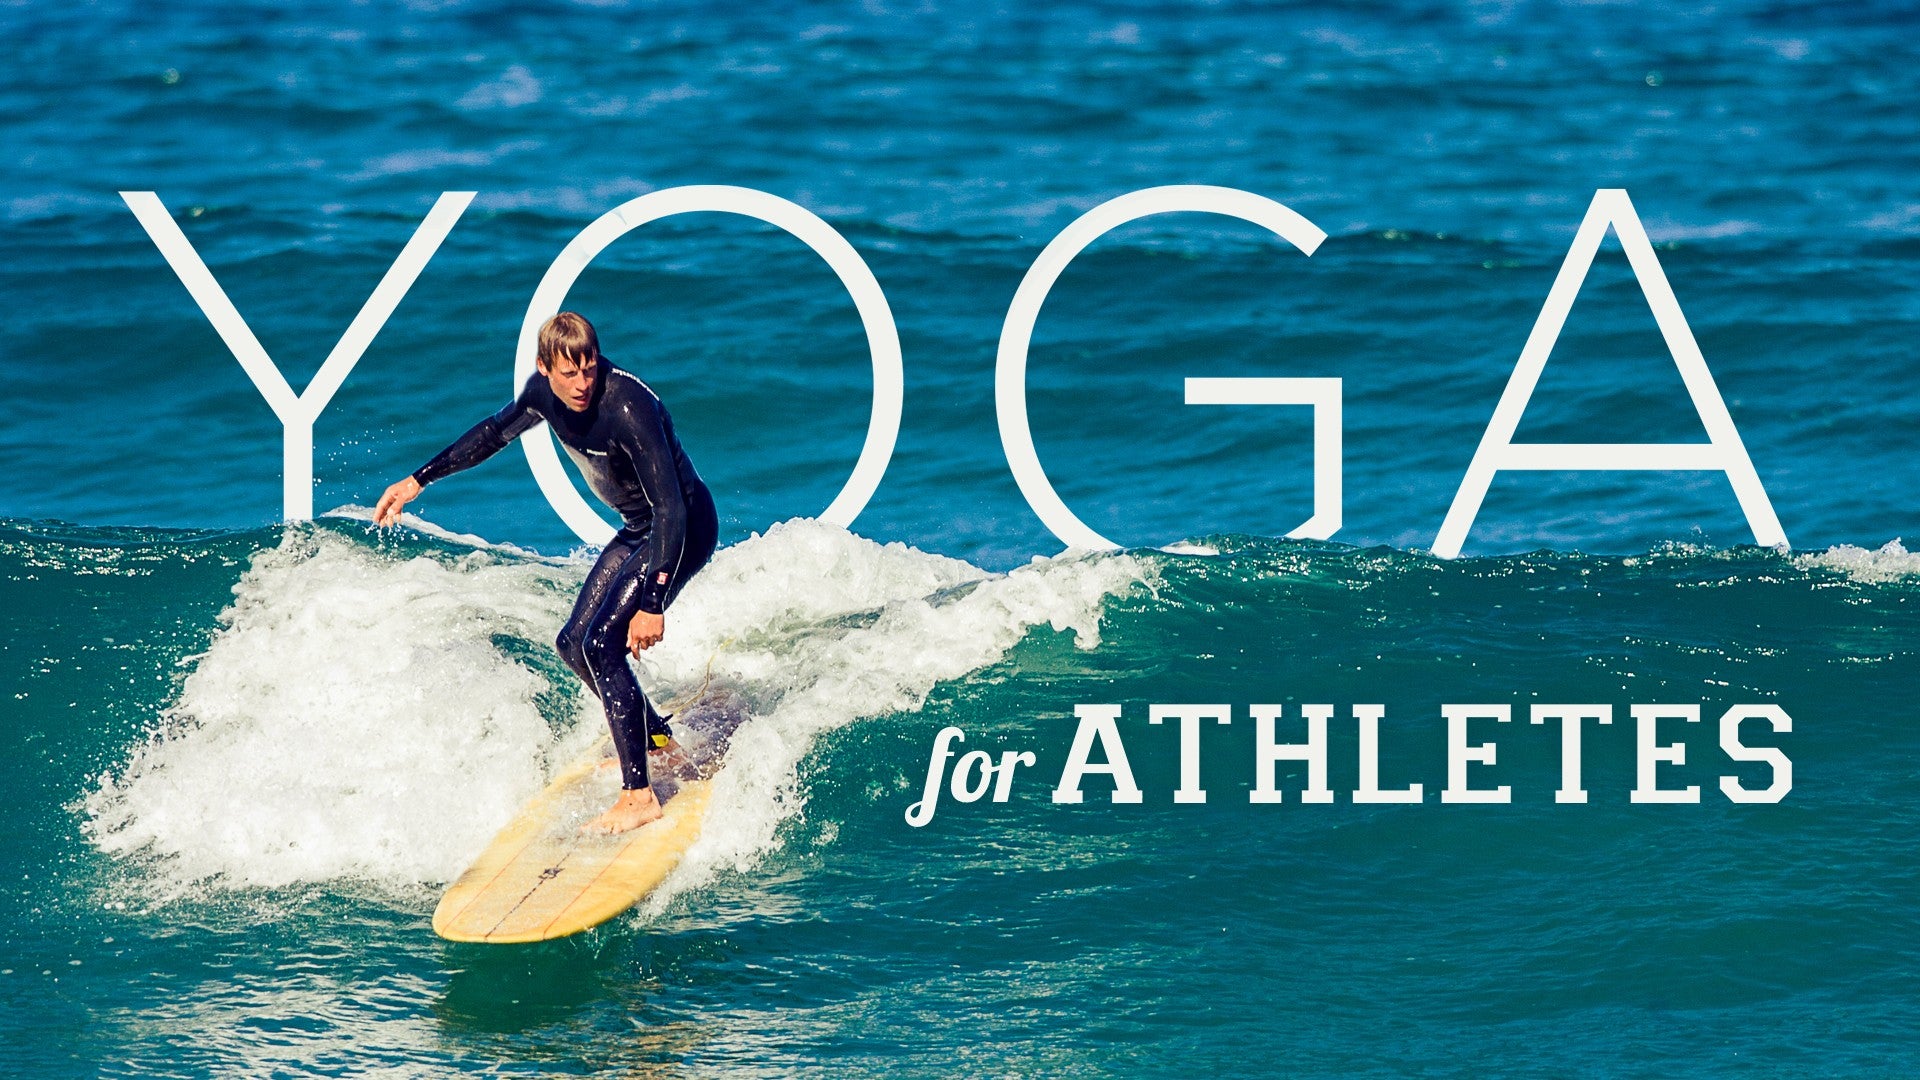
(flowing water) Hi. This is a short sequence for Yoga for Climbers. But it could also be for you if you have stickiness in the shoulders coming through the pectoral muscles and into the hands and the wrists. Also the low back and the hip flexors, we're gonna work with a little bit today. I just wanted to give a shoutout of thanks to my husband Sonnie Trotter who's a professional climber who helped me out a lot on this sequence as well as really amazing climber named Hazel Findlay.
So let's get started. I wanted to start with the feet a little bit, although we're not gonna spend a lot of time on it and it may require you to find a few creative props at your place. Climbers get super tight feet because they are jammed in climbing shoes all the time and the plantar fascia gets really tight. So this may feel really good for you. Maybe you have a tennis ball at home or I use this prop a lot, it's like a piece of wooden dowling which is pretty easy to get but you could also improvise one like using a piece of a vacuum cleaner, a broom or something like that.
I'm gonna show you with the dowel first because it is actually a little bit more potent than using the ball. And you just step onto the prop kind of underneath the knuckles under your toes and shift your weight side to side into this. So for some people this is really intense. If it's too intense for you, you can actually step one foot back and kind of lean weight one foot at a time. And so you could stay here for longer than what I'm showing but we will try to move a little bit lower down so that you affect the middle of the arch and then you can go all the way to just in front of the heel and then you can kinda walk back and forth on this.
Most athletes that I do this with love it and also it's not just for climbers. So if you wear ski boots all the time or... even cycling shoes that are a little bit tighter. So you can go back and forth. So I'm just briefly showing you that if you don't have such prop at home or you can't find anything and you have a tennis ball you can also do the same thing with pressing the tennis ball into the sole of the foot.
So this is also just the deep pressure and the moving in and releasing is going to loosen up the plantar fascia of your foot. And then after hopefully it feels like your feet are a little bit bigger and a little bit more free. So you could take a bit more time with that. But let's move right on to our hands and our knees, and you can spread your hands out nice and wide. Walk your knees back until they are underneath your hips and just start to move into the spine so you can get into your body with a couple of deeper breaths and as you exhale curl your tailbone and your head towards each other and round your upper back.
And as you inhale move your tailbone and your head skyward and allow the spine to sink into your body. And then just do this a few times, linking your movement with your breath. And then from here we're gonna orient the arms in a slightly different way to get into the wrist. So let's externally rotate both of our hands until they point out to the side. And just check in how far you can go with this.
So some people can go all the way around like this and some people would just be about here and that will be enough, pulling in the forearm and the carpal tunnel area. But wherever you can go with that, get into your rhythm of exhaling and inhaling through the spine with the curling and the extending. And try not to actually pop your elbows forwards. So if it's possible, pull the elbows a little bit back. And just do that a couple times, opening up the forearm.
And the left unwind here, sit back on the heels and if this is not comfortable for your ankles you can also come into cross-legged position here and let's work with the fingers. So we're gonna start with pulling the pinky finger back. Stretching out the pinky finger, doesn't really matter which hand you're on. Stretching out the ring finger, the middle finger, the index finger and what actually feels good to me instead of just yanking on the finger is actually creating a little bit of tension in the finger that you are pulling back and it gives me a stretch through a little bit more all the tendons from the tip of the finger all the way into the hand. And then the thumb, this one's my favorite, is pulling on the thumb this way and as you pull the thumb towards you, stretch your all four fingers in the opposite direction.
And let's try the other side. So you might wanna shake your hand out and switch. So as climbers we use our hands a ton and I'd be curious to know how often you stretch out your fingers. So you can pull pinky finger, ring finger and that little contraction of the finger like curling the finger up, almost resisting the stretch might give you more even tone of stretch throughout all of your tendons. And that's nice, especially if you've had a tendon injury because it's a little bit less tweaky maybe in that spot.
And then pulling your thumb back and you can kinda use the mound of your pinky finger into the base of the thumb, pull back and stretch all your other fingers away. And then release. Nice, so let's come up to standing and do some shoulder openers. On the way up, don't forget about downward-facing dog. So you can lengthen back, get into those hamstrings.
Maybe for you it feels good to bend your knees. Lift your sitting bone skyward and then you can slowly start to straighten your legs and just get into your breath rhythm here. And some people have told me that the louder breath in big Yoga classes kinda drives them crazy. So it doesn't have to be super loud, just loud enough that you can hear it and that it's relaxing. It's maybe a little bit longer than your normal breath.
And if you have tight muscles anywhere in your torso, see if you can breathe into those areas. Okay, let's walk all the way up. Come up half way, feet hip distance, exhale, fold. Exhale in your forward fold, maybe having your knees quite bent and just allowing your hamstrings to slowly open. And then drop your tailbone, suction your belly back towards your spine and roll up, your head the last thing to come up.
And once you come up, center your shoulders in the middle of the joint. And we're gonna do a few shoulder openers here but I'm actually just gonna, you can stay at the top of the mat but I'm gonna turn around so that you can get a better view of my back when we're doing them. So from the top of the mat, interlock your fingers together in front and flip them away from you and take them over your head. As you do this, take your inner shoulder blades down your back. Your arms might not be straight, it's fine.
You can slowly start to bring the elbows in towards each other. Try not to arch your back here. Exhale, release that down, switch so the opposite index finger knuckle is in front, relax your shoulders. Take your hands forwards, flip them away from you and up. Slide the inner shoulder blades down your back so they're spaced around your neck.
And think about elongating the sides of your body, like your lat muscles which get really tight when you're always doing a pulling down movement. Might even feel good to do a little bit of a side bend here, side to side. Again try not to arch your upper back. Exhale, release your shoulders. So this time take your right arm up.
Spin your whole arm so the hand points behind you, bend your elbow, grab ahold of your elbow with your left hand and draw the elbow closer to your skull and maybe for some people even behind the head a little bit. And again when there is restricted mobility in the shoulder, the tendency is to just arch the back. So try to keep the front ribs heavy and the back in neutral. Spine in neutral just as if your shoulders were down by your sides, your arms were down by your sides. So you might even do a little side stretch in here and any amount of lengthening you can get into those big lat muscles, the big superficial back muscles is great.
So that might feel really good. Releasing maybe a little lubrication of the shoulders with a couple of rolls and then switching sides. So this arm, left arm comes up, external rotation of the whole arm, bend the elbow grab ahold. And see if you can pull up behind and I'm tucking my chin a little bit here. So the head can actually come a little bit forwards and that might limit the back bend in the upper back.
It might feel really good to side stretch and just take a huge breath into the sides of your ribs, into the armpits. Inhale into the center and exhale here. So this one, we'll slide the hands forwards, flip both of the palms away from each other. Take your hands behind your back. Make fists and slide the knuckles against each other and around your mid-back.
And you can kind of wiggle this up your back, which will give you a little bit more feeling of stretch in your shoulders and here roll your shoulder heads up into the center of the joint and a little bit down. And if you have a really tight front chest, you might see there's a little winging of one shoulder blade, which I know I have on my right dominant side. And if you sense that that's happening, just think about bringing your shoulder blades into your back. Actually bringing your elbows a bit behind you, helps that action. Some people are okay to actually let the pinky fingers find each other and bring the hands together at the back, which is more demanding.
Exhale, release that, roll the shoulders a little bit. Beautiful work, wiggle the hands a little bit. So now I'll turn around and show you this way. Let's take the right arm over the left and you can just start by hugging in. And see if that feels tight in the upper back or in the outer deltoid.
If it's okay, allow your arms to come in front of you and maybe hook one hand, so the left hand here with the right arm on top is coming to find the right palm. This is a really nice one for opening up the spaces in-between the shoulder blades. And I like to do it by curling in a little bit, just in the upper back and then opening up into an upper-back bend where you kind of think about squeezing your shoulders together and look up. And just do this a few times, so exhale curling in and inhale, squeezing the shoulder blades a little bit together and looking up. Let's release that and try the other side.
So hug left arm over right, give it a nice squeeze and then if it's possible, hook and exhale, curl. Try to keep the curl out of your lower back, so it's fairly neutral in your lower spine. And then as you come up think about squeezing your shoulder blades together. They're probably not gonna squeeze, but just that action is gonna give you a nice pulling sensation across the deltoid muscles. So one more time maybe.
And exhale and release. So you're probably still at the front of the mat. I'm gonna make my way there and we'll move through a gentle flow. So find your breath, inhale, the arms up. Grab ahold of your right wrist, exhale, pull your right wrist over to the side and side bend.
Again getting into that lat tissue. Bend your knees here. Keep a feeling of hollow in your lower belly back towards your spine. Round forwards in the upper back, switch wrists, clasp ahold of the left wrist and then as you press straight, side bend over to the side. Inhale into the center, exhale full forward take your hands behind your back, interlock them.
Keep the elbows soft, wiggle up a little bit. Exhale, see if it's possible to allow the arms to fall a little bit back behind you. Release that, hands to the floor, fingertips to the floor. Inhale your right foot back into a high lunge. Exhale, drop your right knee, inhale come up and actually come out of the lunge so that your torso is more vertically in line with your right leg.
And from here we're going to get into this right-hip flexor by actually tipping our pelvis through neutral and posterior tilt it. So we're actually going to think about bringing the two frontal hip points up and the tailbone down. Try not to squeeze your bum as your doing this, just tip your pelvis backwards and let your arms come up. Exhale, you could stay there for a while but we're going to keep flowing. Downward-facing dog here.
Inhale onto your knees, exhale child's pose. Sit back on the knees. Keep the head a little lifted, inhale, come up, exhale slide your left hand through the hole where your right armpit is and let your left temple come to the floor. Upper back twist. Try to keep your right shoulder connected into your body so as you slide the shoulder blade down you can reach through the hand, the right hand, straightening that arm.
Inhale into the center, exhale child's pose extending the arms. It's almost like your arms have floor repellent on them here so they're lifting as you let the spine drop. Head is a little bit lifted, inhale come up, exhale slide your right palm through. Palm faces up and you might even pull your right shoulder away from your right ear and get a bit of space in your neck. Inhale into the center, exhale.
Inhale come up onto your knees and round your back and then undwind your belly towards your heart into a knee upward dog. Exhale, pull your hips back, tuck your toes, downward dog. Breathe. (exhaling breath) We're gonna take our right foot forwards into that lunge position again. So you might wanna come high up on your left toes to make a bit more airspace to bring that foot in. It might not come all the way in, so you can actually grab it and move it, come up on to your fingertips, exhale, knee to the floor.
Inhale come up, so you're more in a vertical line. Exhale, posteriorly tilt your pelvis so that you can start to feel a deeper hip flexor stretch into the front of the left hip. So your back muscles should be in neutral here, they should not be working. So with your back muscles in neutral, take your arms up, enjoy that stretch, continue to posteriorly rotate your pelvis backwards. And then exhale, might be one step or a big step to find a forward fold.
Inhale, come all the way up, exhale. Arms by the sides. Let's do it one more time, this time a little bit more flowing through it. Inhale, come up grab right wrist, exhale over to the side. Bend the knees, hug belly in round forwards.
Switch wrists over to the other side, straighten legs. Exhale onto that side. Inhale into the center, sweep through, bend the knees, interlock your hands behind your back. Either move straight skyward or take them over your head. Inhale lift the belly, exhale fold.
More space in the wrists gives more space in the shoulders, so the wrists don't have to be together here. Fingertips find the floor, inhale, right foot back. Exhale, come up into the lunge. Find the vertical line from knee to shoulder. Posteriorly rotate the pelvis.
Try not to squeeze your bum together as you do this. Keep space around the back of the pelvis. Inhale the arms up, this time interlock your fingers behind the back of your skull and take your elbows as wide as is comfortable for you. Now start to shift forwards a little bit into the lunge, shifting the two sit bones towards the front of the mat. (sighs) Exhale, downward dog.
Inhale, come forwards onto the knees, exhale, child's pose. This time inhale, bring the hips over the knees, walk the hands more forwards. Slightly different twist, move the left arm under, walk the right hand forwards until you can get a fairly straight arm. So the tendency can be to arch the lower back a little bit too much here, so keep the lower belly muscles a little bit engaged. And you can watch the breath work sequence to find that deeper core engagement or the deep core sequence for athletes in this show.
Come on up. Switch sides, so hips a little bit more over the knees, slide back. This one I feel like is a little bit deeper in the upper back. Try to keep your hips orienting straight back so they might want to tip over to the side. Unwind.
Exhale back, roll forwards into that knee upward dog and hug the belly back towards the spine. So if you have some crankiness in your lower back, you're actually not bending too much in your lower back. Try to bring the back bend into the upper three ribs of the chest. Exhale, dog pose. Deep breath, right foot forward so you can come high up onto the left toes, make space, bring the knee into the chest.
Come onto the fingertip, exhale, come back. Inhale, come up, posteriorly rotate the pelvis, hands behind the back of the skull. Bring the inner shoulder blade tips down the back. Widen the elbows as much as you can. And sync into the lunge, keeping the backward tip of the pelvis, but now the lower spine is actually gonna take a little bit of a bend.
You might even try to look up. Phew, exhale take your left foot towards your right foot and fold. Inhale, come all the way up to standing and exhale. And then let's step out to the right. Bring the big toes in and the heels out a little bit and exhale and fold forwards.
Take your fingertips to the floor. Spread your sit bones, press into your feet. Walk your hands back more in line with your toes. Bring your elbows in, squeeze your elbows together over top of the wrist joint and allow your spine to hang from your hips. Some people might need to bend the knees quite a bit here.
And breathe. Then let's walk the hands way forwards, press the fingertips into the floor. You can widen your hands shoulder distance apart. Lift the inner bicep, let the spine hang. And breathe.
Press into your fingertips and imagine someone is pulling your hips back away from you, away from your fingertips, sorry. So let's come forwards and bring our knees to the floor and bring our feet together. So a lot of climbers tell me that they need more space in their inner thighs for hip turnout. And we're gonna work on that inner thigh opening. So open up your inner thighs as wide as you comfortably can here.
Bring your big toes fairly together, it's okay if they're not totally together. And with that width in your inner thighs, start to walk forwards until you come onto your elbows. This might be enough or you could even walk your hands more straight forwards. Lift the elbows off the floor and let your head come down. There has to be some activity in the arms in this one.
If you're not getting enough feeling of stretch in the inner thighs, to make this a little bit more sensational then you can slide a bit forwards. Bring your pelvis along the line of your knees and you may want a blanket underneath your knees for this one, which you could do and you could stay here for a little bit longer. Orient your feet so that the inner edge of the feet comes down onto the floor and the shin bone and the heel kinda lines up with the knee. So it may feel easier to shift your hips forwards and come into a back bend here. But that kind of takes it out of the abductor muscles and puts it into the low back.
So if you can come back so that your hips are in line with your knees and then kind of lift the lower belly away from the floor you're going to get a lot more in the inner thighs. Of course whenever you're doing a deep stretch like this if you feel like there's like a stinging or a pulling on the insertion around the inner groin, just back off a little bit because we stay here for five more breaths, closing the sequence here. It's nice to look down, maybe slide the shoulders away from the ears. So to come out of this one, maybe you could even pause and stay here for a little bit longer. It's nice to stay in these deeper stretches for at least two minutes to really affect the tissue, especially the fascia.
The human body does best, what it does most of the time. So if you put yourself in this position a little bit more often then your body will sort of acclimatize to that. So let's walk back a little bit here and it's nice to come out of this super gently. So use the pressure into your hands to bring the knees right together. Bring the feet right together and you can sit down on your heels and just have a little counter pose with the legs right together.
So let's come onto our back. So however is comfortable for you. Roll on down. And we'll get into a little bit of external hip rotation and open the glutes. So right leg comes up, externally rotate it again.
Bring the ankle in front of the knee. Draw the knee in towards you. You might wanna curl up here to clasp either behind the back of the hamstring or if you can reach on top of the shin. Keep the feet a little bit flexed so the heel's moving away and draw the knee in towards you. A few breaths here.
You might like move a little bit side to side, which can ease up some tension in the hips. If your head is in this position and you chin feels like it's reaching towards the sky and there's some tension in the back of your neck, it's nice to put a blanket or something underneath the back of your skull here. If you're gonna hang out here for a bit, it feels good. So then let's let our arms go but keep the shape of the legs in this position and start to let the legs fall over to the left. So right leg on top, legs fall over to the left.
And the closer that you snuggle the shape into your body, into your chest, the more you're gonna feel it in the outer hip area and the glute area. And even more so if you actually use your left hand to draw the knee in towards you any amount. This other right arm can come out to the side. This one feels really good. And release.
Bring it back into the center. Bring the knees together and just shift the knees side to side. You're kind of massaging across the back of the pelvis. Plant the right foot, left foot comes up. It's kind of like you have no knee joint here.
You externally rotate not from the knee but from the hip. Bring the ankle in front of the knee, draw the knee inwards, curl up if you need to, to grab ahold somewhere. Little bit of a flex in the foot, maybe wobble a little bit side to side. A few deep breaths here, soften your eyes, your jaw. And then release your arms, let the unit of your legs move over to the side.
And the closer in they are towards your body, the more you'll feel it in the outer hip and also the more if you have any low-back compression or pain in the low back then bringing the knees closer, if you can, will neutralize your lower spine. And then you can take your left arm out to the side and try to keep your body quite soft here. If you wanna pull down with your right hand on your knee, you can get a little bit more out of that outer hip. These are the, getting into the hip extensor area. And let your legs come back to the center.
Knees in towards each other, you can rock a little bit on the back of your pelvis. Another nice thing to do to release is just to straighten out your legs and rock your heels up and down like that and just see if you can totally let go of your whole body, all your musculature. So if I didn't get to all the areas that need love for you, then you can pause and do a few more things. Otherwise we'll just take a short full-body relaxation. So the legs can come a little bit away from the body, the arms can come a little bit away from the body.
If you have cranky lower back and it feels like it's really lifted off the floor, press your feet into the floor, lengthen your lower back and you can hang here for a few minutes. Maybe even letting the knees fall together. This is called constructive rest, so it's allowing the deeper hip flexors to release a bit. So close your eyes, take a deep breath in through your nose, exhale it completely. Relax your belly and your back.
And as you breathe, imagine that you are filling yourself up with... energy. Space, space holds more energy than matter. So the density starts to shed off, starts to slough away and that spaciousness can hold so much more... potent energy for whatever you'd like to use it for.
Last couple breaths here. Scan your entire body... and relax a little bit deeper. And then slowly start to bring your knees in. If they're not already, hug your knees into your chest.
Rolling over onto one of your sides. Then come up when you're ready. Thank you.
Yoga for Athletes: Preparation Practices


Comments


This series would be excellent for EVERYONE. I am not a climber, and I found this practice grounding, integrating, soothing, and opening. Thank you, Lydia Zamorano


You need to be a subscriber to post a comment.
Please Log In or Create an Account to start your free trial.
